
The Autumn Inn
Join us on a trip with Zurab as we explore the behind the scenes of the mysterious ZB Inn, visualised beautifully inside Unreal Engine 5. We discover how he approached composition, utilized lighting and colour, used Substance Designer to create stunning materials and much more!

Intro
Hello! My name is Zurab Barisashvili, I come from small country named Georgia. I am 24 years old and I currently reside in Sweden.
From my early childhood my biggest fascination and passion were games, I loved playing them but what I liked more is to explore them, explore all kinds of different worlds, environments and hidden areas they provided. That love and great appreciation stayed with me ever since but, the turning point for me was when I saw this show called "How It’s Made" on Discovery Channel as a kid, it was bout Ubisoft making the first Prince of Persia game, and it absolutely got me hooked right away, I realized that that was something that someone was doing and it was possible to be part of that world which was game development, so since that day I knew who I wanted to be and what my goal in life was, to be an artist and to create worlds that someone out there day will enjoy them like I did as a kid.
Composition
Here is an individual breakdown of composition layers for the project:
First of for this project the base shape of the building was already made in the concept so I didn’t wanted to change it since my goal was to match the concept. The layout I ended up going with is pretty basic setup nothing complicated in terms of composition. But the trick here was the lighting and some accenting prop and asset placement around the main object. As you can see in above breakdown all the shapes in the scene are placed and tilted or shaped in a way to direct viewers eye towards the building, also adding a much needed sense of depth to whole composition.
Compositional Elements Together
Lighting also comes in handy in this situation as you can see most illuminated object in the scene is the building. On both sides of the Inn the lighting is darker as well as the trees and the grass which already directs the eye right to the centre, also the small lit grass area in front of the Inn is lit in a way so it expands as it reaches the building which again accents the viewers direction to the hero prop. As a tip what I would suggest in general about composition is to experiment a lot with it, explore different angles, shapes, layouts etc, it is very important to get the composition right, it helps a great bit.
Here is a progression of the whole project and me experimenting with angles layouts and colours:
Scene Progression
Use Of Colour
For this project I knew what mood I wanted to establish but I wasn’t completely sure about the colours just yet when i was getting started, of course the concept already had colours in it and I wanted to use those colours but at the same time I wanted to add a bit more colour to the environment. I experimented a lot with the colours when it came to asset placement and colour grading, at the end I decided to go with more sharp moody warm look accompanied with just a hint of cold fog layer in between. This combination ended up giving me exactly the result I was looking for, it created warm welcoming look yet it left a hint of mystery to the scene.
You can see example of scene with and without colour grading:
Without Colour Grading
With Colour Grading
One Important tip about adjusting colour in your scenes. Its always very easy to go overboard and completely overdo the scene so make sure to always recheck the progress you’re making with it multiple times.
Texturing
I thought a lot about what kind of stylization I wanted to achieve and how I wanted to texture everything in this scene. At some point I thought I would do some parts tiled textures and some more modular parts would be textured in Substance Painter but at the end I decided to explore vertex painting and texture tiling pipeline further. Thus I ended up creating a small library of materials I used to tile and vertex paint on each other.
Here you can see all the materials there were used for the main building in the project:
Substance Designer Materials
Here are the Substance Designer nodes in-depth breakdown for each individual material:
Aspen Tree - Substance Designer Nodes
Bricks - Substance Designer Nodes
Concrete - Substance Designer Nodes
Grass - Substance Designer Nodes
Ground - Substance Designer Nodes
Steel - Substance Designer Nodes
Wood - Substance Designer Nodes
One of the goals for this project was to pick up and learn Substance Designer properly. It ended up being quite easy and straightforward piece of software to learn.
Here Is the vertex painting workflow I used
Art Style & References
Getting the right art style for the project was quite a challenge, at the beginning I thought I would go full on stylized and go out of bounds of concept a lot as I usually do but for once I wanted to match concept closely, thus I came up with the workflow to have more or less realistic architectural style for the building and vegetation but to have them textured in more stylized manner, I used some references from Overwatch and Sunset Overdrive for visual direction of texturing.
Here are some examples of texturing I was inspired by:
Sunset Overdrive
Overwatch
Choosing The Concept & Adding Foliage
When it comes to choosing the concept or a reference I want to use, I often rely on how the concept makes me feel, what mood it has and how it is presented to me. In this case I liked the concept by Shawn Ma right away as I saw it. I liked the sense of scale, the power the architecture and yet some kind of mystery it was trying to convey. So I tugged on that right away. Although on the concept you can only see the building itself with just a bit of ground, I knew I wanted to expand on that from the get go. I wanted to give it environment to reside in. When it came to vegetation I made it very simple and reusable. By rotating scaling and adding a bit of dynamic to them I was able to achieve the result you see in the final image.
Here are all the vegetation assets that were used for this project:
Vegetation Assets
Also a thing I knew from the beginning is that I wanted to make the scene feel dynamic, make it feel alive and moving. Which was quite a challenge to achieve the result I wanted to see. I ended up researching a lot of Unreal Engine material nodes watching tons of tutorials and this was the result I came up with.
Wind Simulation
Here is the breakdown for the materials used on trees, grass and leaves:
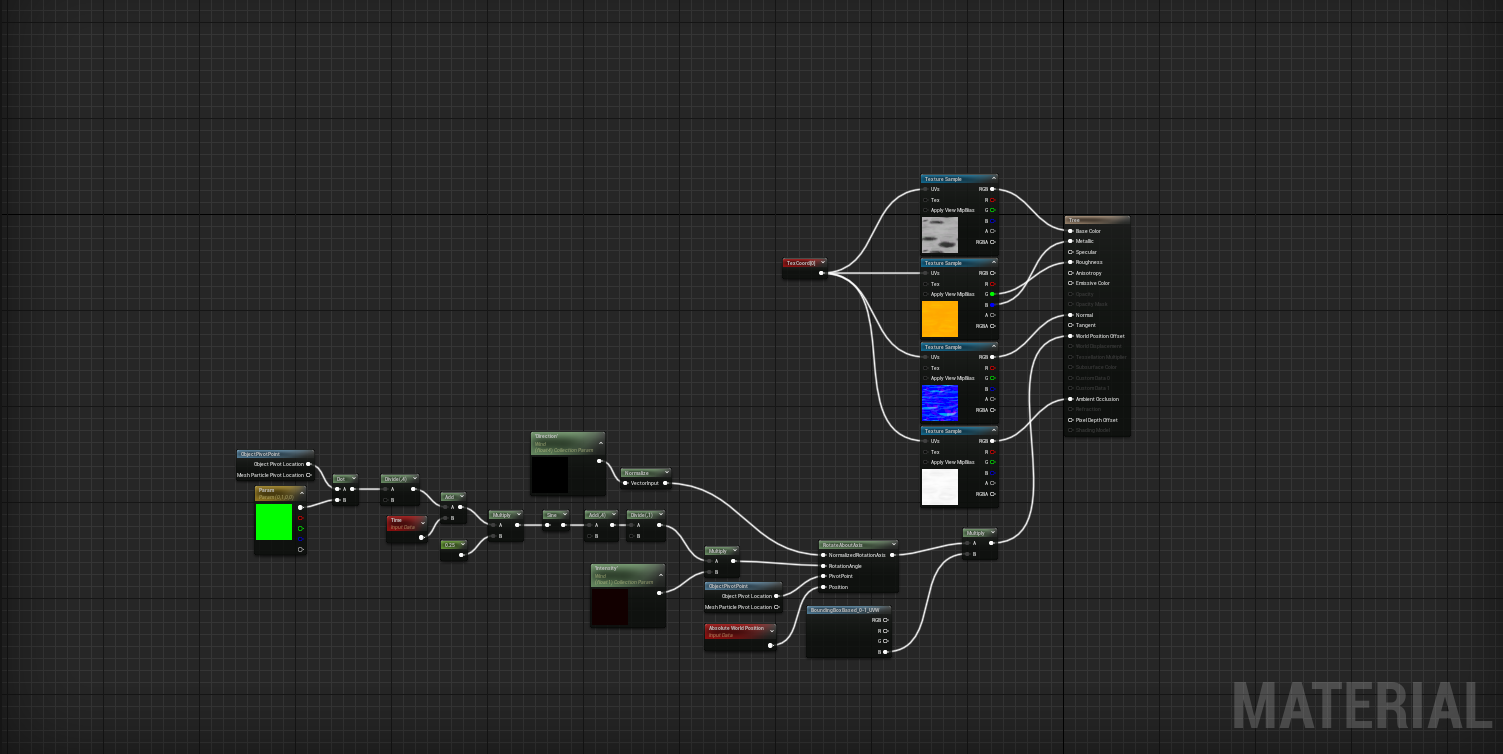
Tree Material
Grass and Leaves Material
Learning Goals
The idea was to make this project be a big learning experience, I wanted to switch to Unreal Engine 5, learn its pros and cons, and basically see what it had to offer. One of the other goals was to make good use of Substance Designer and learn it a bit more in depth.
Growing As An Artist & Feedback
As probably every other artist, I'm always looking for ways to grow as an artist and to improve my art. One of the best ways to do that is to look at others peoples work, compare them and study them. It is always good to learn to differentiate between good and bad art from each other and learn what makes good art look good. Some of the useful places that i have found to search for artworks and engage with other artist are: Artstation, Facebook groups, Discord groups and LinkedIn. Those sources also work as a great place for finding inspiration, there are a lot of artist doing all kinds of different amazing art, which on its own is already very inspiring.
There are also a lot of good artist willing to help and give you a good advice. It is always a good thing to not be afraid to ask someone for their opinion and point of view on something you’re working on, it gives you different perspectives regarding your art that you might not have think about or somehow missed. For example a lot of feedback on this project I received from my good friend who goes by the name of Rene Gorecki.
Additional Advice & Outro
Some of the tips I would like to give to my fellow artist who are just starting out in the industry or are just going through some struggles. I know it gets tough sometimes but try to learn to go out of your comfort zone, it is something that I have struggled a lot at the beginning, I would get too comfortable with what I would learn and then I would end up stumping the same ground for long periods of time. Escaping the comfort zone is one of the best ways to grow in my opinion.
I mentioned getting feedback from other artists, that’s always very good but also learn to criticise your own work. Self-critique its a very good trait to have. Experiment a lot with your art, try researching all kinds of different pipelines, see how industry works, and experiment with those pipelines. I cant tell you how much it helped me over the years to know different ways of doing things, it helps you adapt quicker and learn new skills faster.
And the most important advice I want to share with whom ever is reading this, never give up. No matter what goes wrong, or how many people end up liking or not liking the work you did, there is always room for improvement, you should never bring yourself down by them, learn to see positives in negative cloud around you and one day, you’ll see how far you have come. As the saying goes from where I come from: Never throw down your sword and weep without a fight (might not be the most accurate translation but the meaning is there).

And with this I would like to thank everyone who took time to read about this article and of course Experience Points for giving me the opportunity to share my art and knowledge with other people on their platform.