
dark - a complex breakdown of a tv show inspired enviroNment
Here is Vlad Vanzariuc with an in-depth breakdown of his ‘Dark’ environment, inspired by the TV show of the same name. If you want to learn about how to fully utilise third-party assets, create compelling composition and storytelling, and push your environments to the next level, this goldmine of an article is a must-read.
Introduction
Hey everyone, my name is Vlad Vanzariuc. I’m originally from Romania and I am now currently working as a Senior Environment Artist in Stockholm. I first found out about 3D when I was in high school and I’ve been hooked on it ever since.
I got my start in the industry in a small indie studio in Bucharest which unfortunately folded in about 6 months. I kept working on my portfolio and managed to get an internship at Ubisoft’s Bucharest studio, which lead to a full time position as a Level Artist. There I worked on a number of great games, out of which my favourite is still Ghost Recon Wildlands. It was one of the first games to use Houdini on a large scale and the whole team working on it was incredible. I’m still friends to this day with a lot of the people from that team, it really was a great experience. I’m currently living in Stockholm, looking forward to the amazing summer we have here.
Video games have been love at first sight for me and luckily that still hasn’t changed. The first game I played was probably Super Mario on a knockoff NES, but throughout the years I’ve had countless games inspire me. I could go on forever talking about inspiring games, but the latest ones are Zelda BOTW for its amazing open world and sense of wonder, Firewatch and Life is Strange for their incredible environmental storytelling and Red Dead Redemption 2 for the gorgeous graphics.

Inspiration | Goals
Dark has been a constant source of inspiration in terms of mood, colour and composition for me ever since I saw the first season. Since publishing my Dark scene, I’ve come to find out that has been true for many environment artists, which speaks a lot about the quality of the cinematography found in the show.
My goals for this scene were quite clear before starting. I wanted to focus almost exclusively on scene composition, mood and lighting. I missed just focusing on that since it’s one of my favourite parts of working in real-time.
I decided to use all the Megascans points I had acquired since the beginning of the year and get more comfortable with using them during the production of the scene. I also used the trees and some bushes from the Conifer Forest Collection from MAWI United on the Unreal Marketplace which has some of the highest quality vegetation available in the store.
After getting most of the resources ready to go, it was time to get started on the actual scene.
Composition
Dark’s composition has a very distinct style that it uses throughout most of the shots in the show. It tends to have a very clear subject at the centre of the image framed by strong shapes, leading lines and details surrounding it, giving the illusion of symmetry.
As you can see in the image below, this type of composition can be encountered in most of the shots. I highly suggest studying the composition in this show, since it can create some stunning images.

Screenshots from ‘Dark’
This can also be seen in the intro of the show, with a lot of the shots being mirrored 1.5 times, giving the illusion of symmetry while still keeping the composition interesting.

‘Dark’ Intro
Choosing the shot

Focal Point Analysis of ‘Dark’ Shot
The shot I decided to try and recreate in Unreal is one of the most iconic of the show. However, just recreating it probably wouldn’t have turned out very well because of the relative lack of detail on the sides of the cave, as you can notice in the above image. This works fine in real life because of all the detail present on the ground but is harder to replicate in a real-time environment where a lot of tricks have to be used to achieve believability.
Blocking out the Composition

Progress Iteration GIF for the Environment
This progress GIF shows the iteration process for this scene. I usually start out with a very rough blockout to get the proportions and basic composition done. At this stage, I only care about those 2 things, so there’s no materials (unless already made, like Megascans) and the lighting is very basic.
After that I keep iterating on the scene, adding the most important elements first and when I’m happy enough with the composition (the main subject and lines are in), I add the ground material to start working on the colours, calibration and another lighting pass.
At this point, I already have a pretty good idea of where the scene is going, so it’s a matter of getting everything in the scene and getting a natural looking scatter of assets.
Composition Breakdown

Composition Breakdown of the Environment
I’ve broken down the image into the 2 focus points, leading lines and framing lines.
Like I’ve mentioned before, Dark tends to put the main subject in the centre of the image with secondary details and leading lines to further draw the eye to the subject. The cave opening is right in the centre and is meant to be ominous and foreboding. The secondary subject (in my case the backpack) is meant to add a story element supporting the main subject (did a kid get lost/abducted/etc in the cave?).
The white lines lead the viewer’s eye to the cave and the backpack. The grey lines frame the subject. As you can see, a lot of the trees are slightly inclined towards the opening of the cave, directing the eye of the viewer towards it. I wanted everything to feel like it was “sagging” towards the cave. That not only attracts attention to it, it also gives the ground a more realistic look.
Work For The Shot
I would triple bold this if I could. This doesn’t only relate to composition, but it’s a good rule to follow. “Shot” is a placeholder term for what the viewer/player will see. If it won’t be seen, don’t waste time on it. If it’s a static shot, make sure to focus on what’s visible. If it’s a level, make sure that the player path is stunning, the rest is secondary. Steve Jobs would hate me for saying this but sometimes you need to be smart about where you put in the effort. Doubly so for personal projects where time is even more limited.
Just as an example specific to open world video games, a lot of companies will prioritise what most players will see of that world. Only 10% of players finish video games. Yes, you read that right. That means that the vast majority of people playing your game won’t see the latter part of your game. That’s alright, it means you can be smart about your efforts. A lot of open world games tend to create the most interesting areas in the first half of the game, as that’s where most players will spend their time. The fringe areas of the map will see the least love for the reason stated above - very few people will ever see it.
As an example, here is how the Dark scene looks outside of the main shots:

View of Environment Outside the Visible Shot
Be smart about where you put in the most work!
Working with Megascans
Megascans recently became free for users of Unreal Engine 4, which means that an absolutely amazing resource is now easily available for anyone to use. However, keep in mind that Megascans and photogrammetry are not a magic bullet. The assets can be a lot more realistic, but that also means that any other mistakes in materials, blending, composition and lighting will stick out a lot more.
I’ll go over a few general practices when using Megascans or any other third party scanned (or not) assets you might want to use in your projects.
Calibrate Your Assets
Calibrating your assets means making sure that all the assets work well together. This includes making sure the Base Colour maps are all in the same range and are PBR correct, height maps work well with each other (when blending between 2 materials) and that the colours match. Here are some Before and After shots of the Dark scene, where you can easily see the differences.

Before Base Colour Calibration

After Base Colour Calibration
As you can see, before calibration most of the assets didn’t go well together and some base colour maps were way too dark (or too bright in some cases). After calibrating the contrast, brightness, hue and saturation, you can see that everything fits well together in the final image.
There are many reasons why assets will be vastly different from each other (different biomes, processes or even just mistakes) so make sure to bring them all in the same range. This is also very important for the lighting. Even though I have used dynamic lighting in the scene (which doesn’t bounce light), if you were to use static lighting, you would get vastly different amounts of light energy being bounced around which will not look good.
Here is the Before and After with the lighting applied.

Before Calibration with Lighting

After Calibration with Lighting
Creating Moss
Moss is quite tricky to get right, especially in real-time. It’s definitely a subject that I’d love to look more into, especially when it comes to achieving believable results in Unreal 4. For this scene, I chose Megascans assets that already had moss in them, so there is no vertex painting or Z-Axis blending in the shader, just basic scanned meshes. While this method might not work for every scene, it was more than enough for this particular one.
There is one simple trick to make moss look better in real-time by using the Fuzzy Shading function in the Material Editor. It is basically a fresnel effect that can mimic the translucent lighting going through all the small “leaves” of the moss and gives it a softer look.
You can see the setup for it here.

Fuzzy Shading Function Setup for Moss Material
The Inputs for the function are pretty self-explanatory so I won’t go into them. I’ve added a Mask for the Moss and at the end a Static Switch that I can turn on or off in Material Instances (in case a certain material doesn’t have moss).

Being Flexible | Optimising Your Time
The amount of scanned objects and surfaces can be daunting at first, but even then, you might not find exactly what you’re looking for. This is why it’s important to be flexible with their usage. A lot of the surfaces can be combined in Quixel Mixer to give you the exact surface you’re looking for. 3D assets can have their textures modified so you get something closer to what you want and the new Quixel Mixer will make this even more accessible. Don’t be afraid to mix and match different biomes and experiment with what is already available.
Add your own assets
Don’t restrict yourself to only using the available Megascans. You can improve a scene quite a lot by just adding your own custom assets that fit the story you’re trying to tell. In my case, the backpack and the decals acted as important story elements for the scene.
Using RealityCapture and Houdini to accelerate asset creation
Photogrammetry and Houdini are a full topic in themselves so I can’t go into the very basics here, but I will go over the nodes you need to use in Houdini to get from the photos you took all the way to the final in-game model.
This is the whole node chain that I’ve used for the model. Unfortunately, my RealityCapture license expired so I can’t show you the results in the viewport (it won’t generate without a license), however, I highly suggest you watch these 2 videos on the topic to get an even better idea about the process since there are a few things you need to keep in mind: Houdini Reality Capture Plugin and Automated Photogrammetry To Game Res Pipeline.

Houdini Node Example
Notes: I’ve done the remeshing inside of ZBrush since I prefer the result from that for this particular prop. However, depending on what you are scanning, the Remesh, PolyReduce or Instant Meshes nodes in Houdini are perfectly suited for the job as well. Also, the UV’s are auto generated in this case, which will not produce the most optimal results. However, for quickly getting it into the scene, this is more than enough. If you want more control then manual UV’s are almost always better, but it is up to you and the technical limitations how far you want to take that.
Also, in case you don’t want to purchase a Reality Capture licence, Houdini has integrated the open source Alice Vision photogrammetry software as well, so you can use that instead.
I highly recommend trying to introduce Houdini into your pipeline where applicable as it can massively speed up certain tedious tasks such as this one.
Lighting | Post-Processing
Before going into the actual technical details of lighting the scene in Unreal, I’ll describe the way I think about any scenes that I want to light, as I think it’s important to have a process that can easily be applied to multiple scenes and produces expected results.
I usually make the scene look as neutral as possible, the way you would see it with your own eyes in real life, and then change the colours in post process if I want a different mood for it. Basically, I treat my scenes as I would treat taking photos of that space. I set the time of day that I want to capture, improve it where I need to (imagine adding lights on a film set) and then adjust the image in post process.
A very good series on lighting in Unreal is the Unreal Lighting Academy by Tilmann Milde. He goes into a lot of detail about the basics of lighting as well as how to achieve that in Unreal, and I highly recommend watching all of his videos on YouTube.
Lighting the Scene
Overcast lighting is quite hard to get looking right, which was a nice challenge to get me out of my comfort zone, as I usually tend to go for a late afternoon/golden hour type of lighting. In this case, I decided to go with Dynamic Lighting, as it allows me to have a faster iteration time and since it’s an exterior scene, the results can be convincing even without GI.
When lighting in Unreal, I always add these elements:
A sky sphere that has a HDRI applied to it. This will give you a much more realistic result than using the default sky that came with Unreal before the 4.24 update. The setup for the material is very simple and will properly map your HDRI onto a sphere (it also allows you to rotate the background from a material instance)

HDRI Sky Sphere Material
A Skylight (set to Movable in this case because of the Dynamic Lighting) with default settings to get the ambient lighting
A Directional Light for the Sun. In this case, it’s still present, but has a very low intensity of 0.2
A Post Process Volume that has Auto Exposure turned off by setting the Min and Max Brightness to 1.0. This way you get a good starting point for your lighting. Also make sure to set it to Unbound, so it affects the whole world

Post-Process Exposure Settings
Height Fog, which is present most of the time and works really well to get a sense of the depth for the scene
Overcast Lighting
One of the most important things for overcast lighting is the ambient occlusion. Since the scene uses Dynamic Lighting, Screen Space Ambient Occlusion (SSAO) alone is not enough for this sort of scenario. DFAO (Distance Field Ambient Occlusion) is what brings the most impact to this scene. You can see a comparison of different AO scenarios below:

Ambient Occlusion Methods Comparison
When using DFAO, make sure to turn on Two-Sided Distance Field Generation in the Asset Build Settings for assets with open geometry.

Two-Sided Distance Field Generation Setting
This will correctly generate the Distance Field Meshes for open geometry (vegetation for example). A lot of Megascans assets are open (they are not always closed meshes, a lot of them have holes), which means you need to tick this box if you want them to properly generate the Distance Fields.
As I mentioned in the beginning of the section, dynamic lighting doesn’t generate any GI. However, for certain scenes, you can get a bit of “fake” GI by changing the Lower Hemisphere Color for the Skylight.

Skylight Lower Hemisphere Settings
This is not physically accurate, but it can give the impression of bounced light, so try playing around with this and see what results you get. In my case I set it to an earth brown colour, as that is the colour of my ground.
In addition to the very weak sunlight and the Skylight, I have 3 more lights in the scene. A spotlight that throws more light on the cave and the area immediately surrounding it, a rim light to make the rocks and trees pop a bit and a light inside of the cave that doesn’t give off a lot of light, but has a pleasant specular effect on the puddle on the ground.
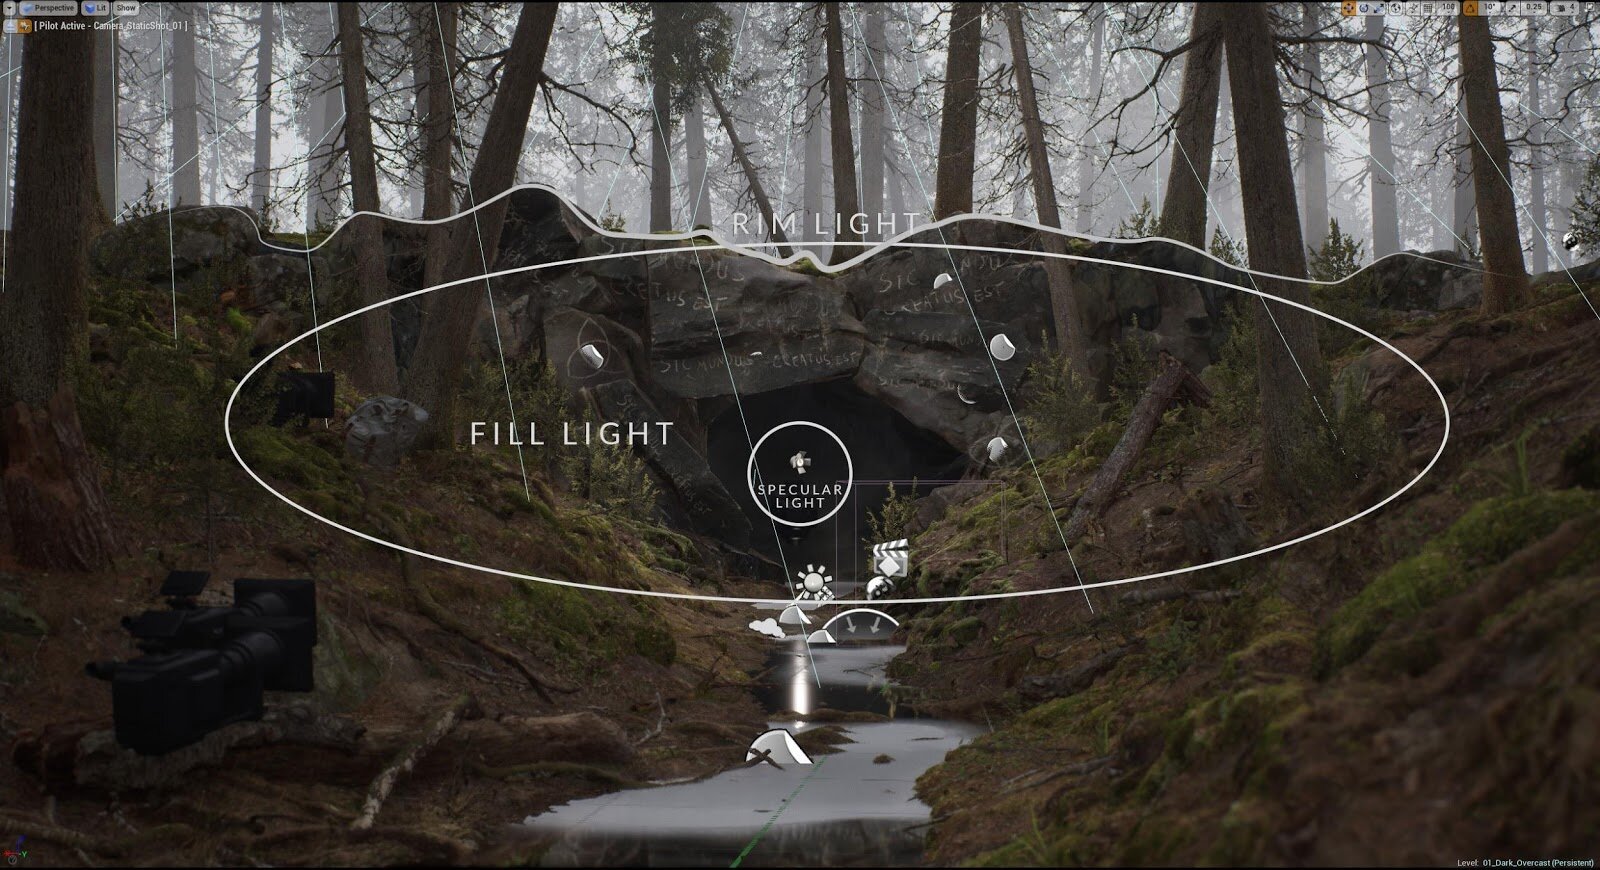
Light Breakdown
This is pretty much it when it comes to lighting. It’s not really complex, but it required quite a bit of experimentation to get the desired results.
Final Touches | Decals | Fog
Decals

Decals
For the decals I used Unreal Projected Decals, since the rocks have an uneven shape so mesh decals wouldn’t have worked. Nothing special here, but they had to be divided into separate textures for the projection.
Fog Cards
In addition to the Height Fog, I have several fog cards placed throughout the level to further separate elements and add a more natural look to the default fog. They’re a quick way to add a more natural look to your fog and relatively inexpensive compared to other methods.
I have 4 different fog/mist textures, but you can easily bring that number down if performance becomes an issue:

Fog Cards
The Material setup for them is quite simple, but there are a few important things that help when they are in motion - Depth Fade and Pixel Depth Offset.

Fog Card Material Setup
Depth Fade feathers the area where the geometry intersects the ground for example. Pixel Depth Offset makes the plane gradually disappear as the camera gets closer to it, which is useful for the panning motion I have set up in the scene.
To get a natural looking motion, I added a Panner with adjustable speed. However, if we apply it to a simple plane, we’ll get a sharp cut where the plane ends:

Example of ‘Sharp Cuts’ Along Edge When Using Panner
To mitigate this, you can either multiply the Opacity of the cards with a circular Mask or feather out the edges of the plane using a custom mesh and vertex colour, which is the way I chose to go about it, since I thought I would do something a bit more complex with it (didn’t end up doing that, but the method still works fine).

The plane has a simple inset and the edge vertices have a black vertex color, which we’ll use to mask the edges in the Unreal Material Editor.
Tips & Tricks | Advice
Taking Better Screenshots
This is such a basic thing but still a bit of a pain in Unreal. By default, Unreal uses Temporal AA, which tends to reduce the sharpness of your image by quite a bit. There are a few ways to get around this one, including a sharpening Post Process Material. I’m not a big fan of that method because if sharpens an already blurred image, which doesn’t produce the best results.
In a lot of cases, disabling AA completely, taking a 2x screenshot with the High Resolution Screenshot and then scaling it back in Photoshop will give you nice, sharp results. Unfortunately, this method is not foolproof either and sometimes you’ll get pretty bad aliasing, in which case, use the sharpening method.

Discipline over Inspiration
Practising discipline instead of waiting for motivation is one of the most important things you can do as an artist. You get a lot more ideas when you start working, rather than waiting for a non-existent magical moment of godly inspiration. This works even better in a team where you can play off each others ideas. Try to do a bit of work whenever you have time so it becomes a habit.
Seek Feedback
I think a lot of artists see this as being insecure, not good enough, etc. Please leave that sort of thinking behind, it will only hold you back. When you look for days, weeks or months at your work it’s easy to ignore certain things that might stick out to someone else. Also, keep in mind that different people have different interests and will spot things you didn’t even know were missing. Always try to get more people to see your artwork before it’s finished, you’ll always see it improve.
I’m lucky to have made quite a few friends while working in this industry and I’ve sought their feedback while creating this particular scene as well, which improved it by quite a lot. Other great places to get feedback are the DiNusty and Experience Points Discord servers. They’re full of artist willing to help you and give feedback, so definitely check those out as well.
Balance
This is a big one and it’s related to many other things like patience, overwork, etc. Please take time to enjoy other things as well, it will only make you into a more interesting artist. And take time to take care of yourself and “slack off” if you need to. It’s harder to recover from burnout than it is to be patient. It’s a marathon, not a sprint.

Outro
Thank you for taking the time to read all the way to here, hope you found some interesting techniques and advice in this article. I tend to post WIP’s and other finished art on my ArtStation and Twitter @VladVanzariuc, so if you like what I do that’s where you can follow me and see more of my stuff! Bye!