
Creating A Stylized Cozy Cottage In Unity
Take an adventure to the Cozy Cottage and discover the behind the scenes of it’s creation. In this article we’re joined by Kayla as we pick her brains on how she crafted her beautiful Cozy Cottage scene in Unity. Learn how she broke down the concept and planned her assets, created a stunning Ghibli-esque skybox, tackled stylized foliage and much more!
Intro
Hello there! My name’s Kayla Kosik and I’m a 3D Environment Artist from Chicago, IL. I graduated with a Bachelors in Game Art from Full Sail University back in 2019 and have been working as a freelance/contract artist ever since. Although I was taught how to create photo-realistic environments and props, my passion has always been for hand-painting and hyper-stylized art even before I began my Game Artist journey. I’ve always been drawn to colourful and lively games such as almost anything made by Nintendo, Sony, and early 2000s platformers - my favourite being Ape Escape. Most games I play in my day-to-day lend some sort of inspiration to my own art which leads us right to this breakdown of my Cozy Cottage!
Concept Analysis
This concept comes from the Atelier Ryza series, and when I first saw it, I was immediately drawn to its colours, fluffy Ghibli-esque clouds, and softness of the foliage. I love a good stylized, foliage-heavy scene and knew it’d be an interesting challenge to recreate it in Unity The concept’s style really resonated with certain games’ artwork like Genshin Impact and Breath of the Wild, so I initially began by gathering references of texture and foliage work from said games. I even took some time to write out my own generalized plan of how I‘d build the scene in a notebook. I analysed the concept thoroughly and broke down the scene by components: terrain textures, foliage, rocks, buildings, props, textures, and possible VFX.
Concept Paintover
By doing this, I put to paper what all makes up the scene and how much I need to do in order to put it together. I was, also, able to see what takes priority, for example, it wouldn’t make sense to create VFX before the terrain, so this step is crucial to understanding where to begin.
Lighting and Composition
In all honesty, I didn’t do anything fancy with the lighting. Setting up lighting in either Unreal and Unity has always been a daunting task for me, something that I really hope to take more time in the future to learn. Until then, I tried to keep things simple; I was already set up quite nicely when I first opened a new scene in Unity since the engine gives you several starter items. I deleted the example assets but kept the main camera, directional light, and post-processing which I turned off for now. I did some minor colour adjustments to the Directional Light and Ambient Colour in the Lighting Environment Tab and played around a bit with shadows and distant fog. Since it was daytime in the concept, and I figured that the skybox would carry a lot of the overall colour and tone, I thought just a few adjustments were all that were needed. For the sky, I knew I wanted to create something similar to the concept. I adored the Ghibli-esque clouds but couldn’t find any resources out there on how out to make it a dynamic cloud system. I did, however, find an excellent video by Ciro Continisio on how to turn a 2D plane painting into your own Skybox/Cubemap using Photoshop! From their tutorial, I learned how to set it up a file as a Spherical Panorama and toggle between the 3D file window and the flat image. This allowed me to paint normally on a flat surface while also being able to check on my progress on the spherical view.
Skybox in Photoshop
From there, I channelled my inner Bob Ross and painted some happy, fluffy clouds using some custom brushes I found on deviant art! Once the sky was done, I exported it to Unity and added it to a new Skybox material set to Cubemap. It was a super simple process that I think turned out super well!
Modelling
Modelling large structures might come off as intimidating at first; but if you break them down to their base shapes and textures, the process is actually quite simple. If you take a closer look at the concepts’ main building and windmill, you can see that the main building is just a large cube with some added detail and trim, while the windmill is a tapered cylinder with a few holes cut out for windows. I usually begin a large structure with its base shape in Maya: for the main building, it was a cube. I divide the cube up with Edge Loops for symmetric detail placement later; horizon cuts (red) for the lower pattern trim, window placement, and wood panelling, and vertical cuts (blue) for wood trim, door placement, and the curved section on the side of the building.
Edge Loops
For this concept, since there weren’t interiors for any of the larger structures, I didn’t have to do much modelling. A lot of detail seen on the finished buildings was from textures sheets and minimal shape extrusions.
Texturing
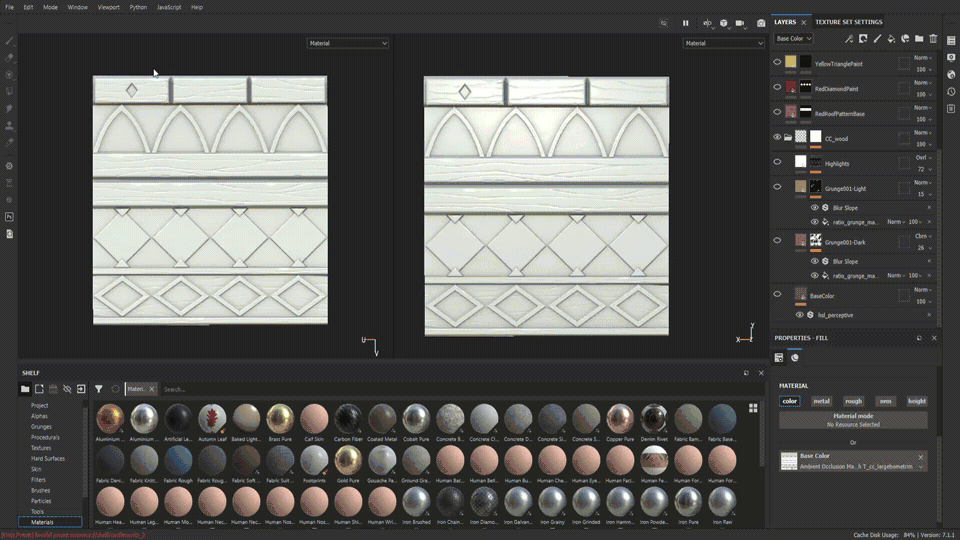
I think one of the most important skills for any 3D Environment Artist to have is the ability to condense and consolidate your textures so that they can be reused over and over again in your scene. It takes far too long to unwrap and map every single object to their own texture sheet, plus in major games, too many materials cause performance issues and half the time, the player won’t even notice. So we try to create textures that can be reused as much as possible - that’s where trim sheets come in! If you take a look at the Main Cabin model, you will notice that the wood beams, arch pattern, roof patterns, and several other elements are seen multiple times throughout.
Main Cabin Materials
I broke the cabin textures down so each were organized into categories: all wood trim and repeating patterns would make up a single trim sheet, the cabin elements like the doors, windows, chimneys, and wood details would occupy another texture map, and the plaster and roof would be their own separate tileable textures. In total, the cabin has about 4 textures that make it up. I was even able to reuse several for the other buildings and structures. Environment Artists love to work smarter, not harder! Let’s dive a bit more into how I go about creating a trim sheet. For the wood trim and pattern texture, I began with a square plane and broke it up using the Cut Edge Loop tool. I divided the plane into 6 sections: 1 for the window wood borders, arch pattern, 2 variations of wood beams, and the 2 roof patterns. Once I got the scale of each right, I extruded and bevelled each piece for easier edge destruction in ZBrush later. For stylized sculpts, I’ve grown ever attached to using the TrimDynamic, MalletFast, and Polish brushes provided by the program, plus a few from Michael Vicente’s brush set. I particularly like using the OrbFlattern_Edge and Orb_Crack brushes from their kit!
ZBrush Brushes
Once the sculpt is complete and I’ve decimated to a workable level, I move into Substance Painter to bake the detailed high-res sculpt to a simple low-res plane. Baking just takes a few moments, then I can move on to colour and detail. I start with a solid base, then layer several grunges to offset the solid colour. To give the grunges more of a painterly quality, I add the Blur Slope filter for more a controlled blotchy feel. The key to stylized textures in Substance Painter is highlights! Once you have a good colour range base, add a white fill colour above your other textures, turn off all other tabs except ‘colour’, and add a black mask to it. Add the “Metal Edge Wear” generator under your black mask and adjust accordingly. I set the fill layer to “Overlay” for a softer look and added a levels to smooth out the rough edges further. Then, proceed to do this to all elements of your trim sheet. Here is where the real magic begins! I like to push my SP textures even more by adding another fill layer above all my previous work, turning off all tabs except colour, and dropping my curvature map into the colour slot. Add a level to the layer, invert it, and adjust the white bar until all your sculpted detail from ZBrush starts to really pop! To finish off your texture, do the same thing as described above, but instead drag your AO into the colour. Set the layer to Multiply and adjust the opacity for your shadows to become more defined! I like to create Smart Materials for overarching Materials like wood for use in other bakes later. That way, when I make other wood objects like the doors or carvings in other texture sheets, I can easily drop the Materials onto my layers view without redoing all of my previous work or struggling to colour match.
Substance Painter Breakdown
Foliage
I’ve been asked in the past what part of the process I like most; I usually say that there are enjoyable elements at each stage, like how satisfying it is to set up clean UVs as it were a puzzle, or seeing how sculpting turns a flat mesh into a knarled wooden plank, or how baked assets spring to life with each layer of colour/detail/texture that is applied! But, if I’m being truly honest, it’s the foliage creation I enjoy most. I’m a huge plant person and active gardener outside being an artist, and over the years, I’ve cultivated a rather sizeable jungle inside my apartment and a booming herb garden outside. Plants make spaces feel less commercial and stiff; and in 3D spaces, they add colour variety, form diversity and they breath life into any scene so I love spending the time painting bright flowers, fluffy bushes, and lush tree branches! For any foliage I create, I hand-paint them all into a single AlbedoTransparency sheet for easier rendering in Unity. It is important to do this so that later, when setting up the material and setting the Rendering mode to Transparency, you will be able to see reflections and specular highlights at full value, instead of a faded mesh.
Modelling foliage, however, is a bit less involved than modelling buildings and props. I usually start by mapping my texture to a flat plane, roughly cutting out each plant using the multi-cut tool, cleaning up and moving the verts a bit for a varied angle look, and setting their pivot point at the base. If you are hand-painting foliage in Photoshop, there's an easy texture packing method you can use so that your textures are compatible with URP shaders. Once you’re done, merge all foliage into one layer separate from the background, create a new layer underneath that foliage and paint-bucket it fully black, create a new layer and set that as a clipping mask atop your foliage art; paint-bucket that clipping mask fully white, so that all that is left is a black and white image: the background being black while your foliage being completely white. Merge all layers and copy the full image. Find the channels tab and add an alpha layer. Paste this black and white image into your alpha channel, then back in your layers, hide the black background and white clipping mask.
Foliage Textures
Shader Implementation
Before starting this project, I didn’t know much about building a scene in Unity. We were taught to use Unreal in school and, in most of my contract work, I mainly created the assets for the level designer to implement into the engine. I wanted a chance to get more familiar with Unity on my own, so this project gave me a great opportunity to do just that! I wasn’t completely in the dark though since there is an abundance of resources online, like in forums or YouTube, that made this process a bit easier, plus if you don’t mind spending a little money, there are some excellent tools from the Unity Asset Store that can elevate any scene! For my project, I specifically purchased the MicroSplat and Stylized Grass Shader from Jason Booth and Staggart Creations respectively.
I had seen other artists use a similar tool to MicroSplat in their Unreal Projects before and I really liked the way the shader blended the terrain in with whatever asset it was interacting with. I wanted the same effect for my rocks and luckily found that the MicroSplat shader did just that but for Unity. I went the Breath of the Wild approach: hills and mountains build from the terrain, a repeated rock texture, and a few rock formations merged in the terrain to give variation. I wanted to use the MicroSplat tool to better blend the rocks to the terrain for a more seamless look.
The implementation was simple, assign the imported MicroSplat Terrain Script to your terrain and hit the “Generate Terrain Blending Data” to allow the tool to gather all the texture info. Once that’s complete, select the assets you’d like blended with the terrain and add the “MicroSplat Blendable Object Script to each. You’ll have to do some mild adjusting, but from now on, you will have almost seamlessly blended objects in real time!
MicroSplat
Using the Stylized Grass Shader was just as simple if not easier! All I had to do was set the shader of the foliage material to the Stylized Shader and adjust colour blending and wind speed within the Editor. The Shader will automatically blend your grass to the terrain and set a gentle breeze throughout.
Particles and VFX
For me, visual effects are the cherry to a fancy sundae that is your 3D scene. They add so much life and character to an otherwise static scene. I didn’t add a whole lot, just some wind trails inspired by The Legend of Zelda: The Wind Waker, some Volumetric Fog, and smoke pouring out of the main cabin’s chimney. The wind trails were by far the most fun to create. I followed along with a tutorial video by Hennejoe where they walk you through setting up the particle system and the shaping of the swirls. It’s all about working with the particle system curves; starting with the X-axis, you’ll want to drag it up to the top of the graph so the particle always maintains a constant direction throughout its lifetime. You will, however, be disrupting the direction once so it loops back on itself for the swirl part later. You’ll do this by creating 3 pinpoints, one at .1 seconds in, another at .2, and the last at .3. Then, drag the pin at .2 all the way to the bottom of the graph, the points at .1 and .3 seconds like act as anchors to the top of the graph.
Wind Trails
To make the swirl part, bring your attention to the Y-axis and create 4 points this time at .1, .15, .25, and .3 seconds. Drag the point at .15 to the top of the graph, and .25 to the bottom, this will create your swirl shape! To create the trail, hop into Photoshop and create yourself a white circle on a transparent background. Go back into Unity, apply that circle to a Material and assign it to your Trail Material, you will now have a trail to your particle! Adjust the size of the trail and taper the ends so your wind doesn’t begin so harshly and there you have a Wind Waker approved wind effect!
Where are you still looking to grow as an artist?
With every project I begin, I try to add some sort of new challenging element. Looking back to some of my published work on ArtStation, I could easily point out the new skill I learned during the process of creating that particular piece. For example, for “These Streets” I learned how to trick the viewer to believe the streetlight was infinite, or the “Little Bottle of Magic” where I learned to invert meshes and play with colours to create outlines and an infinite space within a jar. I like the challenge of going into a project with an idea and experimenting with different methods to see what’ll work! It’s one of my very favourite things about being a 3D Environment Artist: the daily thrill of always trying something new! With “Cozy Cottage” I can safely say that the entire process was a challenge in itself. I had mentioned before that this was my very first time building a scene of my own in Unity, so you can imagine that just opening up the software was a question of what version is best, what is URP, how does one terrain, why is everything pink - never-ending, constant stream of questions and problems to solve as I went along. My only solid land in a sea of confusion was my 3D Artist abilities. With those I was confident I could build my assets and the scene would somehow come together, and here and now, I can say that I’m incredibly happy with how it came out in the end! However, I will be the first to say there will always be things I wished I did differently, but, another important skill an Environment Artists should have, is knowing when to say “I’m done!”. I did what I could do to the best of my ability at the time, and acknowledging possible changes will only make me spend more time learning how to do things better in the future! With that being said, I can’t wait to tackle more challenges like lighting, shaders, VFX, and better overall scene composition in my next project!
Tips and Advice
If I were to give any advice to you here, it’d be to just try it! Try the thing that interests you! It may in intimidating and there may be artists who’ll do it better, but there is no one that will do the thing like you will. There are so many excellent resources out there and people willing to share their knowledge if you just ask - myself included!
Outro
Thank you all for reading! I hope you found some of this helpful or maybe inspirational in trying to create your own scene using Unity! Please feel free to reach out if you have any questions or just to say “hi” on any of my socials: ArtStation, Twitter, and LinkedIn. Cheers! :)