
altar of kings - Inspired By World Of Warcraft
Artem found an art style that he loves and shares his experience of working on this project with you. Explore how he analysed WoW’s unique style, applied it to his own scene that originally started as a challenge and learn some of the workflow techniques he used to achieve this painterly environment.
Introduction
Hello! My name is Artem Ridnyy. I am from Novosibirsk located in Siberia, Russia. I have been working in the industry for about two years and I am now a 3D Artist at Mystery Tag. My first experience with computer graphics was in 2012 in my student days. From that moment on it has become my hobby, though I didn’t take CG seriously and could not even imagine it would be my future job.
Since my childhood I was crazy about video games. My favourite genres were RTS and Adventure games. I loved series such as Space Quest, Age of Empires, Legend of Kyrandia and Starcraft. But when Warcraft 3 came out, it became my favourite game for many years to come and made a great impression on me.
Inspiration and Planning
What is World of Warcraft? It is an awesome universe with a unique visual style. When Blizzard released World of Warcraft I could not believe my eyes. A whole world where I could be a great hero. A world I’d known since I was a boy but from a different perspective. However this magic world only really opened up to me when World of Warcraft: Wrath of the Lich King was released. It was the first WoW I had played.
So what makes it so special?
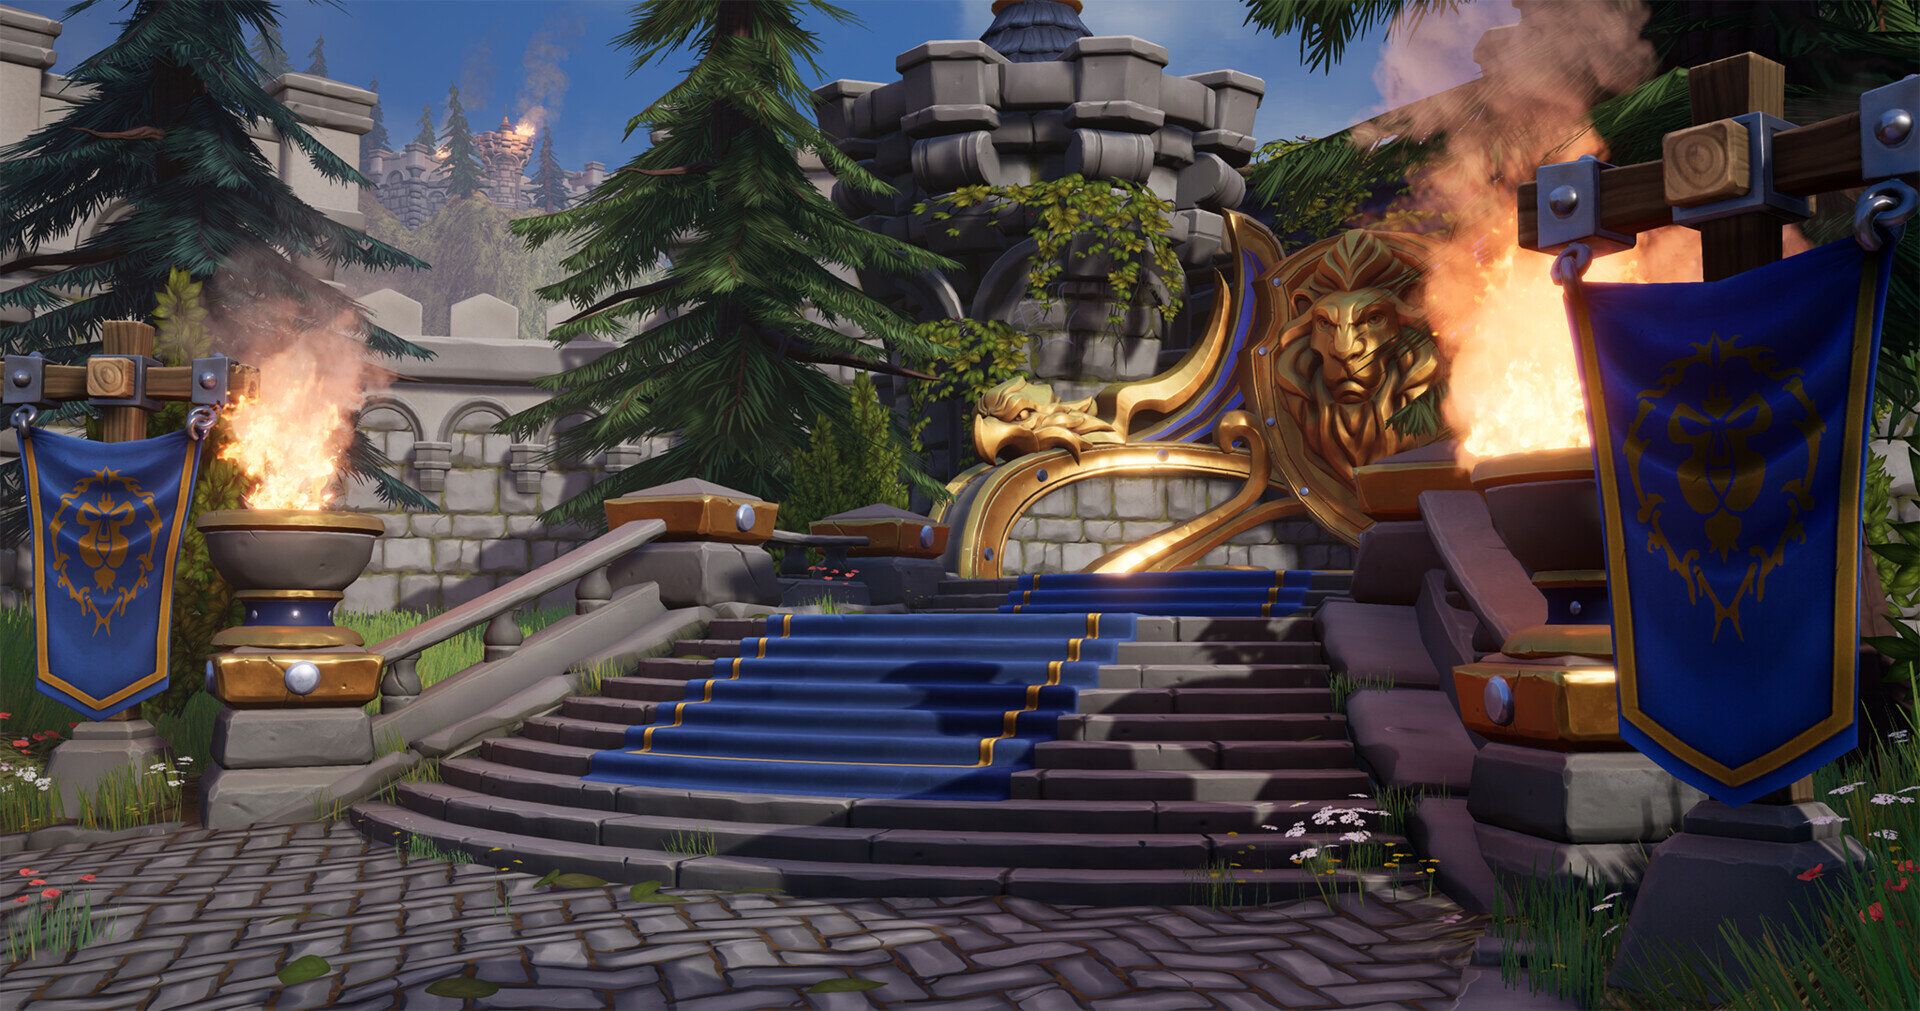
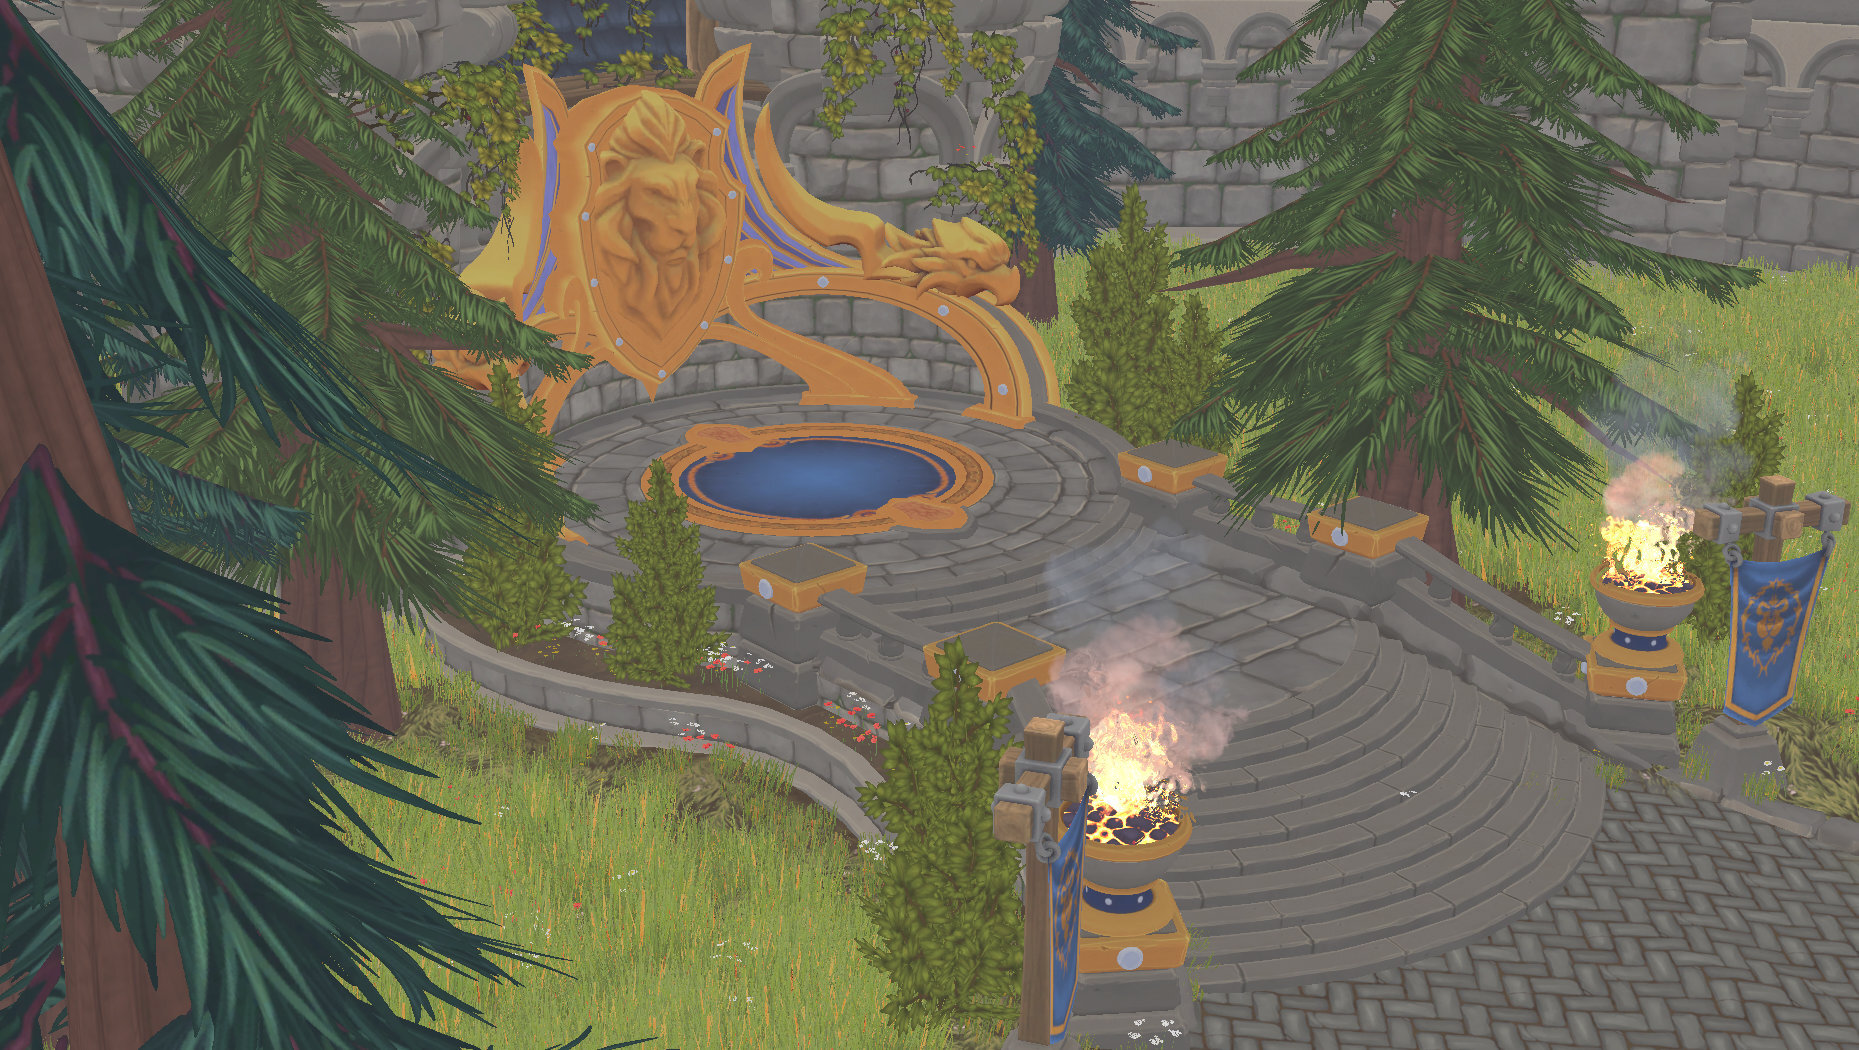
In World of Warcraft, everything around us is very large - characters, monsters, armours, buildings. Blizzard’s artists were not afraid to create a completely disproportionate environment, so I’m sure that you will recognise its visual style at a glance - large massive columns and wooden beams, huge brick blocks, giant statues and monuments. If you take a look at the silhouettes of the buildings, you will see that artists creating them avoided straight lines. I referred to this when I was creating my environment.

WoW Style Analysis
Modelling Workflow
My artwork is the result of the challenge organized by Sergey Panin for his community in the discord channel, so I wanted to push myself to get out of my comfort zone as much as possible. I had very modest experience with ZBrush which is why I chose to use it. I made 90% of the textures in ZBrush, the grass texture I made in Substance Designer and the texture for vegetation I painted in Photoshop.

Reference by Shem Dawson
For the main reference I took this artwork by Shem Dawson. To be honest, I initially did not want to do the whole environment. My goal was to make the altar as a part of the challenge but unfortunately I failed to finish it on time. So I decided not to get upset and make my first environment, not just a prop.
When I was making draft models I was not afraid to play with their sizes and change proportions. I tried to avoid straight lines and to think only about the silhouette. If I placed a full-size mannequin close to the stairs, the steps will be disproportionately large. I did not think about the real sizes and proportions, I wanted this building to look massive and majestic, just like in Azeroth.
All of the basic geometry was made in 3ds Max. It was very important to me to catch proper proportions at a very early stage of work and I believe it’s worked out. Initially I made the side elements straight and only then bent them using the Bend modifier. The basic model in itself is very simple and the main challenge was to make statues of a lion and an eagle. It was a challenge for me because I really was afraid of using ZBrush.

Early Blockout
I made some of my assets in Zbrush using primitives modelled in a 3D editor. Speaking about sculptures which were created completely in ZBrush, I worked with a large number of polygons from the outset. I'm not sure that this is the appropriate approach but it was the most suitable for me.

Some assets from ZBrush
Using the Flatten brush, I added bevels and modified them. In places where the surface should be smooth, I used a Polish brush. Significant amount of smooth lines and bends in this work made me to use the Lazy Mouse option all the way. It helped me out a lot.
Looking at my work now I notice a lot of gaps such as wrinkled edges. But now I’m no longer afraid of using ZBrush and this is my victory.
The original altar of kings from WoW is really great but it was too large for me so I decided to make my own mini version. When I added the wall and then the pines, it started looking much better but not enough to make me happy. Single altar surrounded by trees and walls wasn’t the environment of my dreams of course. So I started making banners which went nicely with my composition. At that time I had already felt confident enough to use ZBrush, so I only spent one day on them.
When I finally came up with the composition, my friends drew my attention to the corner on the first shot. It was too empty. At first I’d just added mountains there, and only then the idea of creating a burning castle in the background crossed my mind. It consisted of elements that had already been made so it cost me nothing to add it there. But “story” came to the location and brought some more interest to it.


Texturing Process
Creating stylised textures in ZBrush is quite simple. I’ll show you through the example of the Floor tile.

Tile texture creation process in Zbrush
My first step was to insert the Plane 3D to define one tile.
I inserted the Cube3D into the project then gave it the right shape and placed it in the corner of the Plane 3D. It was easier to make the tile material start from the corners. I duplicated this brick 3 times and placed this brick in all of the corners using the Offset tool on the Deformation tab. This helped me to see the borders of my texture straight away and filled in all the gaps with missing bricks. When I finished with this I started adding details to each brick.
I only used standard brushes in my work such as Flatten to create bevels, Move to change the silhouette of bricks, Standard to add volume to bricks, Dam Standard to add relief to the centre of bricks, Clay to create potholes.
After that, I baked maps in the Marmoset Toolbag. I needed a Normal, Ambient Occlusion, Normal (Object), Height and Curvature map. I’ll give you a little tip – don’t forget to duplicate the part you were working on over the whole surface of the Plane3D before baking AO. Otherwise there will be artifacts at the corners of the tile.
All of my textures were made in Substance Painter. I don’t know how to do hand-paint textures at all so I decided to make my smart materials using generators. In total I made 4 smart materials - stone, wood, metal and fabric.

Smart Materials
The main thing you should keep in your head, making textures for stylised assets is even colours and soft transitions between them. First thing I refused was any sort of noisy maps as they are good for realistic textures, not stylised. With the help of generators I wanted to make a hand-painted style for textures. I highlighted them from above and darkened from below. For example, if we are speaking about the wall, I highlighted its borderlines from above (as the sun usually does), textures like floors were highlighted from practically all. Also don’t forget about colour variations. Different colour tint, as well as additional green or purple tints, makes the texture look better.

Texturing Process in Substance Painter
One more tip - do not use black for AO, it makes the textures look dirty. It is better to use a dark version of the main colour with Multiply. As you can see all the details of your textures even in Unlit mode.
Unlit Mode

Unlit Mode
Only hand-painted Albedo was used in the original WoW, so they drew glares on the metal. I didn’t do that because I was going to use the Metallic maps. In general you should be careful when texturing metal elements since too dark areas of Albedo make these elements look terrible. First of all I worked with the Albedo map. This was what I paid most attention to. Despite my efforts, my Metalness and Roughness maps turned out to be a little bit boring.
I emphasised four colours - grey, yellow, blue and green in my work. Together they gave the amazing effect of an abandoned, gorgeous monument.
Vegetation
I had never worked with vegetation before so I had a lot of questions.
I decided to start with pines. The only thing I made without any problems was the texture of the bark. But what about branches? It was a hard question to answer. I tried to make them in ZBrush and in Substance Designer but I was not satisfied with the result from the start. So I made them in the old fashioned way - I painted them in Photoshop. I drew branches, added shading to the edges and overpainted them in the centre, then added details. I painted the needles in two layers - dark from below, light from above. Thus, I tried to achieve the effect of depth.

Pine Textures
I really liked the final version of the branches so I decided to make all the vegetation in the same way. As for ivy, I decided to make an atlas. I painted four types of ivy but without leaves. Since I decided to draw the leaves as a separate atlas and give them more volume. I made a separate atlas of leaves for bushes and used it also for leaves which were lying on the steps.

Ivy Textures
I used grass and flowers from this pack I found on the Unreal Marketplace.
Lighting and Composition
Initially I did not plan to make a whole scene so I did not think about the composition and camera positions. When it came to the time to think about the composition, I decided at once that the first camera would be at the beginning of the steps so that the viewer could see the grass in the foreground. In general, I like to have something in the foreground so the viewer can feel that they are inside the scene.

Work in Progress
Speaking about lighting, I used a small amount of light sources. I arranged the main Directional light so that it highlights the head of the lion on the side. Cool lighting of the lion’s head was a priority for me because I wanted to make it a focal point. For the fill light I used a weak Skylight.

Lighting Progress
Additionally, I used three warm Point Lights - two for the roasting pans to give a warm glow around them and one in the background for the burning castle. I also added a white Spot Light that shines on the right banner to highlight it from below.

Lighting Setup

Skylight Setup

Directional Light Setup

Spot Light Setup

Point Lights Setup

All Lights
Challenges
This whole project was one big challenge for me. I’ve never done before such an interesting project. I liked the work by Shem Dawson on Artstation the moment I saw it. The hardest thing for me was to start. For about a week I was thinking whether to start this location or not. When I finally started and was at the blockout point I didn’t like everything I was doing. The grey base material made the model look boring and flat. But when the first material was applied, the altar became colourful and since then I had no doubts that it would look cool.
I received feedback the whole way, from start to finish. The most valuable feedback I got was from the Discord community of which I am a part of. The first thing I was advised was to make the Lion's head brighter. Due to the fact that I added dark gradients in the corners of the Albedo, the Lion statue began to look too dark.
I was also advised to add the grey stone with moss and add some details to the background. All these had a positive effect on the result.
Working on this project, I’ve made the following things for the first time:
Tile material in ZBrush
Full Sculpture in ZBrush
Vegetation
Scene and lighting setup in UE4
These are more than enough points to feel more confident. Moreover, I found a style that I like to work in.

Self-feedback on composition
Future Projects
Now I ask myself the question 'What should I do next?' I definitely want to make a small location. I have two ideas: a pirate cabin in the style of World of Warcraft and a room in the style of Life is Strange.
My goal is to understand technical aspects of working in Unreal Engine, as well as working with lighting, composition and decals. All the knowledge and experience I’ve got working on this project is very useful. And next time I will not rush to finish the location as quickly as possible.
Do not be afraid of challenges. They help us to improve and do not do as I did - plan ahead.
Outro
I would like to thank the editors of Experience Points and personally Kem for such a unique opportunity, as well as everyone who read this article. It would be a great injustice not to mention all the Leoluch community members on the Discord and my friends who helped me finish this work. Especially to Stanislav Vovchuk without whom I would not have written this article.
You are awesome!
Feel free to ask questions on discord Ridniy#9942
Also you can download the texture pack that I’ve made for this project with the “exp_points" coupon for free.
You are welcome to look here for more details about what tiling materials I’ve used.
Wish you all successes.