
Summer Archipelago - A Serene Environment
Join us on a trip to Summer Archipelago, a stunning piece by Pontus Ryman inspired by his fathers summer house in Sweden. Pontus is a master of photogrammetry and in this article we dive deep into his scanning workflow, how he planned the scene and camera shots, his tips and advice for anyone interested in photogrammetry and much more!

Intro
Hi! My name is Pontus Ryman, I am from Sweden and for the past 11 years I have worked as an environment artist in the games industry. My passion for game making started very early, not long after I had started playing video games. Early on I loved gaming but I also loved creating new experiences within existing games. I made maps for Half-Life at the age of 12-13 with the old hammer editor. As time went I explored more and more modding, first on my own in the form of texture editing in different games making my first ever texture for the old Battlefield 1942 mod Conflict in Somalia. I eventually worked on the now released Black Mesa game which began as a long running Mod as well as “Point of Existence” which was a Battlefield 2 Mod.
This childhood passion made me realize that I wanted to work with video games and I studied digital graphics in Stockholm which helped me learn a lot broader about digital art, 3d tools and techniques. I landed an early internship at a VFX company that focused on commercials but always had an eye on the games industry, so once the internship was over I managed to land an entry level job at a small indie studio.
Before I started at the indie studio I had applied at DICE, which I thought rejected my application. Luckily they contacted me a few months into my internship and wanted me to come in for an interview. I landed the job and started working at my childhood dream studio on a franchise that started my career in modding as a child, I stayed at DICE for 8 years where I learned so much more than I could have imagined when I joined, eventually I moved on to new adventures and joined Embark Studios where I am currently working.
Planning The Scene
The “Summer Archipelago” short film was originally just a loose idea I had been playing with in my head. Near my fathers summer house close to the small town of Grisslehamn in the northern part of the Swedish east coast archipelago there is a unique and striking coastline with wind and water swept rocks and vegetation.
I had just finished the last 3d project which was heavily focused on hard surface materials and I felt that I wanted to get back to my roots as a nature environment artist, so I wanted to take the chance and explore this unique biome in a 3d environment.
Initially I wanted to just do a small environment focusing only on the coast part, it was not a movie either, just something I toyed around with, but as i started building the content I realized there was more to it, as I added the rocky coast, i needed a forest next to it, and with a forest next to it i wanted to connect it to the inland wheat fields which was so iconic.
As I went along constructing it, I started to formulate roughly what I would create as a whole, what I needed for the final result and how to present it in a movie format. Fairly early on I knew it would be some kind of video presentation but focused first to build a baseline of content to start looking for what was needed to tie a loose story together. The fields part was the last thing I added in terms of broader scope, it came as a part of the movie script, compared to the forest and coast which was the base idea behind the environment.

By giving myself the goal of this short film, I could roughly plan out what I needed in the base content. A Swedish archipelago forest consists of a loaf of different tree breeds and vegetation so I kept it to only 1 per tree breed and size. So one large , one medium and one small pine tree, one large one medium and one small spruce tree, and so on. This kept the scope in check and I could stake out the boundaries of the amount of work in a rough estimation. This is also to keep the memory cost in check so that there are not too many unique meshes with unique textures within the scene. I made sure to scan generic looking trees for each breed and size, while the more unique trees are more interesting, they do not repeat well, so keeping it generic makes reusing trees easier and the viewer will not spot the repetition so easily.
By giving myself a weekly goal of what I would try to accomplish (x amount of assets, or aspect of the environment done per week) I could plan roughly the span of time it would take based on me working x amount of hours in the evening. Even if I failed to stick to the plan every week, it would still give me a ballpark estimation, better have a set short deadlines along the way that are sometimes missed rather than just floating along without any concept of time!
My daughter was born only 2 weeks into this project, and my wife and I split the time taking care of her, this meant I would stay up late in the evening to keep tabs on our baby and suss her back to sleep every now and then while my wife got a few hours of undisturbed sleep. I was going to lose sleep anyway, better use it for something productive! This time slot gave me a period of consistent time every evening that I could spend on the project, which became routine, helping me keep up the pace, staying consistent with my time and always planning ahead.
In the end I executed more than I had planned, I did not really cut any content other than content ideas I had come up with along the way. I always felt I could “add another tree here, or another feature there” but it would have hardly made a big impact on the final result, there were some specific shots I did not get to which would have been nice for the sake of the short films overall experience, such as a woodpecker, cows in the fields, a shot with rougher waves along the coast etc. But towards the end of the project I followed a stricter deadline each week and I had to make some cuts for this to come together.
Planning The Shots
The planning of the shots and whole of the script for the movie itself came a bit later once more of the base content fell into place. I had a loose idea of a story based on a general emotional experience that was relieved over and over during summer days, that being the typical summer day where we would take the bicycle down to the local bathing spot, passing through fields and forests along the way. It's a summer experience i can imagine quite a few other swedes also have, and its almost an ingrained experience in some peoples lives.
So once I had a rough emotional experience to tell in a linear story, I started to just take screenshots of the environment I had to set up a flow. Where I was missing environment content (specifically the fields part came after the storyboarding) I just searched for reference art that I would then create for the movie, the references was my placeholders for screenshots in the storyboard. When I had the main beats planned out, I would record those towards the end of the project and then make on the fly extra shots that I found around the world that would work well as filler and mood shots for each biome.
Composition and Lighting
For the most part I tried to set the lighting look of the different environments early on, lighting in Unreal can either make or break content, so I spent a significant amount of time just setting everything up right, going back and forth along the way as I built the content to learn, adjust, and readjust the lighting. The forest was especially tricky since you have to balance contrast, overall ambient lighting and sub surface scattering strength. I did not rely on ray tracing and only used Distance Field AO, skylight and directional light to create each lighting scenario.
For each specific shot I would find the right sun angle that highlighted composition in the best way to guide the eye based on common composition practices. I would often try multiple ways of lighting a shot to see which one I liked the most. With a “story” in the movie there could not be too much variation between the shots in lighting and they had to follow a roughly similar style and brightness value in order to not break the visual flow.
Different Lighting Scenarios
When I planned the lighting for the shots I looked at references I had gathered myself from the different locations. Going down to the coast for a swim is unsurprisingly done on a clear sunny summer day so the lighting was quite straightforward to choose in that aspect.
Technical differences where the biggest between the forest and the day field and coast lighting (which were more or less identical) The forest as mentioned earlier had a lot of factors to balance to get a smooth lighting look where I had to balance the DFAO a lot together with exposure. Its easy to go contrasted with dark shadows which when you do, you lose some of the realism. As for colour and tone of the sun, shadows and ambient lighting, I always went for realistic looks based on the references I had gathered. A light green undertone in the shadow in the forest is something I found the closer I looked at reference shots, where the vegetation lightly colours the ambient light as the sun travels through layers of vegetation. In the fields I often found that as you look into the distance, the treeline and houses in the horizon gets tinted dark blue. Its subtle, but it all adds up to a more realistic whole. The lower hemisphere colour also helps lift up the darker parts but can also become very artificial if overdone in a forest environment.
For the sunset shot, which was really all about that summer evening mood, I gathered a lot of references first. A striking sky can really do wonders in a shot and I wanted to hit that stark silhouetted environment against a strong sky. I found 2 key reference images that I studied in depth, especially how the backlit colours affected the silhouettes, and the different types of colours a sunset can produce on the environment (its not all just orange!) It was also key to find a great HDRI that I could base it on, which I then tweaked more towards the reference shots. Strong colours against stark black silhouetted outlines is the striking factor and by having those aspects there, those contrasts creates a different image from the other light settings.
Foliage Process
The process for the foliage is something I tried to learn and explore something new in on this project. I have previously made a full jungle biome for one of the games I worked on but I wanted to see if I could push the quality here.
For the tree stems/base the process was fairly standard, I scanned a tree base that I liked and also scanned a piece of tiling section that I would blend into the uniquely scanned base.
The tiling part would then repeat across the rest of the tree. I relied heavily on detail textures packed into texture arrays, to have interesting and up-close high quality, the good thing with this setup is that blurring and sizing down your unique texture actually benefits the detail texture array and makes it look better. So with the right setup its a win win!
Detail textures bring a lot of quality when scanned from the same source as the content that uses it
The detail texture array setup is a texture array setup that uses a black and white texture, packed into the alpha channel of the diffuse, to map where each detail texture ends up. Technically you can have up to 255 detail layers, but for my use cases I kept it to 2 per type of asset, such as rock or tree.
For the branch leaf cards I tried to challenge myself a bit and scan everything, I mocked up roughly the shape of the different parts I needed in photoshop and packed that into an alpha card sheet, and then went into the forest and found branches that fit those mock-ups. I would lay them on a white sheet (on the games i have worked on we have mostly used blue sheets, but I came to realize that they leave a bluish glow on the scanned assets themselves the white sheet would softly under-light the branches for a more even light balance) and scan them through the regular photogrammetry workflow. It was a bit of a challenge to find the perfect conditions as leaves can move in the wind. I often brought them back home to my back porch where I would set up sheets to block the wind. But when the scan works out, you get near perfect normal maps which produce great final results.
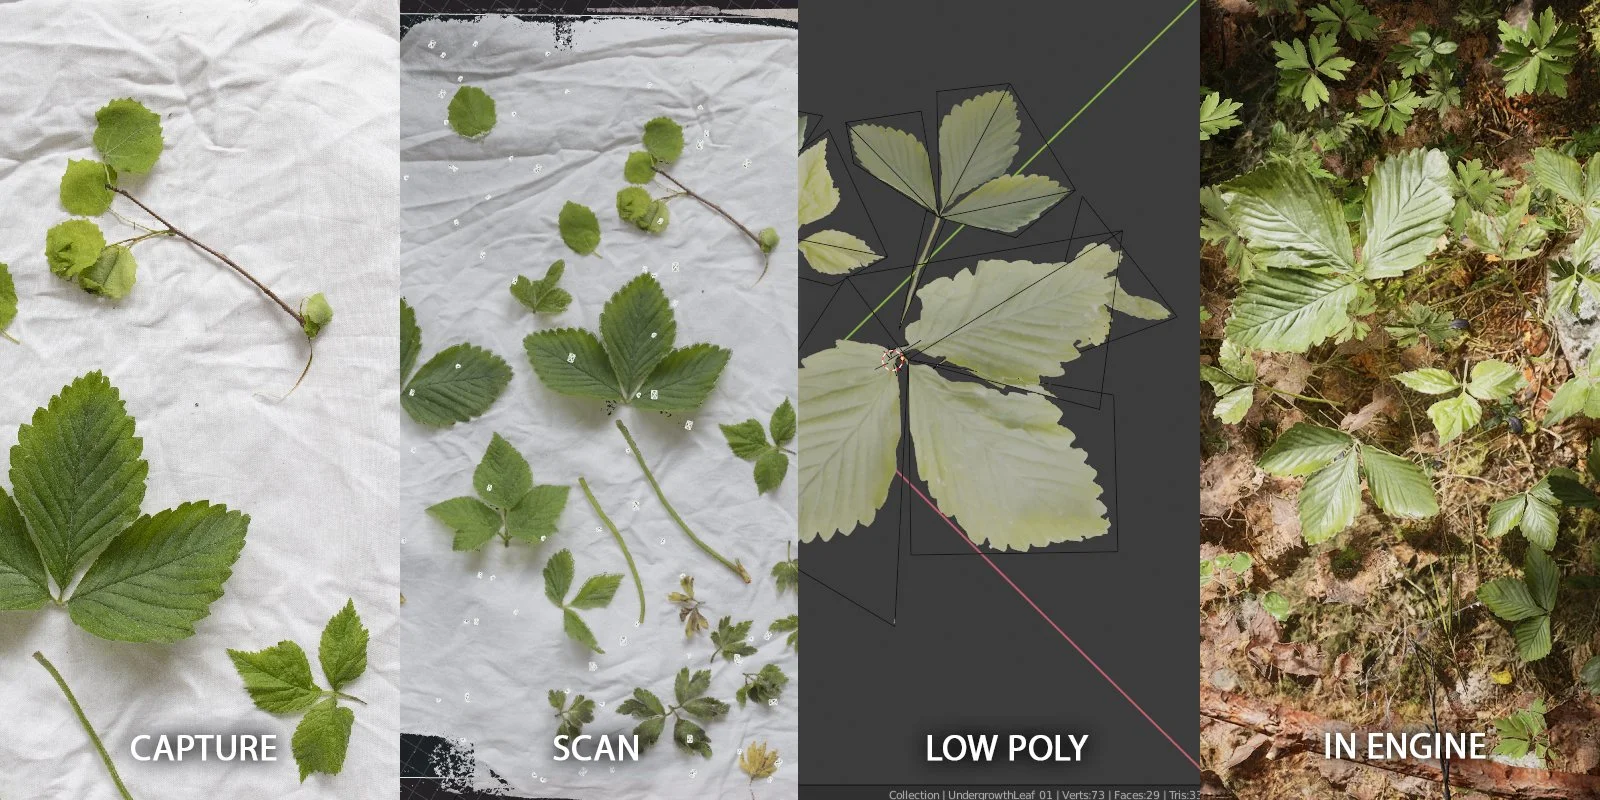
From the capture, to scan, low-poly and finally in-game, by keeping it high quality and being meticulous in the start, the end result can be both high quality and cheap
Almost all the vegetation was made this way with the exception of the pine alpha cards, for those I took references of pine needle tips, and high-poly modelled my way up from a single pine up to a full branch using instance collections along the way , and always having an image in the background as a shape reference (using the same idea as before, blocking up a shape in photoshop then finding a real one in nature, but only using it as a reference for the high poly model)
It’s a more traditional approach but by keeping strictly to the reference and also using a photo texture for the pine needle it produces good results and you get great and clean normal maps.
As I added the foliage content the scenes would start to take shape and I would slowly build towards the lighting I wanted, as I mentioned earlier lighting a forest can be quite a balance, subsurface, DFAO, skylight and the right directional light settings is key. And good references are everything!
Texturing Process
Everything was more or less textured through photogrammetry (other than some minor props, but they were basic and only backdrop related). I followed the standard process for photogrammetry capture where I scan the content with my Canon 6D mk2 and a colour chart. Using a colour chart is quite important as not having one can bite you further down the process when you need to make sure that everything fits together.
A small snippet of some the content that was scanned
The key to the content here was not really in the workflow of the photogrammetry content but the choice to scan everything. Even the fishing net, the boat, the houses and the jetty were scanned. Some of the assets were just run through and a detail texture array added to bridge the quality up close (a good wood detail texture array covered most of the man made asset scans)
textures were baked from the vertex colour via a PLY format exported from Reality Capture. If you have a very dense mesh, using vertex colour is more reliable and scalable for your diffuse colour than baking a texture to your high poly and then baking to your low poly from there…
By trying to scan everything you get a high average quality level on the content, and it also brings up quality on things which might not be scanned, as when your content is mostly photogrammetry based, the average quality gives the illusion that everything is that quality.
This ratio can be pushed of course, but at a certain point it starts to break down so you have to be careful with not introducing too many non scanned assets into the mix.
The terrain like the sand on the beach or the forest floor was just the Unreal landscape set up with terrain materials. I also used the landscape spline tool to drag out some washed up seaweed, an alpha card with some dead reeds and other minor things to spice up the look. But all in all it was just broken down into segments. It consisted of all the content I had gotten together and arranged in a natural way instead of one large scan. There were however other larger scans that I captured like large cliffs. The texture arrays helped keep the quality in these cases but I also layered in extra textures on top.
A layer of pine needles and moss were always present and by splitting out a part of the slice texture. The slice texture array split the grayscale value into how many textures in the detail texture is used, so if its split in three detail texture, it will take values that are near black, mid grey, and white and round off to the closest value, for 4 texture it would split that gradient into 4 values. This can be exploited for further masks for other use cases. By splitting the detail slice mask into 3 but having absolute white as a moss mask while having an almost white value as the slicemask white the detail texture array will pick up the almost white plus the absolute white, while the moss setup will be set up to only pick up the absolute white and ignoring anything below it. Since the moss surface ends up on top of the detail textures, your effectively squeezing out an extra black and white mask out of your detail texture slice mask.
For the pine needles I took the roughness mask of an asset, clamped it so that the roughness mask was only using the bottom half of the texture, it does reduce the accuracy of the roughness texture by half, but since there is so much layering of roughness going on from the detail textures anyway, you won't see that reduced quality. Then the top half is used as a mask for the pine surface.
Creating The Wheat Fields
The wheat fields are set up using a simple vertex position. By scrolling a few different textures at different sizes that mask out each other at different tiling and speed the effect is wind ripple that moves through the fields.
In order to create the effect I spent most of my time on this studying video references of grass in windy conditions. When wind moves through grass there is a shift that angles the grass towards the camera, the reflection then creates what looks like waves of white gusts moving through the grass. I tried to make the masks look like the shapes you see in video references and then also had these gusts make the specular higher, the roughness lower, and the diffuse colour slightly brighter in order to accentuate this effect.
The wave noise texture was overlaid on top of each other at different scales to create masks that was used for the different material channels
Creating The Ants
The anthill was something I came up with as I started to fill out the forest shots and I wanted something that really is an essential part the experience of walking in a forest. Swedish forests are crawling with them and they are such a distinct aspect.
The setup is a 2 step structure. The first part is the shader part. the ants are a small plane card that has 2 an image of an ant in 2 different positions. The plane is mapped to one of the sides of the texture and the shader then drives through time the UV to jump back and forth between the images, creating the illusion that the ant is walking, its quite rough if you look close but sells the idea when you put a lot of them together.
Ant Shader
A slowed down version showing how the ant plane loops between 2 states
The second step is using Niagara to spread out GPU particles along the same mesh as the anthill. The ants will spawn in the shape of the anthill is then through forces such as gravity and noise set to move around the ant hill, add a slight jitter to them and they will together with the flipbook animation shader, look like they scurry around the hill. Its a lot of smoke and mirrors but its quite effective.
Anthill
Photogrammetry
Everything is photogrammetry based other than a few backdrop assets. As mentioned earlier I wanted to keep it to as many photogrammetry assets as possible in order to have a high quality average. When I scan a photogrammetry asset, the process is quite simple. I have been to 15 or so photogrammetry trips throughout my career and experience teaches you a lot about what you can predict about how a scan will turn out but there is a few key factors to keep in mind:
The best lighting is always overcast, without rain. Sun and shadows create a lot of texture clean-up in the content creation process and rain causes reflections that the scanning software have hard to grasp as reflection changes the details that the software matches up between the images.
Focus on how separated an asset is from its environment in order to get a full clean asset, best way to do this is to picture how it will look like an in-game asset
A single free standing rock without any integration into the environment other than the ground it sits on is probably one of the cleaner scans you can get in nature. It will translate into a clean and usable in engine asset. Integrated assets are harder to clean up and cut out into a useable assets, but can also be useful if you plan ahead when you scan and how to apply it in engine.
Generally once you have nailed a good scan the process from there depends on the type of asset. But for objects such as a rock the process is straightforward and usually just follows:
Export your high-poly to a .ply file since the diffuse texture will be baked from the vertex colours
Export a mid poly decimated in the scan tool to manageable size, I usually go for 200 to 500k tris depending on how intricate the mesh is. We will use this to create the low-poly over.
Create the low-poly in your chosen 3d app, I have long used Topogun, its great and handles lots of polys but its a very manual process, shrink-wrapping and adding to the result in Blender is a more efficient way but can be less accurate. UV map the low-poly and try to minimize stretch for the detail textures to align well. Make sure the UV cuts ends up along ridges or crevices so detail textures don’t have obvious seams.
Bake your textures from the high-poly, usually normal height cavity AO and base colour from vertex colour.
Clean-up the textures in Substance Painter. Import the asset with the texture and set up a fill layer with the textures as a base, add a paint layer and set all layers to pass through. Now you can clone stamp away problematic areas and also work on cleaning out blemishes.
If you need to remove extreme sun and shadow problems, I suggest using Agisoft De-Lighter, its really efficient to get rid of the worst cases of sunlight and its shadows from your textures.
Import your asset to the editor or any other software.
Complex Photogrammetry Assets
When assets have a lot of complex elements a little more planning is needed to tackle them. In the case of the fallen log what I did was I scanned the entire thing and created the base asset using the regular workflow, I did not include the splinters in the low-poly at this stage. After the base was done I then baked down alpha cards of the broken off splinters, baked from the same source.
I then placed the cards around where the splinters were in the scan to fill out the splinter areas that I did not include in the base low poly mesh. Added on top of that I added some branches from the branch alpha sheet to give it some living branches sticking out.
Log in Blender and Unreal
Things Learnt Throughout The Project
I learned a lot across all the tools that I used, everything from Unreal Engine specifics, especially around lighting, to developing some of my own techniques to scan vegetation and how to optimize it. By focusing on scanning as much as I could even for the alpha cards for the vegetation I learned how to plan and scan those branches to really achieve some high quality results.
Difficulties Of Getting The Scene To Run In Real-Time
There is a lot of content, especially for the forest. To optimize it and make it run I focused first on the standard setups like LODs and billboard LODs, making sure to cut close to alpha cards to reduce overdraw. I tried keeping the content as low-poly as I could but you need good LOD setups and quick switching to reduce the triangle count cost quickly but in order to really hit higher frame rates you want to cull as many assets as you can quickly. I set up my content to cull away the small undergrowth at very short distances, relative to their size. Very small vegetation would go away near a meter away, such as the moss on the rocks (which were baked into the rock mesh LOD0 and then switched to LOD1 at a very short distance) and then in quick stages the different sizes of undergrowth would cull away quickly. The terrain material and larger undergrowth covers most of that transition without any notice.
I always had performance in mind even if this was to be a cinematic movie. My intention was to make it “game ready” to prove to myself that quality and performance can exist together in Unreal.
To reduce texture cost I used the previously mentioned detail texture setup that reduced the size of the main texture of the scanned assets as well as packing everything tightly into just 2 unique textures per asset with Colour + Slicemask in alpha as one, and R+G as Normal map with the B roughness and Alpha as height for the contact shadows. The B channel normal map is then reconstructed in the shader. A typical midsized rock would be around 512 or 1024 for the 2 unique textures and the detail textures would be around 512 (Normal RG, Colour B and Height in A).
Slice Setup
Combine this with keeping a clear structure for all the content and having a parent shader for all the assets that use the same setup with only a few values to tweak per asset, everything becomes consistent and easy to handle when there are a lot of assets to juggle.
Working With Levels
Originally everything was in one scene, I even managed to set up a LiDAR based landscape of the archipelago with source data from the Swedish Lantmäteriet that is mapping out all off Sweden with LiDAR. The results were great but when I wanted to create the movie renders I recreated the 3 different biomes in their own world just to keep it simpler for me to handle, it was faster to handle shots and lighting between them. The original draft shots were made in the first environment where I had everything in one but the final shots were based in their own replica levels.
Scene and Career Retrospective
I think what I really found the most interesting was the coast aspects which was where the original idea started from. There are a lot of amazing looking forest environments in Unreal and the forest in the short film is nothing out of the ordinary, but I felt the coast environment has its own uniqueness to it, and I think it hits home to a lot of the people who frequent these environments in the summer. It comes together to form its own identity by keeping true to the real life location and by not being too generic.
I think my past work at DICE with both Battlefield and Star Wars Battlefront has changed the way I look at environment art and nature. We began during Battlefront 1 as a small team of just 3, exploring fully scanned environments and going on scanning trips to all kinds of unique nature locations. Since then I have started to look at nature differently every time i walk out the door, and i always imagine how a rock or a small location in nature would look like in a 3d environment. Working at Embark studios now, we are continuing to develop the techniques to push the boundaries of photogrammetry in video games.
This short film project was the first time I had the opportunity to realize an environment like this for my own personal experience, while previous environments have been amazing to recreate, I really enjoyed bringing a location to life that I often visit in my spare time.
Where are you still looking to grow as an artist?
For me, there is always something to learn. While I am an Environment Artist with a focus on nature at heart, I always want to expand my horizons across the board. While always keeping an eye on workflows and tools that are related to nature content I also like to look into areas that are outside of that scope. While having dipped my toe in it in many places, proceduralism through either Houdini, Blender, or other tools is something I want to explore further.
Inspiration
I think my biggest inspiration is of course nature, walking around in environments and imagining it in a 3d setting, finding even mundane places and wanting to capture them and turn it into a full 3d experience.
I'm also always inspired by breathtaking 3d work in general, be it hard surface, interesting characters or breathtaking structures. I have always been inspired by 3d artworks featuring massive mega structures and monolithic features, but have yet to try creating something like it myself, maybe in the future!

Feedback
I think generally from my peers, people around me and my Art Director who has a great eye for quality.
I have many skilled artists around me and its always great to find inspiration and feedback from these people who I trust will give their view of the work. Having people around me with a really strong eye for quality and great working relationships with really brings out the best in my work. Its so easy to focus too much on the one thing that becomes obvious to me, and having someone who can pinpoint other things outside that tunnel vision is incredibly valuable. I also find it very helpful to ask people who are not always in the same mindset as an experienced artist but can give a different perspective. A concept artist can help look past the technical hurdles and give purely artistic feedback, while family and friends completely outside of this group of highly trained artists can give a really good point of view from someone who just experiences the art and has no knowledge of the creation process. Its easy to think that art is being made only for other artists, and its easy to get stuck in that train of thought where its all about impressive details. Asking people outside of that circle helps take a step back and look at the obvious things you might be missing.
Additional Advice
For people who want to get into photogrammetry and nature environments in general, its a perfect opportunity to start! Photogrammetry is a lot more available and well documented these days, when we started with photogrammetry a few years ago we had to figure it out as we went. With so many great tutorials, tips, tricks and so many different ways to approach it, its easier than ever to get into it. You don’t need a high end camera, the most expensive software or the best computer to create something interesting, just dip your toe into it and get familiar with the basics and keep growing from there.

Future Projects
I can never stop thinking of the next nature environment I want to capture from a real life location, but the next time I make an environment I want to try and find something that has not been done before, I don't know what that is yet, but I hope to find something that has not been explored in a 3d environment before.
Outro
Photogrammetry is very fascinating to me, at first it was always about scanning the most obvious objects around you, but as the tools have gotten better, these days you can scan really interesting things and get the most fascinating results, and because of that i think there is a lot of unexplored aspects of what can be turned into a 3d asset through the technology.