
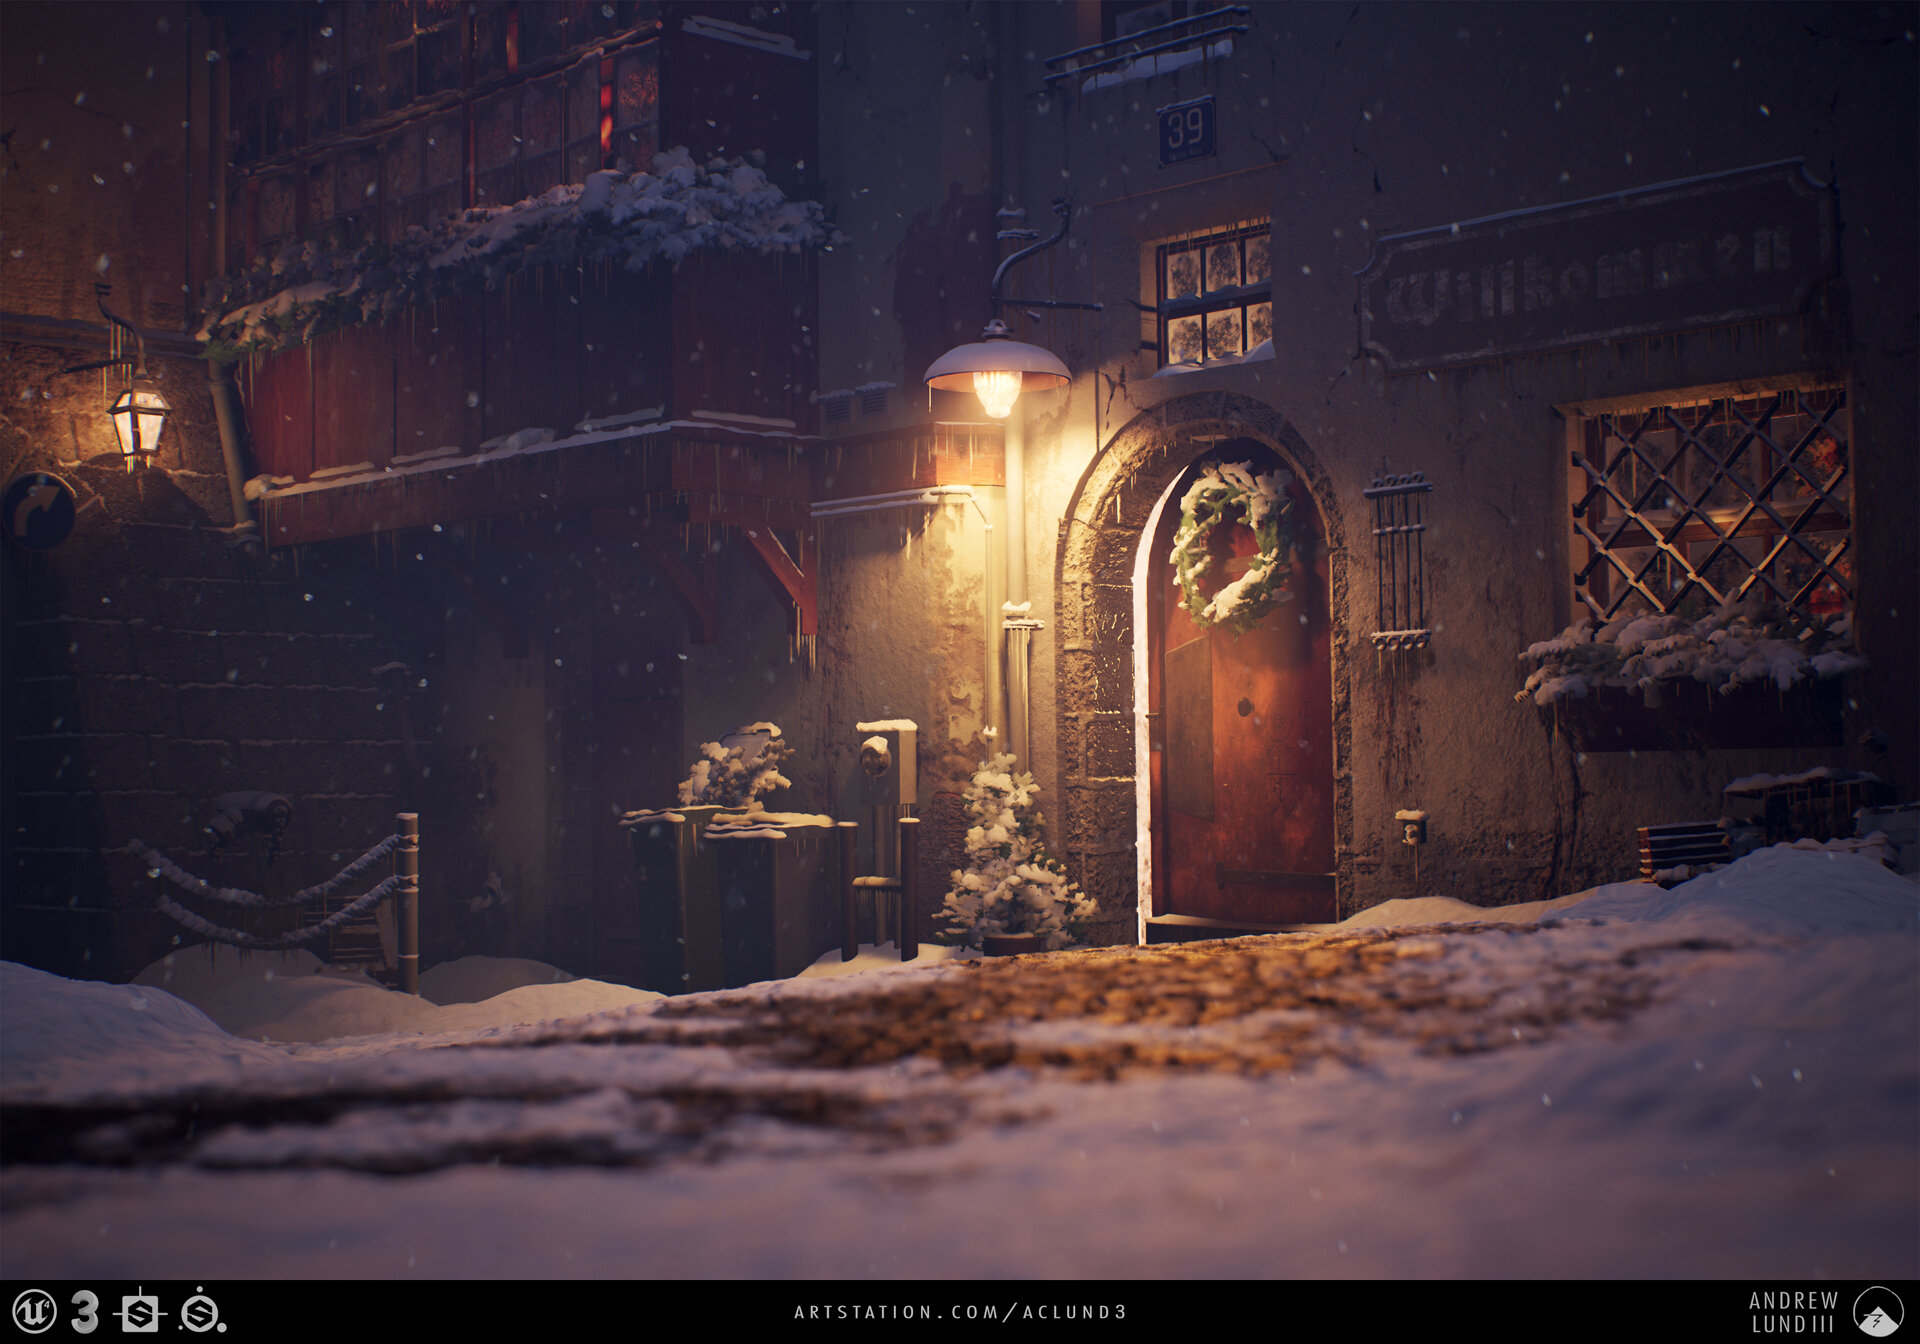
a cold winter’s night
Explore this massive breakdown to learn how Andrew Lund III created this cozy winter environment. Andrew sketched his own concept for this scene and created a variety of unique shaders for this scene. A Cold Winter's Night covers many topics such as implementing feedback and staying motivated. If you’re looking to blend assets with the terrain seamlessly, read this.
Introduction
Hello! I’m Andrew Lund III, a self-taught 3D Environment Artist/World Builder from Seattle, WA area.
I played a lot of video games as a kid. The environments I explored from my own bedroom were simply magic; doors opening to other worlds. I couldn’t get enough. Not realizing that creating video games was a viable career option, I pursued a different passion at University and studied architecture. Following graduation I established myself at a ‘career’ job, creating drawings and consulting/designing building envelope (skin) solutions for large-scale commercial buildings. I loved architecture, but after nine years it became apparent that this work wasn’t my calling.
Searching for another career path I reinvested in myself, getting back to drawing, creating art, and playing video games. I re-realized my passion for architecture in game environments and began learning how to make 3D game assets during my free time (mornings, nights, weekends!). I absolutely loved it. With my wife financially supporting us, I eventually took the leap and left the architecture and construction industry, completely, dedicating myself to making video game environments.
The Winter Street Scene is my latest environment and I’m proud to be able to share how I created it with you!
Project Inspiration
It’s been said that travel sparks the imagination and feeds the curiosity, and I absolutely agree.
A while back I was lucky enough to have the opportunity to visit southern Germany and Austria. Immediately fascinated by the local architecture, I spent hours upon hours wandering the streets and gazing at odd compositions and details. The buildings were old and had obviously been through dozens of rounds of repairs, renovations, retrofits, and remodels not to mention the many different owners and uses they’d survived over time. Their evolution and growth was immensely fascinating to consider and for me, thinking on history of these more common buildings made them just as interesting as any of the major landmarks in the city. I knew that I had to create an environment showcasing this subtle understated beauty.

Inspiration photographs taken in Southern Germany and Austria
Every project needs inspiration, a spark, and this is even more vital for an environment. You’re likely to be sitting with it for some time, so you’ve got to love the subject matter. You can bet if you don’t love it at the beginning, you won’t love it in the middle, and you won’t push the project through to the end.

Workload Management
In today’s world, full environments are not really meant to be created by one person alone; it’s a lot of work. You need to find a way to hold yourself accountable to complete something of this magnitude. Some people have an incredible amount of internal accountability, but for most of us a bit of external pressure is quite necessary. This is why signing up for challenges with fixed deadlines is a great idea; its why posting your progress on places like Polycount, your blog/website, Experience Point’s discord, etc. is so helpful. Getting a community around you that you don’t want to disappoint can be a great motivating driver.
In my case, I had a really good friend who was invested in helping mentor and critique this project. I sent him updates often; just a bit of text and a few screenshots of the recent progress. I felt a personal responsibility to show him something every few days, and it helped drive me to completion.
Reference is King
As always, I started gathering reference before doing anything else. I sorted through my travel photos, looking for anything that showed the unique vernacular (i.e. local) architecture and the interaction of small interconnected spaces. When putting together my reference sheets I used the free program PureRef. It’s a fairly light program whose purpose is simply for gathering reference. Use it. I promise you won’t be sad.

Architecture-Massing Reference Sheet
Having some good ideas for the architectural massing figured out, I did a cursory search for material reference, which I would later expand into separate sheets of reference for each material as I built them in Substance Designer.

Overall Material Reference Sheet
I then searched through Google/Pinterest and created a mood/lighting reference sheet to help nail down the feeling I was targeting for the environment. At this point in the project, I was aiming for an early morning sunrise when you might have the streets to yourself while breathing in the cold air of a morning full of possibilities. Soon, however I would begin shooting for a foggy evening near blue hour. UE4 had recently added volumetric fog to their game engine that I wanted to try out, and the idea of snow flurries in the air with snow on the ground coupled with nice warm lights in the street lamps and windows was really fitting together nicely for me.

Mood-Lighting Reference Sheet
Covering the scene in snow was going to prove tricky, so I dug quite up a bit of reference for it as well.

Snow Reference Sheet
And finally, I searched around for AAA game quality reference. I had every intention of attempting to match current AAA game quality, and without real-time game play and console limitations, there was no reason not to shoot for that bar.

AAA Game Quality Reference Sheet
These images are but a small portion of what I gathered to build this environment. My reference sheets were always being altered as the project evolved. Gathering reference isn’t a ‘one and done’ kind of task that only takes place at the beginning of a project. Constantly monitoring your reference throughout allows it to be as accurate and helpful as possible.
Concept & Planning
While looking back through my reference, I began sketching out loose ideas on paper. Some environment artists concept entirely in 3D, but something about the physical act of laying down ink on paper helps me think. Know yourself. ;) I sketched and iterated, combining my favorite and unique architectural features into one small environment, until eventually I had created something manageable to build in 3D. At this point, I was already thinking about modularity and the ‘grid’ (I’ll discuss this more in a bit).

Concept-Planning Sketches
Using my concept sketches, I created a quick checklist for the assets and materials I thought I might need to produce and I started a Trello board to help keep track of everything.

Early Project Organization on Trello
The reality was that while working on this project, I would also be remodeling our home in preparation for the birth of our twins, so I (correctly) assumed that there might be large stretches of time where I couldn’t work on the environment. I wanted to be able to jump right back in without wasting time reorienting myself to the project over and over again.
Blockout

Greybox Blockout in 3dsMax
I referenced everything against a scale figure, paying attention to the dimension of the spaces and areas they enclosed. The idea here is to keep to primitives and extremely simple geometry as you’ll be replacing all of these meshes later. Don’t be precious with anything! Don’t worry about matching the concept exactly. If something isn’t working, move things around and experiment until you find what your mind wants to see.

Primitive Blockout
Pretty soon after beginning the blockout, I brought the pieces into UE4 and got a super basic HDRI map, stationary skylight, and directional light into the scene. I also began experimenting with cameras. That’s right, cameras in blockout! This is super important! With an idea of the lighting and a few killer camera positions figured out I was able to prioritize work on the larger parts of the image as I progressed. I knew I was going to be making a few 2D presentation images, and possibly a small 3d flythrough video, so I could target my work towards those finished products specifically.
Check out Polygon Academy’s advice on blockouts (aka Greybox Level Design), by Tim Simpson.
Modular Kits
After blocking out the main building walls, lighting, and cameras I jumped back into 3dsMax and started splitting up the primitive blockout into functional blocks with modularity in mind. Cutting up your assets into modular kits that fit into a ‘grid’ space is immensely useful, especially in human-built hard-surface environments like this. Snapping pieces together in Unreal, knowing that they will fit is super zen.

Modular Blocks in 3dsMax
On this project, I went a little too detailed in this phase, whoops. It’s much better to shoot for proxy models, worrying only about proper shape/size/dimensions with good pivot points, naming conventions, etc. You can then properly place those models in the game engine and improve their quality one by one over time. This helps to make sure you’re only putting time into models that are working in the environment, and that you are absolutely sure you need.
This Polygon Academy tutorial is quite helpful in understanding Modular Environments.
Blockout Materials and Lighting
Once I had re-imported and arranged all of my proxy models into UE4, I created simple proxy materials with just color and roughness value. I had no UVs at this point, and wasn’t baking any lighting which was pretty much just set to defaults. The idea here is to get a better idea of the composition of your 2D views and how all of the surfaces are reading with light bouncing around. This is an important step to check your progress and let you know if your environment is heading in the right direction. After assessing the simple materials and lights, you can make quick adjustments and changes that would be much more difficult to make later on.

Basic Material and Overall Lighting Blockout
At this stage, and for this environment, something wasn’t sitting right for me in the composition, and I couldn’t quite put my finger on it. So rather than waste a bunch of time spinning in circles, I took a break from modeling assets. I knew that lighting the scene was going to be really important (and it wasn’t my strongest suit), so I took the opportunity to dive into Tillman Milde’s UE4 Lighting Academy tutorials and really get to learning. His real-time workthroughs lighting environments from scratch is invaluable, especially as he encountered problems and had to come up with solutions on the fly.
Re-Focusing the Project
After filling my brain with lighting knowledge, I came back to the project as a bit more of an impartial observer and finally put my finger on the problem. My composition had no clear focus. In the image below, you can see all of the green arrows going every which way. At best, the protruding window bay could be considered the focus, but there were too many competing elements, and no primary read.

Before and After Composition Studies
I talked it over with one of my lighting artist friends (Kevin Dalziel) and we realized we needed to double down on the arched door as the primary focal point. Removing the chains crossing in front of the door, and relegating the alley to the right and the tunnel to the left as secondary interest helped to re balance the focus of the scene. he lighting also added contrast and the shadows added interest to the shapes near the door. I still had work to do in clarifying the composition, but this re balancing clarified and simplified my decisions going forward.
Allowing yourself the chance to breathe and re-examine your project is crucial. Take a break every once in awhile! Putting your head down and getting the work done will certainly get you somewhere, but it’s those intermittent breaks to check where you’re going that will lead your project to success in the end.
Mid-Poly Sub-D Modeling
Refocused and back on track, I began to slowly work up the quality of each asset: adding polys, edge definition, and creating proper UVs, etc. I paid special attention to my reference, and gathered more when necessary. I worked from the larger to the smaller on my asset list and added a few things along the way. It was all fairly straightforward. There is plenty of information out there on low and high poly modeling, baking, UVing, etc. so I’m not going to revisit it here for the sake of brevity.
One thing I did decide to do a bit differently than normal was in skipping sculpting and baking altogether, going with a mid-poly and decal workflow. Having a darker scene shrouded in fog, I knew that mid-poly assets would hold their own well enough. I would come back and improve the mesh quality of a few of the more important assets later. Most of my work in 3dsMax was done at this point.
Tiling Materials
With all of the meshes now up to a mid-poly level in UE4, I began to replace my proxy materials with tiling materials created non-destructively in Substance Designer. I set up a fairly basic shader in UE4, allowing the non-destructive controls in Designer to handle most of the adjustments. Since this was a small (I thought) personal project, I didn’t bother packing maps in separate channels.

Basic Material Shader in UE4
UE4 and Substance Designer talk to each other fairly seamlessly now, and it’s a wonderful thing. By exposing a few of the more important variables in Designer, I was able to adjust the materials pretty much in real-time in UE4.
Allegorithmic has some fairly decent tutorials on how this all works.
Street and Wall Materials in Marmoset
Decals
Once applied to the assets in UE4, the tiling materials didn’t look too procedural, which was great, but they were still fairly clean, bland, and dare I say, boring. So, I set about adding decals to really wear in the surface. UE4’s decal system is fairly straight forward and there are many tutorials, but here’s one UE4 Decals by Ryan Laley that I found useful.
For the texture maps, I downloaded a bunch of cracks, dirts, molds, deteriorated stucco, etc. for free from textures.com and processed them through Substance Designer to normalize the outputs for each decal.

Decal Processing in Substance Designer
I used a super simple transparent shader, with material domain set to ‘deferred decal’ and blend mode as ‘translucent’:

Decal Master Material in UE4
And then I went nuts adding cracks, dirt, and grime, etc. with UE4s decal system.

Decals v No Decals
I took a few of the more focal assets into Substance Painter for their own custom materials, like the main door below:

Material Layering GIF in Substance Painter (Rendered in Marmoset)
I also used trim sheets for the wood panel elements of the environment, but mostly I stayed with tiling materials and overlying decals for this project.
Prefabs/Blueprints and Material Functions
With the goal of increased technical efficiency, I finally dug in and learned something about blueprints and material functions.
The flexibility of creating multiple variations of object sets in blueprints was quite useful. Sort of like using an advanced form of ‘groups,’ it helped speed up the population of assets in the environment. This wasn’t only helpful for groupings of set dressing props, but also for street lights, signs, windows, etc. anything with multiple pieces that needed to be put together. And honestly, this only begins to touch on what blueprints can do in UE4.
Check out this tutorial concerning Prefabs/Blueprints, by Polygon Academy for more information.
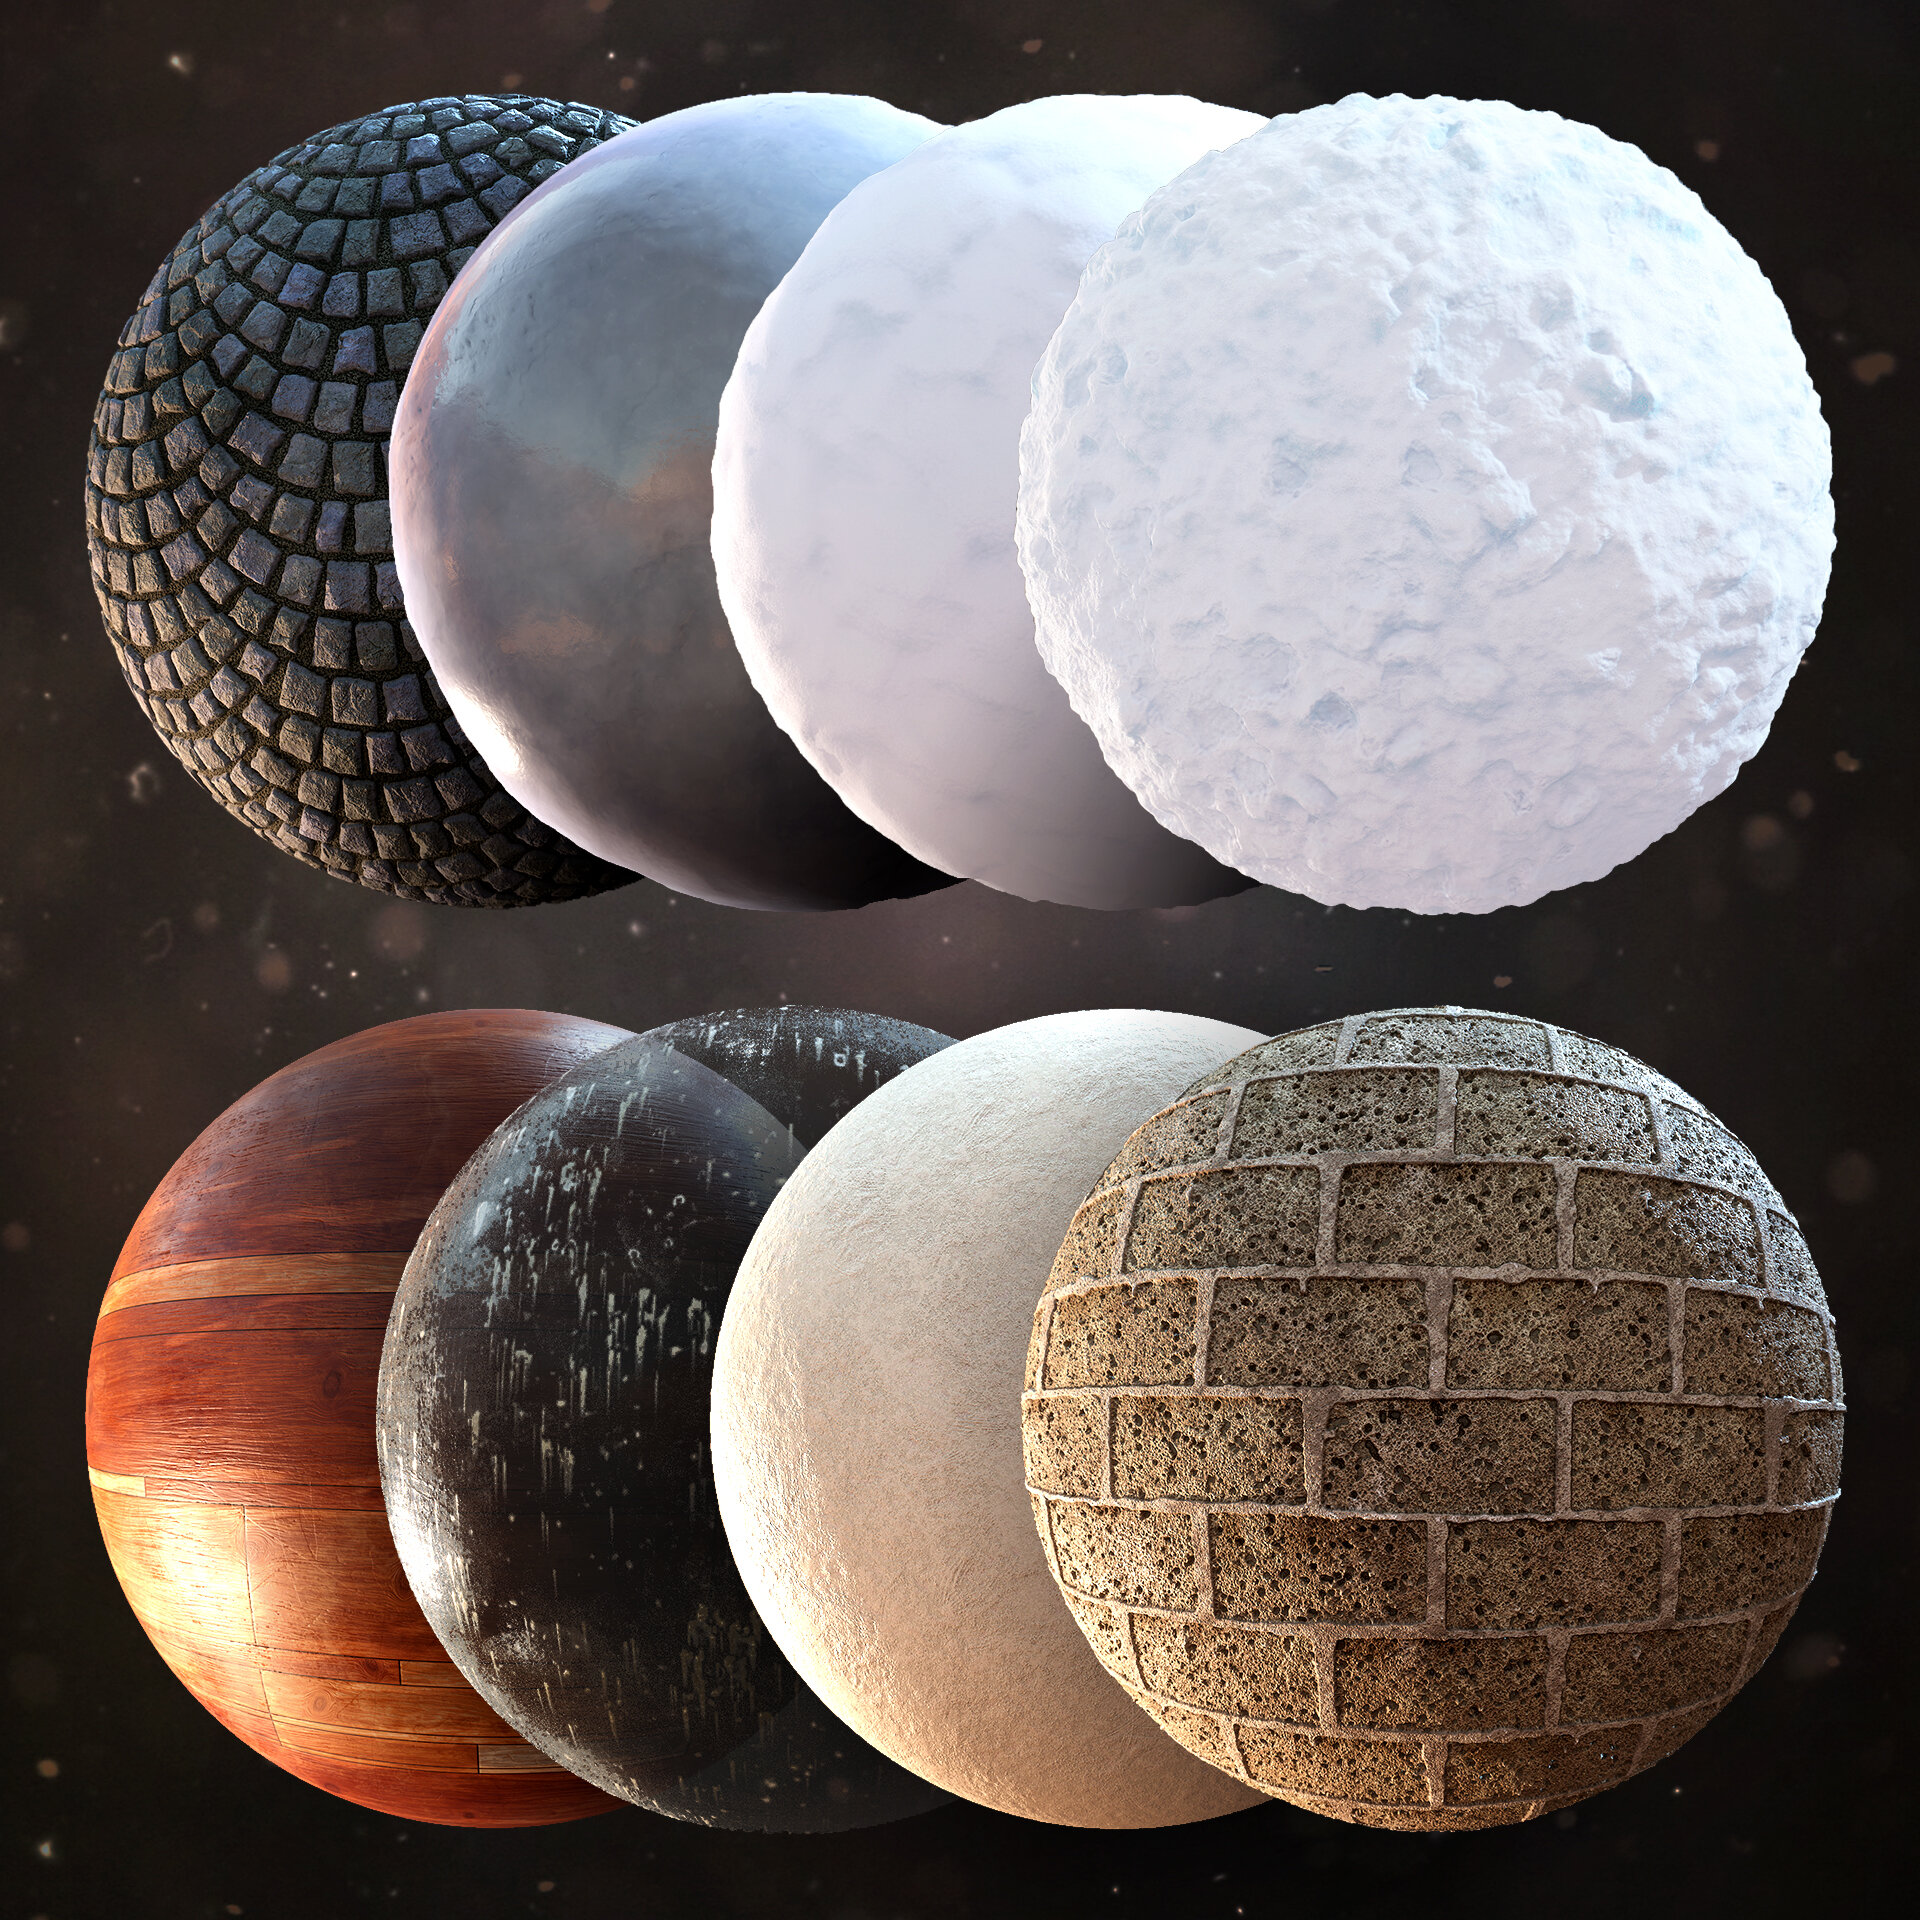
Knowing that my three snow-ice materials (rough snow, smooth snow, and ice) would be intertwined with many of the other materials; I used material functions as containers in UE4. This allowed me to make changes to those three materials in only one place and it would automatically update in my other materials. Consistency across materials was automatic.

Rough Snow Material Function
Check out this 80lv article, How To Use Material Functions in UE4, by Clinton Crumpler for an in depth look at material functions.
Z-Up Snow Master Material Shader with Vertex Painting
I figured that putting snow on the whole environment could be accomplished with materials and shaders or with separate snow meshes. Not wanting to create snow meshes for every single thing, I created a Z-up shader that would tessellate and displace the top facing horizontal surfaces of any mesh with my snow materials.
This Moss Material tutorial by Mind Games Interactive (MGI) explains how to set up a Z-up shader in UE4 quite well. I tweaked some things and added a few nodes for vertex painting out the snow in areas I didn’t want it, so my shader is a bit different than MGI’s. You can see the nice and tidy single node for my snow material function near the upper right corner of the graph below.
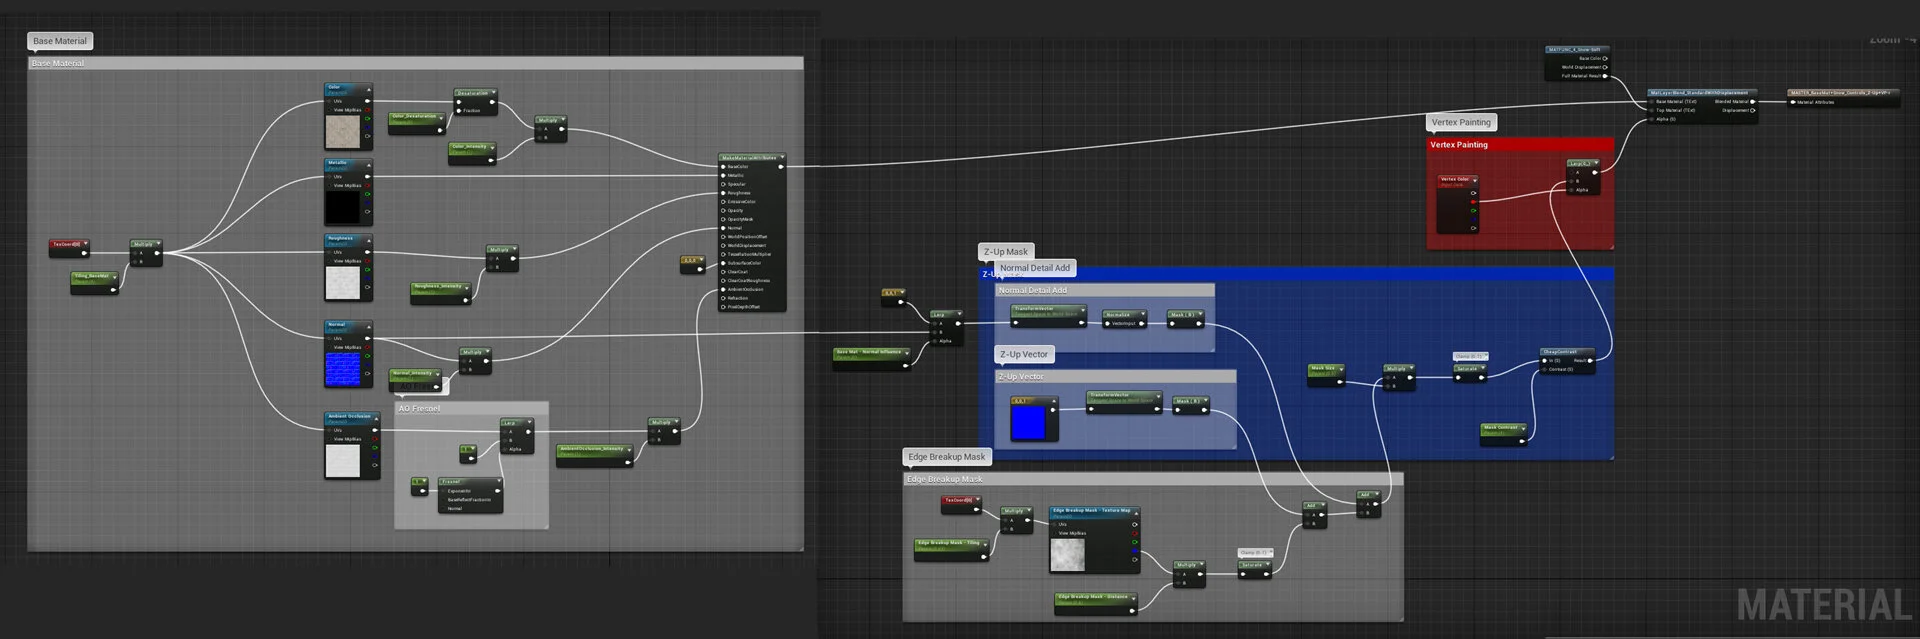
Z-Up Snow Master Material
I found that there was a limit to how far the tessellated snow could go before it started looking really wonky, and in the end I did have to create snow meshes for the sloped roofs and copings to get a more believable build-up.
Mesh Blending Master Material
My largest technical hurdle was in figuring out how to handle the street and ground materials. I’d seen enough games with very visible and ugly seams where meshes met, and I wanted to find a workaround. Looking into articles on 80 Level, posts on polycount, and info on DICE’s Star Wars: Battlefront, I cobbled together a workable solution and commented like a madman.

Mesh Blending Master Material (Get in contact with me if you’d like a copy, I’ll gladly share)
I created a vertex paintable material shader that would blend the separate maps (including the normal) of each mesh and layer for a seamless transition between the ground and snow meshes. Both the ground and snow meshes had the same material applied, with the snow mesh having the ‘affect distance field lighting’ box checked. The shader used the distance fields created by the snow meshes as a mask for the transition area, and I was able to vertex paint right up to it with ice, rough snow, and smooth snow over the arched cobblestones.

Mesh Blending and Vertex Painting Test using Placeholder Materials
I created separate height masks for each transition and used HeightLerp nodes to blend one material over the other.

Mesh Blending Test w Separate Height Masks using Placeholder Materials
I was getting odd seams between meshes after building the lighting so I switched the ground and snow mesh actors to stationary, abandoning the lightmaps for those actors. In the end, I also did a little bit of color correcting at the transition area edge, and ended up removing the pixel depth effect as it just seemed to cause color/shadow issues at the edges.
*I want to take a moment to note that this 80lv article, Creating a Snow Forest, by Leah Augustine, really nails a lot of the things I was trying to do here. I wish I had found it before I got so far into making my master material for the street. As previously mentioned, I had issues with the PixelDepthOffset and removed it from my shader, but otherwise, at minimum, I could have benefited from Leah’s detail normal approach for the snow and her parallax occlusion mapping (POM) approach for the ice. These are the first things I would update if I were to go back in and work on this environment. Thanks to Leah for sharing all of that wonderful info with the community! It’s gold.
Lighting & Atmosphere
This environment ended up using a hybrid lighting approach. As I noted above, the street and snow meshes had to be set to stationary to avoid weird lightmap seams, but most of the rest of the meshes in the environment were set to static, using UE4s automatic lightmaps. Smaller thinner meshes were also set to stationary to help save on baking times.
I ended up removing the directional light since the entire environment was shrouded in fog, and it was near nighttime anyways. I gave the Skylight a colder blueish color and set it to stationary. A few stationary spotlights were set in the sky to bounce off an invisible sphere, giving the sky a soft gradient and glow from behind the buildings and emphasizing the roof line silhouette. Quite a few subtle point lights were included to brighten up dark areas, and spot lights were used to help emphasize the desired light direction from the street lamps and glow from the windows. Every so often I would also set up spot lights on different lighting channels to fake a rim light and pop a silhouette. A lot of lighting tricks were in use here, and I have to thank Kevin Dalziel again for his expertise in lighting!
I included a basic Atmospheric Fog, but the Exponential Height Fog and the volumetric lighting that came with it really did the heavy lifting here. There aren’t a ton of volumetric settings, but I tweaked them all… and often. I was continually working on finding the right feeling of moisture hanging in the air.

Volumetric Fog Blockout in UE4
Story Elements
The story of a scene or image is where an environment really becomes something. I thought about this a lot over the course of the project, and kept coming back to the idea of reinforcing a warm reception in that central doorway. Maybe the viewer has paused for a minute to enjoy the beauty of the environment, but is headed towards the door for a kind embrace and a wonderful dinner with family. Maybe they just got off work. Maybe they’re returning home after a long stretch away at school. Maybe they’re just passing by, and they notice a little Christmas tree sitting outside the door and they pause to wonder why. Maybe the little tree reminds them of their home and family. Maybe they’re an international traveler just looking for their hostel… A lot of potential stories seemed to spring from the cold environment and the warmth at that door, and that seemed to work for me.
Continuing to emphasize that arched doorway, I adjusted the snow mounds and the vertex painting on the ground to help lead the eye towards the door. I added subtle boot tracks leading from the viewer to the door and cracked it open just a little to invite the viewer in. I punched up the texturing on the main door, giving it a warm red color with a lot of wear, and exposing the wood material underneath. I created a welcome sign, and added friendly fir branches and a wreath.
Particle Effects
One of the last things the environment needed was moving particle effects to make it come alive. Subtle movement of fog, steam, snow, etc. really helped to sell a whole world. The environment extending down the streets, alleys, and tunnels far off the screen.
I’m not a VFX artist and I hadn’t targeted this area for personal growth on this project, so I grabbed fogsheets, god rays, steam, and experimented with types of snow effects from a few different free UE4 example projects (I believe most of these came from the Particle Effects and Blueprints Projects). I heavily modified the steam to give it that lazy upward drifting feel, and customized a copy of that for the chimney smoke.
The snow flurries system took much more iteration to work through. The size and shape of the flakes, their movement patterns, and their speed all impacted the feel of the scene. I wanted a nice slow lazy snowfall that felt sublime, rather than a stormy blizzard that made you run for cover. I kept coming back to this particle system over the course of the project, adjusting and adjusting until it settled in just right.

Feedback
At this point, I had almost everything in place and thought I was simply tweaking elements for a more pleasing composition before final polish. But I had been in the scene too long and was losing my critical ability. I searched out a few friends who agreed to give the environment a round of constructive criticism. And did they ever… It didn’t feel great hearing how much work I still had to do, but you know what’s worse? Pretending your stuff is finished and putting it out when it’s not really ready. Constructive criticism is worth its weight in gold. Ask for it. Be quiet, take it, and build on it. Even if it’s tough to hear, you’ll come out a better artist every time.

Before Feedback/Critique

Implementing Feedback
Keep in mind that not all feedback is directly applicable and appropriate for your project and your vision. You have to figure out what to take, what to leave, and how to implement it. With that in mind, I began making changes and adjustments and adding and tweaking and this is a rundown of some of it.
I pushed the post-processing towards blues in the mid-range and shadows for a more cold winter feel to the edges of the image, adjusted the fog and tweaked fog sheet placements to help with layering and increase scene depth, added more damage decals, props, and populated the scene more heavily. I also tweaked materials, UVs, and mesh edges for better silhouettes, adjusted window glow and indirect lighting and the volumetric fog and added light masks for emissive variation. I added subsurface scattering (SSS) to the snow and ice materials, a simple subtle sky with clouds as tertiary interest, chimneys and roof vent pipes with smoke and steam to improve the roof silhouette, noise to the corners of the building meshes to break up lines that were reading overly straight and there was a lot more, but I’ll spare you the details. All of these changes came from having other sets of eyes looking at the environment, and being open to their critique. And it made all the difference.
After working through all of the notes, I went back for another round of feedback and this time, I received only a few ideas for improvement. Addressing those comments, I had basically wrapped up the environment.
Presentation
After working through the standard end of project checks (mainly re-looking at the scene through all manners of buffer visualization view modes) I was on to creating the presentation images/videos. I had already set up my camera viewpoints fairly early on, so now it was just about translating those basic cameras into UE4’s cinematic cameras. The Cine Camera Actor settings replicate actual real world camera settings, so it was fairly simple to set up screenshots, GIFs, and other animations. Getting the focal plane set appropriately and adjusting the focal length, etc. was just a matter of playing around. UE4’s high resolution screenshot option captured great images to work with and from there I was able to create all manners of presentation materials.
I did run into one issue when creating the screenshots. The motion blur didn’t seem to be working on the snow flurry particles. I wanted to find a solution in UE4 but abandoned the attempt after searching for some time. I came up with a non-native solution, grabbing a separate ‘falling snow only’ screenshot from UE4 and compositing it back over the top of the main image with motion blur added to the ‘falling snow only’ layer. Fairly simple workaround, but the static snow stuck out like a sore thumb as you can see below. Now it looks a lot more like the reference I was targeting.

Snow VFX Motion Blur v No Motion Blur
Asset Packs
For this environment, I made just about everything, and it took quite some time. This was a specifically targeted challenge that I personally choose, but it certainly isn’t necessary for every project.

Winter Street Scene Environment – Asset Zoo
There are plenty of free demos and content from even the major game engine companies out there that can be tweaked to suit your needs. I might argue that its best to know how to do something yourself before using a pre-made option from an asset pack, but as long as proper ownership is noted and you’re clear about what you produced and what you didn’t, there shouldn’t be a problem. I’ll no doubt use more high-quality assets from others on my next project and lose no sleep over it.
Conclusion
It was a wonderfully enjoyable challenge to produce this entire environment, from concept to finish. Please check out the entire environment on my Artstation.
I’d like to thank Mukul Soman and Tim Diaz for their incredibly detailed feedback, my wife for continually supporting and encouraging me, and most importantly, Kevin Dalziel, without whom none of this would have ever been possible.
Andrew Lund III, Environment Artist / World Builder