
Overgrown Forest gates in ue4
In this article we explore Wouter Gillioen’s foggy, atmospheric, forest piece, Overgrown. Wouter covers how he broke down the concept and applied his own story to the scene as well as his workflow including: blocking out, tree creation, lighting, utilizing Megascans, Houdini simulations and much more!
Intro
Hey everyone! My name is Wouter Gillioen, I’m a 20-year-old student at Digital Arts and Entertainment (DAE) in Howest, Belgium where I mainly focus on prop modelling and environment art. At DAE I follow the VFX track but I’m starting to get drawn towards the gaming industry and am focusing on that in my spare time. This allows me to have an understanding of both a VFX workflow but also a Game asset workflow.

I’ve always been interested in games and movies, even from a very young age, and am particularly fascinated by how they really pulled me into their stories and worlds. I told myself that I wanted to ‘make games’ without really realising what this meant or where to start. In the beginning, my parents and teachers weren’t a big fan of this, saying this industry wasn’t really growing or that there wasn’t any real work. I moved on and looked at different things to do, most of which were not related to being creative but rather just focused on doing something with tech. But then, about 2 years ago I stumbled across DAE, a game/VFX school that teaches the things I always wanted to do and was based in my country. This is where I first got in contact with 3D modelling. I instantly knew this was what I wanted to do. For me, it offers the perfect combination of being fully procedural or not procedural. For example, you could sculpt a rock in ZBrush and spend hours on creating the perfect rock with the right amount of cracks and perfect irregular shape or you could go into Houdini and make a procedural rock tool that can be changed with some parameters to have different shapes, noise types, etc. I do tend to go more for the first option and make everything unique and less procedural but that doesn’t mean I don’t like to jump into that procedural pool from time to time.

Understanting the Concept
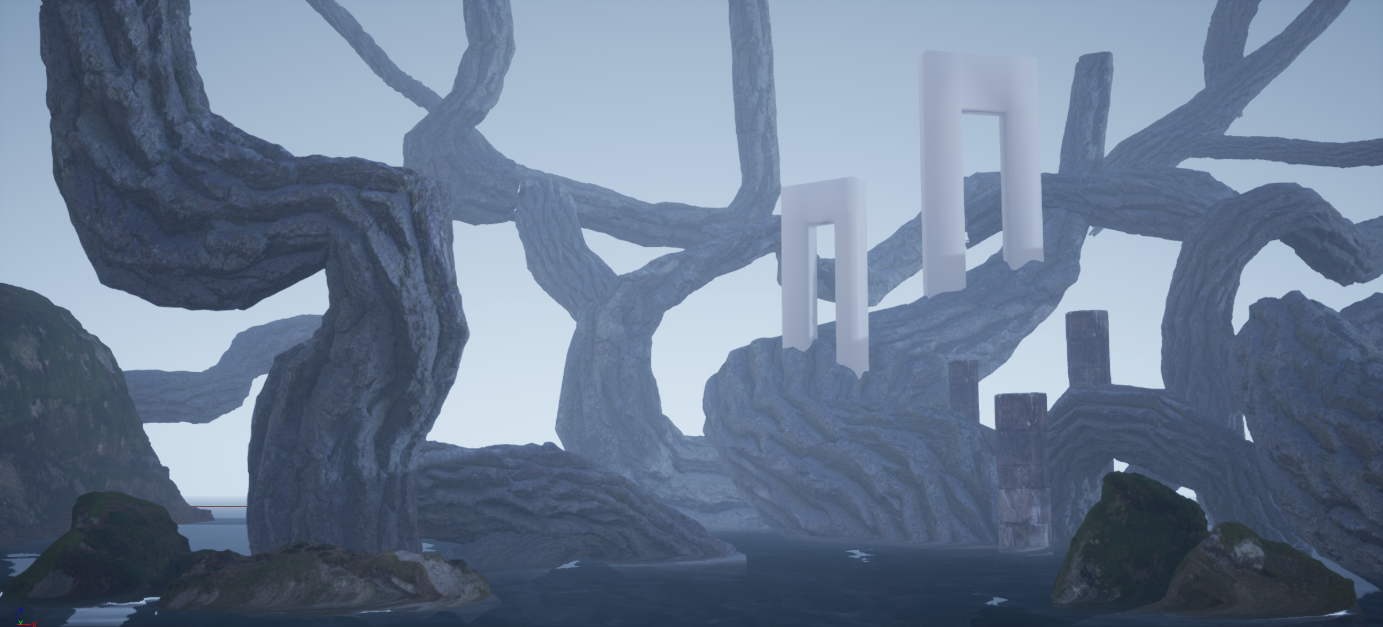
I decided to create this scene when I heard a fellow student mention an assignment he got for his Level Decoration course. They had to pick or make a concept and recreate that scene in Unreal Engine with the main theme being something with old overgrown ruins or buildings. Around that time, I was already looking for a project to learn Unreal, having never used it before since I mainly used Maya and rendered with Arnold. So following that same idea, I picked this artwork by Juan Pablo Rodan. It has all the requirements and made great use of atmosphere, size, lighting and colour. The concept can be broken down into the usual foreground (red), middle ground (pinkish) and background (yellow) elements. It also makes good use of making the trees flow from the middle ground to the background and making everything lead towards the centre focal point, which really appealed to me. Adding all those things up really proves that this was a great concept.

Foreground, Midground and Background

Composition Directional Lines
The only thing that I thought was going to be hard to recreate was the lighting and the foggy mood. Again, at that point I didn’t know any Unreal and was not used to the way lights work (being static, moveable or stationary, having to build lights). After some research with the help of the Unreal documentation, this proved to be much easier than I initially thought.
Story
For me, these gates looked like they could have belonged to some ancient civilization in a magical jungle with huge trees, so getting the scale of the trees right was really important. The concept didn’t add a lot of vegetation to the gates or on those wires, so I decided to add this to make them feel like a part of the forest and to make them feel a bit older. It needed to have the right balance between being old and overgrown while still being clean to read in the final image.
Workflow
My general workflow was going from Maya to Unreal, back to Maya for some small fixing and back into Unreal to test some Megascans materials. Starting out in Maya, I just placed a camera with the right values (this was a process of trial and error, by going back and forth to find the right dimensions), using those same values in Unreal and locking the camera so I wouldn’t have to worry about that again. Giving this camera an image plane with the concept made it easier to align the basic shapes. Of course, these shapes could be refined and re-exported later on.

Blockout
After the blockout, I moved into Unreal and opened Quixel Bridge for a good tree material. I’m usually not a big fan of using premade assets or Megascans since I love modeling and knowing I made everything myself gives me a better feeling. Don’t get me wrong, Megascans are truly amazing, they give very good results really quickly, so I do use them from time to time. Since this project was purely about learning Unreal and I didn’t have the time to spend a couple of weeks sculpting trees, I decided to use them but combine most surface materials to give it my own touch. Once I had the tree surface material, I started looking for assets that could fill in the other spots like the rocks, pillars and stairs. These changed over time depending on how they looked in combination with the other materials. For the swampy water, I used a planar reflection with a water shader on top. The planar reflection gave me the correct reflections while the water shader provided some wavy distortion.
Now the fun part began, making branches and putting leaves everywhere. At first, I thought about using SpeedTree for this. Although, I’ve never used it before but I’ve seen some very good results with it. However since this was a paid program, I quickly abandoned that idea. This is where my journey of making branches began. Actually, it wasn’t as bad as I thought. I just downloaded a couple of empty branch assets from Quixel Bridge and started putting planes around it with a small leaf texture. I started off by making the 2 main branches sticking out around the main lightsource and copying and scaling them around, making some small adjustments as I went on. Scaling them did make the leaves a lot bigger compared to other ones at the same distance from the camera so I changed the UV tiling on these a bit to not only make them smaller but also give the branch a thicker feeling.

Once everything got denser and more packed, it started giving me a foresty feeling which really made me feel like I was going in the right direction. This is when I got into the fog and general atmosphere, I tried some things myself but didn’t quite get the results I wanted. I looked at some tutorials, including this great one by Polygon Academy which quickly taught me the basics of lighting and doing Volumetric Fog in Unreal. Fog is a great way to add depth to the scene and really hides a lot of detail to make the full scene more readable. For this fog, I used a couple of different methods: the main background fog is an atmospheric fog inside of Unreal. To add more fog, I used a combination of starter pack fog emitters and fog sheets with my own moving fog material. Overall placement of these fogsheets and emitters changed a lot while I was doing lighting.

Now, back to the trees. Something I had been ignoring until this point was the moss. I didn’t quite know how to handle this at first since the moss had to have the right texture with the perfect irregular displacement, and had to come out of the tree mesh, on top of the displacement the bark material already gave. For more experienced Unreal users, this would probably be quite obvious, but after some research I used vertex painting for this. It gave me the perfect solution to my problem: being able the paint the moss on top of the bark material while still being influenced by it. So I made my own vertex painting material combining the bark material with a moss surface material. After some tweaking with displacement values I got the perfect patchy moss, but it didn’t feel quite irregular enough. Adding another darker moss material to the lighter one I already had fixed this problem.
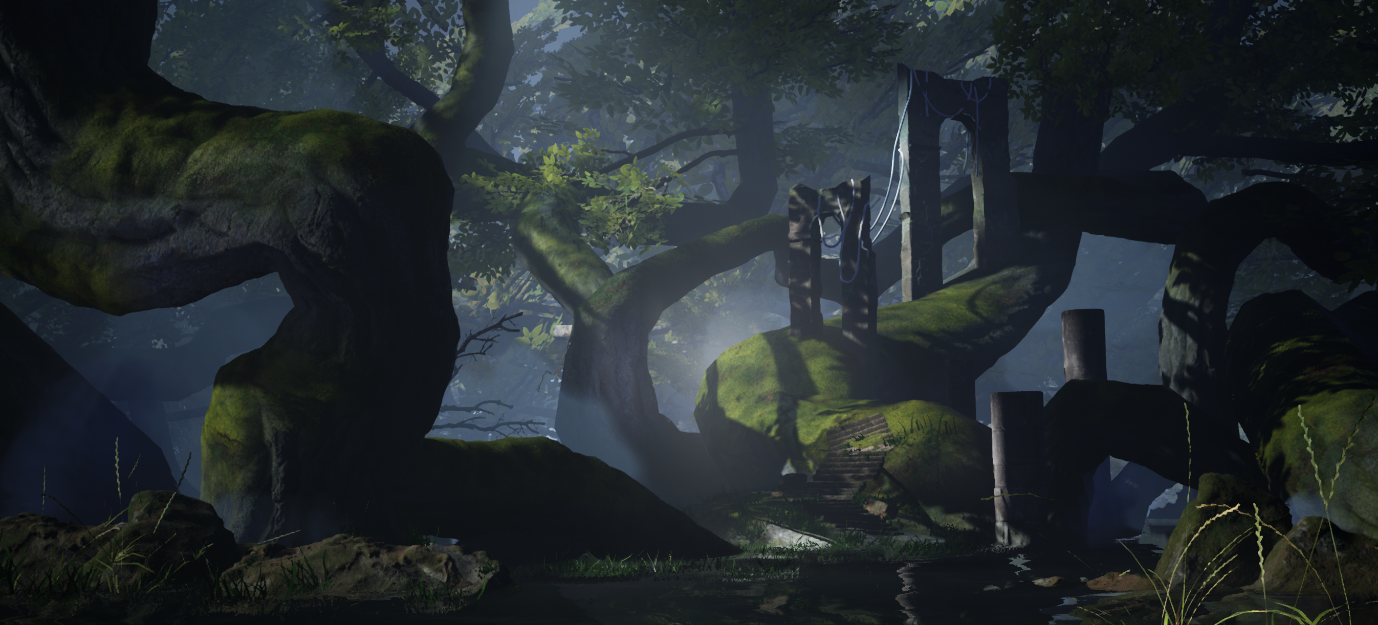
Everything was starting to come together nicely and the only thing left to do now was the lighting and colour grading. I started with the main light beam coming through the forest roof onto the ruins, then I gave every tree the correct highlight, rim light and fill light. Changing the volumetric scattering value on some of these lights also added more atmosphere to the scene.

Final colour corrections were done with the post processing in Unreal. This quickly changed the mood of the overall scene to a cold darker jungle.


Megascans
The full scene only uses 2 main materials that were made from blending different surface materials. The trees use a basic bark material with displacement. To get the moss, I combined 2 moss surfaces to add some irregularity. Then the moss was applied with vertex painting to the bark material, which gave me a lot freedom since I could paint the moss wherever I wanted.
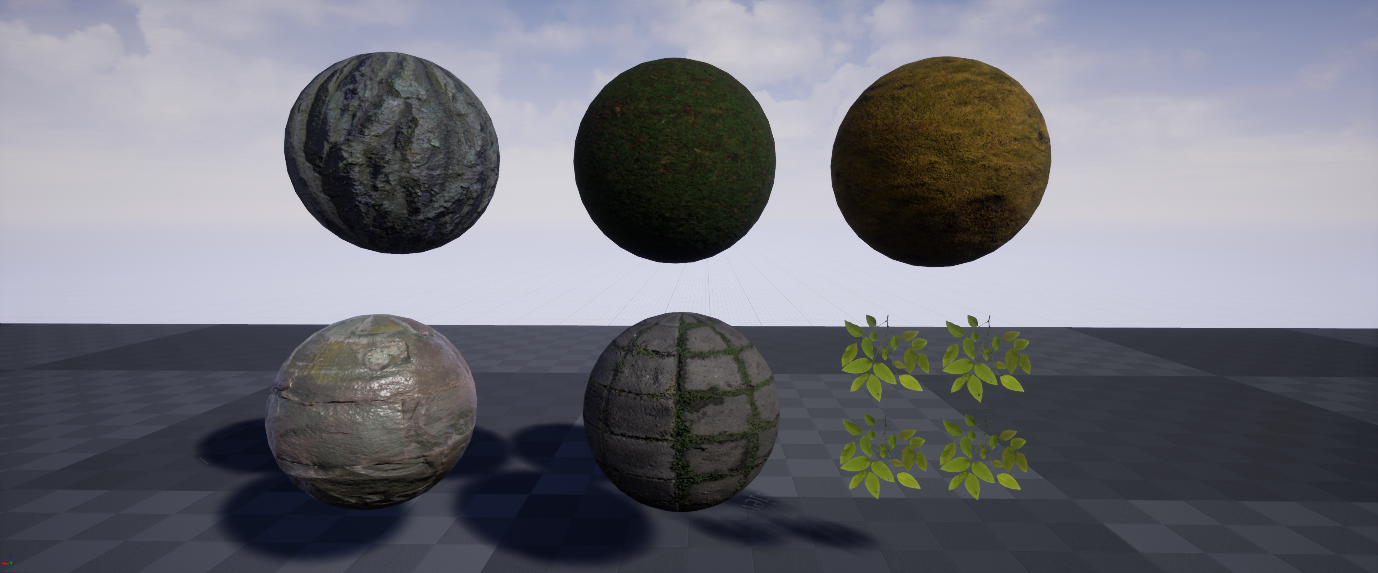
Materials
Getting the right material on the 2 gates was a lot more difficult. I couldn’t seem to find the right material in Quixel Bridge that gave me the right displacement and colour so I also combined 2 surface materials for this.

Megascans
Houdini
I used Houdini for the cables between the 2 gates. I could have just modelled them in Maya but Houdini makes the whole process quicker and makes it easier to make adjustments. After making 2 basic gate shapes, I imported them in Houdini and put a couple of curves above them, resampling those curves to give them more points so they would bend more smoothly.

Houdini Nodes
After importing the gates as a collision mesh and inputting the wires into the wire object, I just had to adjust some settings and run the simulation. Now these wires still needed a thickness, simply dop importing them to only get the wire geometry and putting a polywire on them did the trick. This simulation wasn’t perfect, but cleanup could be done in Maya.
To anyone wanting to learn Houdini, I would say find yourself a good course or teacher. I’m lucky to have a Simulations course at DAE that has taught me the basics of Houdini with destruction, particles, smoke and fluids so this wire setup was quite easy to make. Other good learning sources are Houdini forums such as od|force and CGwiki or just the Houdini documentation and masterclasses. It has a very steep learning curve so finding the right resources and tutorials is a very big help for beginners, not only to learn how to do it but also to learn general workflows and setups.

Houdini Simulation
Inspiration and Feedback
When I’m doing a project, I mostly ask feedback to the people around me who are fellow students, character artists and environment artists. This gives me a general idea of what needs to be fixed first before I move on to the finer details. It’s very easy to get lost in your own work when you’ve been looking at it for hours so I always ask it there is anything obvious that stands out.
I’m also in a couple of Discord servers (Experience Points, Flipped Normals, DiNusty Empire) where I could ask for feedback. However, I generally don’t like posting unfinished artwork in big groups and would rather ask someone directly who has a good understanding of what he of she does and has enough experience to give solid feedback.
These servers do give me a good representation of the level my artworks need to be at and make it easy to compare my work with those of industry professionals and hobbyists. It gives me a clear view of which aspects I need to improve and what I could change to really bring an artwork to the next level. Seeing all those artworks from various artists also gives me a lot of inspiration for future projects. To find new ideas and workflows, I mostly browse Artstation and Pinterest.
Tips and Advice
Don’t get demotivated by how projects look in early phases because a lot can change by just adding 1 thing or changing some colours. If you feel stuck in a certain project and can’t seem to fix it, take a break from it and do something else. Most of the time you’ll come back with a fresh mind, which can help your project a lot. One thing I always try to do with new projects is stepping out of that comfort zone, you’ll learn a lot from doing something you’re not comfortable with and it will improve your skills overall. Learning new things is part of our job so do your research or ask someone who knows more than you do, you can only improve yourself and your artworks with it.
What We Can Look Out For In The Future
More environments and prop modelling!! After Overgrown, I started a new hero prop project, I also have another more stylised environment I need to finish for a project I’m working on with Luna De Groote. Looking onto next year, I’m going to start looking for an internship to end my studies at DAE and work my way up in the industry.

Outro
Stepping out of your comfort zone and learning new software always has benefits. It doesn’t matter if it takes 2 weeks or 4 months to complete something, what does matter are the things you learned during that project and making sure you improve yourself. We all need to start somewhere. Looking out for new resources, workflows and tutorials helps that journey. Eventually you will get there, just keep working and keep learning.