
CATHEDRAL OF THE DEAD - CGMA AND MODULARITY
Nicolas Mendoza serves this massive breakdown of Cathedral of the Dead, the environment he made during his time at CGMA. Read through and explore how he collects reference, create assets, and assembles his scene within Unreal Engine 4. If you are interested in learning more about modularity and the uses of trim-sheets, then this is a must read.
Introduction
My name is Nicolas Mendoza , I’m an Environment Artist from Colombia and I’m currently working as a freelance artist for some indie companies. Before I began my career in game art, I did a Bachelor’s degree in Architecture. After graduation, I began to research about 3D art and I got invested in learning as much as I could. I started watching videos and spending every night doing tons of tutorials. One day I decided to create my own game, Asterion, and publish it on Kickstarter. The campaign was not successful but the learning process gave me the chance to work as a generalist remote position at a small indie company in Spain, where I decided that I wanted to pursue a career as an environment artist.
Ever since then, I have been working as a freelance artist for companies around the world including Japan, USA, and Spain. I still do a lot of courses, watch a bunch of tutorials every day, and I try to be really involved with 3D art Discord communities who have helped me grow as an environment artist.
This scene was a part of a CGMA course I did in summer this year, and I have to say the experience was amazing! After doing a lot of tutorials and courses online I think that CGMA gets the crown for the best course I have ever had. It offers a lot of things that really improve your learning process such as: Live Q/A sessions with your teacher to solve doubts and ask anything about the workflow and industry, weekly feedback where everyone will receive a personal video from your teacher to know your main weakness, see how other people solve problems and resolve your doubts by seeing other people’s feedback, and last but not least an amazing discord server where you can see your classmates projects and receive feedback from them as well. I had the fortune of having Clinton Crumpler as my tutor. He is an amazing, experienced environment artist who has worked on a lot of big projects, and he was a great teacher who guided us to achieve our goals.
Cathedral of the Dead: Breakdown

Shot One

Shot Two

Shot Three
References
My workflow for this scene was a bit different from what I’m used to, especially because of modularity and scale. With that in mind, I started by gathering as many references as possible. My first intention was to have a Victorian-Gothic setting where a ritual took place. I wanted to mix some architectural styles in the process and since it was a lot of information to dig in, I needed a tool that could help me be organised so that I didn’t lose track on later stages.
Pinterest was a great tool for that since it allowed me to create different boards for my ideas in a more organised way. I used the Pinterest plugin for Chrome, which gave me the ability to save any images I found on internet into my boards, and I would be able to access the source link where I found them. For this scene, I created 3 different boards: one for composition and lighting, one for modularity and another one for textures. In this early stage I was mainly focused on the first board, for me it is important that before starting any scene, I get an early macro idea of how the composition and the mood of the scene would be. This will help me establish a mood in the block-out and have a general idea of my final goal before I start to add any other details.
I was inspired by the mood of games like Dark Souls and Bloodborne, I have never created a grim/gloomy scene in the past, and I thought that this would be a great opportunity to challenge myself. I was really impressed with the cathedral of the deep environment when I played through the game so I wanted to look for additional concept art that could relate to this environment in particular. I got the fortune of finding the work of Alana Fletcher, Alexander Sköld and Zhuoxin Ye, who are amazing artists and have the perfect style that I was aiming for.

Composition & Mood Research
As for the other boards, I tried to research how modularity was made for this type of architecture. Not only did I search about similar game art projects where they used modularity, but I also did a research on floor plans and architectural sections of cathedrals to get an idea of scale, proportion and how they were built in the real world.

Cathedral Research
Last but not least, Clinton showed us another great tool we could use. Trello is a pretty nice and free organisational tool that lets you put assignments, checklists, and dates to organise the development of a project. It is pretty easy to use and you can put anything you like to make your development clearer for you. I think this is a must for larger scenes since you will have a lot to do and you need to keep everything clear and organised so that you don’t get lost along the process. I primarily used it to create milestones for the 10 weeks and to keep track of time, so that I could deliver the best result possible before the class ended.

Trello Board
Blockout
The next step was to do a block out of the scene, it was really important in this stage to check for correct measurements and scale, for this use simple shapes, don’t over complicate it remember that you will need to refine the models later. This phase will give you a better idea of the proportions of the scene and of how the assets would be made along the process, it will also help you understand and plan your workflow. It is really important that during your block out you have an idea of how are you going to texture your scene. For bigger scenes like this one you should think how to optimise your time, by creating trims and tileables that would be used later to texture multiple assets. Although it is really difficult to know right away how would you do that, it is a good practice to have a list of them and a small description of how you think they would work, I used Trello for that.

Blockout Pieces
The most important thing is that everything snaps together, this was a bit challenging since this was an architectural environment and there were a lot of complex shapes that needed to be done correctly in order for the assembly to be as smooth as possible. One of the challenges I had was the roof pieces, since they are so complex. This was where I spent most of my time in the block out, and to simplify a lot of the work I used the boolean modifier in Blender. That way I would have a non-destructive way to approach the modelling of the roof.

Blockout in Blender

Blender Grid & Snapping Options
Blender’s grid system was great to align everything with, and to check that every origin and snap point worked correctly. It is really important to set your units accordingly and to always make objects snap to the grid. In my case, I converted the units to centimetres and I scaled the grid to match those units. I also used the new powerful real-time renderer called Eevee, as it helped me play with the lighting in real-time and have a closer look into the scene before putting it inside UE4. I think this is one of the stronger additions of Blender 2.8, as we can finally get a real-time renderer with marmoset capabilities, where you can also play with settings like ambient occlusion and global illumination.
Exporting the Scene to UE4
After I finished doing my blockout it was time to export all the assets into UE4. Before you do any exporting, be sure that all your transformations are reset and that your origin is at the world centre, you can do that with Ctrl-A and apply all the transformations. Also if you want to snap your objects inside the engine using one vertex in particular, you can go to edit mode and use the Ctrl-S function to put your cursor into the vertex selected and then go to Object – Set origin – Origin to 3D Cursor. Remember to always keep your objects’ origin snapped to the grid at 0,0,0.
For the export I used the Blender for Unreal Engine add-on, which is a great script by BLURAVEN that will let you speed up the process of your export. After I had exported every object inside the engine, it was time to recreate the same scene in Unreal. This is a pretty straight forward process, all you have to do is use the snap functions in Unreal to place all the elements correctly in your scene. This part was a bit challenging for me because I didn’t plan the position of the pivot points that well, so make sure that all the objects are snapping correctly inside the 3D program before exporting, so that you don’t have any issues later on.

Blockout in Unreal Engine 4
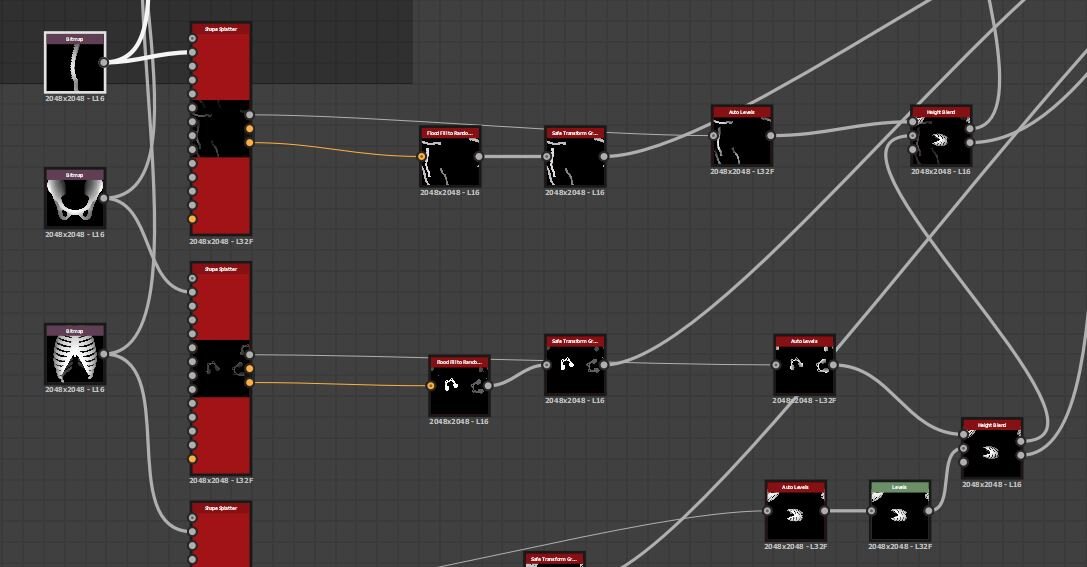
Modularity and Asset Recognition
After everything was setup correctly inside the engine it was time to plan how the modelling and texturing process would work. I started by separating the assets into 3 categories:
Unique: assets that needed a unique UV space and won’t be using tillable textures
Trim: assets that will be using 1 or more Trim textures
Hybrid: assets that will have their own UV space but will also use trims on their texturing pass.
After everything was correctly separated, I started looking for references that gave me an idea of how to approach the texturing of my assets. I looked for real life references of churches and other Gothic and Victorian environments, to see how they were built. Cathedrals used a lot of ornaments and repetitive shapes on their construction so I wanted to start with that.

Unique Meshes

Trim Meshes

Tileable UV Meshes
Trim Assets: Wood & Stone
Before I started working I laid out some texel density rules for my environment. Since this would be a third person game, I used a 5.12px/cm density for my assets. Based on that, I created some layouts for my trims inside Photoshop, which would give me an idea of how to achieve the desired texel density. If you want to know more about texel density there is a great tutorial by Leonardo Lezzi that you should check out.
My intention with the texturing pass was to have a lot of roughness variation throughout the scene, and to make that possible I visited my references again. I wanted to capture the temporality and the different reforms that cathedrals have had throughout time. The best references I had was from Victorian cathedrals, where they used different materials to accomplish a unique Gothic style. With that in mind I started by creating a stone trim and a wood trim that would be used for the structure, the side panelling and other small elements on the scene.

Wood & Stone Trims
The process of these textures was a bit different since I wanted to add a lot of storytelling to it, I started by modelling and sculpting some thematic shapes inside Blender and ZBrush that will work as carvings and ornaments on the wood trim texture. After that I exported them as alphas and started working inside Substance Designer. The creation of the graph was pretty straight forward, I used the tile sampler and the curve node with a small blur to get some bevels on the shape and then I created different types of ornaments and panels for my scene. I also used JRO ornament pack since it has a lot of different shapes and helped me speed up the development process.

For the stone trim I wanted to have a rough surface with metallic ornaments on it, I again used the JRO pack to achieve what I wanted, and I also added fractures and holes into the stone so that I had a bit of wear applied. One tip I would like to give is to keep the details as subtle as possible, don’t make them too big as it will make the tilling more noticeable. One challenge of making this textures is acknowledging that every material wears different. Since I had more than one material in my graph, I made some masks to isolate the different materials and give them the wear effect I wanted.
After the textures were done I started refining my modelling. I decided to use bevels and add edge loops instead of using the bevels of my normal maps. This would help me get the trims right into my assets and prevent sharper edges for my geometry. The weighted normal modifier in Blender was awesome to avoid harsh edges into my models and provide a much cleaner smoothing in the mesh. It is important to notice that I maintain the proportions and measures of the blockout meshes on this stage as this would allow me to re-import the assets back in unreal without having any snapping issues.

Blockout Mesh and Refined Mesh
Then, I started mapping my UVs into the trims I made, to achieve the texel density that I previously established, I used a Blender add-on called Texel Density Checker, it is an awesome add-on that you can grab for free. It works by selecting your UV islands and scaling them up based on your texture size, texel density and the scale of your object. This add-on helped me maintain coherency through all my assets and helped me speed up the process of my texturing.

Texel Density Checker Add-On
Trim Assets: Windows & Stained Glass
For the windows I followed two great tutorials. The first one is an awesome tutorial by Martin de Graaf, who explains in detail the process of using the curve node inside substance designer to create detailed ornaments and complex designs. I really recommend this tutorial for any ornament and architectural modelling. I have applied this knowledge not only on the windows but also on a lot of my other textures.

One of the coolest tricks I learned was to use a combination of the Levels, Curve, and Blur HQ Grayscale nodes to get clean and smooth edges.

Smooth, Clean Edge Node Workflow
The next one is the stained glass tutorial by Vincent Dérozier. This one helped me a lot in the process by showing me how to create complex shapes and patterns by only using images as a base. It is amazing and you can also download it for free! To get my base images I created some simple shapes inside Substance Designer and applied them to the graph, then after that was done I exported my textures into Substance Painter where I added emission and some dirt to the texture.

After that I traced some simple shapes using the curve modifier inside Blender to create the frames of the windows, and created a simple plane where I would map the window trim texture as I did with previous assets.
Trim Assets: Fabric
For the fabric I did a simple graph with some noises inside designer, and I applied some of the ornaments and additional shapes I did in Photoshop to get more symbolic elements into the scene. Like the previous ones, I organised the different trims of my cloth elements using a previous layout in Photoshop and I masked my shapes to have some colour and material variations.

For the cloth elements I used Marvelous Designer, it was a fairly simple process, I created some planes and then I used the pin tool to add some tension to the cloth. Then I did a decimated version inside Blender to get an optimised asset without losing the original silhouette. Marvelous automatically generates planar UVs that I can use to map my trims into the asset. This way the texturing process is really easy to do, and I can iterate my textures easily if needed.

Marvelous Designer Cloth Simulation
Tileables
All my tileables here are made inside substance designer using pretty standard methods. I strongly recommend seeing the work of Josh Lynch and Daniel Thiger, their tutorials are amazing and they helped me understand most of the nodes that designer has. In this article, I will highlight two of my graphs which I think are the most complex ones.

Skeleton Tileable

For the skeleton piles I decided to use the same method of creating alphas that I used before for my trim texture, but this time I used the height blend node to create different layers for my shapes. The node setup is really simple, I used a tile sampler with low random position and rotation for each of the bones types, then I blended it all using the height blend node. It is really important to keep the position random value as low as possible to prevent shape overlapping. To get the height right, keep an eye on the greyscale values of your nodes. I strongly recommend to try and have different intensities for each layer so that the shapes don’t overlap.
When the height map was done, it was time to set up my albedo graph. For this graph I wanted to have yellow and red tones to show that the bones have been inside the environment for a while. To do that I created different colour gradients by using the eyedropper on references that I found on the internet. Another cool tip is to use grunge maps and create a colour gradient based on their greyscale values.
To add some 3D to the pile I did two additional things. The first one was to add actual 3D models into the pile, which creates a more interesting silhouette for them, allowing me to break up the simple shapes and give more depth to the tilling texture. One thing that I wanted to do was to blend the bones as much as possible into the tiling texture. To achieve that, what I did was to bring the 3D models inside Substance Designer and by baking them, that way I will get textures that I could use to apply the colour and the details that my original graph had.

Skull Piles
I also created a simple tessellation material inside Unreal so that the bones have more volume and depth. A really important tip in here is to always blur the height map a little bit Inside Designer, as this will prevent some artifacts when the texture is displaced.

Tesselation Material
Ornamental Tile Flooring

Ornamental Tile Flooring
I wanted to create an ornamented tiling texture that resembles the one used in most cathedrals. Again, my intention was to create a version that would give theme and storytelling to my environment. I first created a simple tile material to establish height and shape, and then I created a 2D pattern inside Designer with a colour ID mask to put it on top of my material.

Colour Nodes
For creating the 2D shapes I used two different methods. One was to use some of the alphas I have been using with the level nodes to get a flat shape. The other one was to create some functions that will help iterate on the shapes easily. Kyle Horwood’s Tutorial explains this process way better than I, so I really recommend to check it out.

Creating 2D Shapes
Uniques
For my uniques, I used the blockout props that I have already made and then I started to create the low and high poly versions inside Blender. I kept my assets with a poly count as close as possible to 5k to optimise the geometry of my assets. Again, the texel density add-on was great to get my UVs right, and this time I used the UVpackmaster add-on, to optimise my UVs. This add-on is great and has a lot of options, its only downside is that it is a bit expensive, but it saves a lot of time and lets you optimise your UV space.
Also try to optimise your workflow. For example, in the chandelier, I created alpha cards for the chains and overlapped the UV islands of the objects that repeated in the asset. This allowed me to save time on the baking and texturing pass, and help me optimise my UV space to get a nice resolution for my textures. Remember that you can always add details to break this repetition through vertex painting inside the engine, I will talk about that later on this article.

UV Packmaster Add-On
After that, I baked them inside Marmoset and then used Painter to texture the assets. The process for each unique asset is more time consuming than doing a trim one, hence why I kept their count as low as possible for the environment. Marmoset has a great tutorial that explains this baking process that you can find here.
Hero Prop
In the concept phase for the cathedral I originally had a small altar that would serve as my focal point for the environment, but I started to realise that this was not enough. Clinton gave me an awesome idea to add a statue to my composition, that way I would have a much clearer focal point in my environment. Even though I was a bit scared to do the statue, since my anatomy knowledge is pretty limited, I still wanted to challenge myself into doing it.

I intended to create an angel of death, I started by gathering a lot of references of how death was represented throughout history and I found a sculpture inside CGtrader made by the user TheTNR that pretty much was exactly what I was looking for. I still wanted to do my own thing, so to add a darker tone, I changed the human figure with a cloaked one, that way I would not have to do the face and it would help me speed up the sculpting process.

Sculpture
I first began by putting a skeleton inside Marvelous Designer and try to simulate my cloth using the skeleton as the base avatar. This didn’t work because the skeleton had too many holes. What I did instead was to use a base female model on Marvelous. It gave me a good result but the shapes were too thick for what I was looking for. So, what I end up doing was a hybrid model of the two meshes by cutting the arms and the head of the female model and putting in the skeleton parts instead, this gave me the result I was looking for.

Hybrid Mesh for Marvelous Simulation
Another thing that’s cool inside Marvelous is that you can import an FBX with animations and poses, and the program will do another simulation of the cloth based on the new position of the avatar. So what I did to get the pose I wanted, was bring the original simulated avatar into Blender, rig it really quickly and easily by using the Rigify add-on, and then export the FBX back into Marvelous.

Simulated Cloak in Two Poses
After the simulation part was done, I brought the model back to ZBrush to start working on the details for the cloak. I mainly used the brush Drapery and Foldings that I found on ZbrushGuides for this, as it really helped me accentuate the folding of the cloth, giving it a traditional sculpted look.

Sculpting the Cloth in ZBrush
After the cloak was done it was time to move onto the wings. I started by trying a lot of different workflows to see which one could work better for the pipeline. The best solution that I found was to make low poly objects to get a block out of the wings and then, using dynamesh, join them together to start with the details. After the model as done I decimated the parts, UV mapped them and joined all the UV islands in a single material before I baked them in marmoset.

Sculpted Pieces
Vertex Painting, Decals and Breaking the Tiling
After I finished my first texture pass, it was time to create the textures that I would use to vertex paint my environment. Vertex painting worked well for me as it helped not only to add more storytelling to my environment, but also to break the repetition of the tileables and trim textures that I had been using.

To make them blend as much as I could, I used the graphs I have previously done in the first texture pass to create new destructed versions. Creating a workflow where I could use previously created assets allowed me to have a closer blending with the original texturing pass. For that reason, it is really important to always keep your files as organised as possible, that way if you want to come back and create new assets based on the original files, you won’t spend that much time figuring out how to modify them. Also, remember that you can always modify your colour values inside Unreal by double clicking the texture, or by creating some saturation nodes inside your material. This way you will have more control over the blending of your textures.
To check if was doing my blending correctly, I used the buffer visualisation inside Unreal for the base colour, this way I can see if the saturation or hue are off the mark.

Base Colour Visualisation Viewmode in Unreal
Buffer Visualisations are great tools to see how optimised is your scene, I usually put a 90 FPS mark and try to keep it as close as possible to that. Although if this is a personal piece, I always try to work like if it was a work assignment. That being said, always remember that quality comes first, so don’t be too attached to optimisation.
To give more storytelling to my environment, I also added 3 different decals to the scene. Although decals are really fun and easy to use, beware that they consume a lot of resources, so try to keep it simple and only use them when necessary. To check how complex your decal is you can use the buffer visualisation mode inside Unreal to see how everything is working. In my case, I use the decals to add details that I could not do with the vertex painting. I used blood splatters and a ground damaged decal to break the tiling of my floor and give more character to it.

Decal Usage on the Floor
Lighting and Composition
Interior lighting was a bit difficult for me since I had never done any previously. It is very difficult to not get carried away and start adding a lot of lights into the scene, but keep in mind that the more lights you have, the longer your baking would be, and that is not optimal since you will lose a lot of time without doing anything. One thing that helped me was that I already had an idea of how the lighting was going to be from the block out. So what I did was some preview light quality bakes, where I would start adding and removing lights to get quick results before doing the final bake. To speed up the process, I also created blueprints of the assets that contained lights, this allowed me to make quick changes to the scene without having to go and change each individual asset separately.

Candle Blueprint with a Point Light Attached
The light should always be part of your composition and should guide the player’s eye to interesting points in your scene. My initial idea was to put all the attention on the statue, but as I started experimenting with it, I realised it created some nice composition lines in a shape of a cross, so, it became another symbolic element in my scene.

Scene Composition
For the final bake I increased the bounces of the skylight and indirect light, so that the light would bounce everywhere, preventing me from having pure black areas in the environment. It is really important to do this subtlety as you don’t want to end up washing out your environment. Also keep in mind that increasing the bounces won’t increase your build times, so feel free to increase the number as you see fit. I also increased the indirect lighting quality to have more accurate results.
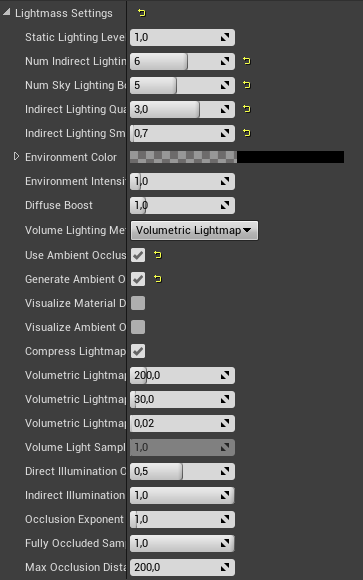
Lightmass Settings
Post-Processing and VFX
To finish the scene, I started by messing around with the settings of the post-processing stack. I created a LUT inside Photoshop to modify my colour values and give the scene a colour grading pass. I also modified my ambient occlusion to get more interesting shadows that would help me outline the silhouette of my assets. Finally, I added some sphere reflection capture elements into my scene, and I increased the quality of my screen space reflections, that way I would have more accurate reflections and give the PBR materials a more realistic look.
To push my details a bit more, I created a post-process sharpening material, by following Ervin Jesse's tutorial. This is a great way to accentuate your edges and give more visibility to the details of your textures. One thing though is try to use it in a very subtle way, otherwise it can get pretty noisy.
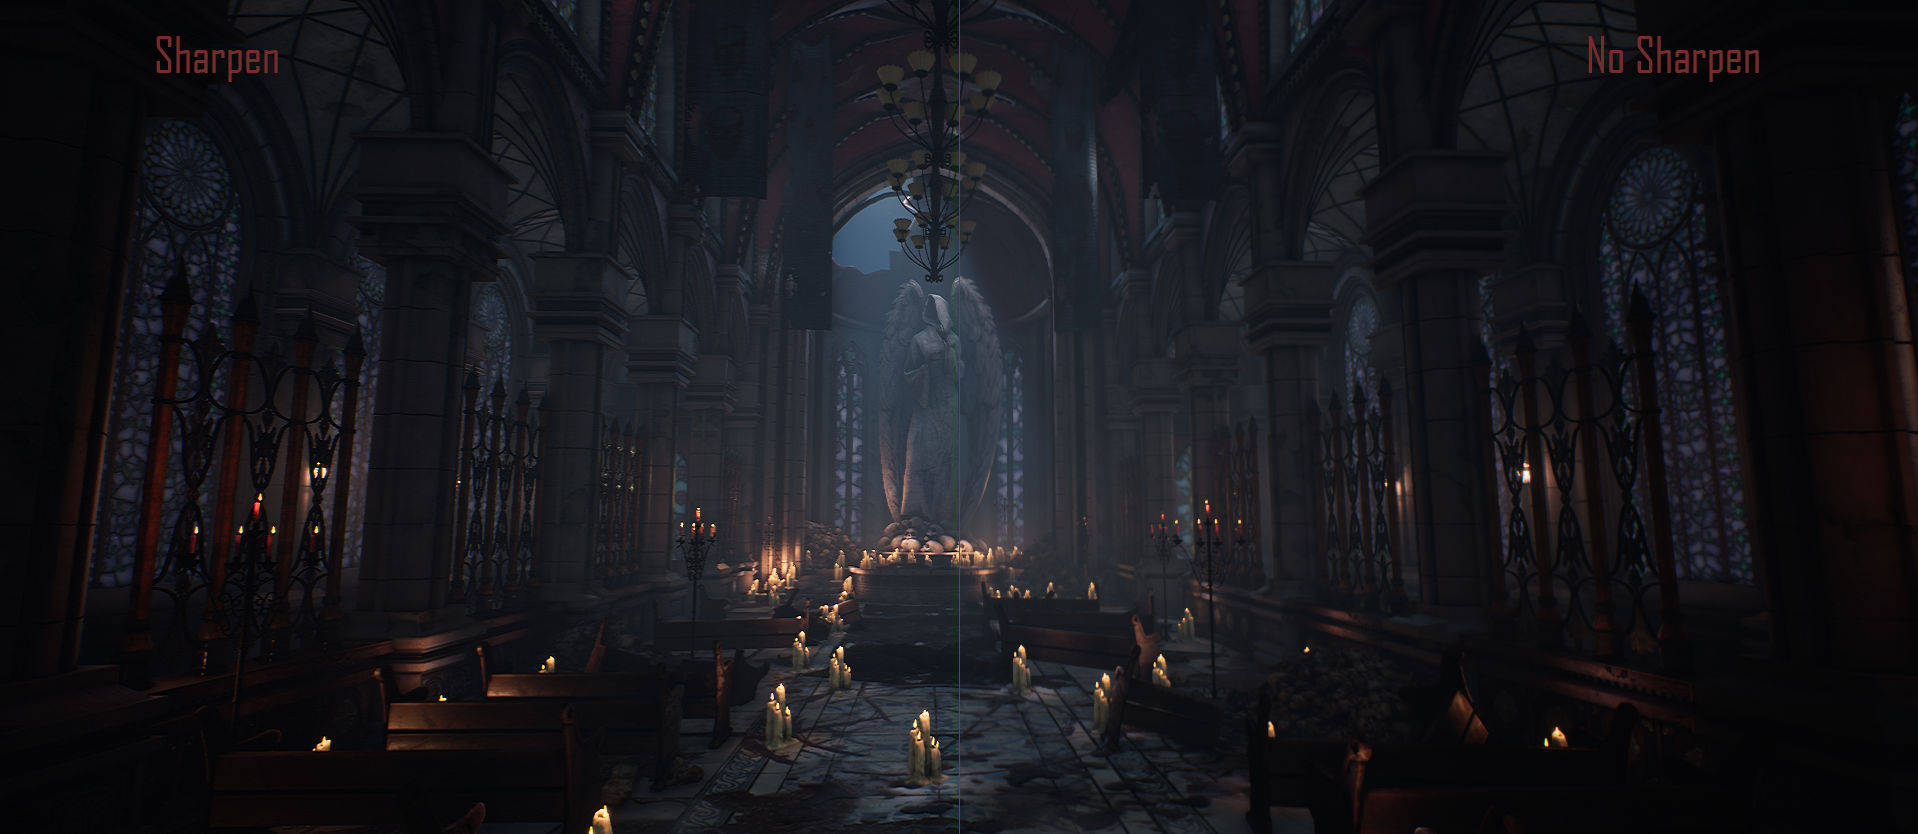
Post-Process Sharpen Comparison
For the VFX I added a small dust particle system and a fog plane in some areas. VFX are not my forte, so I took them from the Unreal particle project and then I modified them just a little to make sure that they worked in my scene.

Scene VFX Demonstration
Finally, I was inspired by how the candles looked inside Dark Souls, but I was really scared of spending too much resources on them. So what I did, was create a simple world offset material that would bend my flames in different directions using 3 values. To prevent the flames moving weirdly, I created a simple vertex paint option where I would paint the base preventing it from moving from its original spot. This helped me optimise the scene since there were a lot of candles, and gave the asset a subtle movement at the end.

Flame Movement Material
Final thoughts on CGMA
I have learned a lot in this course and I really recommend it! It showed me a lot of technical and artistic approaches that I have never done in the past. Being able to understand and use trim textures helped me speed up the process of creating this scene, but it also allowed me to understand the workflow behind creating complex environments. My two biggest recommendations for anyone who is planning on taking this class would be: Always do your assignments in time, every weekly feedback will make your scene stronger, so don’t miss the opportunity and work hard. Ask anything that you want to your instructor. Don’t be afraid, everyone has doubts and you are all in the same course, so even if you think your question is dumb or pointless, just ask it and resolve your doubt.
Afterword
Whenever a challenge is in front of you just… take it! It is unbelievable how much can you learn just from getting out of your comfort zone and try to do things you have never done in the past. One thing I forgot to mention, and I think it is one of the most important subjects is to always get feedback. I cannot stress enough how important it is to look for other people critiques and opinions. Showing your art to other people can be rough, especially if you get strong critiques on something you have been working on for a lot of time, but be humble! Accepting critiques and improving on your work is one of the most important skills an artist should have. There are a lot of discord communities you can join to get amazing feedback, help other people and keep learning. I will name a few but there are a lot more: No More Grid, The Dinusty Empire, Handpainter’s Guild and Stylized Station.
I do hope that this article helped you. Thank you for reading so far and thank you Experience Points for this opportunity!