
Seasonal Storytelling in a baroque bedroom
Tuur gives us an incredible breakdown on his Baroque Bedroom and details how he created the ornate patterns, weaved the carpet and masterfully told a story through his set dressing and materials by crafting everything to focus around the 4 seasons of earth depending on where they are in the room.
My name is Tuur, I am an Environment Artist with a strong focus on creating materials. I recently graduated with his environment from the University of Arts (HKU) in the Netherlands with a degree in Game Art.
Before I started my studies at HKU, I was experimenting with 3d programmes and creating environments in UDK. I was also creating a small game for fun with some friends, which is when I was introduced to programming as well.
In my second year at university I was focusing on Environment Art, which got me my internship at Turtleneck Studios. It was an exciting time to work on Rite of Ilk and seeing the incredible art the team and previous interns had made. In my spare time I started to experiment with Substance Designer, which led to my fascination about material art and the inspiration of this project.

Inspiration
While studying at the HKU I started to grow an interest for baroque architecture, but knew that I wouldn’t be able to create a full environment in such a detailed style. That was until I created my Indian wood panel, which included several hand painted heightmap ornaments. From there I started to develop a new workflow that allowed me to create complicated ornaments using an efficient workflow.
My main focus with this project was to tell a story through textures and efficiently create baroque ornaments. Therefore, I wanted to use simple shapes and put the focus on the materials. One of the biggest inspirations during this project was De Salon de la Princesse located at Hotel de Soubise in Paris. The room contains a lot of very simple shapes and gets all its details from the ornaments. This provided me to focus primarily on creating the materials.

References
Storytelling
In order to tell a story in my materials I chose to visualise the Abduction of Persephone by Hades, from Greek mythology. In the Baroque period, most paintings and sculptures were inspired by Greek myths as well as the architecture from that time.
In order to visually tell the myth, I decided to use symbolism. The appearance of day-lilies resemble Persephone. Since she has the power to grow vegetation, I wanted the day-lilies to grow from a small bud to full grown flower. The pomegranate represents Hades. When Persephone ate the seeds of a pomegranate, she was doomed to spend half of the year in the underworld. This led to the forthcoming of the seasons; the vegetation on earth starts to wither as she goes to the underworld and the vegetation comes to bloom as she comes back to earth.
The room itself is divided, similarly to the story, by the seasons. Spring and Summer represents Persephone as a character, while Autumn and Winter represent her abduction by Hades.
The references I gathered came from a variety of sources, including books; The Elements of Style by Stephen Calloway, The Architecture of Europe by Doreen Yarwood and Ornaments by Alexander Speltz. And of course a lot of references came from Google and Pinterest.
For each ornament I create in my workflow, I use one of three techniques. For ornaments that have simple shapes (hard surface ornaments) I use Substance Designer, ornaments that have organic shapes, such as leaves, I create in Photoshop and for flower ornament I use Maya.
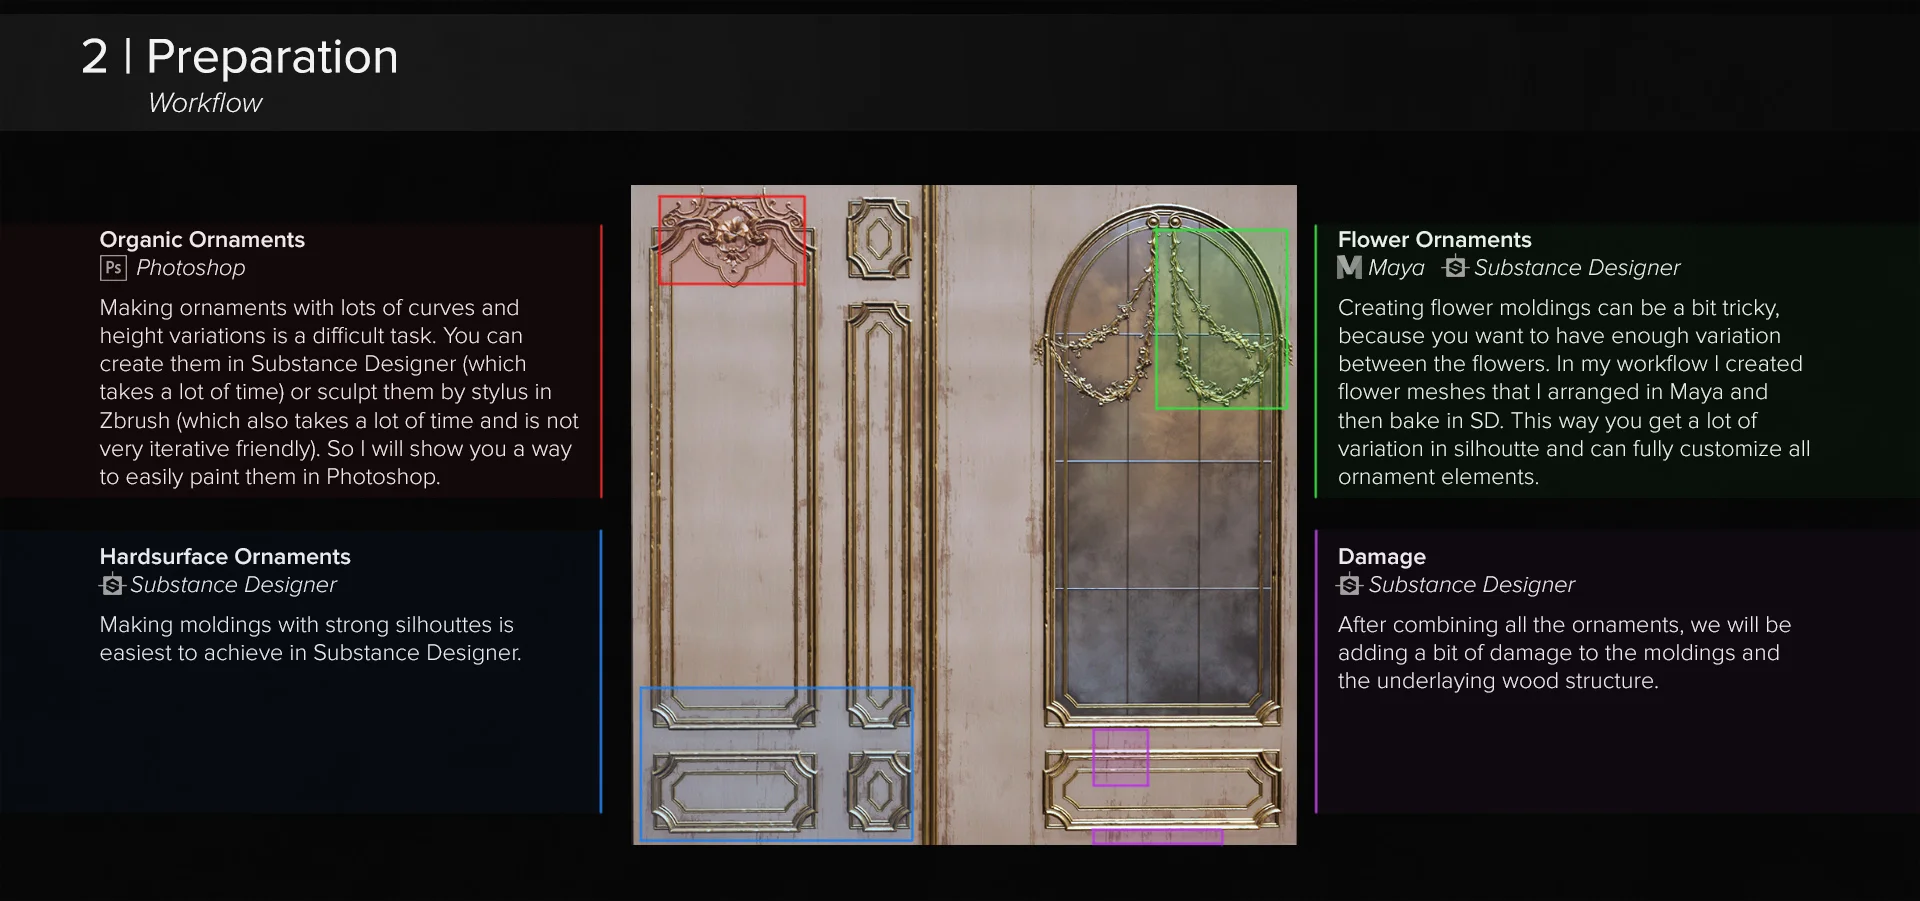
When I was experimenting at the start of the project, I tried to sculpt some ornaments in Zbrush. What I found was that it took a lot of time to create the ornaments that way. The same was also true for creating complex ornaments in Substance Designer. That is why I decided to use Photoshop. It was very simple to paint the heightmaps and you can also export a simple line sketch to check if the pattern you want to create works in the final material.
Ornaments with Curves

These moldings are created using curves in Substance Designer. Daniel Thiger has made a very nice node for this as well which you can find here. The process is actually quite simple. You create a shape and use the bevel node to create a gradient from the edges to the centre. The curve node then uses that gradient and manipulates it to form a relief. I also use this technique to make the vase for the carpet and the paintings.
Organic Ornaments with Photoshop
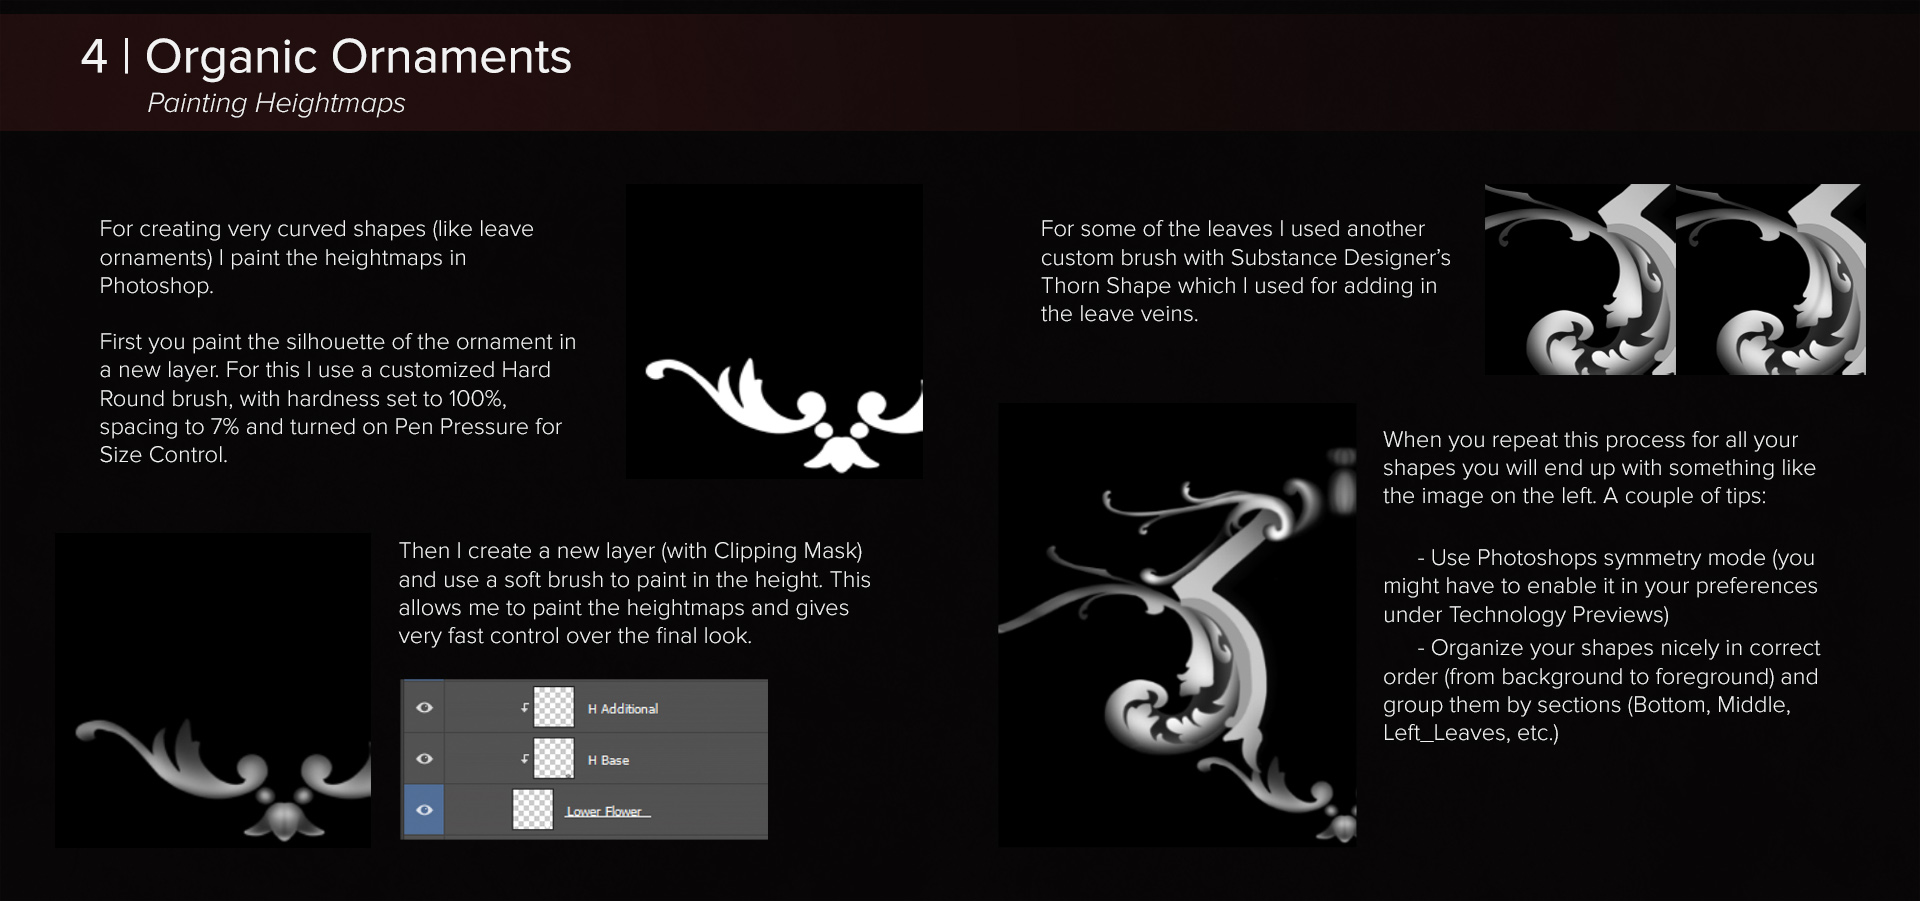
This technique looks much more complicated than it actually is. You simply paint a shape with a hard brush. Then in a second layer, set to clipping mask, and paint in the height using a soft brush. I really came to like this workflow, because it is really fast. You can also export individual elements and use them in other materials as well.
Other usages
This material was used as a trimsheet on all the walls and doorways. The technique description in the tutorial was used for nearly all assets, including the ceiling, paintings, carpet, chair and the bed.
You can find the substance graph and the full tutorial here for free.
Creating the Carpet
The carpet was creating in three steps; creating the heightmap, converting to a carpet material and the implementation in UE4.

Similar to the workflow I explained in my Baroque Ornament Tutorial, I assembled the different ornaments using the three techniques. The first pass is exclusively done in Substance Designer. The second pass is also done in Substance Designer, but some of the smaller complex elements are painted using the Photoshop method. You can see this more clearly in the vase process below. In the last pass I arranged the flowers in Maya and then baked (including a colour map from Mesh to separate the leaves, flowers and branches when colouring) and combined them with the other heightmaps.

Converting To a Carpet Material

When all the heightmaps are combined, I run the result through a Shadow, Highlight and Ambient Occlusion node. The output is used to add some depth when colouring the individual elements. After that I overlay some of the Ambient Occlusion and shadows.
To create the carpet material I used a Tile Sampler (colour) to place all the tufts. Using a Normal map from the height map in the first step, you can warp them according to the pattern by inserting it into the vector input. You can also use the colour input to create a more realistic feel, since each tuft would realistically be made of one colour.
Implementation in UE4

The material in Unreal uses three techniques. The first one is Parallax Occlusion Mapping, to create some height. Make sure to set the min-max steps to a very low value, or use the BumpOffset, to save performance. For the long side I used a trimsheet on the second UV channel, which helps to give it a vintage look. Lastly, I added the FuzzyShading node in the BaseColor to make it look more soft.
Seasonal Storytelling
The placement for the assets came from the story. In the environment I show each season as part of the story.
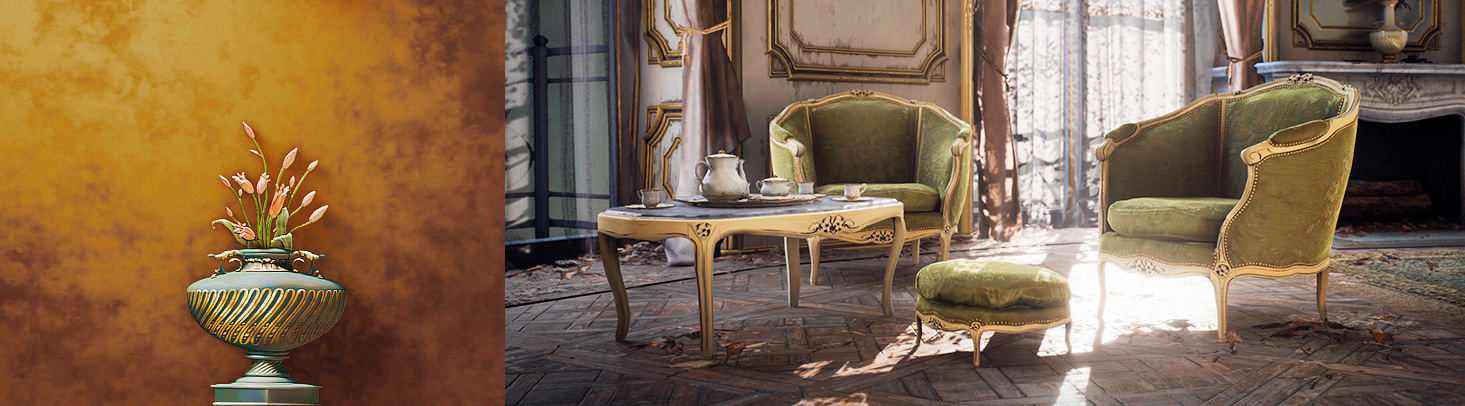
Spring
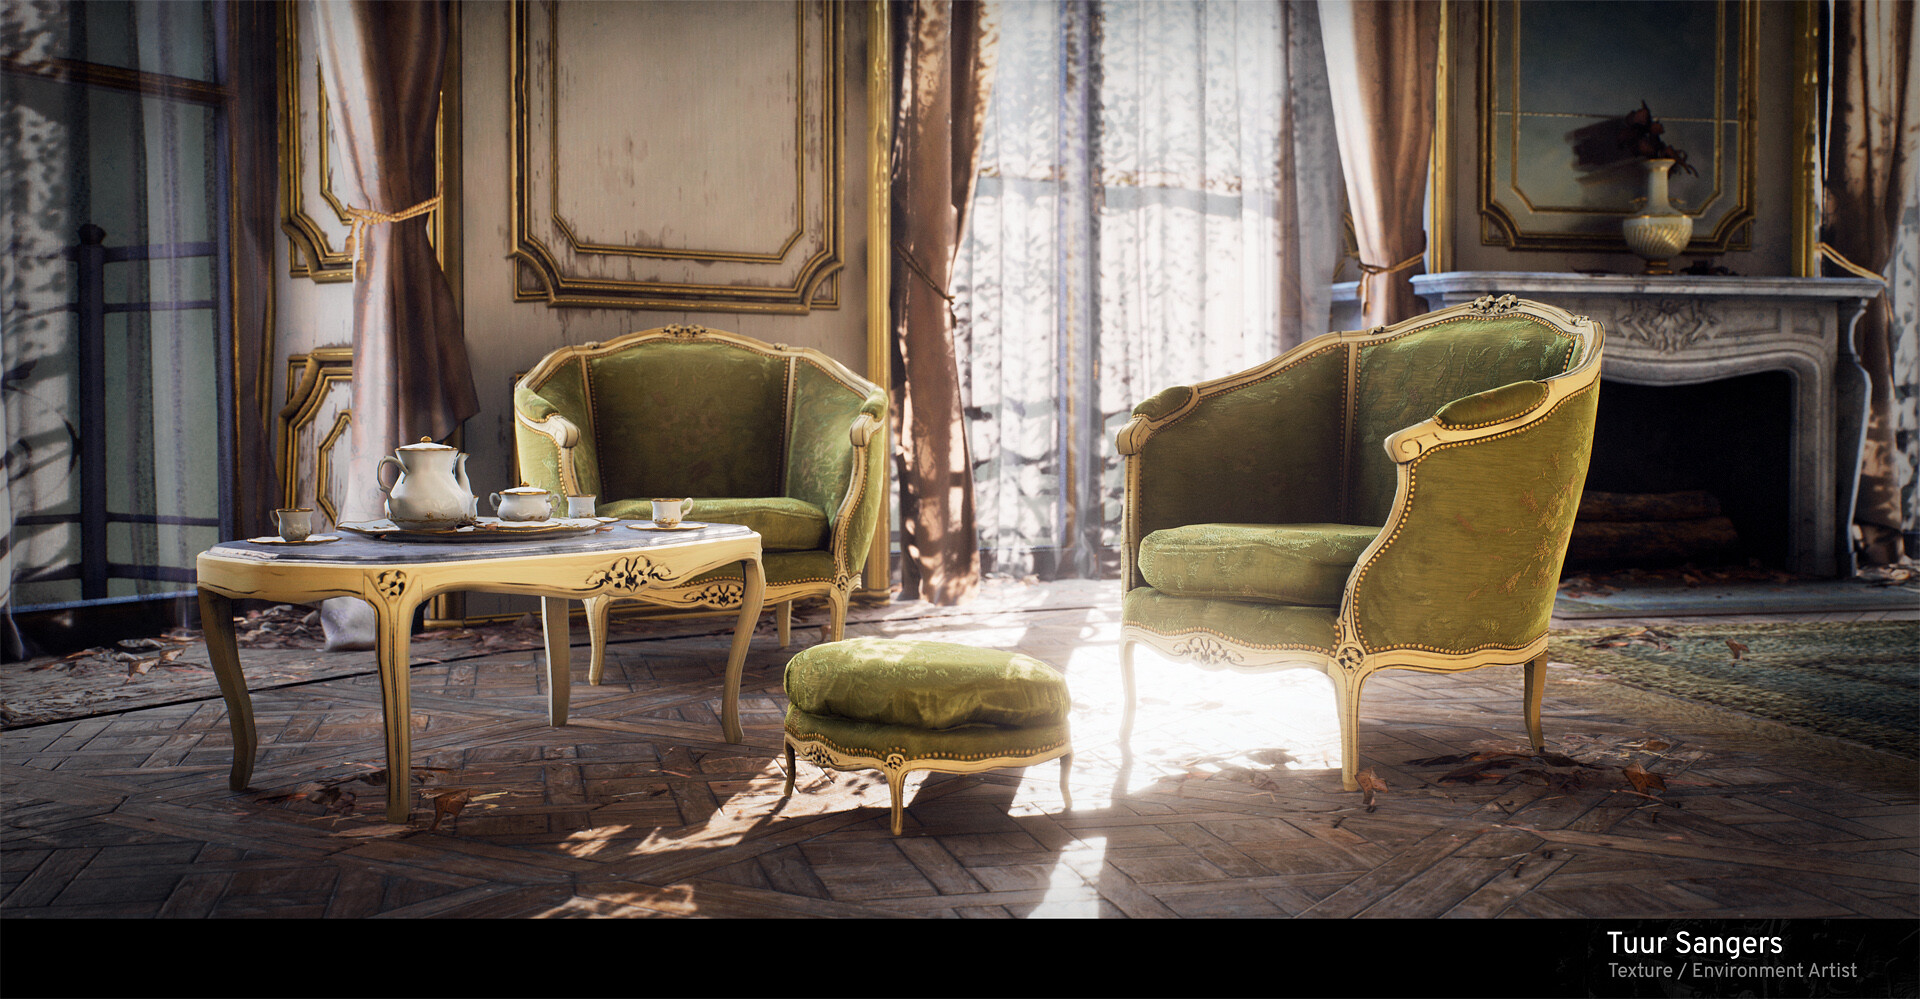
Near the entrance of the room is a cozy corner with some armchairs and a tea set. The flower bouquet paintings above and the fabric of the chairs show budded flowers, a direct reference to the start of spring.

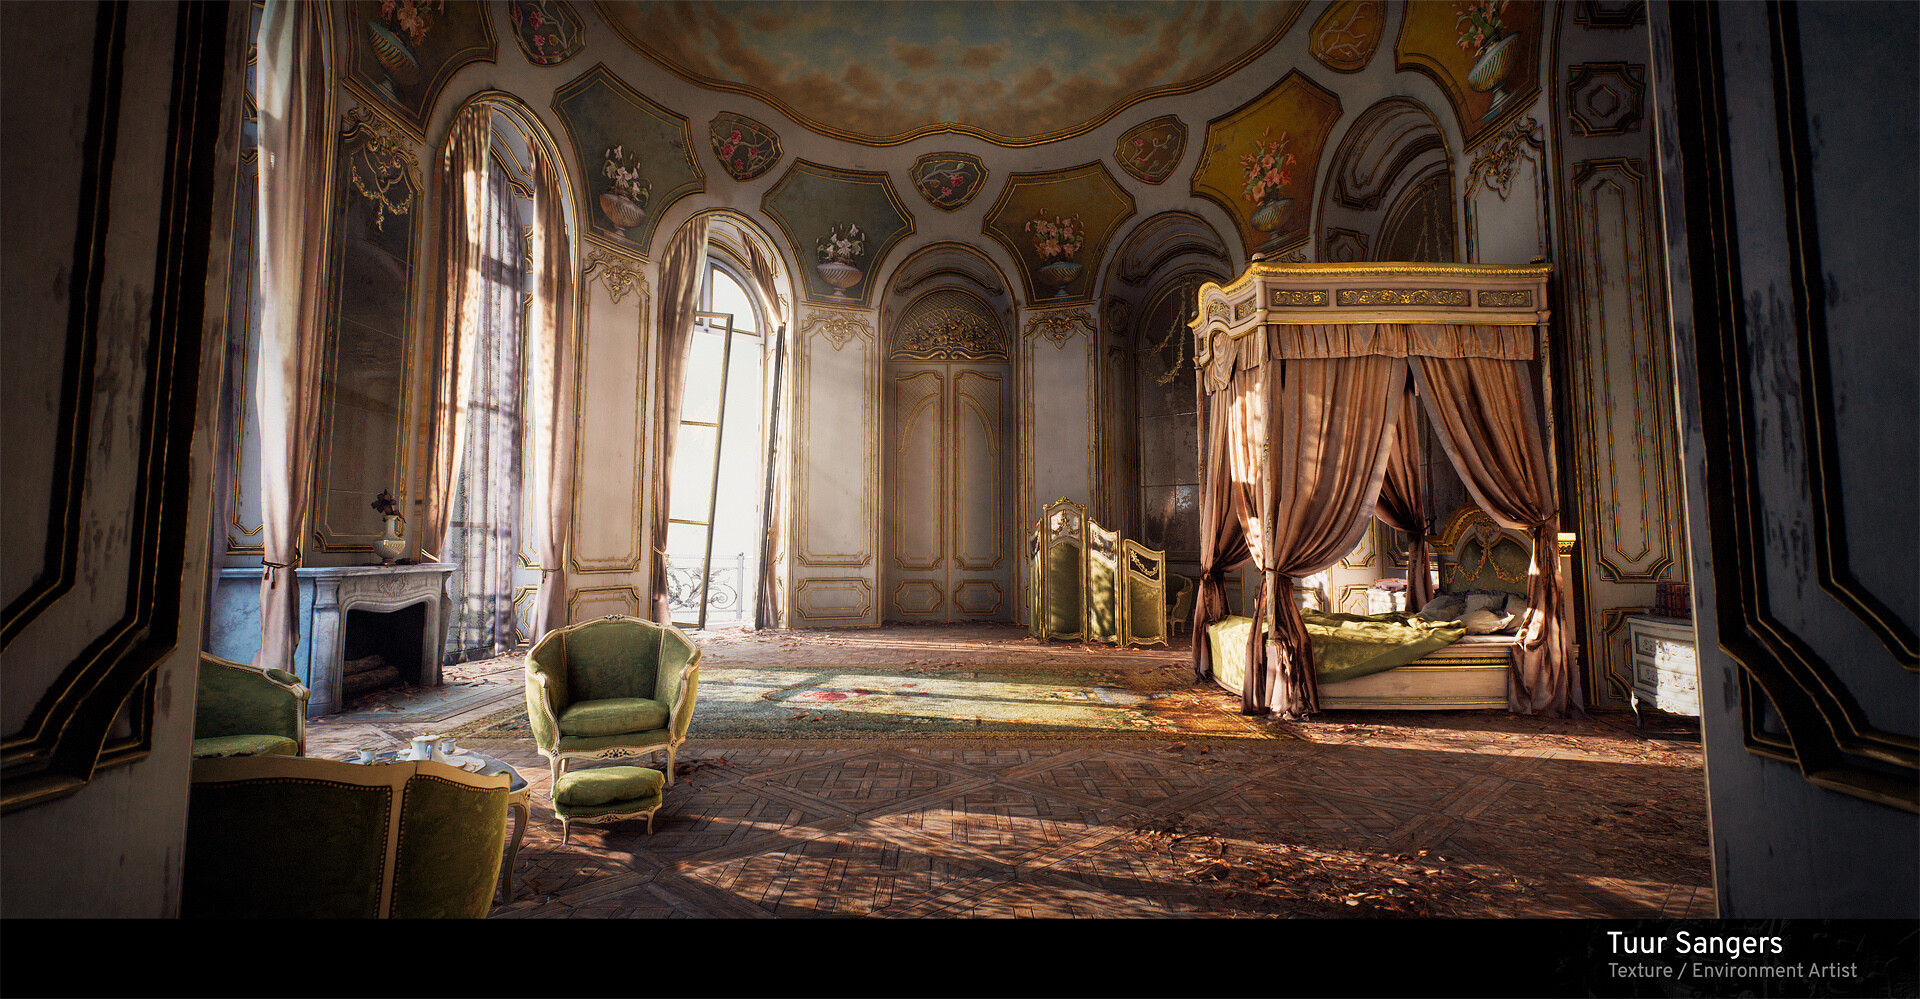
Summer
Then the bed represents summer, this is the hero prop that depicts who she is as a character. The columns at each corner and the cornice show day-lilies growing from buds to full grown flowers. The nightstand at the right side has with neatly organized books, representing peace and order. The bouquet painting above shows fully grown flowers. But beside it the pomegranate plant start to grow.
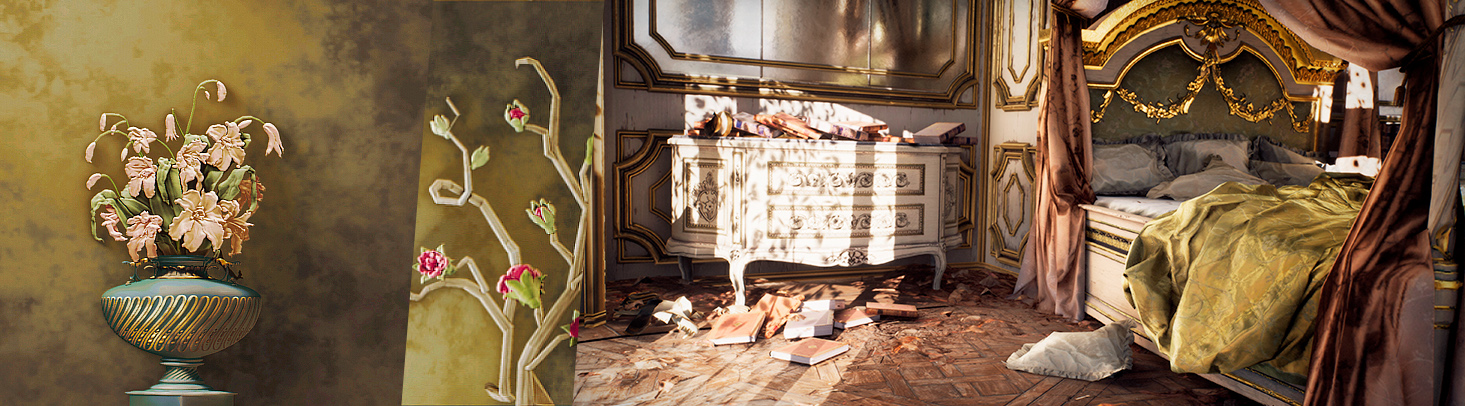
Autumn
The other side of the bed shows a sign of struggle. With the books and one of the cushions fallen down, as well as the bed sheets being pulled and folded. The flowers have now started to wither, while the pomegranate starting to bloom.
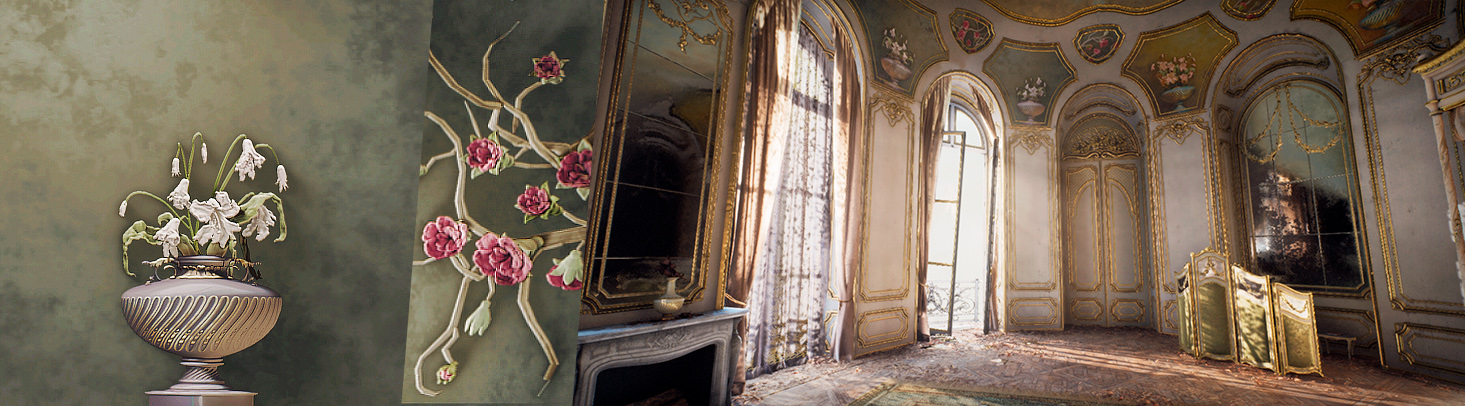
The window represents winter. This is where Hades had invaded the room, where the day-lilies have started to wither and where the pomegranate flowers are in full bloom. The signs of struggle become apparent here by the broken window frame and the fallen glass.

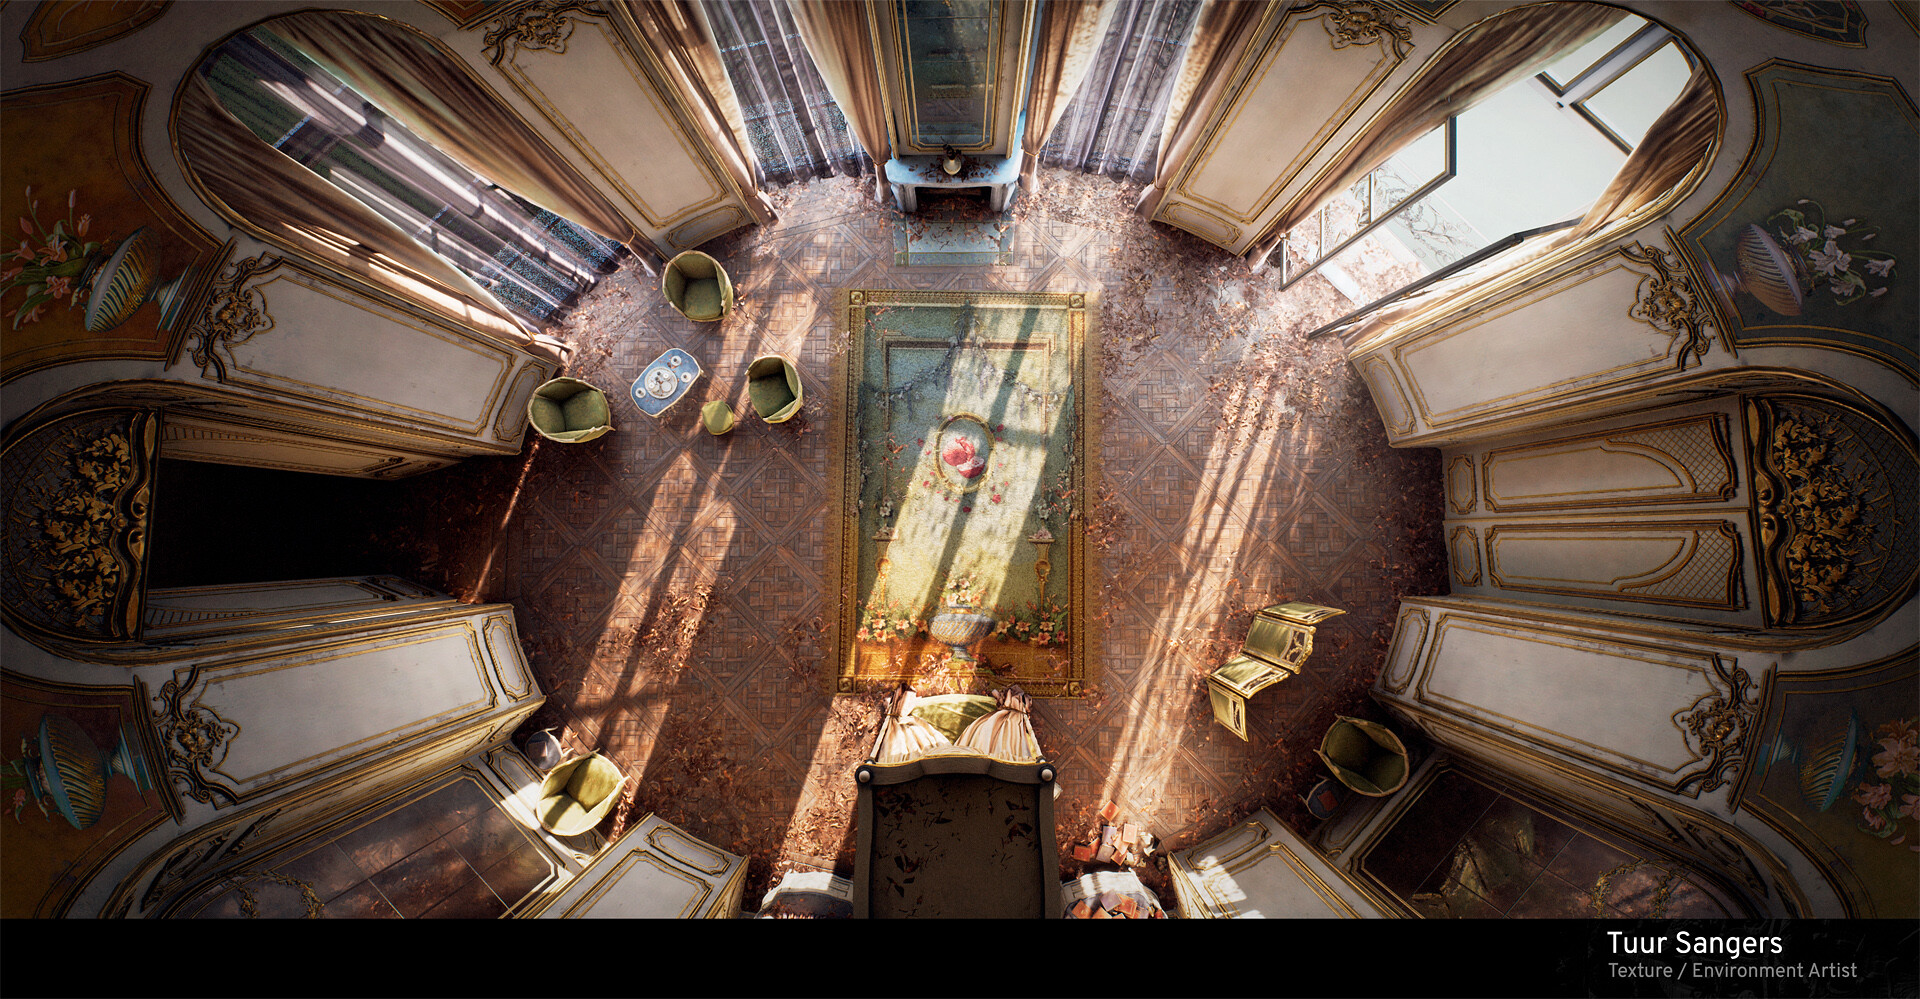
From the top we can see this very clearly as well. The carpet inherits this story, with the flowers close to the bed in full bloom, while the flowers in the back, surrounded by the pomegranate, have started to wither.
Lighting
As soon as I had the initial mesh for the architecture I started to experiment with different lighting scenarios. Eventually I chose a near sunset moment of the day, because the light then has a warmer feel, enhancing the gold in the ornaments.
At first I wanted to have full control over the lighting. I was inspired by the baker scene from Into the Woods and decided to handplace multiple lights, similarly to how it is done in film. While it did gave a good result in one angle, other angles looked odd and unbelievable.

I then decided to use a true to life approach by using measured values. At near sunset the sun has an average brightness of 500-600 lux (you can find more values on this here) with a temperature around 5000 Kelvin (values can range from 1850k to 6500K). For my skylight I used a HDR from HDRI Haven and set the intensity to 800 cd/m2.
The settings for lightmass where similar to those shown in the lighting masterclass by Jerome Platteaux (I definitely recommend watching it: https://www.youtube.com/watch?v=ihg4uirMcec). Since I wanted more warmth at the first bounce, I decreased the diffuse boost to 0.65 and scaled the Indirect Lighting Intensity for the Directional light to 5.

Recommendation
Try to find a time of day that fits your mood and observe how light reacts in real life can really help you with lighting and composition. Looking at references can help, but most photos are not calibrated and edited. Seeing the subtle difference of light over time and in different weather conditions is much easier to see when going outside.
Essential Skills
When creating any environment I believe it's essential to be able to work efficiently and not be afraid to cut or change elements. Making games is a creative process, that requires a lot of iteration while also making sure that all elements get finished in time. Balancing these is very difficult, but I learned it will come with a lot of practice.
Challenges
From the start I know that time management would be my biggest challenge on this project. There were a lot of very detailed ornaments, different material types and complicated props that had to be made in a short amount of time. To tackle this, I created a work-breakdown where I kept track of my progress. It lists every asset and how much time I expect is needed to finish it. At the top you can see how it calculates the days I have left, so I can easily see if I have to make sacrifices or not (which there were a lot). On the right you see my week planning during the final weeks. When needed I filled my weekends with one small non-essential task that I enjoyed doing.

Advice & Tips
Make something that you want to create! Do not make a portfolio piece that you think someone expects you to make. The concept of your work is going to say a lot about you and will be the thing people remind you by, so try to make it memorable. And most importantly, have fun doing it.