
HIGH VOLTAGE - the living station in ue4
Enter the space station that almost seems like a living creature. David Karis shares his entire pipeline from conceptualization to the end product and goes through creating modular kits, trim sheets, hard surface modelling and creating stunning visuals with lighting. Explore the station now.
Introduction
My name is David Karis, I have been working as a freelance 3D artist for the past 7 years focusing mainly on public art and interior visualizations many of which have been built & feature across Australia. I am also a qualified Game Artist that graduated from the AIE Melbourne in 2012.
I got into 3D art relatively late in life at 26 years old, having worked in retail for 6 years. I did a lot of 2D animation in high school and knew I wanted to get into digital art in some capacity so I joined the Academy of Interactive Entertainment in Melbourne on a whim and realised I had a talent for 3D. So began my obsession with 3D art.
I’m 34 and have been playing games as soon as I was physically able. The first game I remember playing was Kung-Fu on the Atari 2600. But the first game I remember really getting into was Altered Beast on the Sega Megadrive. For the record, my favourite game genre is survival horror due to how heavily environment design plays a part in story telling compared to other genres.
High Voltage

Concept Art by Mateusz Szulek
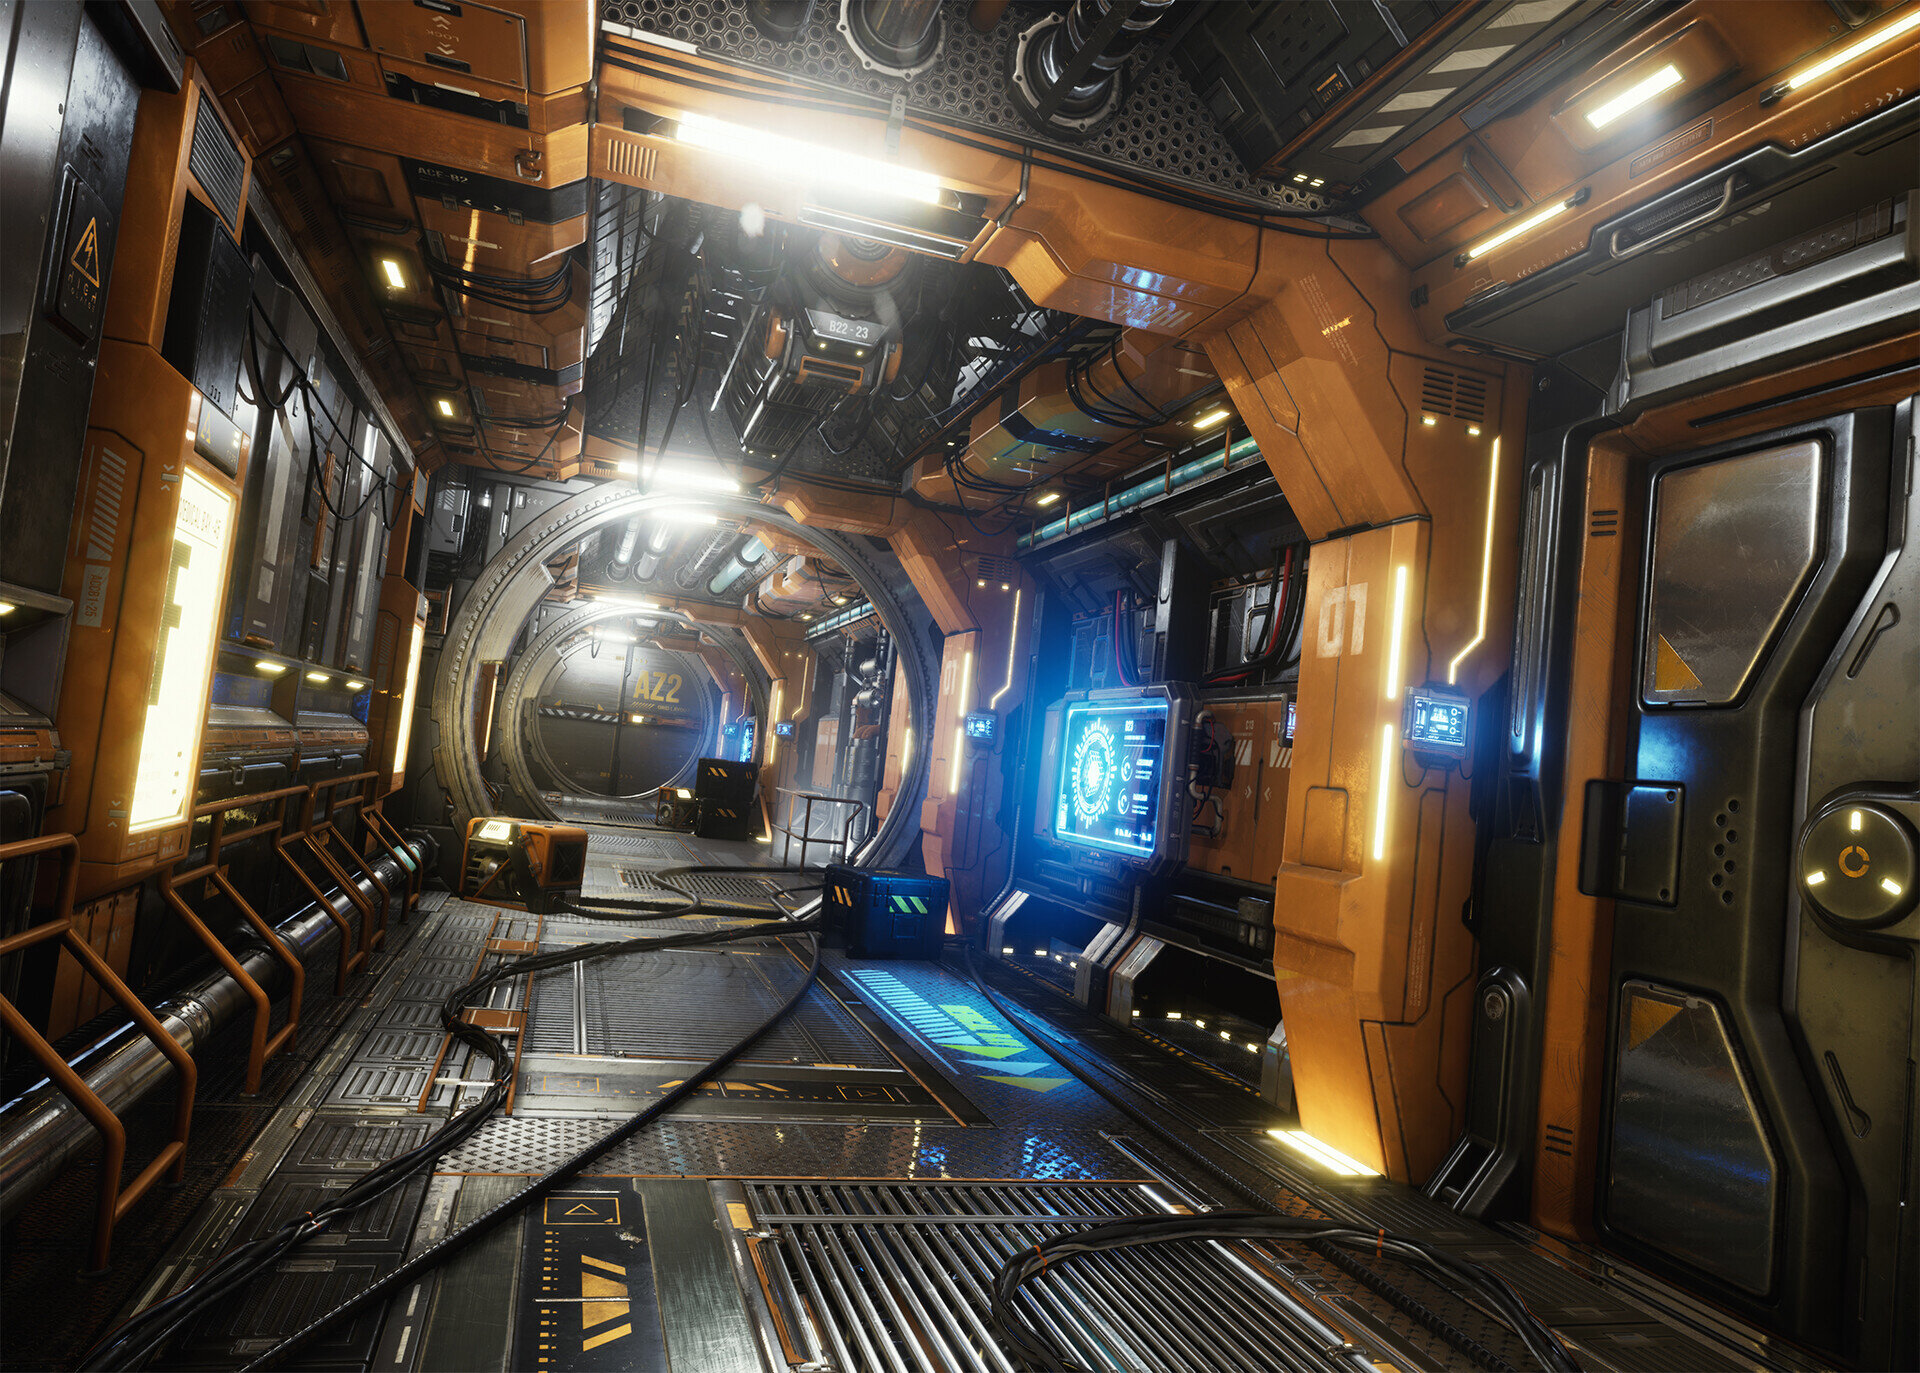
The main reference I used for this piece was some concept art created by the artist Mateusz Szulek.
This gave me the foundation for my target camera angle and composition. The other shots were essentially an afterthought. It really wasn’t hard to get some other nice angles with the amount of work done on the scene by the end.
Composition & Lighting
Given the nature of the scene, being sterile sci-fi, I wanted to keep the composition very organised & uniform and decided to focus on thirds. The camera in the main shot is canted about 6 degrees. This is a technique used in film to give an unsettling feel to a seemingly normal situation.


Given the amount of emissive components built into my models, I wasn't able to have the freedom I would have liked when lighting the scene but at the same time it forced my hand to do certain things that ended up looking very realistic. Essentially with completely predetermined light sources the challenge was to turn them all on and it not looking like a mess.
First of all I used Luoshuang’s GPULightmass to make the primary GI engine brute force for light baking. In doing so it sped up my bake time and bake quality but it’s not without its issues, especially when dealing with emissives, which I had a tonne of.
All of the light sources are basic spot lights with volumetrics on, except for the neon tubes on the roof which are point lights. I felt nothing mimicked a real neon tube light like a point light with its length and radius increased.

Lighting
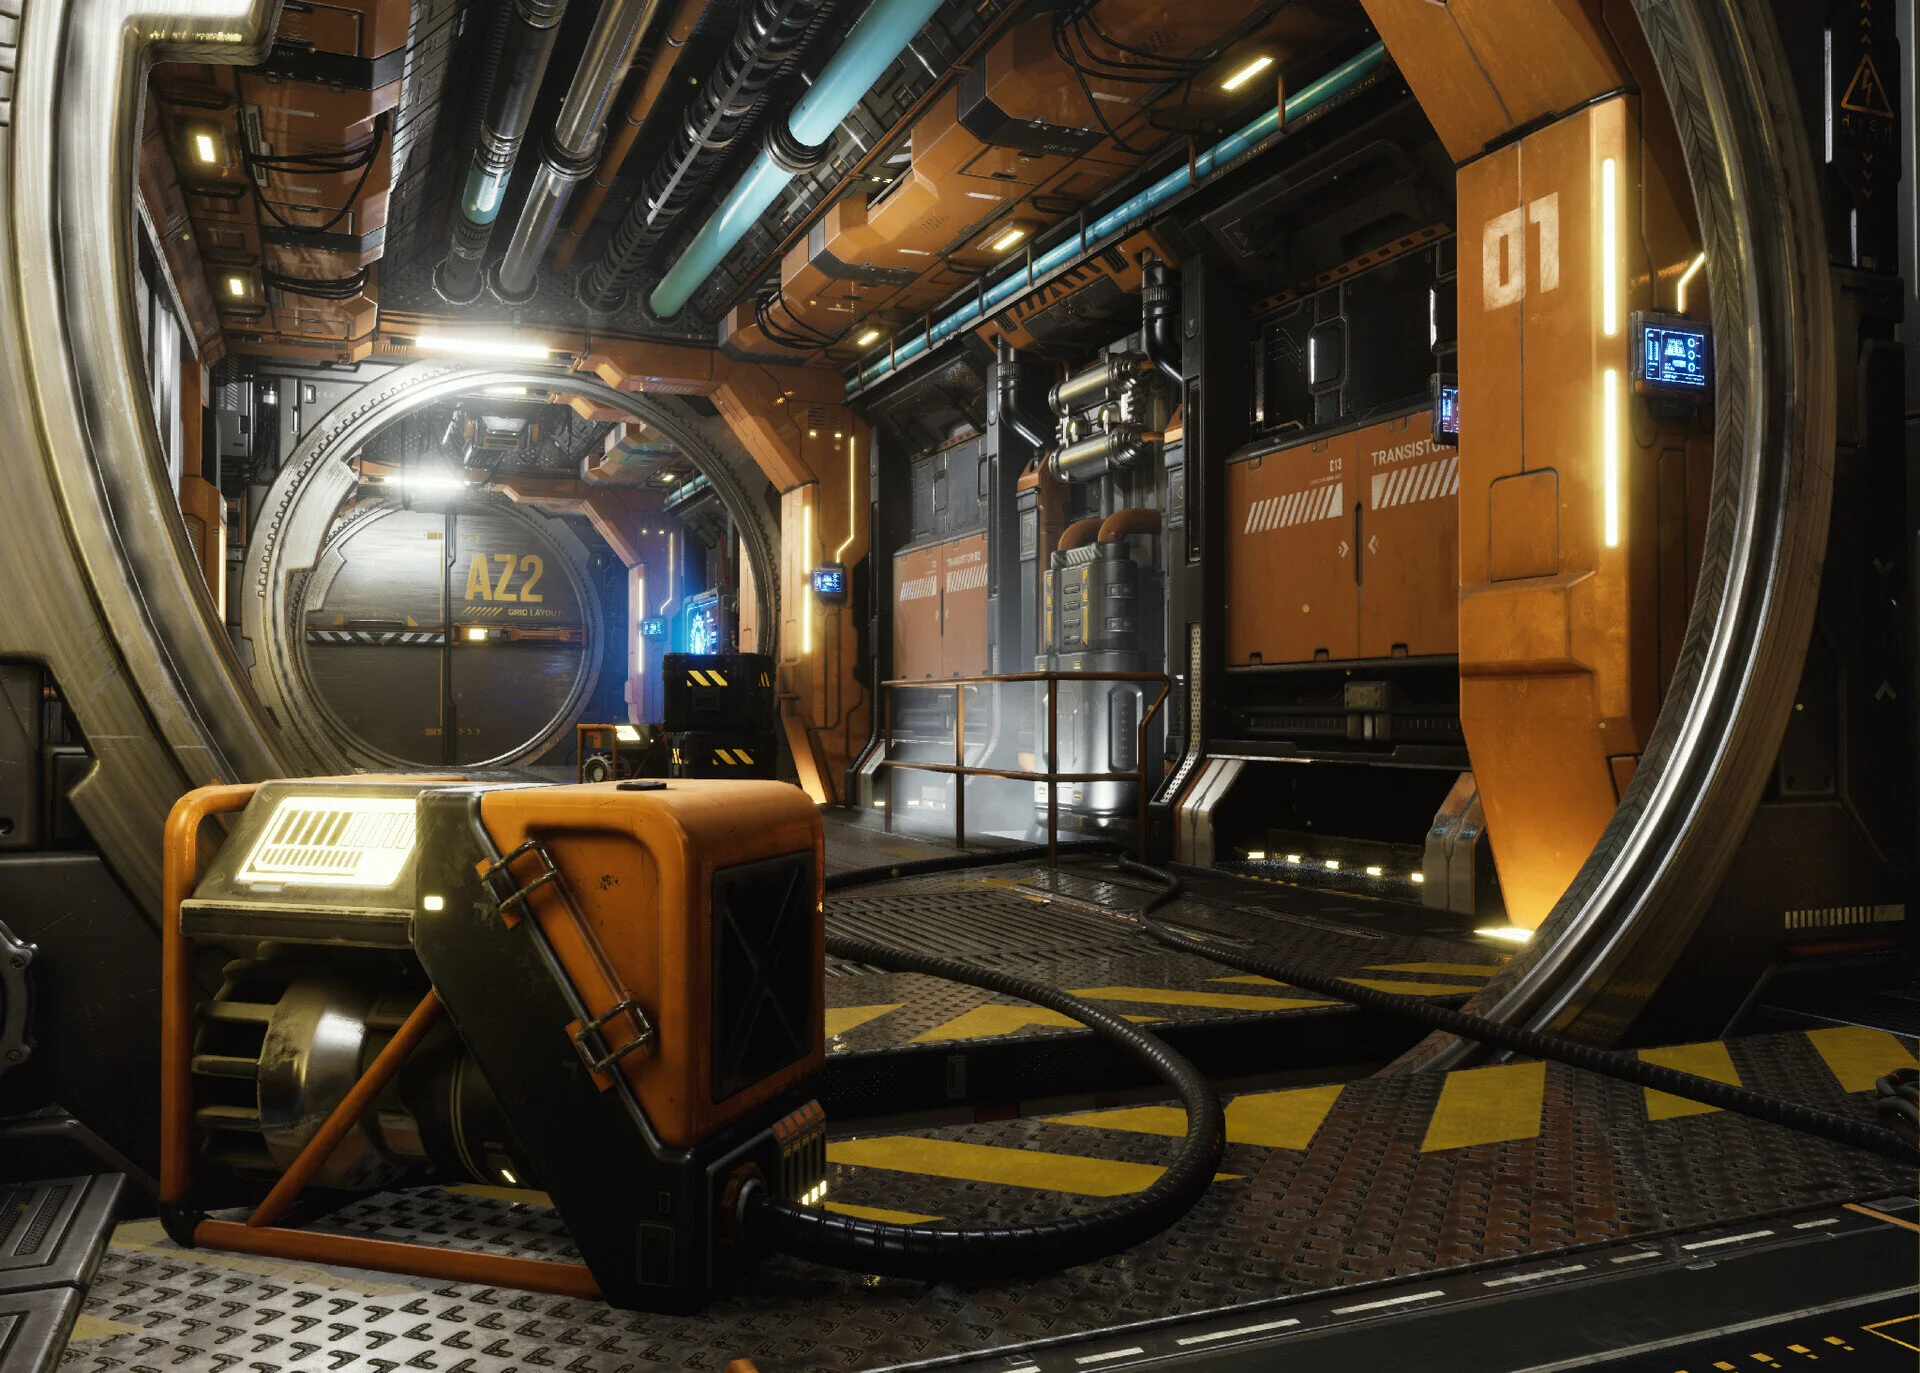
There are 3 reflection captures in the scene. A sphere at the back of the corridor, a rectangle going down the length of the hallway & a 2D reflection plane on the ground. Having this many light sources, emissive lights & reflection captures made iterating on the scene extremely delicate. It was a careful balance that often and easily got thrown out of whack.

Detail Lighting
In terms of blending the emissive and the light actors, I wanted the main light sources to do the grunt work and the emissive as just highlights but also wanted the warmth of the yellow emissive throughout the scene without making my light actors yellow. This was achieved by turning the indirect lighting intensity to 10+ and emissive boost on the actors up to 4 or 5 but in doing this, using this GPU lightmass you get large fireflys and light splotches. To fix this you need to go into your BaseLightmass.ini and adjust the GPULightmass settings and increase GI samples to 128 or more. Just be aware, this destroys bake time so you only increase this for final product (for anyone using this GPULightmass).

A lot of the colour separation comes directly from the reference so shout out to Mateusz for nailing that. I didn't like the yellowish green though and wanted to go for a stronger, darker orange colour. Apart from the shades of metal the only other colour is the blue on the terminals and the pipes. Without that blue though, it is a very different scene with nothing to break through the gritty orange industrial palette.
During the baking process when I was creating all the maps from the high poly, I made the decision for there to be 5 main materials that will be on all components across every asset. Painted orange metal, a dark steel, a light steel, a chrome/high gloss steel & rubber. With this decided early on I made 5 reusable smart materials in substance painter and the bulk of the colour selection was done.
Story
My idea was to convey a distant future industrial/mining style ship, one where technology and machine are so ingrained into society that the ship itself almost seems like a living creature. Machines powering machines and the cords like veins pumping resources through the ship with only a hint of human presence. I wanted to create a space to spark other people's imagination to provide an intriguing and mysterious space that's function is ambiguous. I have what I think it is but that's not the point of the scene and is irrelevant :) Here is a link to the flythrough, keep what I have said in mind and take another look.
Materials and Reflections
There was a back and forth on how scratched and dirty the whole scene should be. I wanted it to look lived in but not completely messed up. As I mentioned in an earlier question I have 3 reflection captures in the scene, all very carefully placed to put reflections in the places I wanted (see image).

Reflections
The only small tip on texturing I can give is consider every element of the model and consider why? It sounds obvious but after a long time on 1 asset you lose objectivity and that thought always grounded me.
Substance to Unreal does metals very well so start with a nice preset then make it your own and as long as your materials are setup correctly in Unreal and your captures are in the right place the pretty reflections will come naturally.
Oh and also the only way to get your screen space reflection to max quality is the terminal command r.ssrQuality 4 :)
Modular Kits

Here is my original block out of my scene
Given that my scene was only a hallway it didn't require that complex of a modular kit.

The floor panel is all separate geometry with a tiling metal material and is essentially it’s own modular kit that can be rearranged to make multiple floor configurations.


Trim Sheets

Roof Components

Machine Misc

Pipes & Cords
I knew that creating a scene based on one camera angle would cause issues when viewing the scene from any other angle and expose holes/gaps and inconsistency of the logic with the reference.
The machine misc trim was made to fill these gaps but also for the background behind the piece i called “Machine unit” halfway down the scene. The roof components trim was created to fill holes and cover everything above the hanging generator and above the pillar overhangs. I knew I was going to go hard with pipes and cords so i just made a complicated trim with lots of details that I could experiment with and chop up to make a lot of different pipes and cord variation.
Like the majority of the scene, all the detail was done in the high poly bake. The scene is essentially an experiment in high poly modelling and baking with that taking 75% time of the whole process. As I mentioned in an earlier question, the trim sheets were made to fill holes in areas I couldn't figure how to fit a modular piece into. They acted as patch work and polish essentially. For Example;


Machine Trim Locations

Machine Trim Locations
Hard Surface Modelling
The scene started very reference heavy as I was really trying to absorb and learn all the hard surface modelling techniques I could find. It was a lot of playing games and taking screenshots, looking on Pinterest for specific shapes and trying to get an understanding of what type of sci-fi i was trying to achieve. Once I collated reference for most of my assets it was just a learning process, adapting reference and extrapolating on it. The further I got into the scene the more I found myself comfortable with the forms and moving away from reference and just sketching and experimenting. I then developed my own greebles kit, after an asset or 2, I was happy that I could speed up my modelling process and keep cohesion among assets. Here is a section of it.

I would suggest to someone wanting to learn hard surface that;
Understand your toolkit as much as you can before starting. Don’t be afraid to make a practice crate or object to form your techniques as early as possible.
Patience. If it's not a clean model first time round just scrap it and start again. Sci-fi & hard surface is precise and exact and any mesh imperfections are very obvious. If you have the time just keep remodelling over and over until it's perfect.
Watch every single hard surface modelling technique video you see, even if you just skim through them. See what tools are used on what shape and why. There are so many ways to achieve the same thing and watching them all will make you a master in all situations.
In terms of places to start for hard surface modelling, I would play a game with an art style you really like. Find an in-game asset and take a bunch of screenshots of it. Then just keep remaking it until you get it right, trying to mimic the techniques you see as best you can.


Difficulties with Hard Surface
The thing that gave me the most trouble in the beginning was understanding the amount of radius I should be having on my edge. If you want your normal map to actual do something when you are using a bevel of 1 segment on your low poly you need to over smooth your high poly edge to almost dough like corners.
However, having doughy edges makes it hard for the finer details so balancing these took a lot of trial and error. I would recommend that when you get an edge looking right in terms of width and bevel on both high and low poly. Just import them into every scene and have them in the background as reference to know that it’ll look right & also keep consistency throughout your modelling process.
Here is an example of my edges low and high poly.

Low Poly

High Poly

Low Poly

High Poly
Another thing that I learned is coming from Modo, the Maya modelling toolkit is super clunky and you just need to practice to find ways around its flaws.
For example, bevelling 2 different edges at the same time often gives the 2 edges a different radius. I learned that don't be afraid of Ngons while you create your high poly, it’s better to get the edges perfect then stitch all the right points together that to battle with edge flow if its not working how you planned. Also floating geo is your friend for high poly baking. It it doesn't affect an edge just leave it hovering above for the bake.
Workflow
My process was;
Import my grey box and start creating a low poly version of the asset just simple shapes

Grey Box

Basic Low Poly
Keep the low poly in a separate group and start the high poly model around my duped low poly
During this process I add components that I need a low poly version of and dump duplicates of them in my LP group as I model the high poly. All high poly models have a soft bevel of 2 segments, then support loops for edges, then run a smooth over the whole model

High Poly with edge support and Smooth 1

High Poly

Final Low Poly
Once high poly is complete, reassess my low poly components, match up shapes and reverse engineer some of my high poly to create an optimal low poly model. All low poly main edges have a 1 segment bevel.
I then explode the mesh and apply materials to high poly for material id bake.

Exploded HP with material id
Export 2 versions of the model, 1 exploded for all maps except AO and 1 for the AO (In marmoset)

All maps besides AO Bake

AO Bake
Bake all maps for substance painter in Marmoset; Albedo, Normal, Object Normal, Curve, Position, AO & Material ID

Model is now ready for texturing in Substance :)
Marvelous Designer
To be honest I only used Marvelous Designer for a very small part of the scene, the elastic plastic pipe covering on the pipe & cord trim. My implementation in the scene wasn’t that great and if I were to do it again I would make the Marvelous Designer component have its own geometry so it really shows off how great the program is. To do this I followed a tutorial by the god himself David Lesperance, he has a tutorial on Artstation on how to create fabric style elastic pipe.
Shaders in UE4
I wanted my work in Substance Painter to do as much as possible in UE4 given that I'm not the greatest at creating my own shaders. I developed an easy to use master material in UE4 that allowed my full control over my imported maps.

Master Material

Material Instance
This allowed me to control albedo saturation & brightness, roughness, metallic, normal strength, add a detail normal if needed, emissive strength and colour. You might notice there is an extra map input there. It was to give me the extra control over my material in engine.
Like I have an AO/Roughness/Metallic RBGA texture, I used another RGBA texture to mask certain things I needed to control like anything orange metal. I could adjust its saturation and brightness in real time and also this is where I put my emissive and alpha. Essentially putting 6 textures in 2 files and leaving my albedo alpha channel free for specific masking.
Challenges
In the beginning I had some trouble with my modular pieces and scale. I rushed the initial stages of planning and ended up paying for it by wasting time and making a lot of assets that were unusable. I learned the hard way of how important the first few setup steps are. To be honest once my block out and composition was right there weren't many other notable challenges other than just learning software I was unfamiliar with.
Maybe summoning the creative energy to invent more detail by the end was getting difficult. I wanted to add a new detail to each model that wasn't part of my greebles kit just for practice and by the end I found it was taking longer and longer to find a new detail that matched the style. This was remedied by never stopping looking for reference. Sci-fi is such a saturated style which makes it easy to get inspiration if you need it, albeit not always very original sometimes.
It’s pretty easy to find inspiration when all I do with my down time is play games, watch movies and 3D videos. The more I get my head space into the project the more I found myself taking inspiration from everything around me. For example, just walking around my neighbourhood I found the reference for my tileable material. Also just look at websites like Artstation everyday to raise your quality benchmark.

I am fortunate enough to have Garth Travis, Senior Environment Artist at Machine Games as one of my closest friends. He was my trump card when I was pulling my hair out over something I couldn't figure out and also an incredibly honest critic which I was super thankful for.
Advice and Tips
Just be a sponge, never stop learning and absorbing information. If you have ever thought about learning a new program just learn it and don’t make excuses. It’s 2020 and there is an abundance of tutorials on everything which makes it so easy to learn. In an hour or 2 you can turn something that seems beyond you to something you can just do now which feels super rewarding.
Also when you run into technical issues if you don’t have someone to ask, you are only as good as your ability to word your question in a google search. The information you need is always out there and if it's not, it’s because you are doing something very wrong or so obvious no one has talked about it. Also, never compromise on your quality, if you make something that seems maybe not perfect, think about showing it to a prospective employer and what you’d give in that moment to fix something that would not have taken that long to fix at home.
Future Work
I have never done any anything organic before and it’s always been on my list and a big hole in my 3D skill set. Essentially I want to do something very different to this project so something very bright, rocks, trees and grass heavy but I change my mind pretty frequently so we’ll see. Hopefully this next one won't take me a full year to do :)