
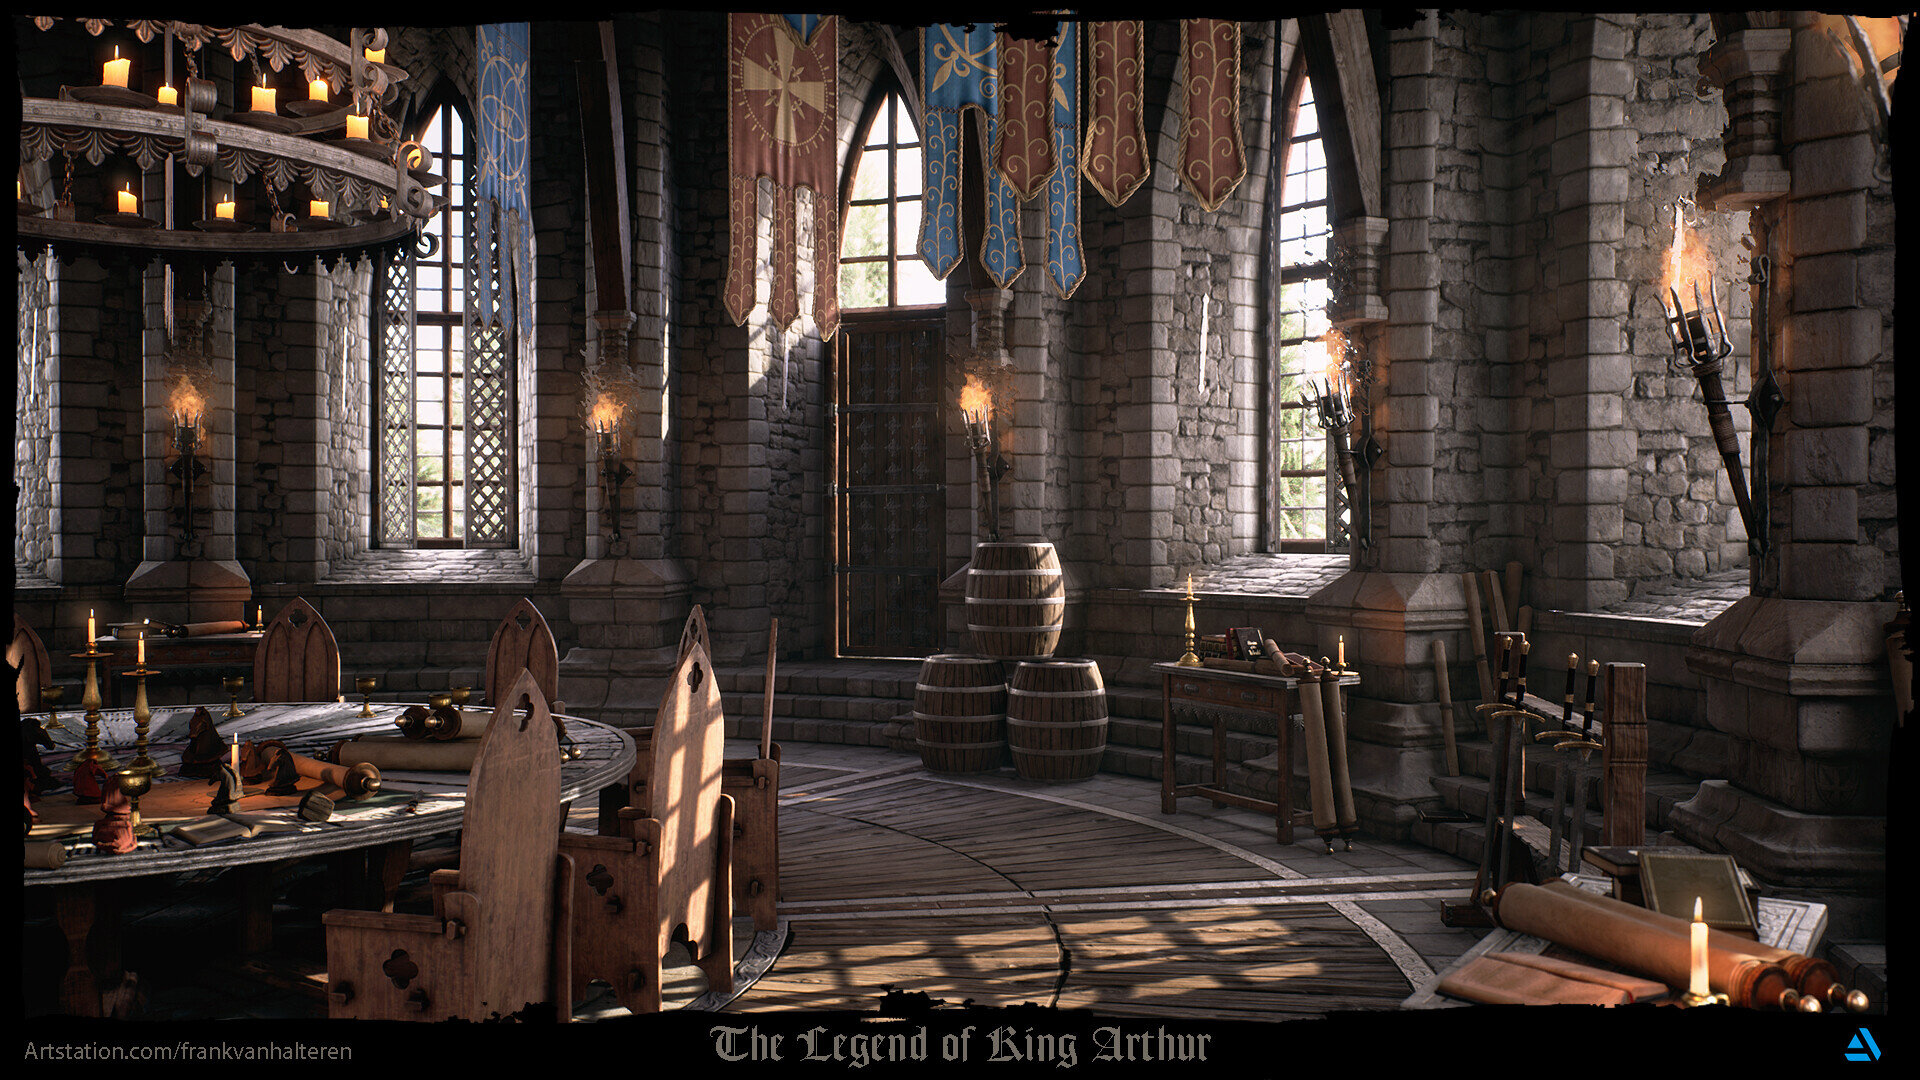
KING ARTHUR - GRANDIOSE KING’S CHAMBER
CGMA Student Frank van Halteren breaks down his King Arthur scene and explains some of the techniques he used to craft the Grandoise King’s chamber. Learn how he used trim sheets, created materials and incorporated props that added lots of subtle storytelling.
Introduction
Hi! My name is Frank van Halteren and I come from the Netherlands. My road to the world of 3D started at a young age. I have always been fascinated by the creation of fictional worlds. When I was young I had a scale model train and I was always busy building scenery and trying to lay down the perfect railways. At a later age the scale train was swapped with Warhammer. I was especially interested in collecting scale models from The Lord of the Rings. I remember I had a subscription to a magazine where you would get new figures every week. Inside the magazine there were loads of tutorials to create really neat scenery.
At a later age when I finished my high school I started an education of architectural engineering. After one year I switched to interior design. It was in this era that I started to get into 3D design. I worked on interior rooms in SketchUp and rendered them in V-Ray. I can remember when I was learning about texture maps that I stumbled upon normal maps. This was when I got in contact with 3D design for games.
It took a couple of years after my interior design school before I really started to get into the world of 3D design for games.
Studies
Specifically for game design, I went to SAE institute in Amsterdam. I felt I was not challenged enough and I already knew I wanted to be an environment artist, so I quit after one year. I then did two courses at the online school CGMA Academy. I followed the course ‘Organic World Building' by Anthony Vaccaro and ‘Modular Environment' by Clinton Crumpler.
Improving as an Environment Artist
As an Environment Artist you need to convey a story without any characters. Without any interaction you should be able to tell by looking at the environment what has happened or what will be happening in the near future. If you look at my Adventures Study scene, I tried to do this by cluttering the desk with stuff that shows that our adventurer has found the clues of a new hidden treasure. You can see that he scavenged through his older stuff by the fallen boxes, books and papers everywhere.
Next is creating beautiful props and environments, two skills you will become better at just by making a lot of them. I think the most important skills you should have are analysing references and lighting. Making believable art pieces mostly comes down to nailing scale, colours, proportions and lighting as these can make or break a scene.

The King Arthur Challenge

Before starting the challenge I was in the middle of the ‘Modular Environment' class at CGMA. I was working on a sci-fi scene. In this time I moved to another house and the scene didn’t really progress well. Then the new Artstation challenge popped up and I immediately was really excited. I always wanted to join a challenge but was never able to because I was in the middle of one of my own projects. I made the decision to finish the course by making a new scene for the challenge.
When I read the description of the challenge I immediately had the idea in my mind of the chamber with the round table and how it should look like. I wanted to make it look like a real grandiose kings chamber.
I started with reference gathering and searching for building techniques and material types of that era. My scene is set further in the future than King Arthur would have lived architecture-wise but I could find better reference this way and give myself a little more freedom to follow my own concept.
After this stage I started to build some trim sheets in Substance Designer. Two of my main trim sheets are the stone blocks and wood metal. With these two I built out almost all of the architectural elements. After this I started building props to fill in the scene. I knew I wanted to make a few key pieces like the torches, chairs, round table, chandelier and banners. To give the scene some life I added in all of the small elements like side tables, candles, maps, barrels and books. The books I reused from my adventures study scene 😉.
To give the scene a real story element I added in the map on the table with the horse figurines. This is to show that battles are planned and discussed with a nice goblet of wine.
To finish the scene off I worked on the lighting and post process. I go over this process further below in the article.

Scene in Maya

Modular Components in Maya
Tools and Workflow
My main modelling tool is Maya at the moment. When I need to sculpt something I use ZBrush and like most of us, I love all of the Substance software. For this scene I made about 75% of the textures in Substance Designer. Also in this scene I used Substance Alchemist for the first time. I mainly used it for the wood textures. The albedo you can get from it is so detailed, it would take ages to make something similar in Substance Designer. I also got a few textures from Substance Source.
My workflow for the architectural stuff is mostly modelling to texture. What this means is that I modelled the main silhouette and shapes of an asset and then textured it using the trim sheet. I cut the UV’s up in different pieces. Below you can see a few examples of assets using the same material and their UV space. I made sure that they are mostly horizontal long strips. I straighten the UV’s and find a trim to put onto it. It sometimes takes some scaling or creative cutting of the UV’s. When doing this carefully you can get a lot of mileage from just one trim sheet. With trim sheets you don’t have to worry about going outside the 0-1 UV space because these kind of textures always tile from left to right or up and down.

Trim-sheet Modelling Examples

Pillar Model with Trim UV Layout

Pillar Model with Trim UV Layout
For the props in the scene I used 2 methods. The first one is the high to low poly workflow where I model a high poly model with sub-d in Maya. Some of the models got a sculpting pass after this. I then make a low poly version and baked all the needed texture maps. I then texture the model in Substance Painter. I quickly came to the conclusion that I didn’t have time to model and sculpt all of the props in the scene. So the second method I used is the same modelling to texture like explained on the architectural assets.

High to Low Poly Workflow

Modelling to Texture Workflow

Barrel Model with Trim UV Layout

Rack Model with Trim UV Layout

Table Model with Trim UV Layout
Lighting
The scene uses a combination of movable, stationary and static lighting. I will break them down one by one. I started the lighting process from outside to inside. Because this is a daytime scene I wanted a natural and realistic feeling to the light coming from the outside. I made a custom skydome on which I applied a HDRI with a simple shader attached to it with some sliders for intensity and rotation.

Skydome Shader
I added in a skylight as the main light source and to add bounce light and global illumination. In the skylight I added the same HDRI used for the skydome. The skylight is set to stationary. To boost the global illumination I added a rectangular light in each window-frame. I set the colour of this light to a really light blue that is colour picked from the sky of the skydome. These lights are set to static so all light coming from them is baked and wont effect performance.

Window Light Setup

Light & Fog Setups
I then added in a directional light and an exponential height fog. The volumetric fog within the height fog is turned on. I then bumped up the volumetric scattering on the directional light. These setting combined give a nice layer of dust in the air and create the famous ‘god rays'. The directional light is set to movable. I did this to be able to adjust the light for screenshots from different angles. This way you can adjust the light to highlight the focal point of each shot.
Lastly I added in the torches and candles. For the torches I used the fire effect from the particle scene provided by Epic in the learn tab of their launcher. I added a point light directly above the torch with a red tone to it. All these point lights are also set to static. For the candles I made a really simple shader of an emissive flame that is put on them. I added the same type of point light that I used for the torches just above them.
Challenges
Overall for this scene, time was my biggest enemy. I had a pretty clear vision of how I wanted my scene to look. Reaching the art style went very well. However the amount of assets needed to fill up the scene to not make it look or feel empty was quite a hassle. The last weekend before the deadline I slept only 6 hours…
Advice for Environment Artists
My biggest advice would be to plan out any environment you want to create. Dissect the concept and make a list of what you need to make. Plan out a timeline for yourself so you have some guidance and endpoint to work towards. Also try to not start with too big of a scene. In the long run it will wear you out with the risk of abandoning the scene. Lastly, join some online communities like No More Grid and DiNusty Empire. The people in there are willing to help and get you better as an artist. Show your progress regularly!
Check out my portfolio at artstation.com/frankvanhalteren and reach out if you want to know more about any of my work. Cheers!