
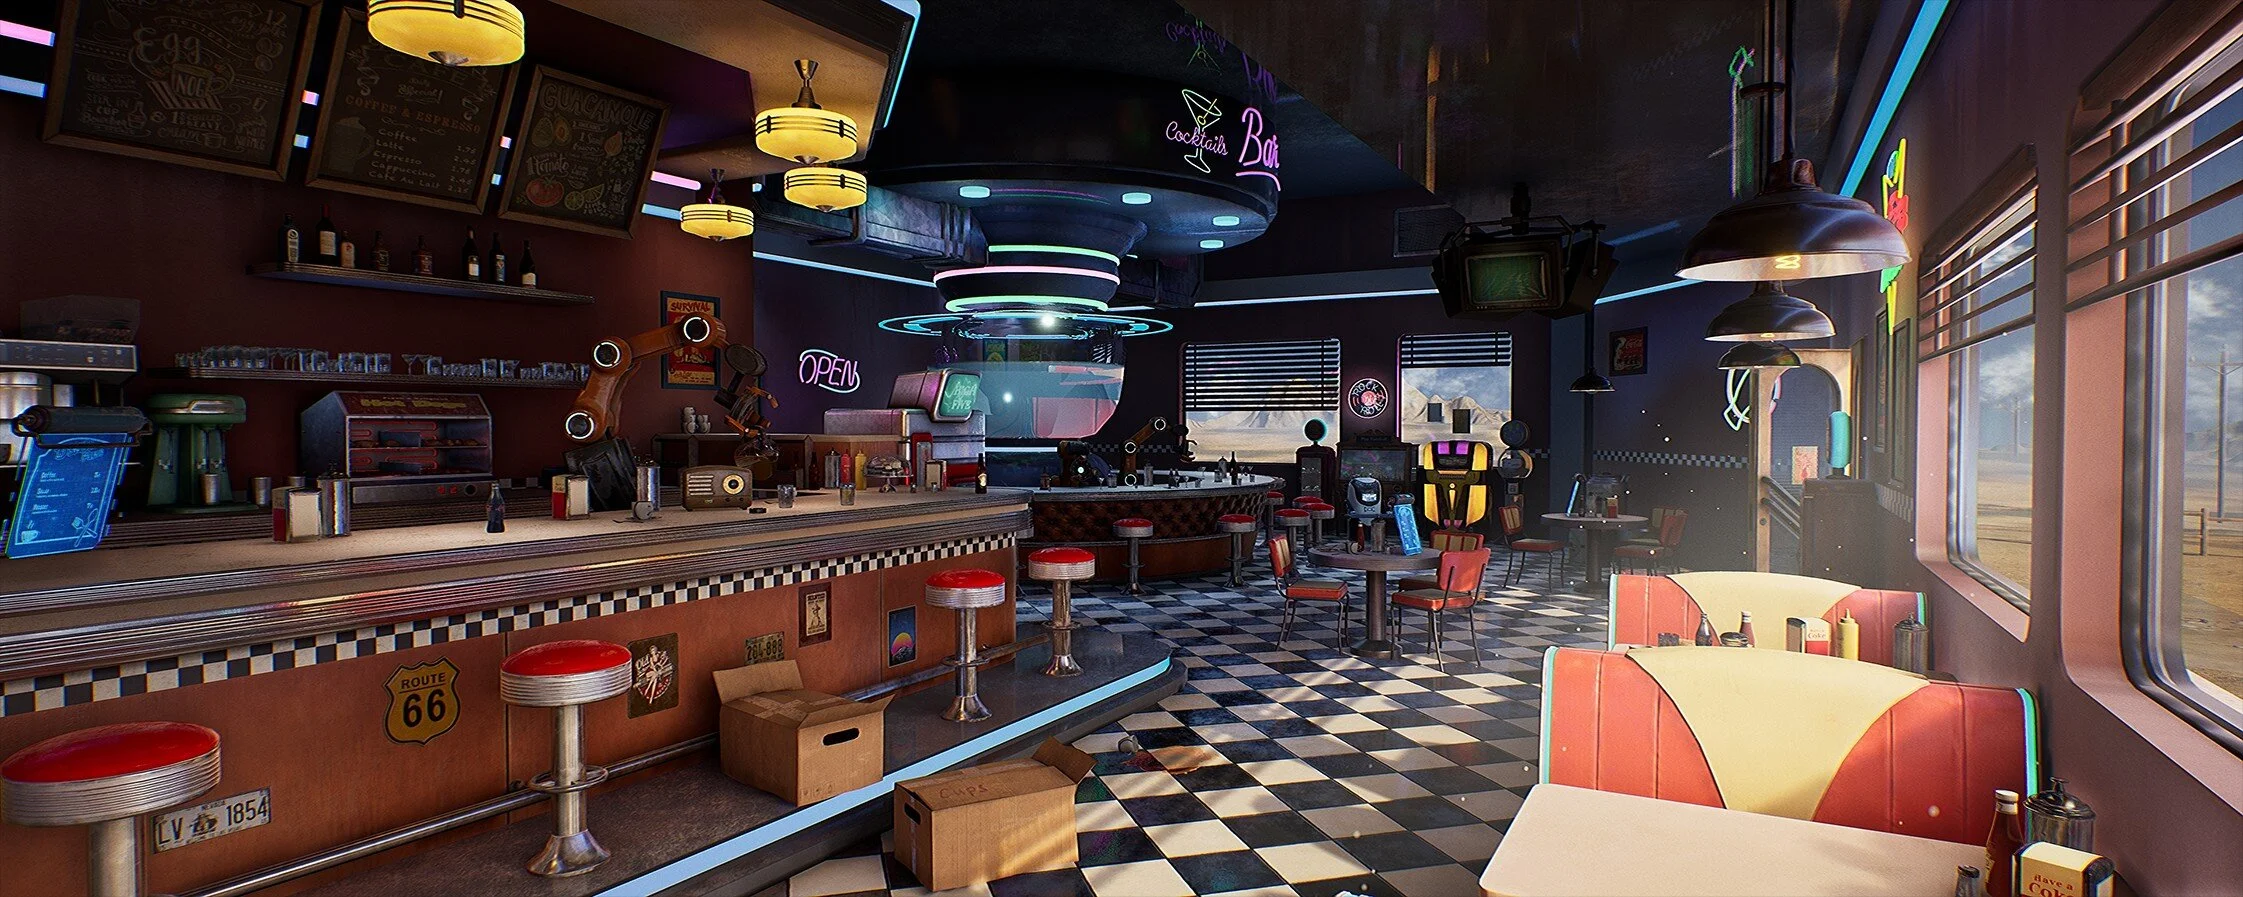
Sci-fi 50’s american diner in ue4
Stanislav Vovchuk goes through what inspired and helped him to create his sci-fi 50’s diner in UE4. If you want to know how to save time texturing and maintain quality, utilise trim sheets, create natural and artificial lighting and much more then this is the article for you!
Introduction
My name is Stanislav Vovchuk and I’m a freelance Environment Artist from Tula, Russia. My way into the world of CG started about 2 years ago, and it was not an easy one. But looking back now, I do think, it’s the most magnificent and exciting thing that I’ve ever done before. I’m a self-taught guy, an enormous number of tutorials, lectures and breakdowns on 3d helped me a lot, and a big shout out to Sergei Panin for his mentorship and priceless advice.
People often ask me why I’ve chosen this profession, and I don’t have an answer. “I always wanted to create my own world” – sounds like a cliché, but it is a half-truth. Ironically, I was never a big fan of computer games, but for instance Fallout 2 made a great impression on me. Game development seems to me as a marriage of technology and artistic taste, this’s also one more reason why I’m here.
Inspiration
Initially, my plan was to make something in the Fallout style. Even when I found Fan Jing’s unbelievable concept, the thought kept lingering in the back of my mind for a while. The opportunity to make a post-apocalyptic diner seemed worthy of consideration; moreover, it would be extremely challenging to work on an old, damaged, broken location and the story about all these. But the original concept made me still give up this idea. I decided that the story, based on it would be more interesting, brighter and vivid.
Concept, Planning, Thinking

As I said before, I decided to choose this concept and stick to it. I was taken by a harmonious combination of the old diner and futuristic style. Moreover, it was not about complete reinvention and modifying old diner into a sci-fi one, it was only about adding some sci-fi elements which make the diner futuristic. Such things were a levitating menu, Coke vending machine, robot arms instead of a human bartender, a big barrel containing liquid on the other side of the bar. It was like the diner from the movie “Back to the Future”. It had usual tables, chairs, a bar counter, and, at the same time, many other things screaming about their futuristic origin.
Before I continue, I would like to say that I’ll skip the part about collecting references and making a blockout. Of course, I do think it is the most important preparatory work. But also, I’m sure that it’s been mentioned by many of my colleagues before and not once.

Progress GIF
Therefore, let’s get on with it. I didn’t try to build the whole diner getting it sized for the main shot. I referenced a lot to the concept, but the main task was just to make a real size diner. Thus, all shots were set in the process of creating the scene based on my understanding of beauty and composition. I see no reason to talk about the rule of thirds, the golden ratio. Where I can give one advice though – experiment and try out. Don’t be afraid to make some extreme values of FOV or try unusual angles of the camera, looking for the best shot. Sometimes these experiments create exciting shots. The pictures below are examples of such high FOV values. I used 100 degrees for the first shot to show as much room as possible and for the second to make some sci-fi effect. Looking at the first picture you can see distortions on the bar counter, but it doesn’t matter, because it’s not the main shot and as I’ve previously mentioned my goal was to show the whole diner. Though, undoubtedly, be careful and attentive with high values of anything.

Wide Angle Shot (FOV = 100)

Storytelling
Storytelling is a vital part of any project. In my case, I like that the story has not been completely brought to light. The viewers have an opportunity to make up a story themselves of what they see. My job was to leave some anchor points for the imagination to latch on – a puddle of coffee, half-eaten meals and half-finished drinks on the tables, a half-open door and waiter-android with a tray. I didn’t want to reveal the whole story fully. It’s hard to understand where the action takes place – on the Earth or any other planet or even when it happens – in the near or distant future, who the visitors of the diner are – humans or any humanoid race. And the most critical question is why nobody is there. I do have answers to all these questions and my own story, but I’ll be happy if it’s contrary to yours. It means I have achieved my goal. I understand that such an approach doesn’t always work, but it’s up to you to try! Why not?
Props, Modelling, Texturing
Regarding the technical background of my project, I would like to highlight only some of the points. When I got down to the scene, the main goal was to improve my modelling-texturing skills and work on different lighting schemes and perhaps try some new approaches to lighting. Therefore there are no over-complicated master materials or modular systems that just don’t make any sense. And based on that I would like to go over the points, which seemed to be the most interesting to talk about or I just had some difficulties with.
All neon elements were made with the help of a very simple master material. My goal was to achieve the effect, where the borders are darker than the inner parts of the neon.

Simple Neon Master Material in UE4
Speaking about glowing objects, I would like to say, darken the borders of emissive materials make it look more natural. Also, you could diversify your emissive by playing with roughness and even adding some details on a normal map. Work with different layers, so the emissive doesn’t look too uniform. For example, making this jukebox I tried to create the effect of old plastic, lighting with bulbs from the inside, so all dirt and dust are visible. As you can see on the GIF below, I used many layers and painted some parts by hand.
Adding Variation to Emissive Areas
If you don’t have time to model or texture something, you can just work around it. Maybe it is even better and makes your story more vivid. I was too lazy to model sweets inside, so I just made a sign.

“Out Of Order” sign created to save having to create the sweets inside the machine
Emissive does help when you deal with the glass material. While creating the Coke vending machine, my goal was to make the effect of frozen glass with bottles inside. It should look nice, but also not take up too much time in production. And it was the emissive that helped me create just that effect.

Adding drinks to the vending machine without having to model them
Also, trims help you to save a ton of time. My bar counters are made with the help of one trim. Part of this trim can also be seen on the walls.

Trim Sheet Breakdown
You don’t always have to use Vertex Paint; sometimes you can make it work with decals only. I used only decals for my walls, floor and ceiling to get some variations in roughness and albedo. Also, I added some dirt in several places, and I’m sure that’s more than enough in my situation.

Decal Breakdown
Lighting
Before I started the project, I had known what would be the light of the scene. My idea was to divide the diner into two different parts. First one is the family part with soft sunlight from the windows and gentle light from the lamps over the tables. The second was intended to be more like a party area with a dim, cold light and a large amount of neon.

Lighting paintover to show the two different areas of the diner
It was a challenge to combine these two parts in one room, so they wouldn’t be unpleasant for families who come to eat or people who come to have a drink. For that reason, I had to add warm spots in the party area – yellow emissive on the jukebox, warm highlights on other machines. But I didn’t forget about cold lights in the family area – the corner with vinyls and triptych on the walls.
All light is baked, except the directional one. I’ll explain later why. To fill out the room with the light, I used simple planes out the windows with spotlights directed at them.

Plane with spot lights directed at them
It’s not something super new, but it showed to be sufficient enough.

Spot Lights Comparison
I needed more light in far sides of the diner, so I added some rectangular lights at the windows to strengthen the effect of spotlights.

Rectangular Lights Comparison
Next, I switched on the skylight, but using the lowest values, just to highlight dark corners and add a little bit of cold colour.

Skylight Comparison
The last but not the least main light source was the directional light in movable mode. It was so because I needed subtle shadows inside and bright light outside.

Directional Light Comparison
After all, I still had a lot of dark corners, but before fixing it, I set up the artificial light. For lamps, I used the combination of 2 point lights (up and down with lower values and turned off shadows) and one spotlight.

Lamps Comparison
Now it was the turn of the corners, so I just lighted them with artificial light, as if it bounced from other light sources and I added some smaller details.

Corners Lighting Comparison
And only after all this, the time of god rays, particles and some polishing came. You can compare the final result and previous iteration below on the GIF.

Final Lighting Comparison
Don’t forget to place Reflection Captures in the scene. Sometimes it happens that you are not satisfied with the reflections somewhere in your location. If you would like to make them sharper, you can find the required menu in Project Settings and increase the reflection quality. Just remember, increasing this value correlates with a performance cost.
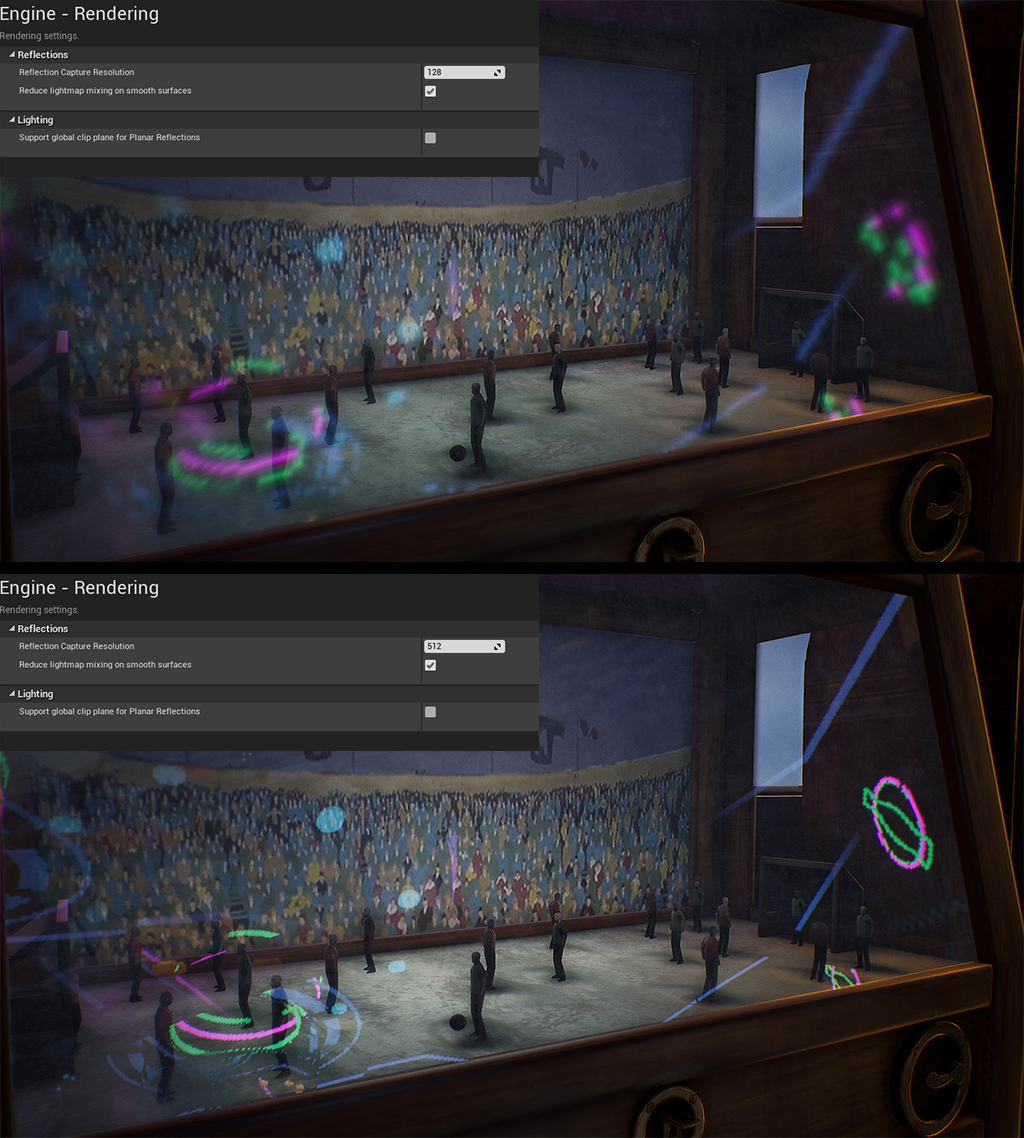
Reflection Capture Resolution Breakdown
Besides, keep in mind that you can move spheres to make a nicer shot.

Moving the Reflection Sphere
Finally, we get to the post-processing stage. Here I played with some values: slightly increase the saturation to get more vibrant colours; gently rose the gamma in the shadows to make dark corners a little bit brighter; added a LUT to reduce extra yellowness; changed the Ambient Occlusion to get more realistic shadows.

Post Process Comparison
Challenges
Time. Perhaps, the real trick is to find time for your projects. I’ve taken care of this problem, dividing the week into 2 parts – 4 days for my project and 3 days my time. I prefer to alternate working and non-working days. In a month, I usually add one working day. Towards the end of the project, I work as much as I can.
Blurred vision. The easiest and the best decision of this problem is to ask for feedback from your colleagues, friends or different 3d communities.
Motivation. Personally, I have no problems with motivation, but a long-distance race can be suffocating. That’s why I think it’s crucial to apply deadlines working on long projects.
My greatest challenge is a struggle within myself. Sometimes I’m attacked by demoralising thoughts about how bad my project is, despite the fact it’s not that. It usually happens occasionally, and I have no idea how to fight this, but ignore it and keep going.

Outro
Concluding my breakdown, I would like to thank the whole team at Experience Points for the great opportunity to share my thoughts and knowledge with readers. It’s great that you provide a platform for artists to express themselves.
Also, I would like to give tons of props to Artem Ridniy for his help and support and the Leoluch – Development Game Content Discord channel for the friendly atmosphere and team spirit. I hope this breakdown will be useful and you’ll find something new and interesting. If you have any questions, feel free to message me on Artstation. I look forward to answering all of your questions. Before I draw a line under the whole thing, I would like to quote Henry Wadsworth Longfellow, the quotation is valuable for those who work on personal projects, “Great is the art of beginning, but greater is the art of ending”.