
substance insanity - creating a metropolis
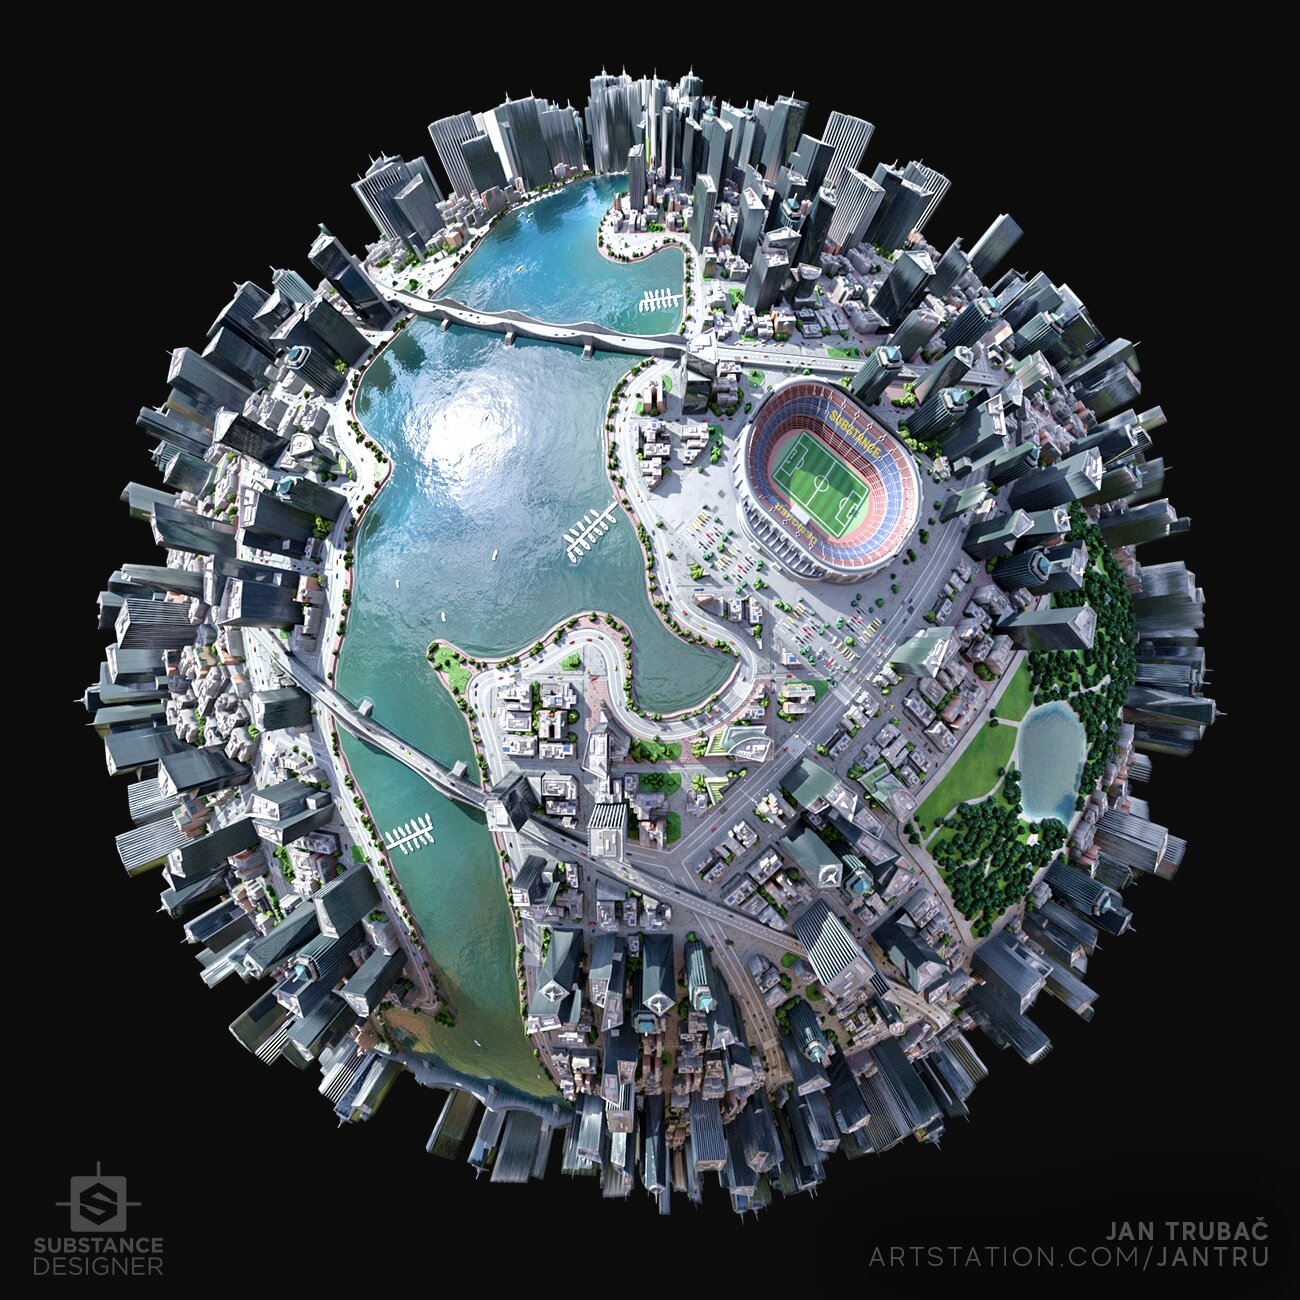
In this extensive breakdown, Jan Trubač talks us through the creation of this astonishingly detailed Substance City. Looking at reference collection, building individual buildings and landmarks, and how to combine all of them together, this article is a mountain of knowledge!
Grab the material yourself here.


Introduction
Hi, my name is Jan Trubač and I’m from the Czech Republic. I currently study VFX after graduating from Computer Science, where I focused on Computer Graphics and Image processing.
I’ve been fascinated by 3D graphics in both films and games for many years. It all started when a friend showed me a simple level he made in UDK (Unreal development kit) back in 2011. I was absolutely amazed and immediately knew that 3D is something I want to dive into. So I started by creating small medieval environments in UDK. I was always a fan of medieval games. If I should remember the first game I ever played it was probably Knights and Merchants followed by Gothic series, Elder Scrolls etc.
Inspiration | Reference
I think that finding inspiration for materials can be relatively easy. The key thing is just to look around yourself. Even just on your way to work or to school, there are surely many interesting materials around. A great example of such an approach shows well know Substance Designer artist Daniel Thiger in his Exploring Taiwan series, where he recreates materials he encountered while “walking around the busy streets of Taipei”.
Sometimes, inspiration can come right from the material you are currently working on. For example, as I’ve been working on some forest ground material and added pine-cones I realised that it would not be hard to modify the cone and create a separate material out of it. And this is how my pine-cone material came to life.
When I started with the Designer I knew I wanted to try something different, to use it unconventionally. So when my friend challenged me to make a city, I very happily accepted the challenge and decided to make it.
Every project should start with a good reference. Especially if you are trying to recreate something from the real life. In my opinion, this is one of the most important steps and quite often also the most neglected one. Yet if you have a good reference you progress much faster, because it eliminates the need for guesswork. You simply recreate what you see.
For the city material, I’ve gathered images from big cities like New York or Tokyo. I tried to include both wide shots as well as close-ups.

Moodboard
Except for the 2D images I also took advantage of Google Maps and their 3D scans of the cities. For this project that was probably the most invaluable source. I found an interesting building, viewed it from all angles in the browser, and then recreated it inside the Substance Designer. Actually, most of the buildings in the city are recreations of the actual buildings from New York.

Example of Map Reference and recreation in Substance Designer
Breaking Down the Reference
Regardless of what material are you making, you have to look for individual features, patterns and other details which make up the material. In this case, I looked at the layout of the streets, placement of the structures, landmarks, etc.

Reference City Pattern Breakdown

Material Pattern Breakdown
Obviously, trying to stuff the whole city into one file would be a nightmare, so when I logically broke up the city into the individual parts, I began to think about the general structure of the files.
I split the city into four files. One file has all individual buildings in it. Then there is another file which puts these individual buildings into blocks. Park, stadium, parking lots and docks are also in a separate file. And eventually, all these three files are then linked into the final file where everything is merged together.

File Structure
Creating Buildings, Blocks, and Landmarks
One of the biggest problems I had to solve was the problem with the windows of the buildings. Because the whole city is nothing else than just a tessellated plane with height map displacement, making individual windows was pretty much impossible.
The solution to that would be to give the sides some resolution by making the top of the building a bit narrower than the bottom. Thanks to that, I would get a few more pixels on the sides to work with. But still, it won't be enough to make some decent horizontal details on the sides and on top of that, the taper of the buildings would be visible.
Another solution would be to ignore the windows altogether. This approach would probably be fine if the city would be far away from the camera. But my aim was exactly the opposite. I wanted to bring the camera right to the streets and still have enough details in the scene.
I found that a good compromise was eventually in the selection of buildings from the reference. Choosing the buildings with all-glass sides proved to be the best solution to the problem.

Single Skyscraper Maps Breakdown
Notice the roughness map and the black border around the building - that’s actually what makes the sides (windows) glossy.
To make the process faster some objects like air conditioning units, solar panels, pre-made roof detail parts and roof debris are in a separate graphs. So when I needed to put any of these on the building I just drag and dropped them.
Here are some iteration images of some buildings:

Angled Skyscrapers Breakdown

Double Building Breakdown

Curved Skyscrapers Breakdown

Old Building Breakdown
The next step was to use the individual buildings and form bigger complexes which can later be directly placed into the street layout. The process was quite straightforward - find buildings that fit together, organise them in block and add a few trees.
Altogether, I created 6 blocks:

City Blocks
I knew that to make the city look believable I need to have as much diversity as possible. So I decided to also add park, stadium and some docks for yachts.

Park Breakdown

Stadium Breakdown

Single Car Breakdown

Dock Breakdown
Combining Parts Together
This was probably the most complicated part. Mostly not due to technical difficulties, but rather due to the design and organisation of such a number of individual parts that must all work together.
I started with the basic layout. Using Cells Noise I created masks for the main layout and streets.

City Layout Breakdown

City Layout Base Maps
This approach of hard cutting the streets into the buildings has a few problems. One of them is that the street can intersect the building close to its edge. This results in small remnant of the building which doesn’t look good. To fix that I used Flood Fill to BBox Size that generates a grayscale map where objects are coloured based on their size. I then used Histogram Scan node as threshold to remove the small pieces.

Using Flood Fill to BBox Size to remove tiny unwanted pieces of buildings
Another problem was that the buildings that remained had a visible cut. Fixing this so that the cut is not noticeable is virtually impossible. It simply a limitation of this approach. To at least partially hide the cut I did a little bit of masking and coloured the cuts with the windows colour.

Masking the Cuts
I’ve also created several different parameters that allow customising the water surfaces. Users can use and combine two variables - water canal and ocean.

Water Graph
To create the ocean mask I used a simple Fractal Sum Noise and Histogram Scan. The nice thing about this combination is that by changing Position slider in Histogram Scan I can specify the threshold of the mask and thus push the banks of the ocean in or out.
Problem is that sometimes you get small isolated islands or lakes inside the city. Maybe that can be something you want, but for greater control, there is also an option to suppress that. To identify the small islands in the mask, I again used Flood Fill to BBox Size. The result is then passed to a Histogram Scan, which works as a threshold.

Using Flood Fill to BBox Size and Histogram Scan to Remove Islands
I did a lot of testing to make sure everything works well. With so many exposed parameters and switches is quite easy to overlook something. For instance, when I turned off the generation of the bridges, the city regenerated well, but I had forgotten to remove the cars as well. So suddenly there were cars on the roofs of the buildings and in the water floating alongside yachts. Sometimes I had a good laugh when something like this happened.
But the reason why this happened was mostly because of a poor design. Ideally, the graph should be designed in a way that something like this simply can’t happen. It’s very similar to coding. If the design is correct, it is not necessary to manually handle every situation individually. The design simply shouldn’t allow that to happen in the first place. With that in mind, I changed the design so that the car generator uses a bridge mask, which is generated only if the bridges are used.
Sometimes I get a question how I managed that the cars are correctly oriented in their lanes. The solution is quite simple. For the distribution of cars, I used the Tile Sampler which has Vector Map Input. To that I connected a normal map of a blurred version of the streets masks. That will create a vector map which defines the rotation angles for the cars.

Placing the Cars on the Streets using Tile Sampler
Just plugging the vector map to the Tile Sampler won’t do anything. In the Rotation dropdown of the Tile Sampler, there is a parameter called Vector Map Multiplier. If you set the parameter to value 1 the cars will rotate accordingly.
A similar approach is also used for zebras (pedestrian crossings). When I added zebras to the city I realized that It would also be nice to add pedestrians to bring some life to the city. So I reused my sidewalk mask and used it as a mask for pedestrians. In doing so, I thought it would be also good if people would gather in front of zebras, waiting for the traffic lights. So I took the mask for zebras and applied a Bevel to it. This created a mask for the area around zebras. Then I multiplied that with the sidewalk mask. Result is the mask that includes places that are on the sidewalk in front of zebras.
This illustrates that sometimes even with a very little amount of work you can make your material look much more natural and believable.
Performance | Exposing Parameters
Due to a large number of elements and high resolution of the textures (to show all the details I used 8K texture for the final render), the performance was a big concern. Even though I tried to optimise the material (using lower output resolution whenever possible, using 8-bit instead of 16-bit, reusing nodes, etc.), computation time still wasn’t ideal. That was a problem, especially if you wanted to tweak exposed parameters and quickly try different layouts.
To help solve this I added a special switch to the parameters which enables “Proxy Mode''. This mode disables computationally heavy parts of the graph (such as flood fills, and the whole Base Colour sub-graph) significantly improving performance while tuning the parameters.

Proxy Mode
The true power of any Substance Designer material lies in the ability to generate infinite amounts of different versions with just a few clicks.
Because of that I generally try to expose as many parameters as possible. This time, however, I had to be careful not to add too much to the point it’s confusing. If I would add the option to tweak every little detail the list would be endless. So finding the right balance was the key here.
Usually, I don’t plan ahead what parameters to expose, I come up with them as I make the material. Obviously some parameters you know right from the start - such as general layout seed or water canal width and shape. This time, however, I realised that it would be nice to have more control over certain features to really dial in the look in front of the camera. For example to move the banks slightly so that the buildings close to the water are not clipped, also to be able to change the seed for zebras so that they fit better to the city and so on.

Exposed Parameters

Generation Examples
Presentation
It’s always a shame to see a technically brilliant material not receiving much attention due to poor presentation. Arguably the most important thing is lighting. Depending on the type of the scene I choose either image based lighting (HDRI) or if it is some sort of a studio render I usually tend to stick with a three-point lighting system.
What I always try to avoid is a “flat look”. The lighting should enhance the depth of the scene not suppress it. I quite like a quote by Jakub Čech - “Everything that looks flat, looks fake in my opinion”. So try to introduce gradients to bring life and depth to the scene.
Except of lighting very important factor is indeed a composition. If you want to learn more about it form a CG artist’s perspective I would recommend Andrew Price’s famous Understanding Composition video.
For most of my renders I used Corona Renderer. I fell in love with it many years ago and stuck with it. I love how quickly you get very good looking renders out of it, plus it’s also Czech Made. :D On the other hand, the future is in real-time technologies so I definitely want to expand more in that direction in the upcoming projects.

Tips
Here are a few tips which I've picked up along the way:
⦁ Start with a good reference.
⦁ Study the reference closely - find the shapes, patterns which make up the material.
⦁ Think and markdown what features you want to have in your material. Be organised.
⦁ Try to structure the graphs in a meaningful way so that you can focus on the creative side of the project and don’t waste time by finding the right nodes. It may also come handy in the future, for instance, if you open the material after months you will be able to quickly understand what is where.
⦁ Take your time and really focus on your height map.
⦁ Think about the performance optimisations. It's always good to think about them already in the process, rather than at the end, especially in bigger project. It will speed up everything when the graphs get more complex.
⦁ Be patient when things don't go as planned. Many times I scrapped a graph or a part of it and started over. It’s normal we all learn by making mistakes.
⦁ Feel free to experiment and have fun in the process!
Outro
The city material was my biggest Substance project so far. I’ve learned a lot during the process and I’m glad I can share some insights about how I created it. It wasn’t always a smooth ride but I’m super happy how it all turned out. Now what I enjoy the most is hitting the randomise button and seeing all the different cities. Even I am sometimes still surprised at what it can do.
What will be my next project? To be honest I still don’t know but it definitely won’t be another city generator or something. (hmmm... :D ) I always wanted to dive more into rocks and ground materials, so it will most probably be something in that direction.
Finally, I would like to thank the community for all the support and positive feedback in recent weeks. It was a blast!
Thanks also to Experience Points for the opportunity to write this article and to all of you guys for taking the time to read it! I hope you’ve found this at least a bit helpful.
If you have any questions feel free to drop me a line on Artstation or follow me on Twitter! :)