
CREATING A EUROPEAN FOREST ENVIRONMENT IN UNITY - BREAKDOWN
Bohdan Bilous tells us about how he created his impressive European Forest Environment in Unity. In this article he covers his process for creating game-ready vegetation, as well as his material setups and how he creates effective outdoor lighting.
Introduction
Hi Experience Points! My name is Bohdan Bilous, I’m from Ukraine and I am a 3D artist that’s been working in the games industry for 4 years now. I started my career as a 3D artist when I was a student in Poland.
Why did I come up with the idea of creating 3D? I started my path as a 3D artist 4 years ago after completing a Bachelors Degree in Fine Arts. I had a plan to move to Poland and study there, so I chose computer graphics because I felt this was the best area to use my knowledge from my previous educational course. Before diving into computer graphics, I was studying academic art (traditional sculpting, painting, ceramics) in Ukraine. I have always been passionate about art and creating different interesting things to express myself. At the same time I’d dreamt about developing games since high school.
Halfway through my first year studying in Poland I got my first job at an indie games studio. There I got my first experience in creating 3D for games and I wanted to know more about it. After university lectures and working on indie projects I spent all of my free time self-studying, searching and craving to find more ways to practice. Starting from 3D essentials, I've gone through almost all directions to find ways for self improvement.
Why did I create my scene in Unity engine? I had worked before in Unity. I am familiar with the UI and instruments so it was easier for me to start experimenting. I’d also noticed how actively this engine improved in terms of graphics, so I decided to give it a try…
At the beginning I didn't have any plans, I just wanted to create a nice looking place and test different solutions with vegetation and tree making. I chose the region and type of landscape and naturally my choice fell on Eastern European terrain, so every next asset has to fit it. Then I grabbed as much reference as I could from the internet so I had an idea of how light works with nature and what inspired me the most. I looked for assets to fill up space on the asset store such as dynamic clouds, conifer trees, background mountains and so on.

Approaching Tree Creation
I didn’t plan to create all of the foliage and trees, only a few of them for practice. I found some interesting birch trees which are frequently found in the environments of Eastern Europe that I selected, so I decided to create one. There is a cool standard tool in Unity for creating trees which works great in some cases. It is simple and lets you create trees fast, directly in Unity. Below is the node system I made for the main birch tree. I used 3 leaf nodes so I had better control of how I placed them or it meant I could assign different materials and colours to them. If you want to put other textures on, it will automatically put it in a separate UV. I wanted to have control over this model, so I used FBX export from Unity and imported a tree model into 3DS Max. Then I changed the bark UV’s and customised the trunk texture. Next I deleted all duplicates and flipped (after Unity tree creator) the leaves meshes, because I had a nice shader in Unity which renders back-faces. It helped me to optimise the tree and finally I created LOD’s.

Birch Tree Node System

Tree Trunk Mesh

Tree Mesh with Leaves

Final Tree
The branches were modelled in 3DS Max by using splines and a couple of modifiers. I took the texture of a leaf and used this silhouette for modelling, then placed each leaf on the branch manually. I could easily replace all leaves with any new one later using the instance-replacer script for Max. Then I baked colours with alpha, glossiness and normal onto a simple plane.

Branch Plane

Branch and Leaves Texture

Final Branch
I wanted to make a custom trunk to create a more realistic tree, so I decided to combine two textures together. That’s why I took the bark texture and made it 1x4 proportions in Photoshop. I broke repetitive tiling by using a mask and blending techniques. Then I copied half of the bark texture and made the bottom trunk segment with it, so now it looks perfectly connected to the base bark on the top. I could’ve put it all into 2 separate textures (branch and trunk), but I wanted to put all on one. Here is the result:

Combined Textures

Seam Lines Fix

Final Tree
Here are the other trees and shrubs I generated directly in Unity:

Unity Generated Trees and Shrubs
Vegetation
Based on my terrain concepts, I selected some greenery to fill up my location and add colours to the scene. I didn’t make it all in the same way but for modelling complex vegetation types I decided to jump into Substance Designer. I think these flowers will be the most interesting example to show you in a breakdown. So let’s get started.

Flower Vegetation
Heliotropium are an almost cosmopolitan genus of flowering plants, counted at around 325 species and usually has different formation types. They have spiral, sphere-like forms with randomly placed flowers, different colours and shapes. I stuck with the Heliotropium Arborescens, the garden heliotrope, because of its specific appearance that I wanted to recreate in Designer. I took a couple of references and started planning. I then created a concept sheet so nothing could distract me while creating the material.
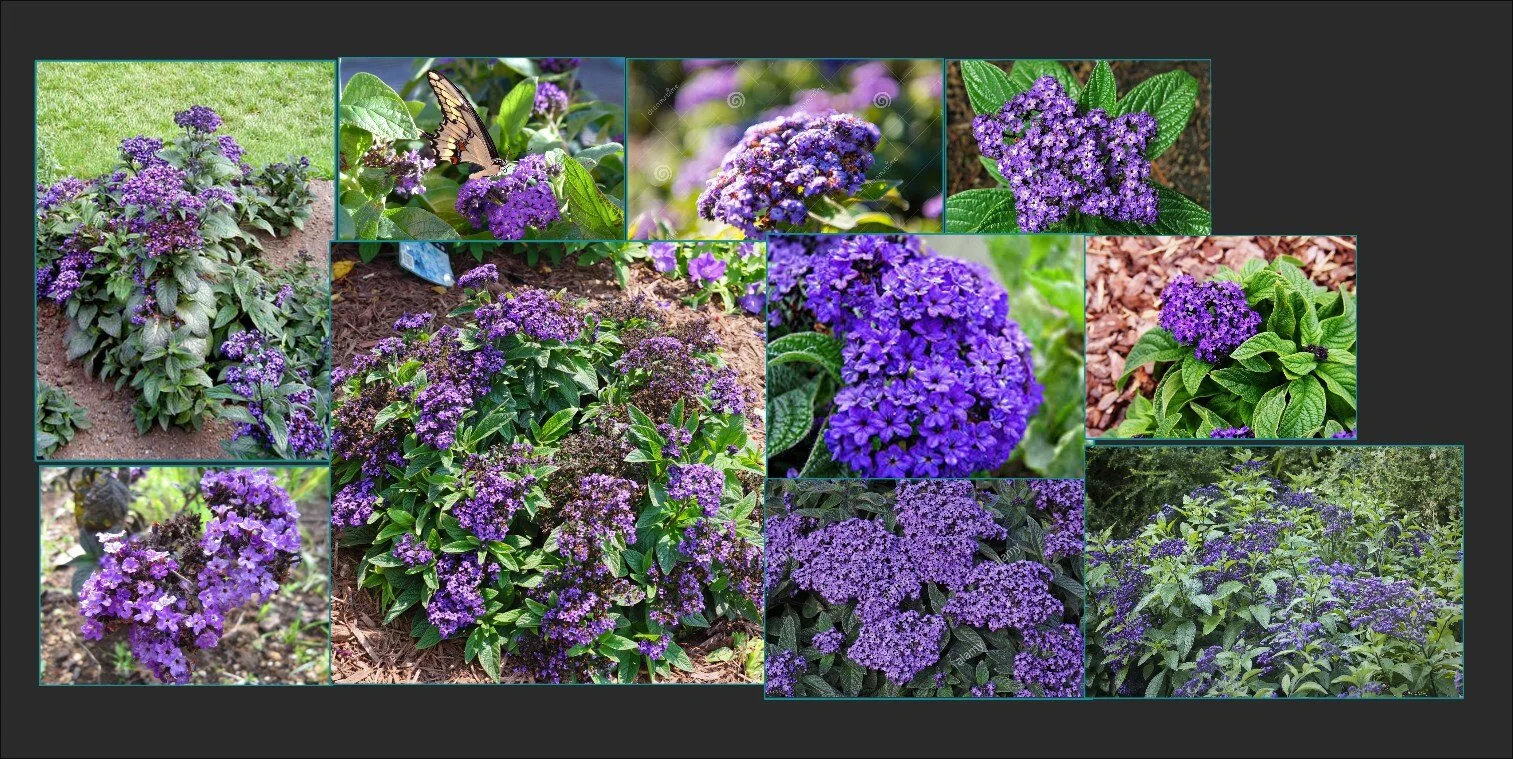
Reference Board
I think it’s important to remember about the conservation of diversity during environment making. Slight variety is much better than a copy. So after analysing silhouettes of flowers and leaves I decided to make 3 types of each one. I tried to recreate natural forms with standard Substance Designer nodes, using warped spherical shapes, stripes with combining symmetry, edge detect nodes, etc. Then I plugged the results into a circular splatter node to create masses that I could place in a proper spot by hand later, after making the rest of the details (base for flowers, dead leaves and branches).

Leaves with Splatter Circular Nodes

Flower Building Process
While working on shapes I often overlay a result on top of a concept so I can check the sizes and proportions of the texture atlas. Also to keep it simple, it's good practice to create an ID colour-map for each part of the flower. Due to that you have easy access to all masks in one place.
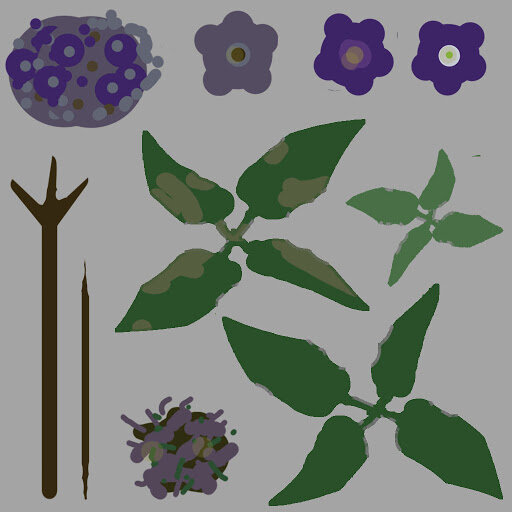
Initial Atlas / Proportions

Final Atlas
Later I jumped into 3DS Max for modelling a mesh for the flower. After that I simply drag and drop FBX file into the Substance Designer 3D viewport for viewing the mesh with its texture. Below is the preview I had in I-Ray.
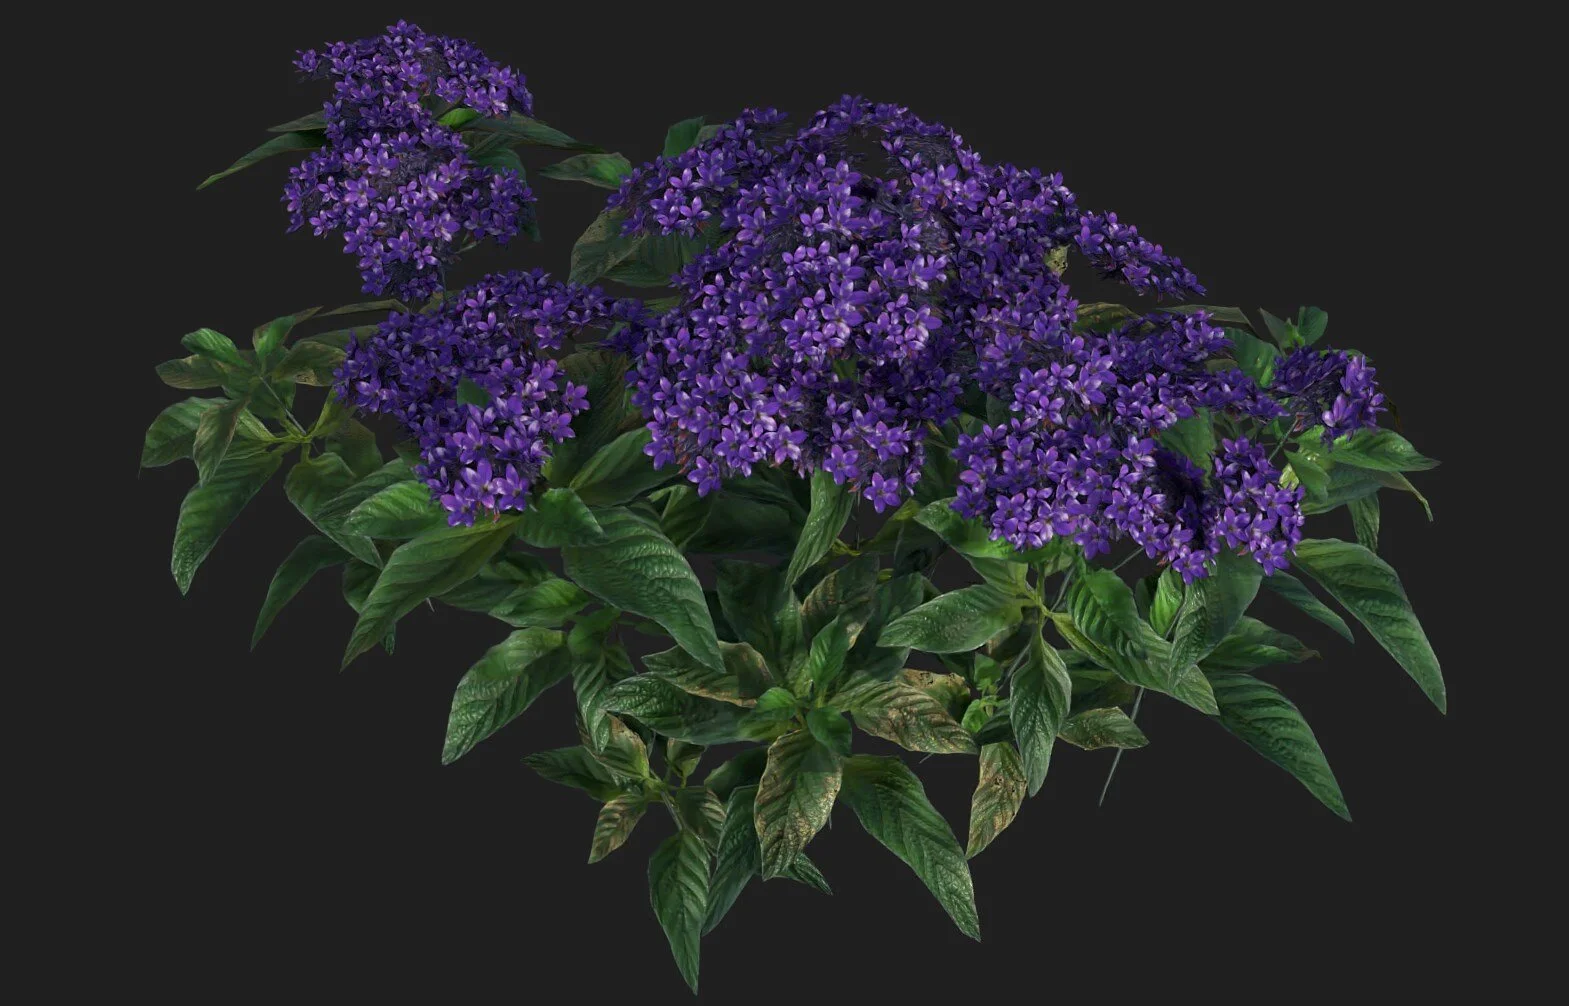
Substance Designer I-Ray Mesh Preview
Here is the rest of the vegetation that was made for this project. Dandelion, chicory, fern, small maple, and some grass I made in Substance Designer. Some grass was used from Unity standard environment assets but I slightly modified the colours of the custom mesh. For some details I took textures from the internet and made 3D models for them.

Vegetation Assets
Here are a few words about the difficulties I ran into while creating the vegetation. First, Unity’s standard grass plane has too much ambient occlusion in the vertex colours channel, that creates visible border-lines between grass and terrain. I overcame this by using prefabs instead of the standard grass provided by Unity. It gave me more control of vertex colours and the prefab could be changed at any moment. Secondly, the standard Unity shader doesn't have glossiness, translucence and normal channels, so the generated grass looked completely plain and boring. Because of this it could not be used for shading objects bigger than a dandelion. I solved this problem by finding a custom shader that had all required channels and looked better. At the same time it affected the rendering process. The custom shader (which I really liked) didn’t work in the HDPR system, as well as custom terrain shader. It was an option to rewrite these shaders and integrate them with the system but I’m not a programmer so I didn't use Unity’s HDRP for this scene. Thirdly, because I couldn't use the standard shader I was not able to use the standard paint details tool. So I was forced to place bigger vegetation objects by hand or paint them by Game Object Brush. Finally, I had to make LOD’s due to performance optimisation.
Terrain
I looked for a terrain shader for a while and found this one - Microsplat with tessellation. This shader is fast and very easy to use. I added standard textures as placeholders and started to paint. The area is not too big (500 meters squared) so I decided to paint it by hand to have control over the materials masks.

Landscape
I created a couple of materials for this terrain in Substance Designer (rock and soil). I created the grass with my material generator, which helps me to save a lot of time. I made a .sbsar material, that works like B2M. Here are some of them:

Landscape Materials
I downloaded the rest of the materials from Texture Haven, I found them best fitting for my project. Below are all the maps placed into the shader. I used the alpha channel in colour for glossiness, the rest of the inputs are simple: normal, displacement and ambient occlusion. Also for all of the displacement maps I made auto level for full blending splat maps possibilities. This meant that later on I could easily manipulate tessellation offset and be able to put height values in the right place. I added prefab instances to terrain: grass, flowers, bushes and trees. I often jump back to materials and provide some small changes with colours, roughness and so on. Just experiment with options and research what works best.

View of Texture Maps
Due to performance, grass details had to disappear at 120m distance in my case. I had to match the colours of the terrain material with the actual details of the grass, to prevent the appearance of a visible edge between the grass and the empty surface of the terrain.
The background environment was done by using simple free mountains from the asset store. This asset has nice looking erosion and was really well optimised. I just placed it with scaling and rotating to fill up empty space.

Terrain with Foliage and Background Mountians
Here's the GIF process that highlights how everything had been changed and further detailed.

Environment Process GIF
Lighting and Cameras
This step was the most challenging for me but also it is one of the most important parts of the process. I changed the light and fog colour for most of the time. Those two parameters make a big difference with the general mood of the scene. I always try to find the best solutions because I am convinced this part should be enhanced all the time while you are working on a scene. When planning lighting it's good practice to stick with one specific day time and select the main distinctive features of it. All of your iterations with values and parameters should be directed specifically to achieve proper ambience.
I wanted to have more interesting scripts and effects. I found this free aura light and custom SSMS (screen space multiple scattering) fog somewhere on GitHub, which had really nice looking effects. For the skybox I used a standard procedural sky and added free procedural clouds from the asset store. All light is pre-computed real-time and for the trees I baked light probes.
Here is what my light presets look like.

Lighting and Script Presets


A big part of lighting is the camera post process. Parameters slightly modify the colour of light, ambient light colour and the overall palette. For the fog I have used custom SSMS which allows me to blur far objects a bit, control and override colour of global fog directly in the camera post process layer. The rest are basic post process: basic bloom, ambient occlusion, some chromatic aberration, anti-aliasing and so on. Plus there is an additional AO camera effect called HBAO, which works excellently in terms of visual quality and performance. Here are screenshots showing details of the post process.

Post Process Details and Setup


As you can see, grading curves used the ‘Lum Vs Sat’. This curve defines how much colour will be on light spots and how colour will degrade in shadows/dark areas. By using this method I discovered how it can maintain contrast in colour values. The combination of auto exposure (eye adaptation) with ‘Lum Vs Sat’ will emphasise the brightness of colours in shaded areas. In reality we perceive a huge spectrum of light and colour, and monitors don't show it as good as in real life. This is why strengthening these effects help make more realistic lighting sensations.
Conclusion and Tips
This was a really fun project to do. I was able to experiment in this scene and find new solutions of creating natural environments. Gathering different assets from different sources and making something holistic was hard but fascinating. I learned from this project how to improve the quality of assets and manage them for gaining results. At the same time I found an efficient pipeline for creating trees and vegetation and which way is better to combine ground materials together. I found a new path on how I can improve my scene lighting and enhance it with camera post process.
Firstly, for new environmental artists I recommend to go for a walk if you get stuck in a dead end. Nature is an inexhaustible source of inspiration, all you need to do is just be attentive. There are probably plenty of beautiful areas near your home and you can always learn from it while taking some mental breaks for recovery and brain rest. In the end a solution could be simple! Maybe that is one of the reasons I love to make environments - constant inspiration near to you.
Secondly, when you are already working on your project don't be scared to try different ways and make some changes. As artists we have a powerful diversity of assignments and millions of ways of problem solving for goal achieving. I can guarantee that any changes made to your project will improve your vision and subsequently improve your work. As Theodore Roosevelt said: “The only man who never makes mistakes is the man who never does anything.”
Big thanks to Experience Points for giving me this opportunity to show you some details of my work!