
THE QUIXEL MIXER MACHINE
Eric Dinoware has been hard at work inside Quixel Mixer and gives us an insight on how he creates all of his unique materials. In this breakdown, get a look into his workflow techniques on how to approach material creation, a full breakdown of his Planet material as well as a very unique lighting approach using Marmoset Toolbag 3.

Introduction
Hey guys! Eric Dinoware is here. I am a universal specialist in the field of CG, but my main specialisation is design. I was born and raised in Ukraine, Mariupol. A couple of years ago I have moved to Russia, Khabarovsk, where I have been living since (hoping this is also temporary 🙂).
I have been loving games my whole life, especially those that involve creating things. It all started with cardboard puzzle blocks (the ones with pictures, letters and numbers on the surface), rearranging of which seemed to me as a creation of the real works of art. 😄 Later I was obsessed with all kinds of meccanos, puzzles, construction sets - constantly designing and building all sorts of objects, surrounding me as well as imaginary.
When I was a teenager, I decided that just playing games is not enough for me. I wanted to understand how everything works and wanted to bring all my own ideas to life. I have been studying everything that is somehow related to the creation of worlds, in order to eventually become a true demiurge.
In this article I am going to share my first steps in Quixel Mixer. Some tips and tricks that I use in my workflow will also be covered. I hope you will enjoy reading.

Getting Started with Quixel Mixer
I have done my first steps in Mixer just couple of months ago. Although the program is still in Beta, and so far it has not as many features as I would like to see, it still has potential. Mixer's interface is quite intuitive, the program is easy to master. At the same time, thanks to the Megascans library it is possible to create awesome materials in just a few minutes. I believe, in the future Quixel Mixer can become a new industry standard.
The basic principles of working in Mixer is not much different from any other app.
Idea. Something we want to show.
Research. Looking through as many references as possible and selecting the most suitable ones.
Creating the "basic forms".
Polishing. Adding all kinds of small details.
Rendering (in order to analyse the progress of skills development in the future).
Feedback from friends and colleagues is very important at different stages. It helps to correct possible flaws in time.

Idea Creation
There are two types of ideas in my life.
In the first case, I just get an idea to do something. For example, as is the case with the tire. I just sat, ate, and then BOOM! - "I want to make a tire!" 😅.


After coming up with a concept I develop it further. I think about how this can be done more interesting or unusual.
In the second case, I see something that I want to repeat. Or, perhaps, try to somehow make it even more interesting.
It can be 2D or 3D work from another artist. For example, as is the case with "Space material or "Ice".


Or some things that I see when I walk down the street. For example, in the case of the road or the wall in my house. I just walked, saw it and thought - "I want to try to do it!".


Or something from everyday life. As, for example, with the curtains in my room. I just lay on the floor (I like to lie on the floor after a long sitting at the computer), looked at the curtain, and for some reason began to imagine what modifiers it consists of 😄. Then I decided to check whether this is so.


But in both cases, any idea for me, first of all, is a challenge! This is a test of my capabilities and a way to improve my skills. I don’t think about whether I can do something or not. When I get an idea, I'm just looking for ways to bring it to life.


Creating the Planet Material
Each idea requires an individual approach. But I will try to describe my basic workflow using the example of creating Planet material.
The Planet was my very first work. When I first downloaded and opened Mixer, I thought: "No warm up. Let's start with something awesome right away!". 🙂
My main goal was to have a look at the main features of the app and try them out, as many as possible. I thought that creating a planet is a rather complicated and interesting idea to achieve. So, I got started...
First of all, I started researching the references in order to get a clear understanding what I wanted to achieve in the end

For references, I usually use the PureRef. This is a very convenient application with many features.
After I finished with the references, I can finally get to action.
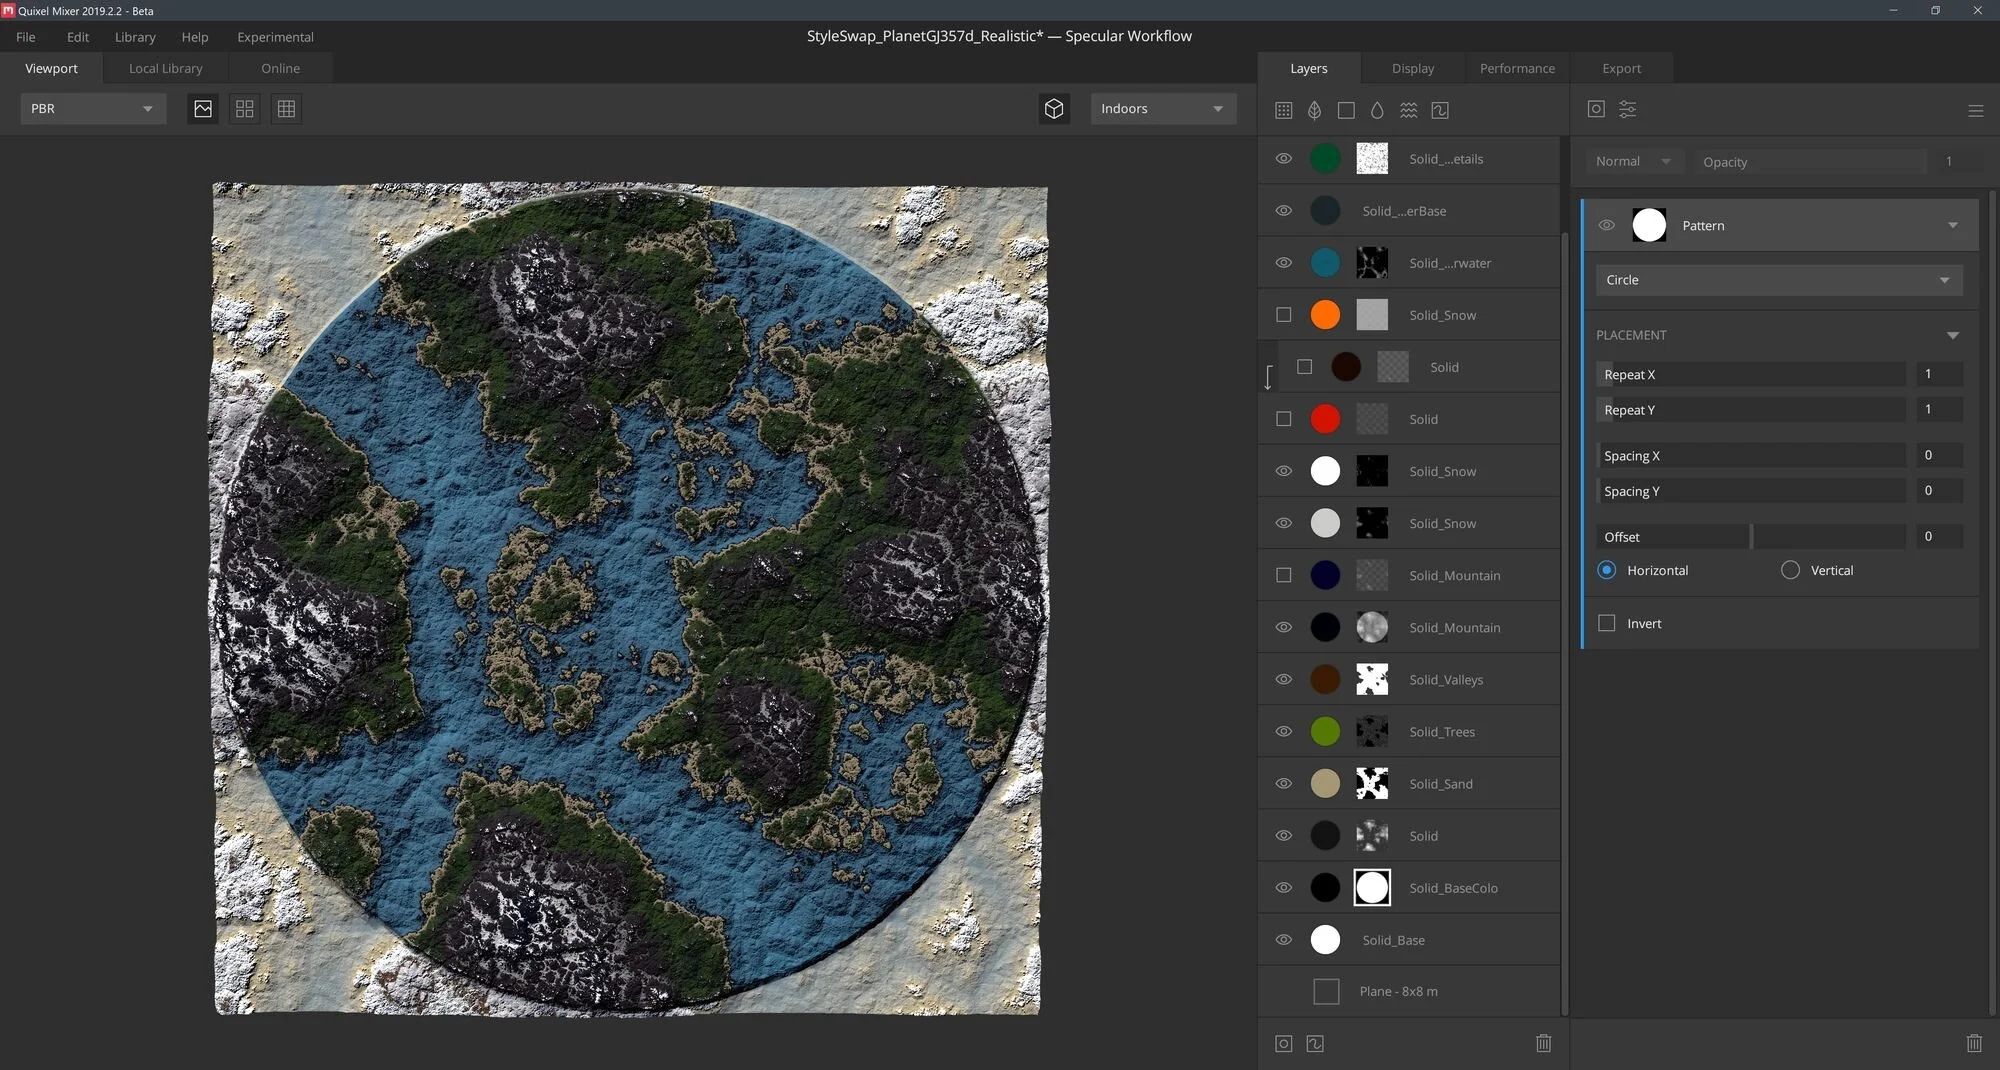
Usually I start with basic markup of the main forms in different colors. As you can see in the screenshot. First, to create displacement I added a base layer with the simple "one-layered" noise as a mask. Then I marked the main types of surfaces:

Colouring base shapes for visual reference

Different colors help you quickly and easily navigate the project. You immediately see where the specific elements are in the layer panel and how they look on the object.
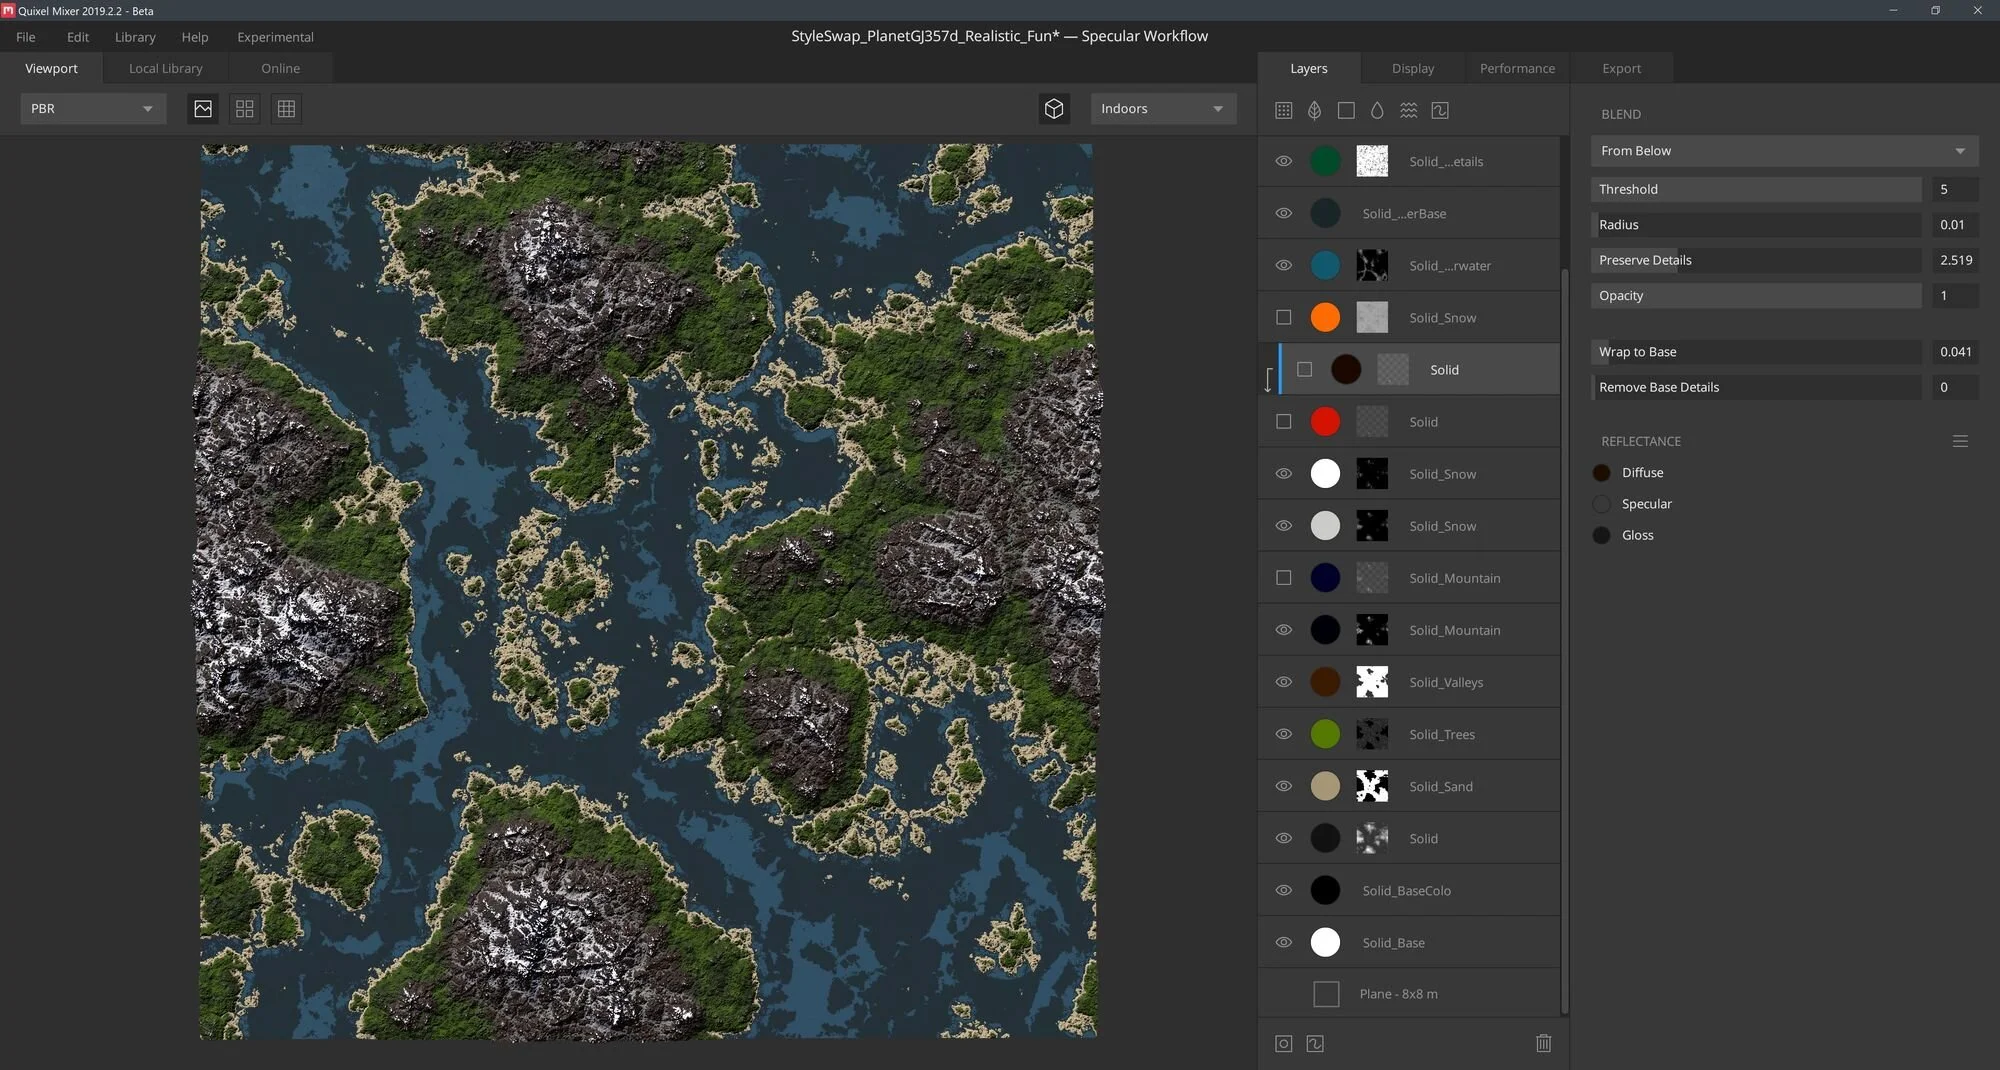
The next step is assigning suitable colours to corresponding surfaces.

I felt satisfied with the result.
It looked pretty cool and reminded me of some kind of geographical atlas.
In this project I used only simple colors. But in some other projects I used materials as sub-surfaces too. It's very easy to change. You need just right-click on the layer and select "replace material".
After that, I added a couple of layers of water, trying to simulate the difference in depth.
Then I really wanted to add a volcano. It seemed to me that some conspicuous details were missing, and the volcano could become the “cherry on the cake”.

It's just simple "Circle" pattern, which I first pushed up a little, and then pushed down.
I thought it would be great to add something else. And then I had the idea to add something similar to a crashed ship.

In fact, the ship was built using only the "Square" pattern. A base was made from a rectangle that was “tilted” using a gradient. Displacement of the surface is also a "Square" pattern - just with "Offset" at 0.5 and large tiling. Masts are simple rectangles too. The debris around the ship was simulated using noise and the "Circle Transform" modifier.

Then I started adding smaller details and refining existing elements. I improved the volcano - added a leaking effect to it. Changed the lava - made it more realistic. And in general, increased the number of colors to make it look more believable.

It seems that the work was already completed, but something was still missing for me. And then I decided to add some kind of clouds.

It's just a simple "one-layered" noise layer with transparency. At that time, I had not used Marmoset Toolbag (because I don't like it). So I decided to render it in Unreal Engine 4. At first I created simple material.

Next, I created a scene on which I placed the usual sphere with my material. Added background and a bit of post-processing. Then took the final shot.

Despite the fact that I was more or less pleased with the result, I still had a feeling of incompleteness. And the render seemed boring and not professional enough to me. Then, I decided to study Marmoset Toolbag 3 and re-render all the created materials in it. For most presentations of my materials, I tried to come up with some interesting ideas. After all, any creativity - first of all, is some kind of story.
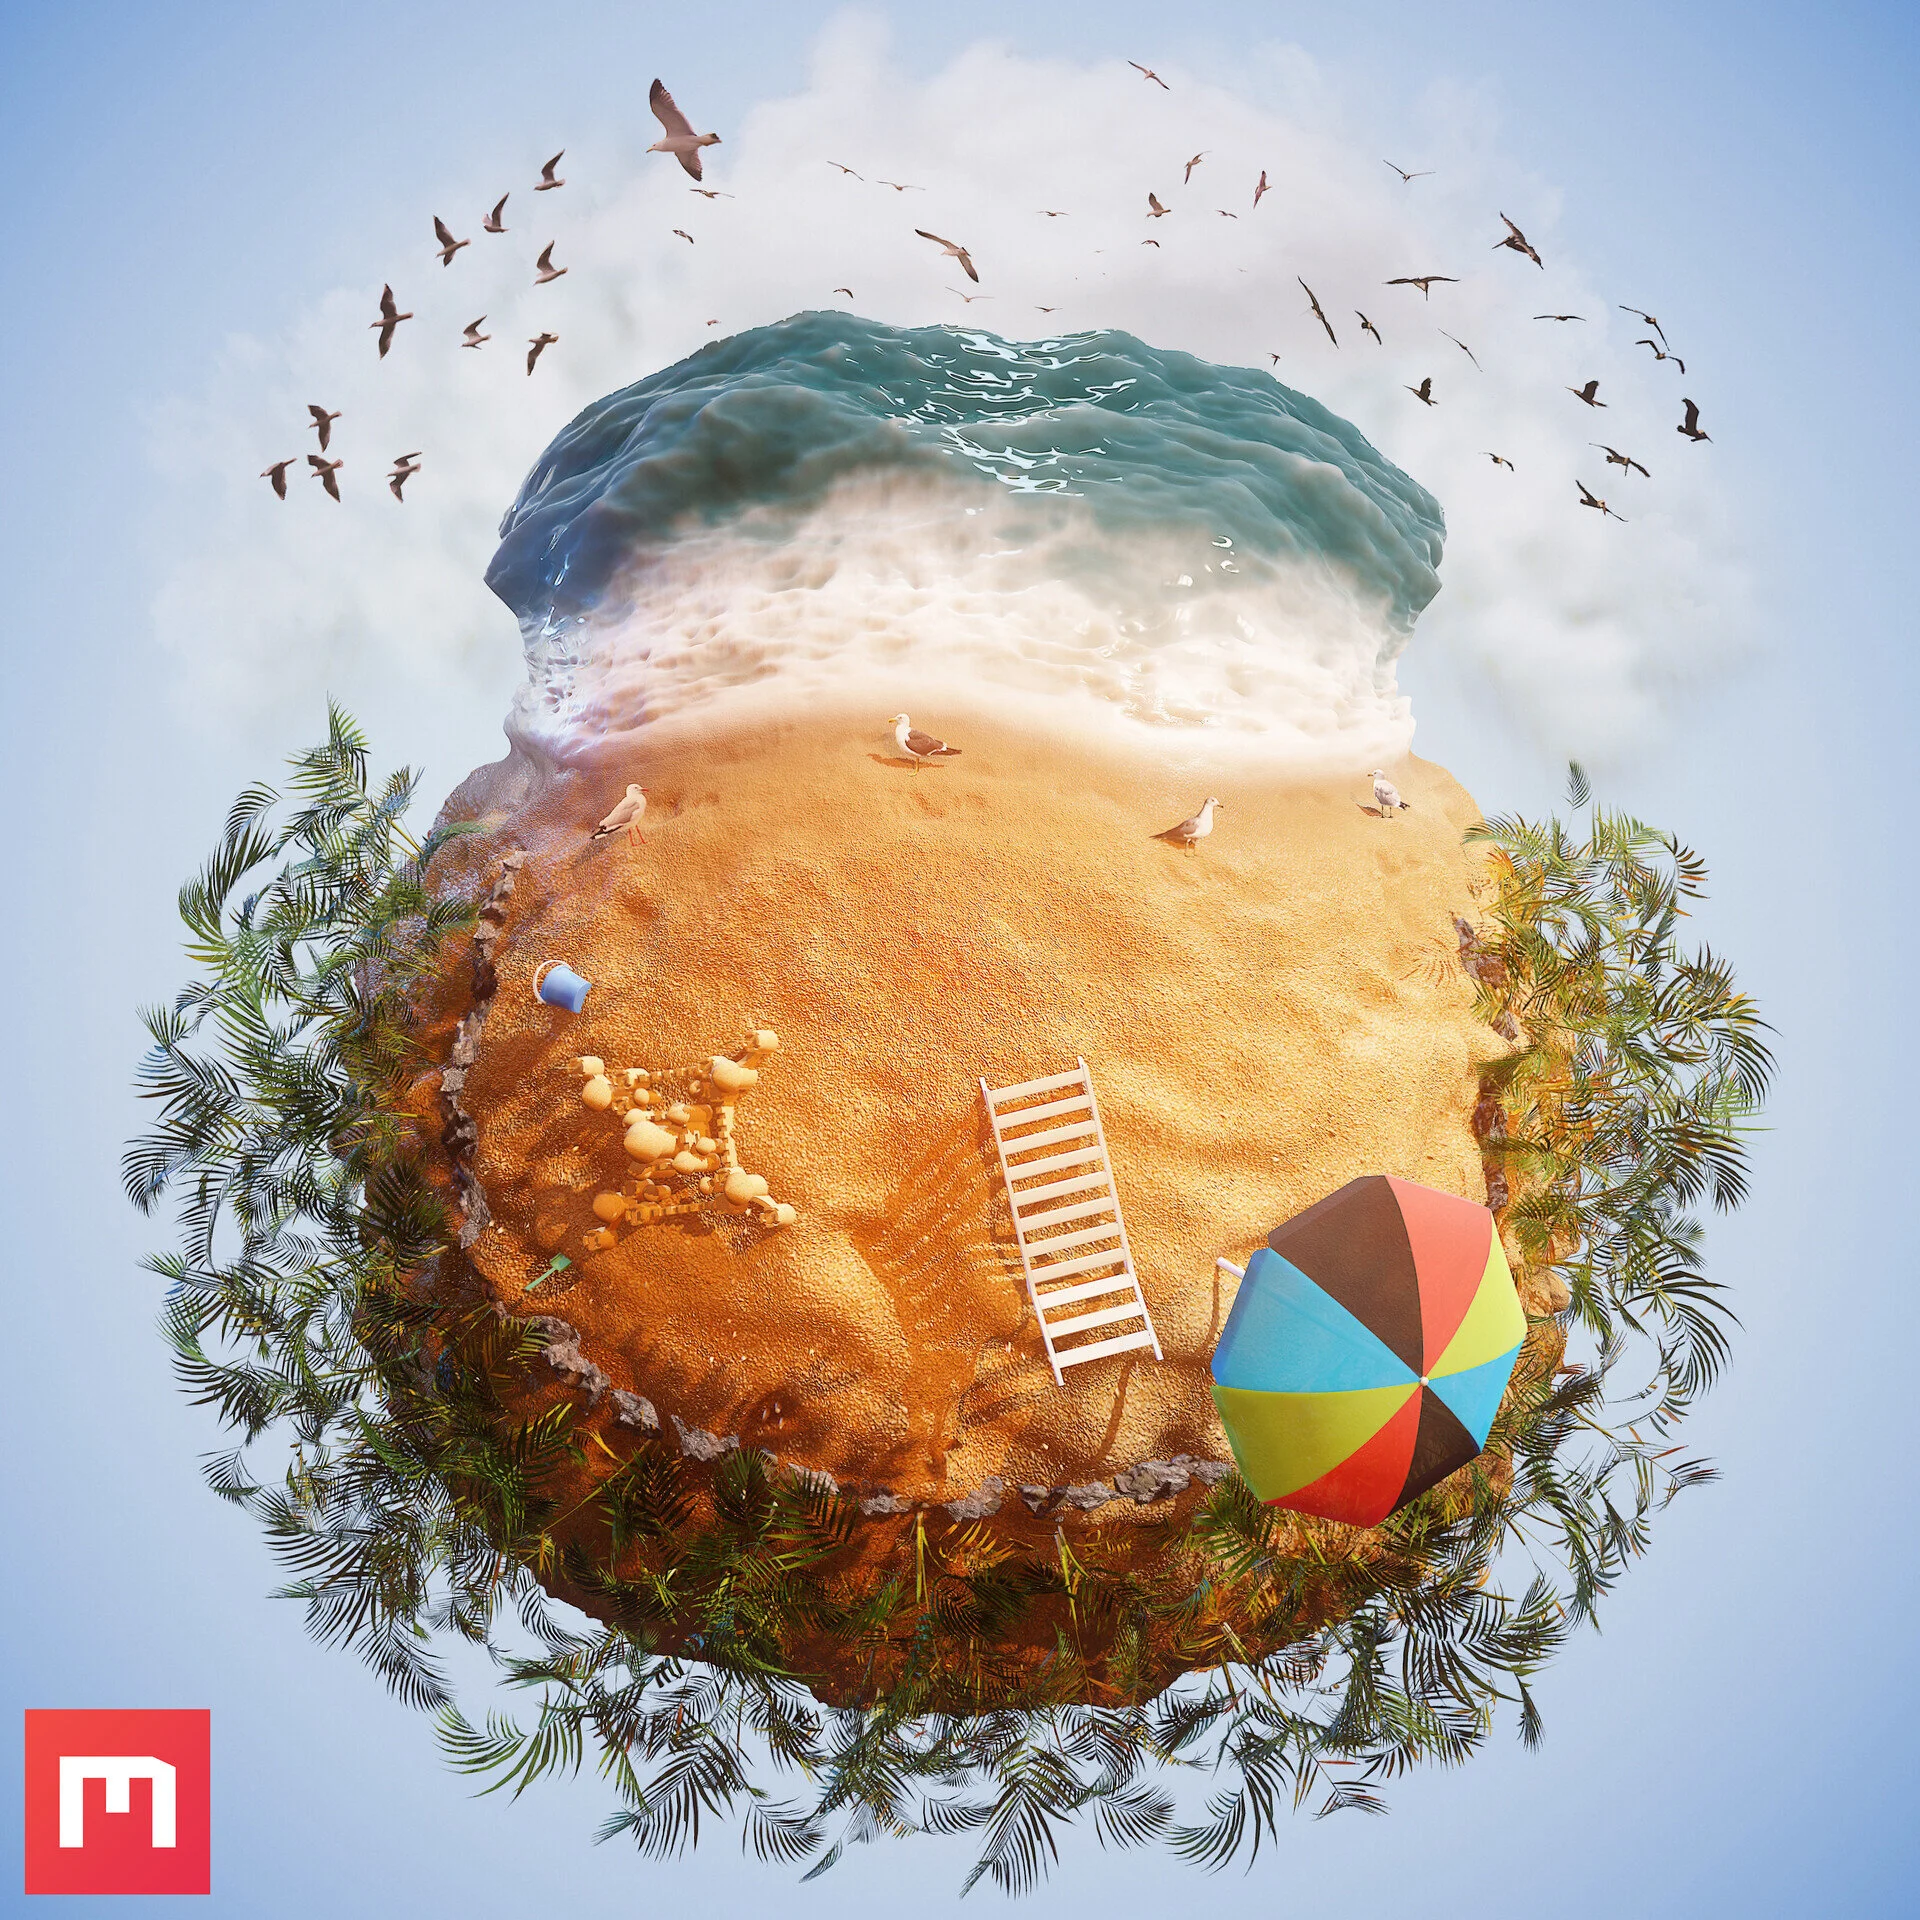
And I created a story that I tried to tell. A lone traveler, in one of the distant universes, enjoys the silence, freedom and admires the "cosmic sunrise."
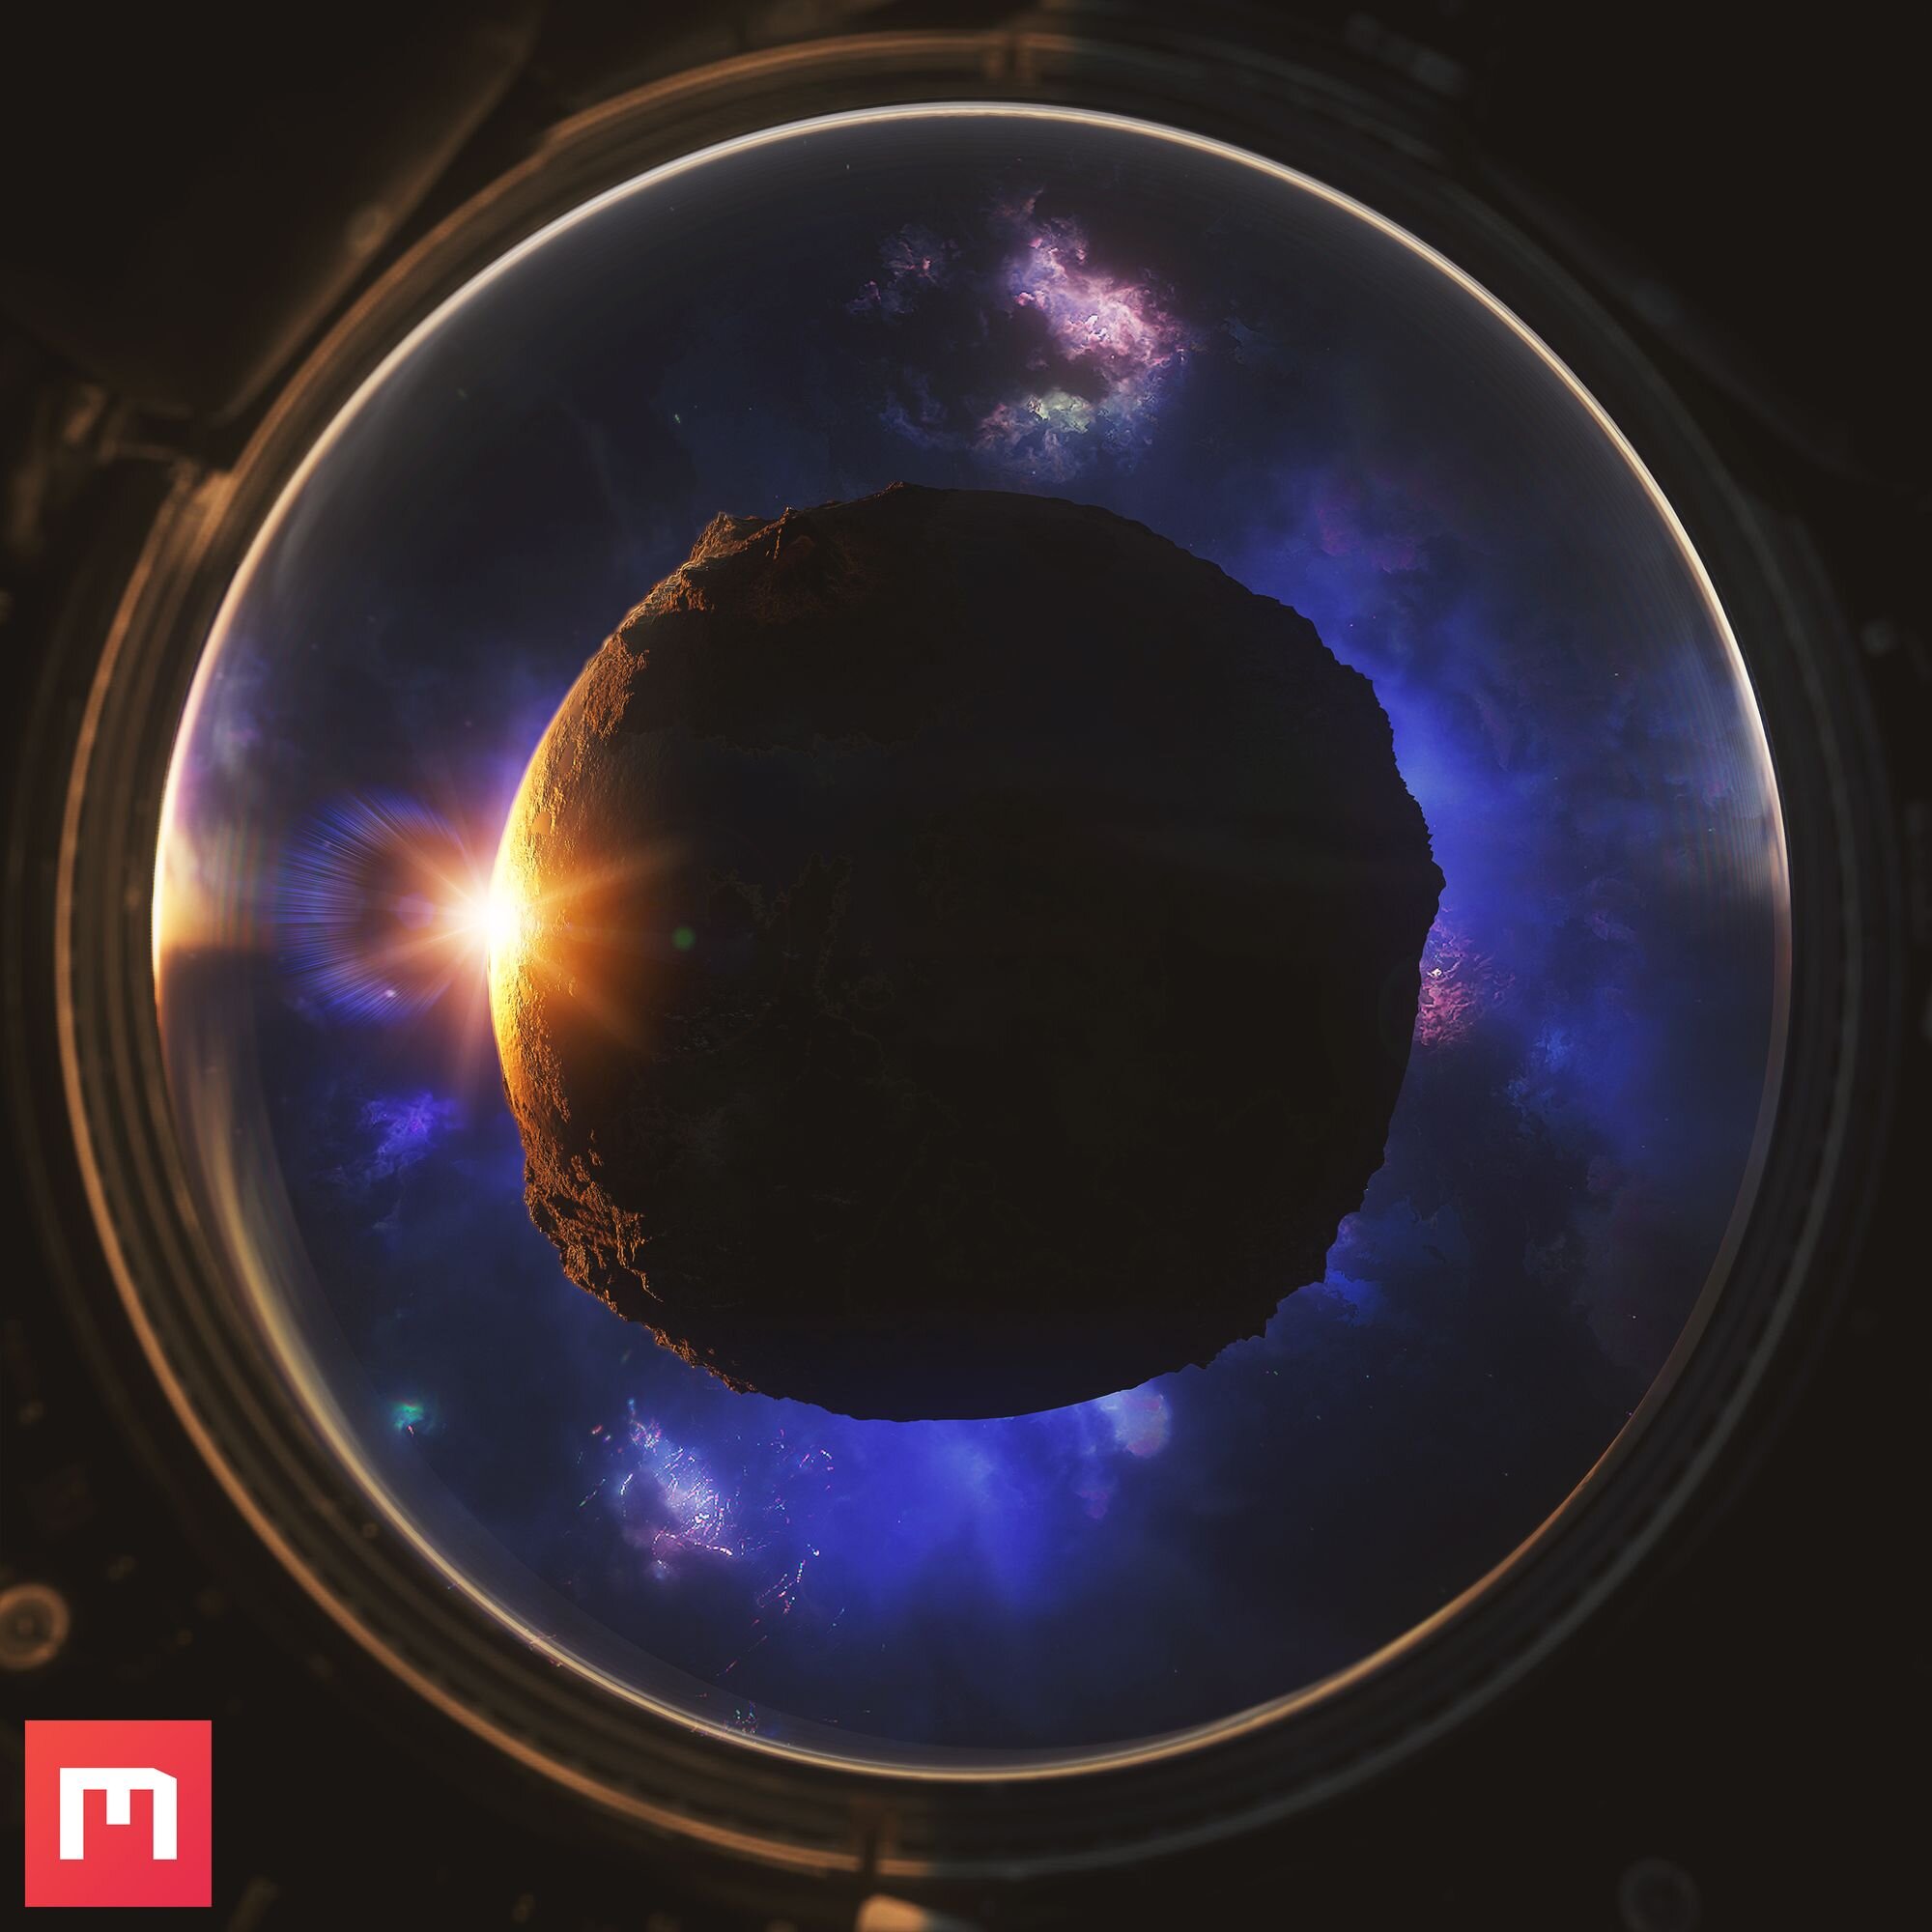

To realize my idea, I found a photo on the internet of some porthole. I edited it a little. Then I just used it as a texture on a plane, after creating a mask for the window’s hole. And so that the excess light does not fall on the plane, I created two simple cubes on the sides.

For the background, I also used a simple image as a texture on a plane.

I used 4 light sources. It is important to understand here that how we set up the lighting determines what mood our work will convey. I wanted the work to look a little fantastic. Therefore, I set completely different colors.

After that, I made several renders with different settings. I combined them in a graphical editor. Added a bit of post-processing and got the final image. I added the Lens flare using the Photoshop plugin, Knoll Light Factory.
With the image of the "dark side" everything was even simpler. I just added one light source behind the object. After that, I added a sphere over the mesh and applied a standard glass material to it. This made it possible to enhance the effect of light reflection.

Then everything is the same - creating several renders, combining and post-processing.
But I would like to tell you about another technique. There is no information on the internet about it (at least I did not find anything when searching). The technique is to add shadows on your object, for example, as in this works:


The bottom line is that we add a plane with a masked texture assigned to it, which will create the shadow. Of course, you can add 3D objects. But it is not always possible to find the desired 3D models, unlike pictures.
In the first case, I added two types of palm trees. Then placed them on the stage so that the light fell on the graffiti.

Due to the fact that the light source is usually tilted relative to the object, it is not always easy to adjust the shadows properly. But usually I just tweak the scene until I’m happy with the result. When creating this image, I especially liked that the lighting on the floor contrasts with the rest of the scene. As textures, I most often use PNG images from the Internet.
In the second case, I used simple planes of different sizes to create a kind of door with a grill, through which light passes.

I liked this technique so much, that I use it quite often in my works. I think this allows you to more clearly convey the mood of work.

Skill Improvements
As I wrote earlier, a very important step in almost any work is to get feedback, analyze already implemented ideas and work on flaws. It is not uncommon that you think - "That's it, my work is finished!". But after sharing it, you begin to notice some things that are worth improving. Or other people who are watching your work notice it.
I always try to get some kind of feedback about my works at different stages of creation. In the case of materials, I share my progress in Discord Quixel chat. I try to listen to every advice and opinion in order to make my works as high quality and interesting as possible. And of course, in order to improve your skills. Because I believe that criticism is a very important component of skills improvement.
Most often, I received feedback from Jin (Quixel technical artist). Thanks to him, I began to use the technique of creating shadows on the object. And in general, communication with him over the past two months has inspired me and helped me develop.
Besides Jin, other community members also helped to make my work better. Special thanks to them for that! 🙂
Why Quixel Mixer?
Quixel Mixer - is a simple yet functional tool for creating high-quality materials in a short time.
I have a lot of experience working in apps from Allegorithmic (Substance Designer, Substance Painter and even Substance Alchemist). I admit that at the moment their products are more functional and technological - it's hard to argue with that. But thanks to the huge library of photoscanned materials and incredible ease of use, Mixer is also well suited for creating materials, even for AAA projects. In addition, I am confident that in the future, Mixer will become the new industry standard. That is why it is worth thinking about starting to study it now, while it is free.
In any case, I think this is a great opportunity to watch how similar products develop and be part of it.


Future Work
I publish all of my materials on Artstation to create something like a checkpoint. But I still have a lot of ideas that I will gradually implement. In addition to the materials, I have various ideas for scenes and small videos. I also plan to record a series of video tutorials in the near future.
Here is a couple of my new materials, which I completed recently.


Useful Tips
Summing up, I want to share my list of the main components of creating almost any work:
Come up with an idea. Focus on it.
Use references.
Use more references.
Even more references! No, perhaps this is already too much.
The main thing is to stop in time.
Do not proceed to the next level of detail until you have done the maximum work on the current.
Use color splitting to make it easier to navigate.
Keep track of the scale of what you are doing.
Ctrl+S shortcut is your best friend.
Always try to get feedback.
Try to improve your work.
Do not publish the work immediately - let them "rest". Look at your work a few days later - this will allow you to see new opportunities for improvements.
Do not forget to render your work and save the result in order to track the progress of development of your own skills.
When creating a presentation of your work, try to tell a story.
Use the shadows.
Do not forget that lighting, colors and composition help to tell exactly the mood and exactly the story that you feel.
Do not be afraid to experiment and try something new.
If you have learned something, feel free to share your knowledge with others.
Try to always learn something new from others.
Never stop on the achieved result.
Develop your imagination - try to hourly invent something.
Just create! Anywhere. Anytime. Creativity - is a skill!


I was very interested in sharing my experience with Quixel Mixer. I hope you were no less interested in reading this. But it’s better to go and try this application on your own while it is free. And, perhaps, for you it will also become one of your main tools.
Thanks for your attention!🙂


P. S. In the CG industry coming soon:
Say my name!
. . .
Say! My! Name!
Mr. Mixer?
You're goddamn right! 😅