
the artist’s studio - every artists dream
The Old Masters spent many hours painting in their studios. Tyler Thomas has recreated the artist’s studio and talks about his workflow techniques from blockout and lighting, to material creation and prop creation. Tyler Thomas was also kind enough to put my oil painting of my dog in the scene!
Introduction
Hello! My name is Tyler Thomas, and I’m an Environment Artist from Los Angeles. I just graduated from California State University of Northridge. I’m currently trying to break into the video game industry to work in one of the studios. Like many 3D Artists, I grew up playing video games for many years, and I will say that Farcry 1 is the earliest game I can remember that got me into the world of 3D. If you don’t know the Farcry games, they have the map editor where the player can build the maps with their assets. It was incredibly fun to create the maps in the game while I get to see other people’s creations. It was not until my freshman year in college I found out that people can make a career out of building environments in video games. So I have been creating many of the environments ever since those years.


Planning
While I was surfing Artstation to find concept art for the project, I found YuQing Wang's artwork that captured my attention. I love how the atmosphere feels in his artwork with the lighting and warm color palette. Painting landscapes is one of my hobbies that I enjoyed, and I realized that I will have so much fun to create paintings and supplies. I used PureRef to collect the reference images I’ve found on google. I tend to start gathering the reference of the materials for walls, floors, and wood. Wood is the most important reference to collect because the majority of the props in the artwork are made out of wood. After that, I gathered many of the reference photos for all of the props in YuQing Wang's artwork. Once I have all of the reference photos, I analyzed all of these pictures to figure out the best way to make these base materials and props efficiently.

Concept Art
Workflow
The entire process of the Studio involved the Blockout, Trimsheet, modularity, vertex blending, decals, and texture atlas workflows.
Blockout
After implementing the character model as a reference scale into the level in Unreal, I set up the wall and floor to fit the scale right while I was eyeballing the concept art. Once I got the scale right, I started placing the cubes as placeholders for the props. This meant it would be easy for me to create the main props with the right scale once I exported the placeholders out of Unreal to Maya. The lighting was pretty basic at this stage with just directional and skylight.

Blockout
Base Materials
After finishing the blockout level, I started working on the textures for the wall and floor in Substance Designer. I didn’t do anything fancy in Substance Designer because I’m still getting used to creating textures in the software. I used a lot blending the pattern, blur, warp, etc. The floor and dirt textures were combined into a material that I can use the vertex painting to add the dirt around the floor.

Materials
Trimsheet
Tim Simpson, Polygon Academy, created the tutorial videos on Youtube about the Trimsheet that helped me to understand how to create the Trimsheet. I decided to use this technique for all of the furniture because the majority of the props in the scene are made out of wood. I created the plane with several edge loops where each part of the texture will be. Then I modeled the pieces as a base mesh before I imported it into Zbrush.
TrimSmoothBorder and ClayBuildUp are the brushes I used very often for sculpting the base mesh in Zbrush. Once the sculpt was completed, the high polygon mesh was baked down to the plane in the Substance Painter. I used the smart material of the wood walnut as a base and I adjusted the parameters inside. After that, I added more details by using smart masks and painting some details by hand.
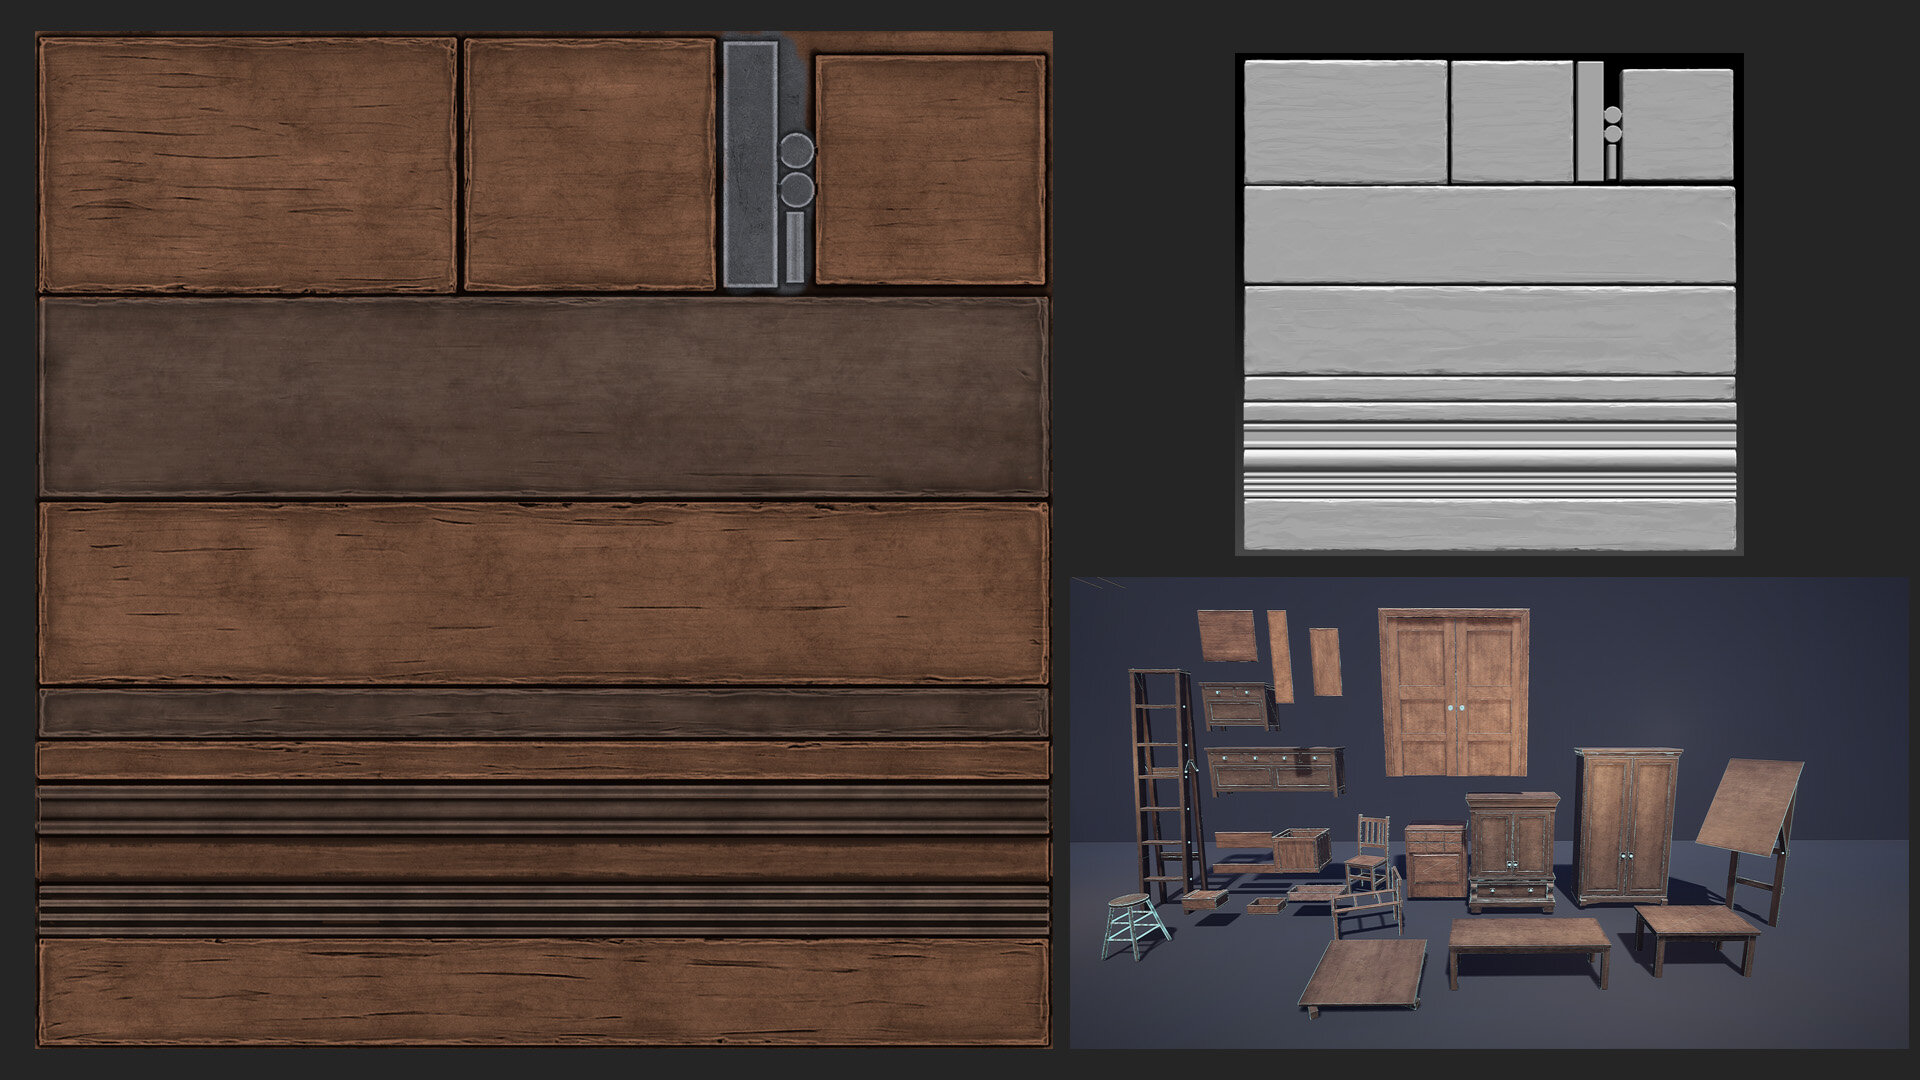
Wood Trim Sheet
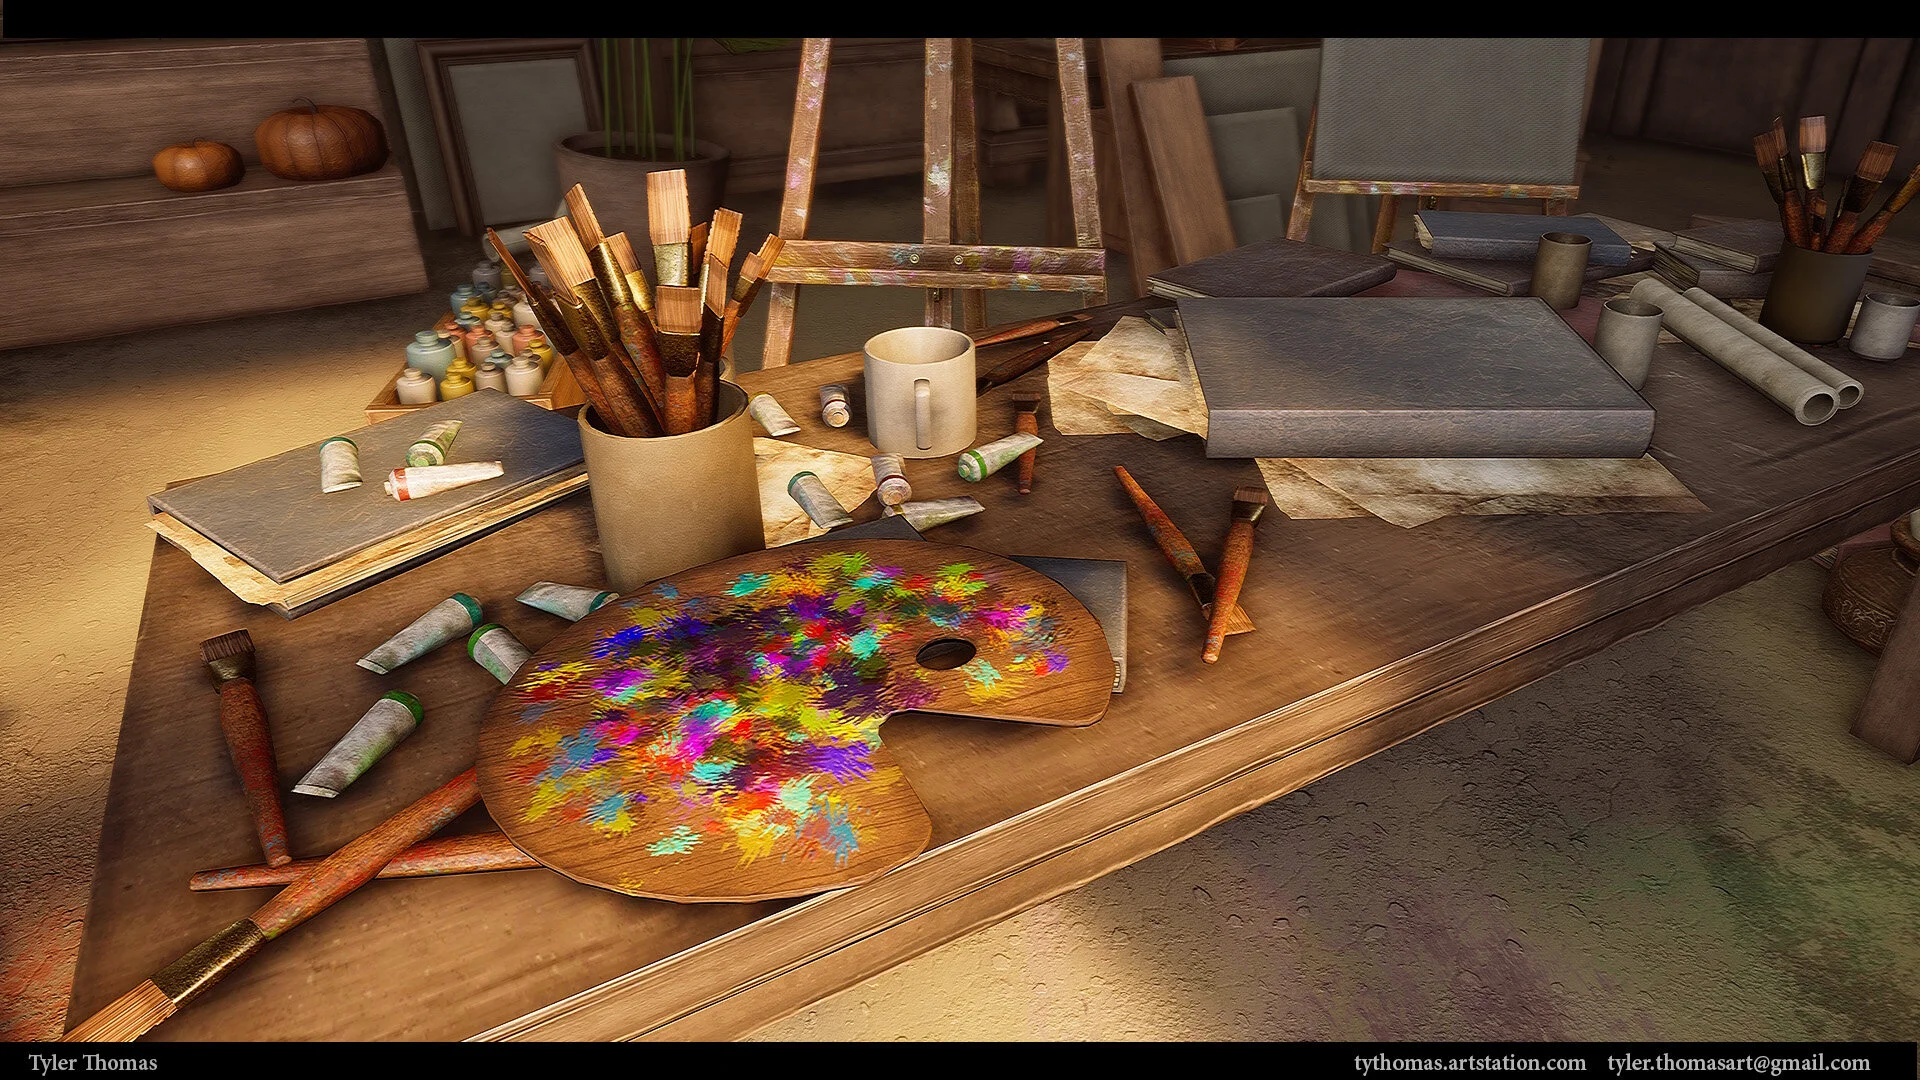
Easels & Statues
The easels and statue head were some of my favorite things to work on for this project. From my perspective, the easels and statue head are the hero props because it’s where the viewer will be looking most of the time and it is what sets the theme of the scene.
The workflow for these props goes like this: Model the low poly in Maya, make the high poly sculpt in Zbrush, and then texture in Substance Painter. The workflow is a little different with the statue head because it is an organic shape that I decided to start making the head in Zbrush from a low-res sphere symmetry. After I finished sculpting, I decimated the head to make it a low polygon model. Sculpting is one of my favorite parts because I feel that I can give a lot of characteristic details to the props that give some story or history behind the details.
Brushes I mainly use in Zbrush: ClayBulid up, TrimSmoothBorder, and TrimDynamic.

Easel
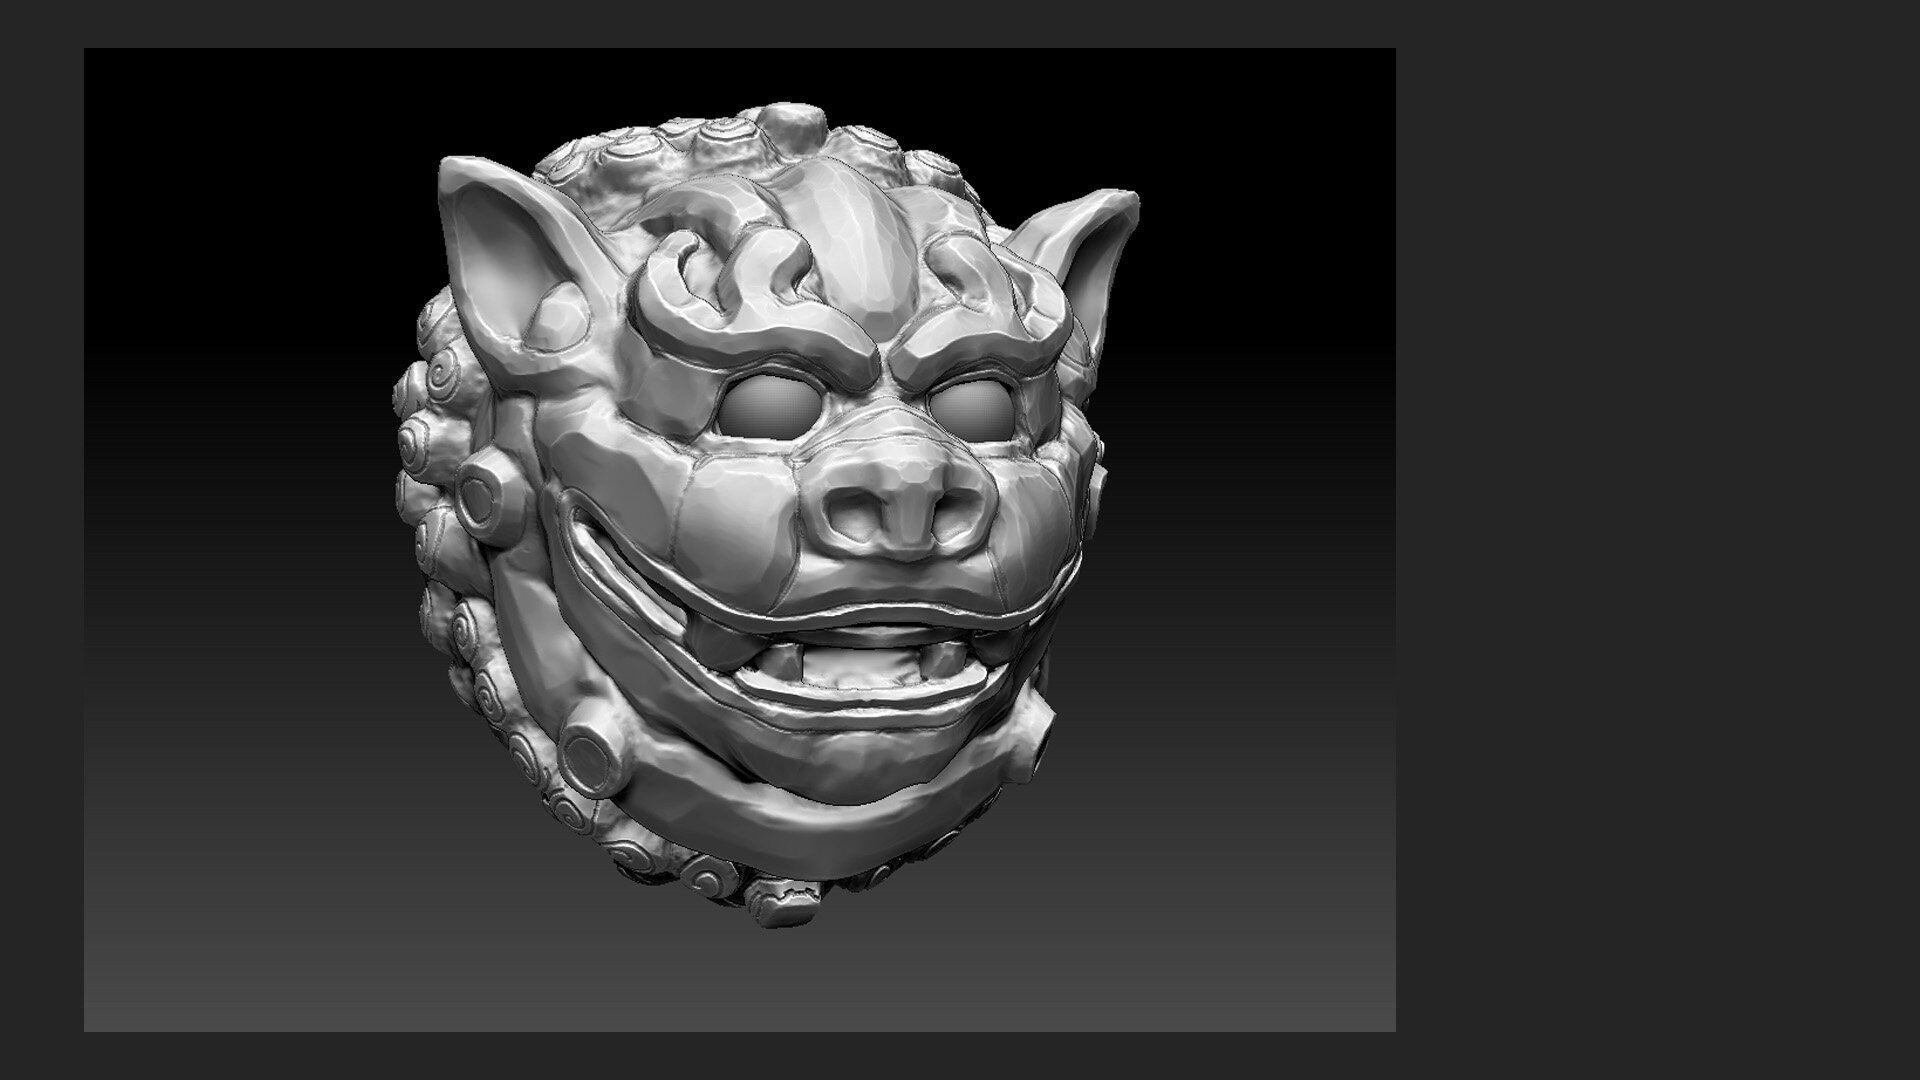
Statue Head
Texture Atlas
Texture Atlas helps me create the texture pretty quickly because the props can share a single UV map. Plus it can save memory and reduce the draw call in Unreal for the performance. After I unwrapped the UV map for each of the props, I combined all of the props. I then make all of the UV shells for all of the props to share the same texel density. I use the layout tool in the UV editor to pack all of them into the single UV map, and I then manually clean up. It’s good practice to use this workflow in any of the projects.

Texel Density
Oil Paintings & Decals
The decal may be a small tool but it will make a huge positive impact on the project. Dirt and paintings were put into the level as the deferred decal. The dirt decal can be applied to the props to give a variation of the roughness. It can help to break up the repetition of the tiling texture and make it look a bit more interesting.
The textures of the dirt came from the website, textures.com. It has a great resource for decals. All of the paintings were created in Photoshop by the hands. I used the “oil paint” brush to make it look like it was painted traditionally onto the canvas. This part of my project was pretty fun that I got to paint many different kinds of paintings. I created the materials instances to make it easier for me to switch the paintings with some color variation.

A special thanks to Kem Yaralioglu for letting me use his oil painting of the dog!


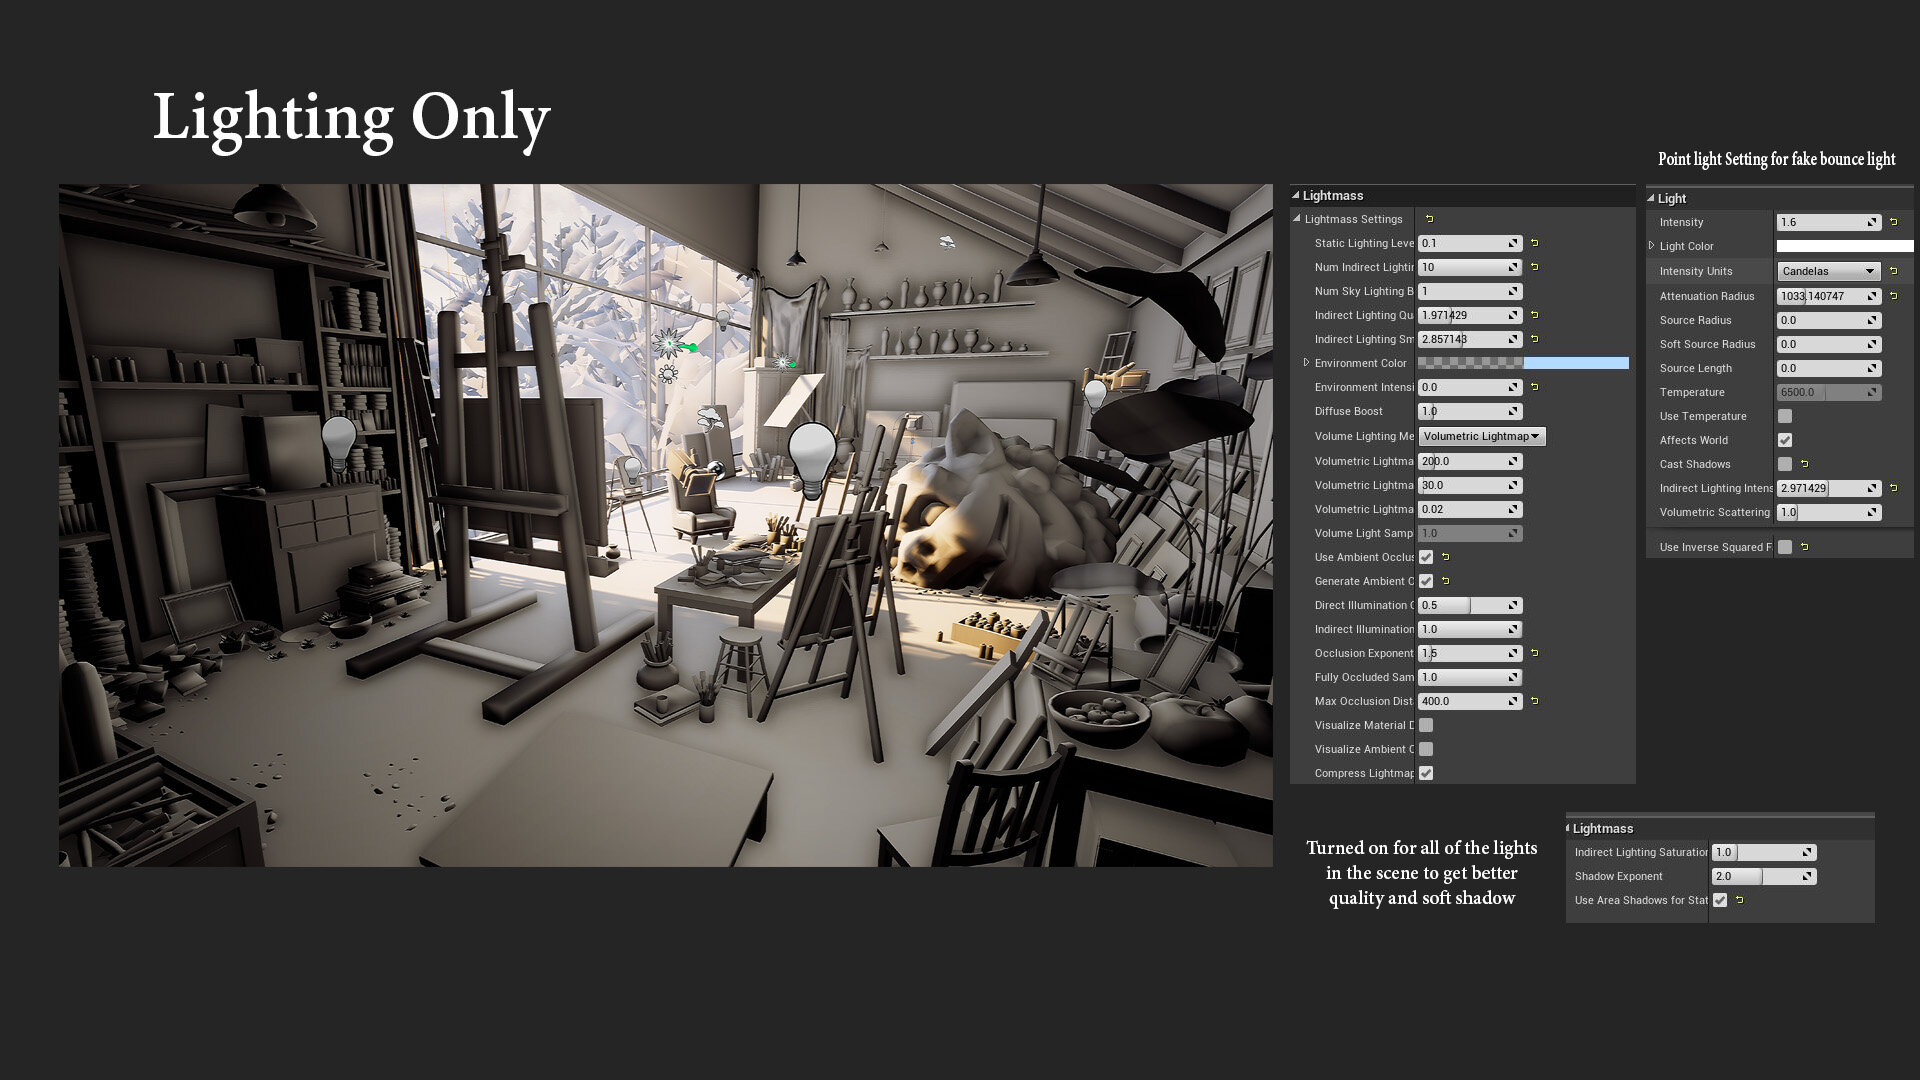
Lighting
The lighting was set up with a stationary directional light, skylight, and a few point lights. The point lights in the level were put there as a fake bounce light. It can help to brighten the part of the room that was too dark. The inverse fallout and cast shadow were ticked off to help with that.
Challenges & Advice
The lighting was my biggest challenge on this project that made me adjust it so many times to get it look right and visually appealing. In the beginning, the lighting looked a bit flat and boring, but eventually, I got it to look better with more contrast and warmer colors. What helped me to get through that process was asking for feedback from the Polycount and No More Grid community. They were able to explain to me what I can do to improve the lighting and post-process. LUTs in the post-process were a huge benefit that pushed the quality of my project. This is one of the reasons why I always advise people to post their work online to get feedback because I strongly believe that critiques will always help to create better quality projects. I recommended all environment artists to join the Polycount and No More Grid Discord communities.
Asking for the feedback is incredibly important because it will help you to improve the quality of your project. When you look at your project so many times, you will most likely develop "art blindness", that you will probably overlook the issues that need to be fixed. My project changed a lot with the influence of the communities. The main things that they gave me the feedback on were to fix the scale and lighting which you can see below in the screenshot to see the difference.

