
Dead End - Born From an Art Test
Stephen Seress-Smith tells us about his latest environment that started out as an art test and then became something bigger. Explore detailed composition and lighting breakdowns, storytelling through props and set-dressing, paintovers, planning techniques and more.
Introduction
Hi there, my name is Stephen Seress-Smith, I’m a 30 year old dual national British/American citizen currently living in the UK. I’ve just graduated from Teesside University with a Masters Degree in Computer Games Art at Distinction level and am now on the lovely journey of finding a job.
My admiration (or obsession) for games came to me when I first began playing Sonic, Shadow of the Beast and Double Dragon on the Sega Master System. It was like nothing I had ever experienced or known about, having been playing with Lego or fighting demons with a stick and my imagination. I soon became hooked, cranking out hours of gameplay each day and being fully immersed in their worlds.
I then got to experience Mario Kart on the N64 with friends and Pokemon on the Gameboy, then various classic titles such as Spyro and Crash Bandicoot on the PS1 but the release of the PS2 really solidified my goals and dreams of working in games.
Jak and Daxter, Ratchet and Clank, Need for Speed, Tony Hawk, SSX, Twisted Metal and GTA III were my big go to games. There was something about them that was really striking with their style and gameplay that I thoroughly admired and enjoyed.

Origin and Composition
This piece originated from a 3 day art test I did for a studio. The goal was to create an environment of any kind based off of a blockout they provided. There were some restrictions that I won’t explain but that’s the origin story of this piece.
I then took the concept and decided to use the theme and art direction for my final Masters project.
I had to outline my own goals, learning outcomes, restrictions and incorporate a research element, which I decided was going to be; “Exploring stylised art production utilising industry standard techniques to produce an environment for emerging technology experiences.” In other words, a stylised game environment for Virtual Reality.
The composition is inspired by the narrative and level design. The overall idea here was to consider playable space when immersed using the VR headset. Having an interest in Level Design and being a fan of the games mentioned before, I drew a couple of ideas down and decided to treat this like a small arena area found in PS2 era platformers.
With that, the plan was to produce either a spherical or square space with chapels on the outskirts and a large chapel as the goal/end point. It was set on quite early and after trying both options, I decided the spherical map would be better for the, what was then decided, central courtyard.
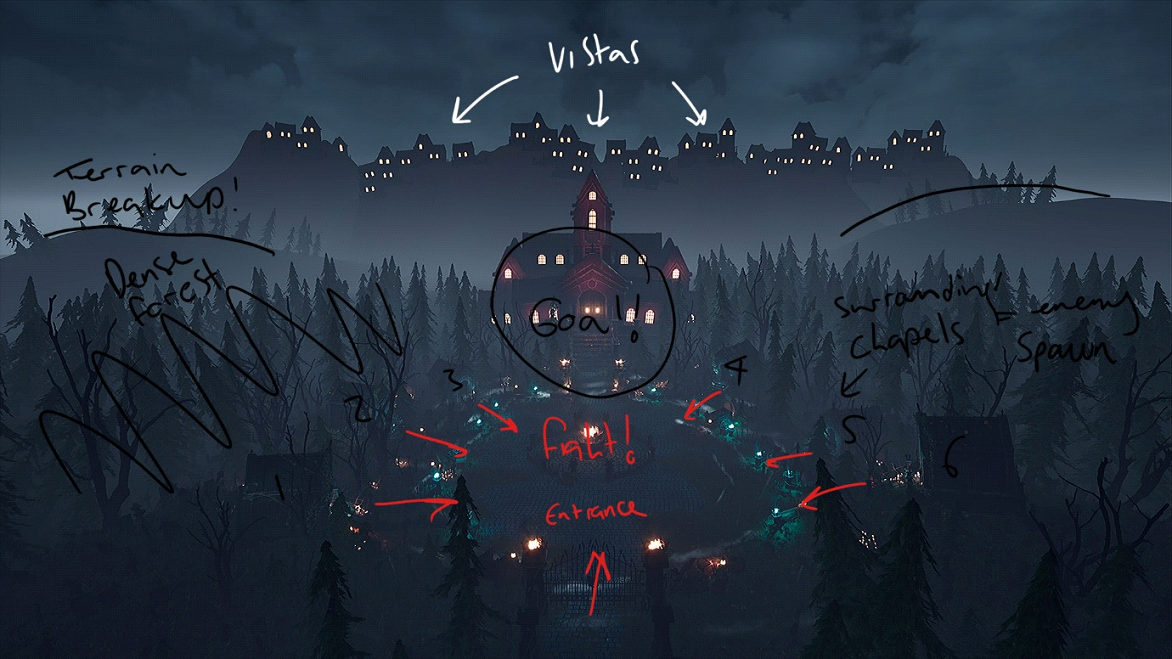
Composition analysis
When it comes to the composition of the scene, almost everything is there for a reason. The shape of the map is designed to represent an arena and each chapel around the edge would have enemies spawn from them randomly and attack the player who would be in the centre. The entrance is a tight alley between two tall walls with grand pillars at the end, so when a player enters the area opens up to a much wider space making it feel bigger than it actually is. The large red chapel is directly in front, showing the player exactly where they need to go and lights encircle the courtyard at the entrances to the small chapels, drawing the players attention towards them as a level design rule.
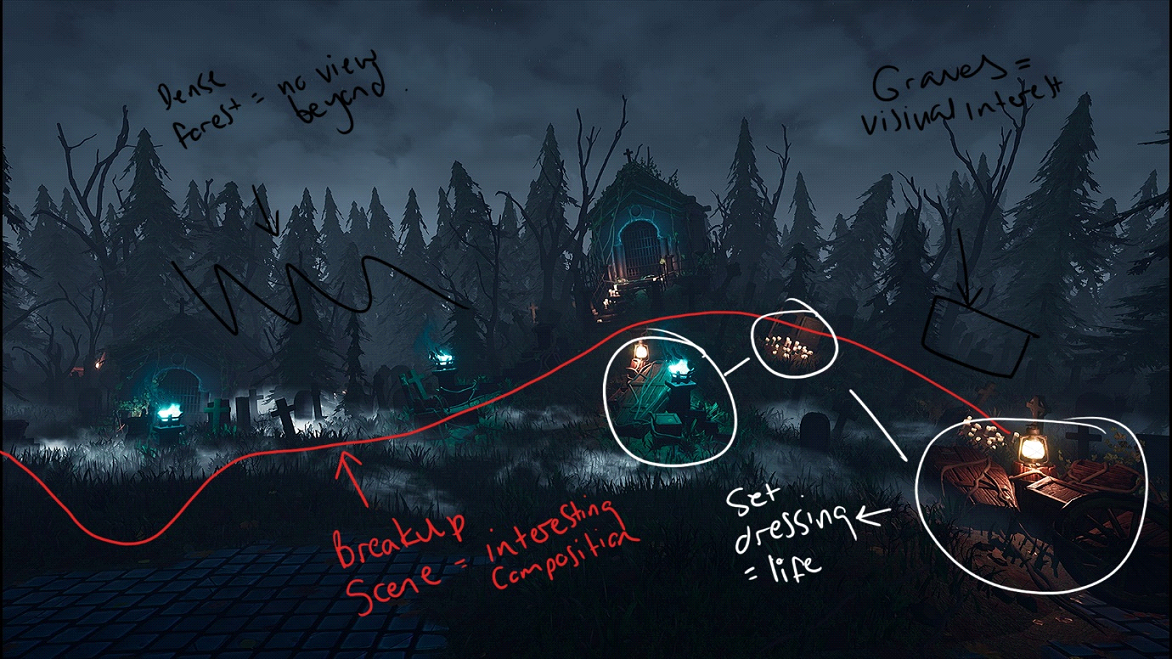
The vistas in the background bring a sense of a larger world beyond the trees and differentiate in height to add to the world building believability but also visual interest and this is also seen with the foreground terrain with chapels either sunk or raised around the map breaking up the encompassing scenery.
The trees are purposely dense with foliage, graves and mist so the player can’t see through and within the forest, there are small pockets of visual interest for the player to enjoy whilst exploring.
Again, the entrance to the large chapel is larger than the other walls and pillars, provoking a grandiose feeling of importance when entering and the set dressing in the foreground is there to fill pockets and gaps with something exciting to look at whilst suggesting life in the world but also a sense of abandonment and age with the use of vines covering them up.
All that’s to say, despite there being a theory behind it, that doesn’t mean there isn’t a madness too, a lot of this is just creative flow, “I wonder what would happen if I put that there, nah, no good, what about this? Yes perfect, ooo and what about this? Excellent, and this? No, no, no … “.
It’s a very iterative process of trial and error, back and forth and pondering.
Composition analysis
Lighting
In this scene, there are three types of lights, set lighting, thematical lighting and directional lighting. Set lighting is essentially world lighting, so night sky or sun light. Thematical is there to solidify the theme and art direction and the directional is used as a design logic to show the player points of interest that I want them to see, whether that’s places to go or things to see to spark curiosity and immersion.
With this being a night scene, the only Set light I really needed to consider was the moon and any bounces as a result, which could be simulated using staged spotlights. The thematic lighting is essentially a supportive base, and in this case, consists of two directional lights; one a deep purple for the shadows, and the other a sickly green for the highlights. You can see them both here in the Detail Lighting viewport.

Detail Lighting viewmode
What this is doing is footing two primary mood colours taken from the colour palettes, that complement each other but can act as a contrast to the other thematically. After that, the directional lights are scattered across the scene as primary, secondary and tertiary elements to draw attention or lead the players eye and is mostly consisted of point lights building the initial glow and spotlights simulating bounces on the neighbouring assets.


What I have learnt during the development of this, is simulation. Singular lights aren’t really able to do all the heavy lifting so you have to build up the lights in the scene with a consideration to how real light react. Two books worth recommending for understanding this from a creative standpoint is Digital Lighting and Rendering by Jeremy Birn and Color and Light by James Gurney.
From a technical standpoint, admittedly, I am still learning. I can tell from my optimization viewports that my light information closer to the front of the chapel is quite complex so learning better ways to work with the lights is something I’ll need to explore further in my professional development and understanding.
Storytelling with Props
I purposely ensured I had a limited pallet to work with because I wanted to push my modular mentality and workflow and deciding on the most valuable props was important. This kind of decision making really comes down to how well you’ve researched your theme, art direction, world and concept.
With this being a Halloween type environment, looking at various games such as Bloodbourne, Diablo, MediEvil or Sea of Thieves, really helped with the decision making on what would work well in this world and what would not.
Additionally, looking at other artists such as Tobias Koepp, Dmitrii Mukhortov, Simon Kopp and Tomer Meltser provoked a lot of inspiration and creative freedom with regards to world building.

Once the research was in place, the questions then were; what would you expect in a graveyard? What year or era could this be? Who would’ve used it, how? What’s happened since then? Does anyone still use it? What world is this set in? Is it real life or fantasy?
Answering these sorts of questions really helps round out any concepts or thoughts. My answers were; Graves, coffins, oil lanterns because this is a fantasy Victorian-esque environment. Undertakers would use carts to move bodies, let’s get some carts in there. As this is a magical place, maybe candles would suit and bring a seance like vibe (a meeting at which people attempt to make contact with the dead), ooo and some cold blue magical lights. As this is the entrance area, there could be crates or boxes because it’s a drop off point for the main chapel…
That kind of thinking. From there it’s just a case of building, iterating and ensuring visual interest.

Lantern prop

Wooden props

Candle props

Cart prop
Planning and Materials
Planning is key to the success of a project, sometimes you get it right, sometimes you get it wrong but as long as you’re building, developing and iterating whilst understanding your faults, you can always build on your weaknesses in the next project.
I always start a project with solid pre-production and research, lots of research; I’ll consider my theme, what props I need, what resources can help, what materials might work and what help I’ll need to complete what I need to.

Planning spreadsheet
With this plan and using the MoSCow method, I am able to know exactly what to do next and one of those things was to get some Substance Designer practise in.
Understanding that this environment will have a courtyard with a forest and in a stylised art direction, I searched YouTube for some tutorials and was lucky to find two brilliant resources; the first is “Get Learnt”, the second is Kalyson and I can’t recommend either of them enough.
With that, it was just a case of free flow following a tutorial and adding some creative freedom to the development. I won’t break them down too much as they’re not really my own work (it is but it isn’t) and I’d prefer to direct people to explore the resources for themselves. However I will recommend working smart with what you’re building and try and understand the fundamentals of the tools you’re using by exploding the values to see the full reaction of what it is you’re doing.
It’s also really important that you use real references to help build your materials as accurately as possible, even with a stylised art direction. Our brains are very quick to recognise a break in the rules and a fault with what we’re seeing, the colours can seem off or the shape is wrong, the roughness values aren’t making sense and the normal information isn’t working. Again, be smart about what you’re trying to achieve.

Pavement Substance

Grass Substance

Clipping areas
After applying my materials, I realised there was this terrible clipping happening, to fix this, I decided to explore vertex painting with dithering.
The shader I made in engine was a simple material height blend between the cobbles and the muddy grass, then on top of that, I used a pixel depth offset and multiplied it with a Dither Temporal. This created a smooth blend between the assets and as I understand it, Dithering is essentially blending the values together by spreading out the pixels in between each other.

Dithering shader example to combat obvious clipping
Particles
The particles are made using a plugin from the Unreal Marketplace, it’s called Fluid Ninja and if you’re doing anything stylised, I recommend checking it out.
Essentially, it’s an in-engine developer tool that let’s you create and combine a mix of GIF planes and particles to create some really interesting FX assets. It’s easy to use and very intuitive, a really good purchase and also a great tool for understanding other ways of creating some really nice FX at a relatively low cost.

Fluid Ninja plugin
I think it’s important here to add that not everything needs to be made raw. I’ve realised that using Megascans, Mixer, Speed Tree or various plugins such as the Smart Spline Generator (which I used for my vines and roots), isn’t actually bad practise. A lot of the time, especially in environment art, assets or other teams will produce a lot of content and it’ll be your job to piece it all together coherently. I don’t know if this is true for lots of studios but I’ve spoken to lot’s of developers who have confidently said, do not feel like its cheating, using these extra tools or assets.
Sky Box
The sky box is just the generic sky blueprint from UE4 with the starts turned up and the sun at its lowest point, nothing fancy I’m afraid.
Cinematic
I went into the cinematic with a love it or hate it attitude. The inspiration came from choosing the right song for the scene (In the Hall of the Mountain King) and then being inspired by the old Alton Towers TV adverts from like the early 2000’s. This song is like their signature go to music for marketing so I wanted to incorporate that inspiration somehow and so what I decided was to imagine what it would look like if you were panicking and stuck in this area, which a player would be. The early shots are really designed to show off the environment a bit from a presentation standpoint, the assets, lighting, foliage, scene etc and the end is literally just a bit of cinematic fun. Arguably it isn’t everyone’s cup of tea but hey ho, I enjoyed it.
Foliage
The grass clumps were made by baking high poly grass assets to a plane in Substance Painter and then hand painting the details in to give them a bit of realistic colour variation and depth. This is then cut out in Max as tight as possible to lower overdraw and then masked in UE4 using an Alpha mask and that’s that.

Grass Textures in Substance Painter
The problem with this method is it can be extremely expensive and in fact, the cheaper alternative which I later incorporated was to just simply use planes. We’re coming at a time now where geometry really isn’t costly at all and studios are figuring out smarter, more intuitive ways of rendering complex and high fidelity scenes in real time. Horizon Zero Dawn – The making of the game (2017) documentary really goes into some of the clever techniques being implemented by Guerrilla Games, behind the curtain. It’s some serious wizardry.
The trees were created using Megascans assets and a bit of creative freedom. The first gangly looking tree is nothing more than a giant dead branch asset from the library and the conifers were created by downloading some branch materials, scaling 4 different types onto a map, adding a surface blur to the albedo in Photoshop for that “Stylised look” and thickening out the mask to avoid it looking too realistic and defined. Then I popped over to Max, added the materials to planes and chopped them up into cards to create branches with, which could then be built into a tree.

Blurred colour and alpha cutout textures
Tim Simpson from Polygon Academy has a great video on YouTube where he goes through the breakdown of his Feudal Japan scene and talks about how you could build these branches from scratch using a similar technique as the grass cards above, as this project had a limited time scale I needed a quick and dirty resolution so this is how I overcame that hurdle.
In future developments or to expand my knowledge further, I personally would actively try and find some examples of these branches in real life and take the opportunity to practise photogrammetry as this is an excellent skill to have but also a great opportunity to build a personal library of your own high fidelity assets to use.
Fog
There’s not really much I can say about the fog as these were migrated from one of the UE4 starter packs called “Blurprints”, which anyone can find, obtain and use. Beyond that it was simply a case of tweaking and applying them in the right place.
Receiving Feedback
The feedback has been great and with this being a VR environment, there’s nothing better than seeing people explore the space, fully immersed and excited.
Personally, I’ve recognised some room for improvement and some areas to keep developing. My confidence has grown tremendously with this piece as has my development knowledge. I couldn’t be happier with how well the project has been received by my peers and others in the industry. It’s what makes this line of work so rewarding, seeing people enjoy your work whilst being open and honest about where you can improve, it’s very motivating and important we keep that attitude alive.
I’m also very fortunate to an open chat with some of my most admired artists in the industry and I’ve received some amazing praise and future practise from some really solid people which is every Junior Artist’s dream. Now it’s just about finding a studio that will hire me!

Tips and Advice
I think the best advice I can give is; work hard, dream big and never give up.
I’m 30 years old, I grew up in a time when games were considered a joke or fad, if you wanted to be successful you needed to get an apprenticeship and get a “normal” job. This wasn’t an industry. There was no education system for this, no YouTube and a crappy family PC with AOL dial up.
I’ve been homeless twice in my life and have overcome other personal adversities including depression and anxiety. I had given up on myself and my dreams. But I pulled myself away from one of the lowest and darkest points a person like me could be in their life and over the course of nearly a decade I have built myself and just recently graduated from Teesside University with Master’s Degree in Games Art with Distinction.
Life doesn’t happen in a day so be patient and be bold, take chances, trust yourself and force confidence in your abilities, then drive towards your dreams and engage in them. Don’t be afraid to speak to people, ask for advice, take criticism, move countries, evolve and adapt and most importantly never give up on something you truly want to achieve. I literally opened 3ds Max for the first time 4 years ago and now I’m sat here writing an article about the development stages to one of my projects - 10 years ago, I was living on the street. Imagine that!
So yeah, I’m a prime example of anything can be achieved if you go for it. But you have to work hard for it. Don’t expect life to fall down onto your lap. A dream and a bit of grit is all it takes.
Outro
Thanks for this amazing opportunity. Thanks to the lecturers at Teesside University for teaching me. Thanks to my friends and family for supporting me and thanks to all of you who have taken the time to read this, checked out my work and offered advice or feedback. It’s been an absolute pleasure and I look forward to the next time.