
CERBERUS - focusing on the task
Enter Cerberus, an environment that proves a great example for how to keep the end goal constantly in mind. Join us once again as Alex Beddows shares some great tips and tricks for creating stunning visuals and hacking your way through an environment within Unreal Engine 4. Learn about creating animated raindrop shaders, localised fog, tonemappers and more.

Hey guys, so third time is the charm, right? My name is Alex Beddows, Associate Lead Artist with Dekogon and 3D Learning Manager at Artstation. Outside of these I also host a podcast called Game Dev Discussion. I have guests on weekly and we tackle their experiences, current topics and issues within the industry.

Past Experience Points Articles
If you want my backstory check out my previous two articles, one covering the creation of a material while leveraging Marvelous Designer and the other is a breakdown of my Out Of Gas scene. But these two articles sum me up pretty well, I am NOT a materials artist, I am an Environment Artist who has a strong knowledge and understanding of materials. I like to keep my skill-set broad and while early in my career I do not want to put myself in a box just yet.

So, this project… Cerberus. This was a project inspired by this fantastic concept from Gilles Ketting. It was an odd change of pace for me, this was a project where I wanted to focus purely on capturing the mood of the art and sticking extremely close to the concept. In past projects I have taken a lot of creative liberty in creating my scenes, so why the exception this time?
Well if you know me, I treat every project as an opportunity to learn and fill gaps in my skill sets, so with this piece there were 2 elements to focus on, 1 was showcasing my ability to really capture a scene’s personality while being faithful to the concept, which is quite common in the professional domain. For example, if the whole pre-production on a project is spent with concept artists creating and refining the art and design with the directors, the role of the 3D artist is to replicate that in the 3D world, not throw it out and do what they think is best.
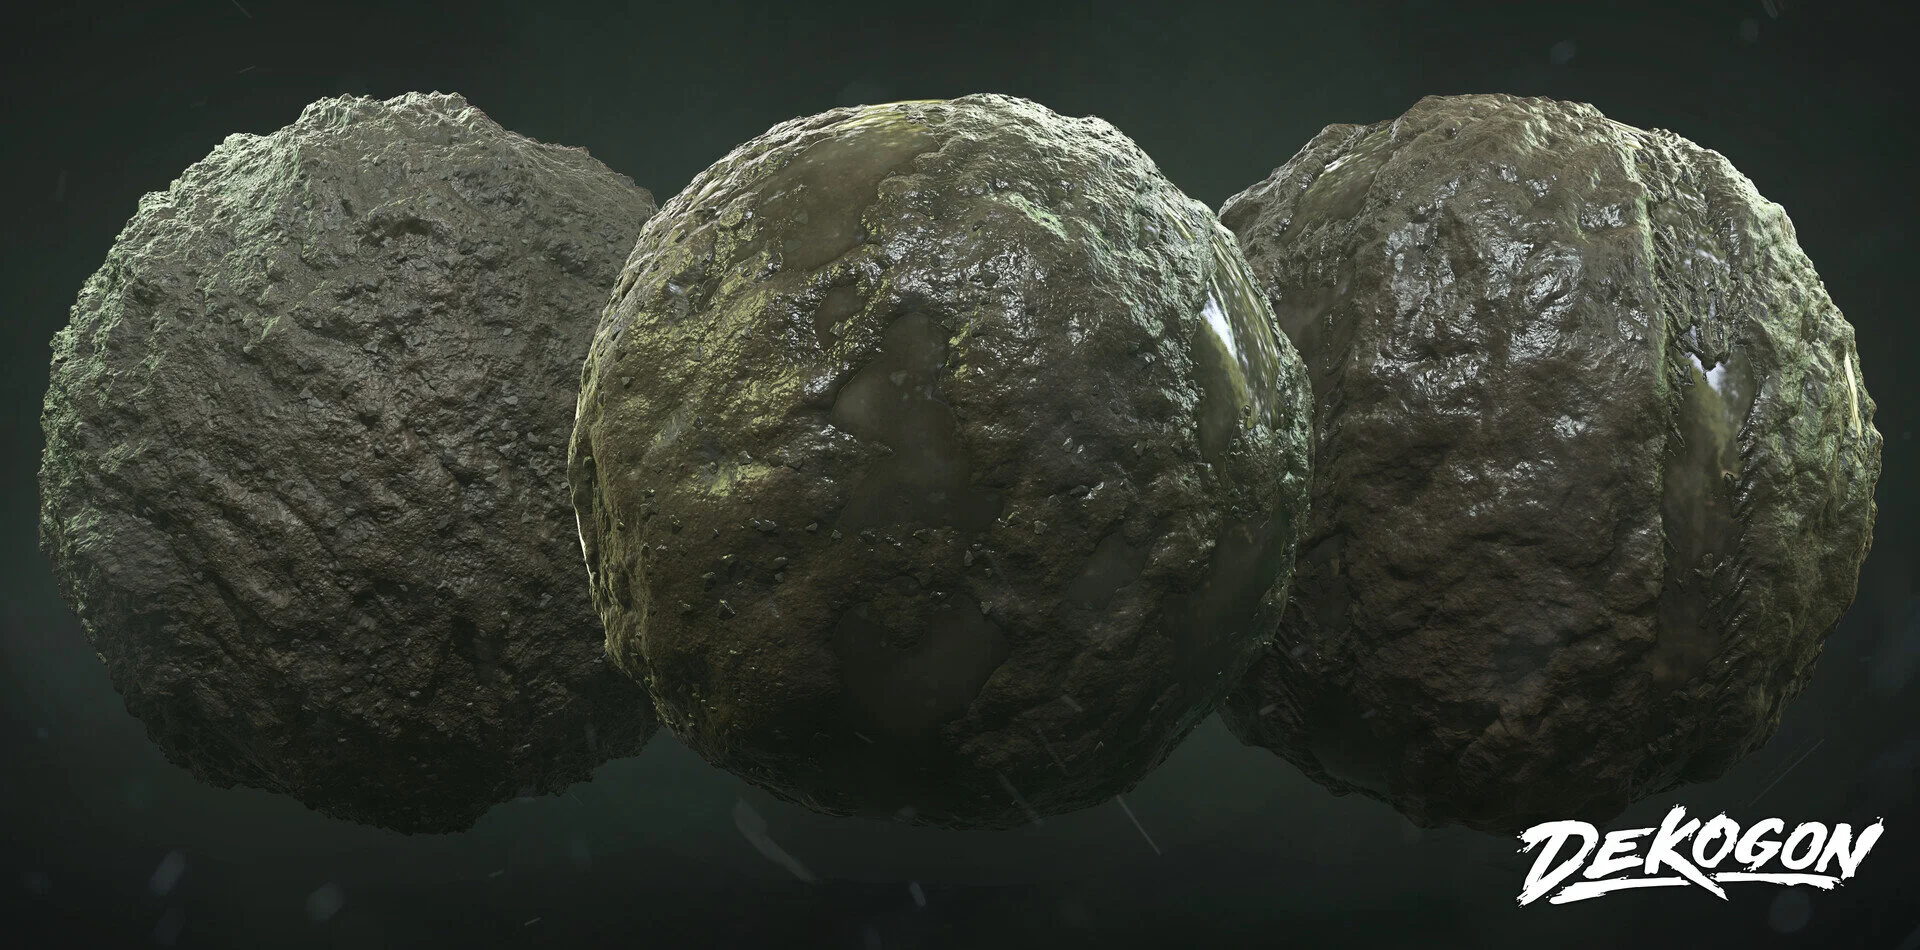
Mud Materials

Wood Materials
Secondly, I had the pleasure of participating in the recent material drop with Dekogon. I wanted to utilise some of these materials while trying my hand at the raindrop shader showcased by Koola.

Lets start with these shots I put together, this was when I was purely focusing on creating the raining mud shader. This shot was completely separate from the scene but I used the same colour palette since that was the lighting setup that the shader would be used in.

Rain Shader Test Setup
As you can see, this is super basic and somewhat hacky. I made an emissive shader and used the reference art as the input, then by toggling in the mesh lighting settings ‘use emissive for static lighting’ means I could treat the planes as my lights and place them to create the mood I was after.


The Substance graph was supplied by NicolasW on Polycount, linked in Koola’s original post, I then outputted an image for each stage of the ripple and then stacked them in Photoshop.
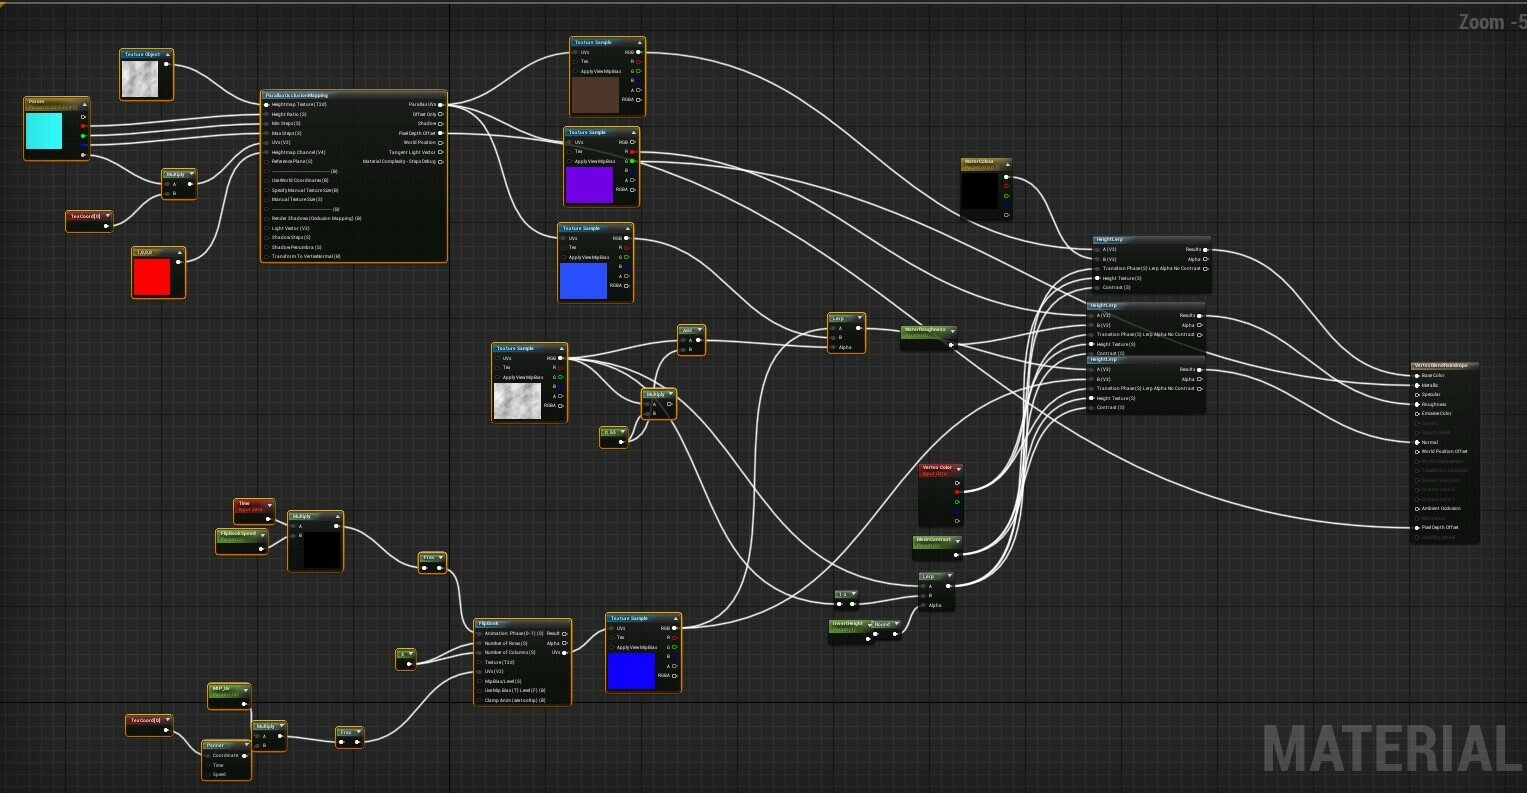
Rain Shader Graph
I then created a normal POM (parallax occlusion mapping) shader and used the flipbook node to allow me to dictate the speed, tiling and proportions of my rain effect. This gets blended into a simple water shader and I use vertex painting and height lerps to blend between the two materials. This part needed to work as I use the puddles to craft the reflections and it needed to work cleanly so I wouldn’t be restricted.

The one major challenge I faced with this scene was the orange glows of the windows and doors. I used emissive lighting again and what happens when you crank the intensity up is it washes out to white. But in order to achieve the look of the concept I needed it to hold colour, that’s when I received the advice from this wonderful and talented man - Brian. He introduced me into tonemappers and helped me figure them out to achieve the lighting style I wanted. In particular the GT tonemapper, below is a desmos graph showing what it does. Once I overcame this problem, lighting-wise it was smooth sailing, I just needed to use the shader I created to place the puddles in the best locations to really capture the reflections and show off the raindrops at the same time.

Desmos Graph
Fog… this was a little bit of a challenge as volumetric fog did most of the heavy lifting but I didn’t have much control. I wanted a foggy scene but with a clearer view up the path to the house but with either side of the metal structures to be foggy, and unfortunately the volumetric fog could not quite achieve this.

So I created a simple particle material and it in a particle generator spawning local clouds of fog that I could place exactly where I wanted to allow me to shape and frame my scene better.

Fog Material

Environment Overview
The mess outside of the shot…
Joking aside there is something I think a lot of artists that start out will run into, they make scenes where everything is full, made properly even if you never see them. There is something to be said for deciding your camera shots first, and ONLY making what you see. We are an industry of tricks and optimisations and time is a precious commodity, so learning to be efficient and doing what is needed to achieve the goal is a pretty important lesson to learn.

Showing Missing Walls of House
You can see in the above shot I didn’t even bother making walls for the house, they were meshes made in blender with tileables slapped on, this was because I knew you would not be able to see these areas, and the lighting would be so dark you wouldn’t see the details. I wanted to spend as little time as possible on the modelling aspect, so I knew my job with this was to suggest the shapes and surfaces, and that doesn’t require much time in this particular instance.

Lastly on the props front, the Quixel and UE4 partnership being announced mid-project was a god send. I have never been quiet on the fact that I don’t really do foliage, however having access to the Megascans library allowed me to add the grass, trees and rocks quickly and stepped the scene up in quality!

So everyone knows my go to place for feedback is the DiNusty Empire! But this project was kind of tricky, I had a lot of feedback along of the lines of ‘you should do X,Y or Z’. And this was fine but I knew the goal of the project so I had to filter this out most of the time, I was always posting my current version with the reference, and had to listen to the feedback where I was being told where I missed the aspects of the concept, this was a particular challenge due to some amazing suggestions being made to do some crazy stuff, but I am glad I stuck with the original plan!
As for tips for people reading, well… its tough but I think what the whole aim of this project is a tip in itself. That ability to set the targets upfront, the criteria for success and failure goes a long way to keeping a project in scope. I know better than anyone how easy it is to add things mid-project until it snowballs out of control, but when you know the boundaries, you know the end point and there are very clear milestones to get there!

What to expect in the future from me? Well I have been lucky to visit a lot of places in the past year and I have started a material series – ‘Exploration’. I also have a list of things I want to explore, Blender Eevee renderer, Blender add-ons like Mesh Machine and Hard Ops, and I want to do more lighting studies using only Megascans, where I can purely focus on lighting and composition rather than propping.
So that’s the project! Once again thank you to Kem and the Experience Points staff for the opportunity, it is always a pleasure working with these guys, have a great, productive and successful year!