
TWILIGHT TEMPLE - COMING TO LIFE WITH LIGHT
What happens when you shine a light on something? In the Twilight Temple, everything comes to life. Maxime Rigole walks us through his environment and details how he created his foliage to react to light, spline based foliage that comes to life, lots of useful blueprint magic and trim sheets to speed up his workflow. Enjoy the adventure and check out the wildlife.
Introduction
Hello there! My name is Maxime Rigole, I am a Junior Environment Art Intern currently working at Climax Studios but born and raised in the Western-Flemish province of Belgium. I would like to tell you a bit about my graduation work called Twilight Temple where I worked out how to make plants react to light in UE4. But firstly I’d like to share a bit about where I come from as an artist.


I always felt a connection with creating worlds and building things both in real life and in 3D, starting out with my first few LEGO sets as a kid, building small cities where I could spend hours playing around with figurines, eventually as I discovered gaming, I got really drawn into playing Minecraft, but my time playing Minecraft was quickly turned from survival (which I enjoyed many many hours none the less) to being creative, and just like LEGO, using the blocks provided to me in the game to build houses, pixel art, towns, farms... the list goes on.
I then heard about a well known school for game development at a mere 10km from my home, and when I visited it for the first time I was instantly sold, being able to not only make my ideas come to life with building blocks, but making the building blocks myself is something I really value as a 3D artist.
The first game I ever played must have been Jak and Daxter (the precursor legacy), I was completely engulfed in the game every time I started up my Playstation 2, the puzzles, the enemies, the wacky humour, they are memories that I will always carry with me. Whenever I didn’t play on my PS2 I would go to my Nintendo DS, playing Super Mario Bros or going over to my friends house for a Mario Kart LAN party.
Twilight Temple
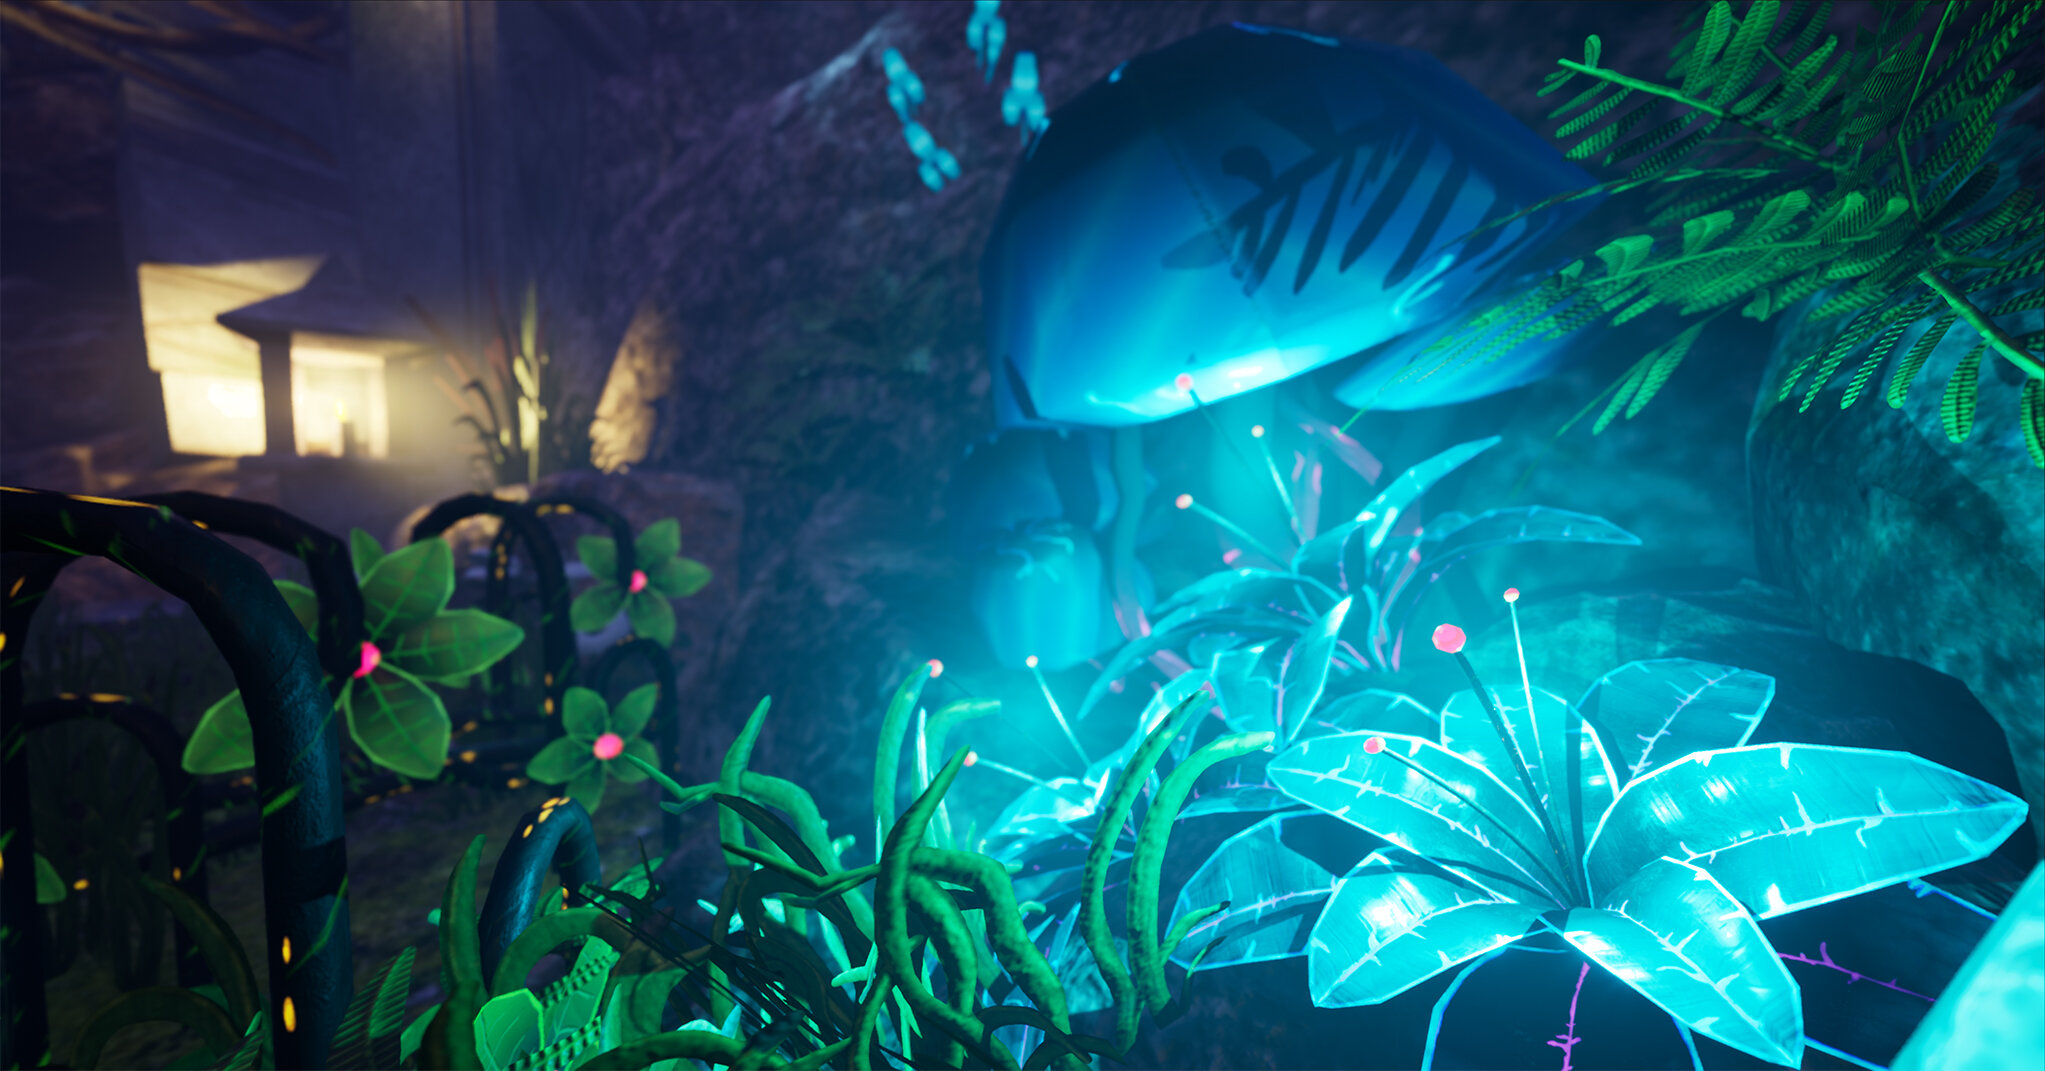
I was initially inspired by James Cameron’s Avatar, and together with Blackreach (a region in Skyrim) and the alien plants from Subnautica, I came out with the idea to make these nocturnal type plants inside of Unreal that really change physically when being shined upon.
I went for quite a simple composition, I was working on my graduation work more or less just blueprinting in Unreal Engine before doing all the art stuff, when I came across a video of a person digitally painting a temple engulfed in twisting vines, the environment felt right and the idea of a temple was really cool to me as it would create contrast with the very noisy and biological jungle surrounding it.
The most important thing is that composition starts at the very beginning of layout out your scene, don’t start doing details or adding textures or particles, start with a “Greybox” which as the name implies is simply blocking out the scene and how it will mainly be shaped. Focusing on the big picture. But composition goes along the entire process from there, things like movement, lighting, foreground obstacles all add in to the way a player or viewer is lead trough the scene via its eyes.

Composition
Plants
To create the plants I divided all the plant I wanted to make in to two categories.
The non-reactive plants would mainly be made the traditional way, unwrapping planes on to a texture and using opacity to mask out their main shapes.


The light adaptive plants are made without opacity to make the shader a lot less heavy to calculate, these are a bit higher in polycount but follow the shape of a plant more accurately and their normal details have been sculpted in ZBrush.
They also have 2 base colour textures instead of 1 and an emissive map. The base colour they get are 1 for the “daytime” version inside the light, the other is the glowing “night-time” version for when they are not being shined on.

To animate the adaptive plants I rigged them inside Maya and gave them an animation both for opening and closing (closing being the same animation as opening but reversed).
When it comes to the amount of plants you need, a general rule is to stick to around 5, a player generally keeps up with 5 items before they lose track of the amount.
Temple
For structures and props a widely used technique is using trim textures with modular props.
This mainly comes down to a singular texture that acts as a “mould” you can pour models in to, it takes a bit of understanding of texturing, but this video by Polygon Academy explains it quite well.
I myself made the trim texture inside of Substance Designer. It is such a powerful program and making everything procedural ensures the best re-usability for the texture.
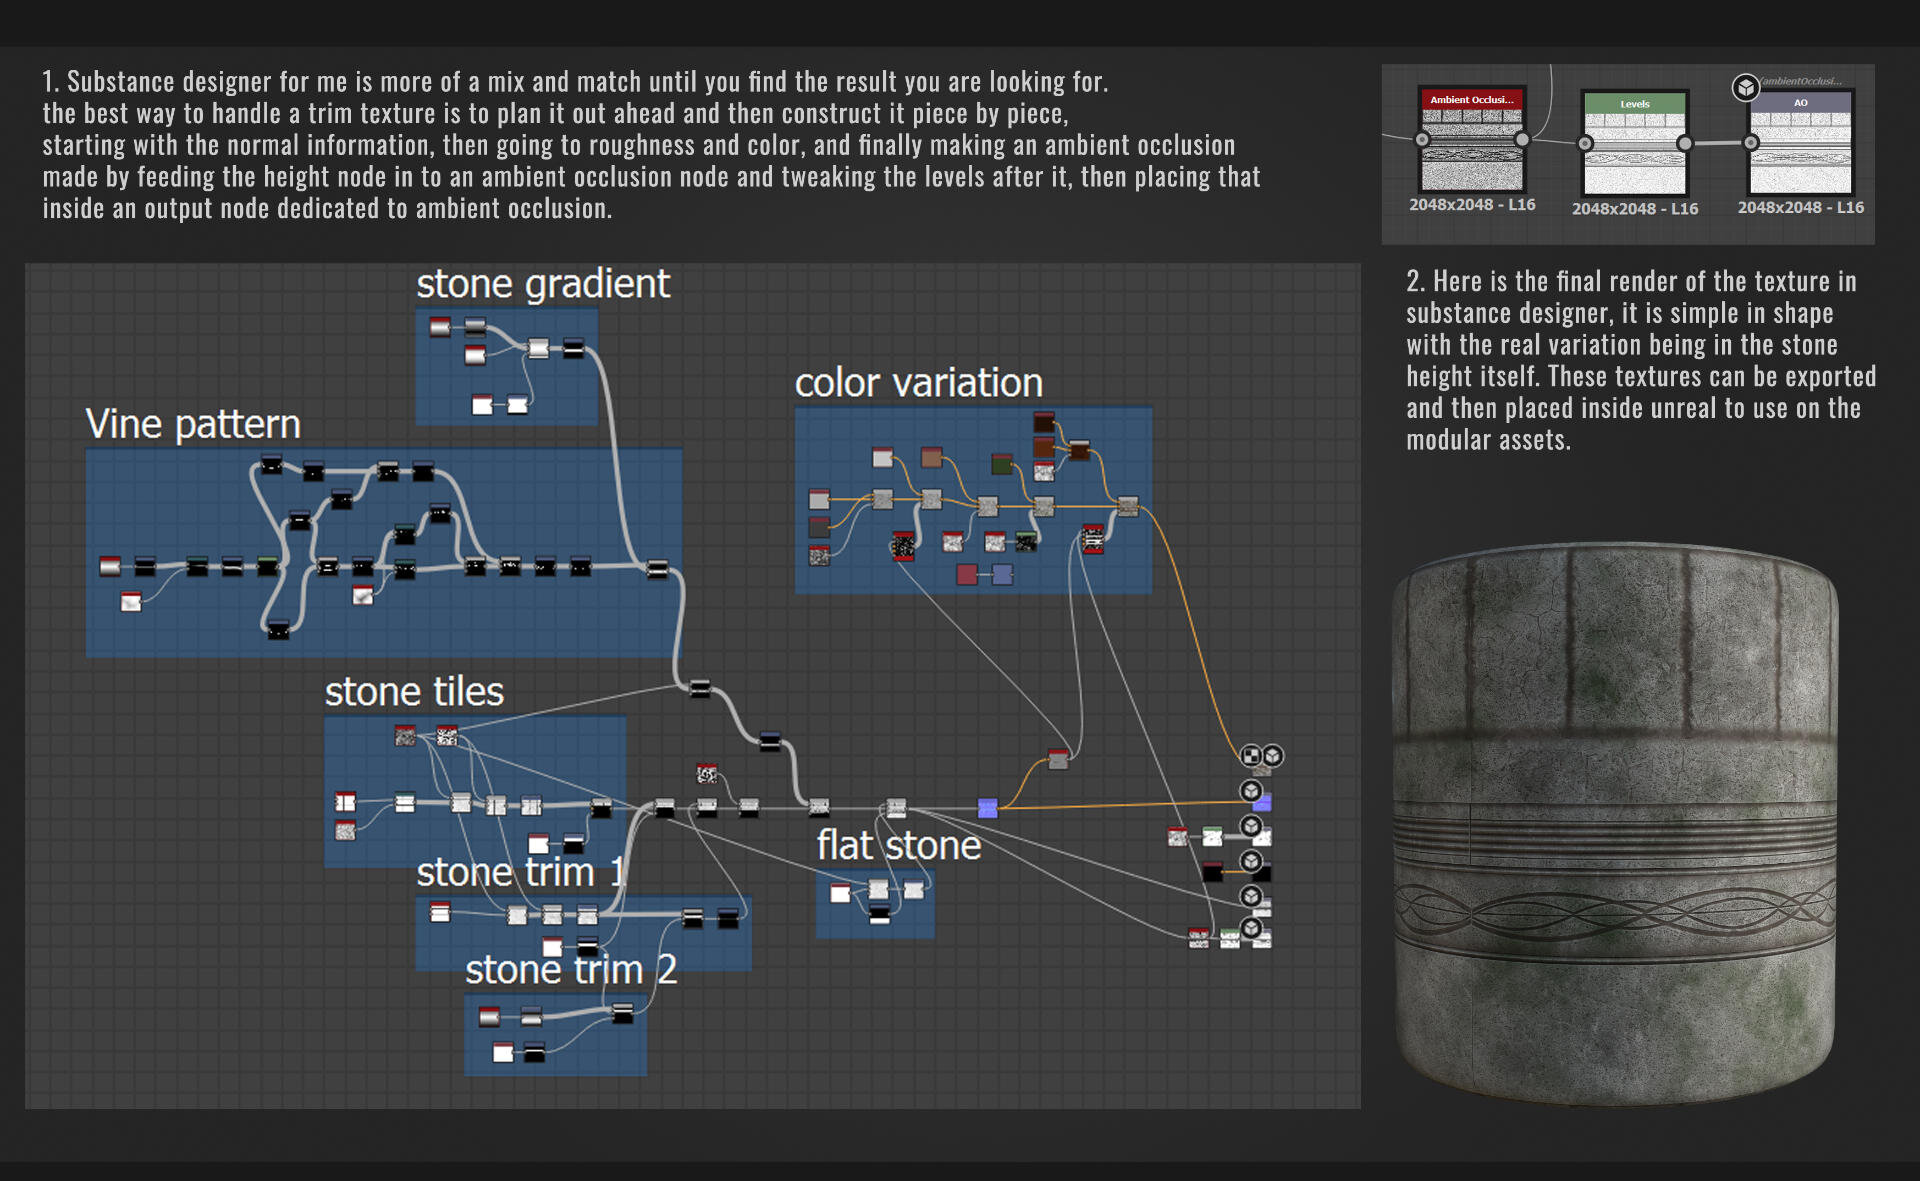
With modular props I mean making a whole bunch of simple shapes, instead of making the entire building as 1 mesh, you can make the walls, doors, windows, etc.. separate, and puzzle these together in the engine itself to create an unlimited amount of variation instead of a single same house.

Lighting
Lighting for games is mostly done in 2 ways, static or dynamic, or a mix of both at the same time. They mostly determine how shadows are calculated in the editor.
Static lighting can be baked into a lightmap, almost an object specific occlusion map, this makes the game itself somewhat heavier but it will run smoother.
Dynamic lighting is when a light is calculated every tick at runtime, this is heavier to sustain but makes the game a bit lighter to load.
In my experience if you don’t adhere to a specific colour scheme, you’ll find that your painting, level, textures, etc. will appear to be really noisy and unbalanced and something about the image will not look correct.
Here’s an example of how the combination can be used: When inside an office with a blinking light, the office itself does not change so its lighting can be baked, however the blinking light does not continuously cast a shadow on objects, and baking this would make object look like they are lit up even though the light is off, in the same way I used dynamic lighting only in my scene due to all of the plants moving constantly.
To limit the light calculations I lowered the attenuation radius of all my lights, making them influence less space in the scene, I also used spotlight over point lights as point lights are very heavy, think of a point light as a cube with a spotlight in each direction, casting 6 shadows at the same time in every direction.
The Unreal 4 Lighting Academy series on YouTube is a great way to learn the power of lighting and how to do it correctly from the first go.
But all technicalities aside, from an art point of view lighting must draw the attention to the viewers eye, using a bit more saturation and a contrasting blue orange colour in your lights adds a lot of attention to certain points off the scene, I chose to also include a pink/purple between the two to create a better transition between the colours. I tried keeping the lighting not to dark, but all the while keeping the centre of attention (the temple) the most brightly lit in the scene as to draw in the viewer to that point.
Light Adaptivity:
I wanted the plants to react to light in a fluent and optimised way, I chose to use a flashlight to make the entire process interactive, the reaction of plants mostly consists of 2 elements.

The texture of the plant is blended on both the base colour and the emissive map inside the shader, based on where the light is located, where it is pointing and whether it is on or off.
By casting a linetrace from my flashlight outwards I can detect where in the world my light hits the plants, this location is then given to a blendsphere that lerps between 2 textures, both for the basecolour and the emissive (with the non-emissive being just black).
Animation - When a light is on a plant collision within its reach, the reaction animation is played, as soon as the light goes off or the plant goes back out of that collision cone, the plant is restored to a resting position with an animation that goes opposite to the reaction.

I also made a spline generated vine that reacts to the players flashlight, if you are interested in how exactly I created all of these elements in a lot more detail from blueprints, you can find my free paper on the entire 6 week research on Gumroad.


Sound
As an extra I would like to say that sound really makes a scene pop, it adds so much immersion to a player experience. I always smile when I put those first sounds inside my scenes simply because they add so much more life to them, I mixed together an ambience out of sounds from the internet together with some footsteps and a flashlight click, and finally a ruffle noise for when the plants move. These really make the scene feel more connected and whole.
Feedback
Before completing your work, remind yourself that you have been staring at it for countless hours and it is always great to ask feedback once in a while as you get tunnel vision more quickly than you’d expect and letting somebody else give their thoughts on your art can bring in a fresh wind of overlooked faults or details you oversaw. For this I always refer to other artists and colleagues, there are also numerous Discord servers for artists and developers where you will get advice from amateurs to professionals and long-time industry veterans, polishing your scene makes a huge difference, and can take up a lot more time than you’d expect.

Advice & Tips
Most importantly, have fun! Making game art is a detailed and time consuming process and not all of it is fun and games, make something that reflects both your goal, but also yourself. Don’t see it as another task but as something personal, a way of giving your creativity free reign for a bit. See how others do it and don’t be afraid to ask questions about their methods or thoughts.
Outro
Daring times are ahead of me, for the first time I’ve got into the industry as an art intern, I am very happy to start, but going international has many tedious tasks and is out of my comfort zone (not that I don’t welcome it, opposite even). I will think about making some personal projects while working to further try out new things (mainly Houdini, I’d love to get my hands dirty on it) and more lighting and modelling practice.
It is a great honour to write for Experience Points and I hope you’ve learned a few tricks or gained a new insight into how I handle creating environments from start to finish. I’d like to specially thank Arthur Tasquin for inspiring me on the look of my plants and my colleague Keltic Vermeersch for his continued feedback during the process. If you have any further questions or want to have a chat with me you’re more than welcome to contact me via Artstation or LinkedIn.
Take care!
Rigole Maxime