
REAL WORLD REFERENCES TURNED INTO 3D ENVIRONMENT
Robert Schröer was so dedicated for this project, he traveled to Germany to collect references. Learn how he used Houdini to procedurally generate cliffs, how he created the foliage and set up his master material for his first ever project inside Unreal Engine 4.
Introduction
Hello dear people. My name is Robert Schröer and I am currently studying Game Design at HTW University of Applied Sciences in Berlin Germany. I have 2 years to go until Graduation.
The first time I touched 3D was 4 years ago when I was still studying Applied Math and Physics in Nürnberg. I had great fun just dabbling in Blender the time back and create some Spaceships. Then I tried to implement one of my ships into the game Star Wars: Empire at War which took around 3 weeks to figure it out but when I saw one of my creations (rotated incorrectly, way too small and green because the shader was set up incorrectly) fly in a game environment I was totally blown away and 100% addicted. Some time later I joined a small modding team which was looking for an artist to overhaul the vanilla space game assets. It was fun not only building stuff for myself but to create them for a greater purpose. Some time after that I went to Gamescom in Cologne and met the SAE Institute there and that´s when I realized that one can actually study Game Art/Design. It took a lot of effort to quit my Maths and Physics studies to look out for an University to study Game Art/Design. I was lucky enough to find out that HTW offered a Game Design Bachelor degree. Because the courses are partly funded by the government they only cost roughly 300 Euros per Semester which makes them way more affordable than others. I had to make an Art test to get chosen out of hundreds of applicants to get one of the 40 seats available. While studying Game Design I am still working on personal projects to grow as an artist as much as I can. I also joined the Yuuzhan Vong at War modding team which is developing the Yuuzhan Vong at War modification for the game Star Wars: Empire at War: Forces of Corruption where I have the opportunity to work with highly talented people and a professional Art Director for Corporate Design making my hobby a perfect training ground for my career while learning new skills like HLSL shader programming and using Houdini in a pipeline context.
Safaga - Berlin Schöneweide

Setting
Safaga 1992 - The player lost track of his 2 friends who tried to reveal a myth around a German train station in the East Egypt Desert.


Quick Design Overview
I started of with collecting references to get an Idea of what I want to make.

I really like the East Egypt Desert. In the end it was really tough because it features so many different types of rocks. I used some reference images from mountain regions as well.

After that I went to Berlin Schöneweide, measured the entire place and made hundreds of reference pictures.

This is a small part of the graph I created in the software yEd to help me structure my Design and do the planning in it.

I sketched a lot to get a decent base concept to start of from. These are the 2 I favored. In the end I should have spend a lot more time in this phase to make my concept strong enough so it could have answered all of my questions later on without any conflicts.

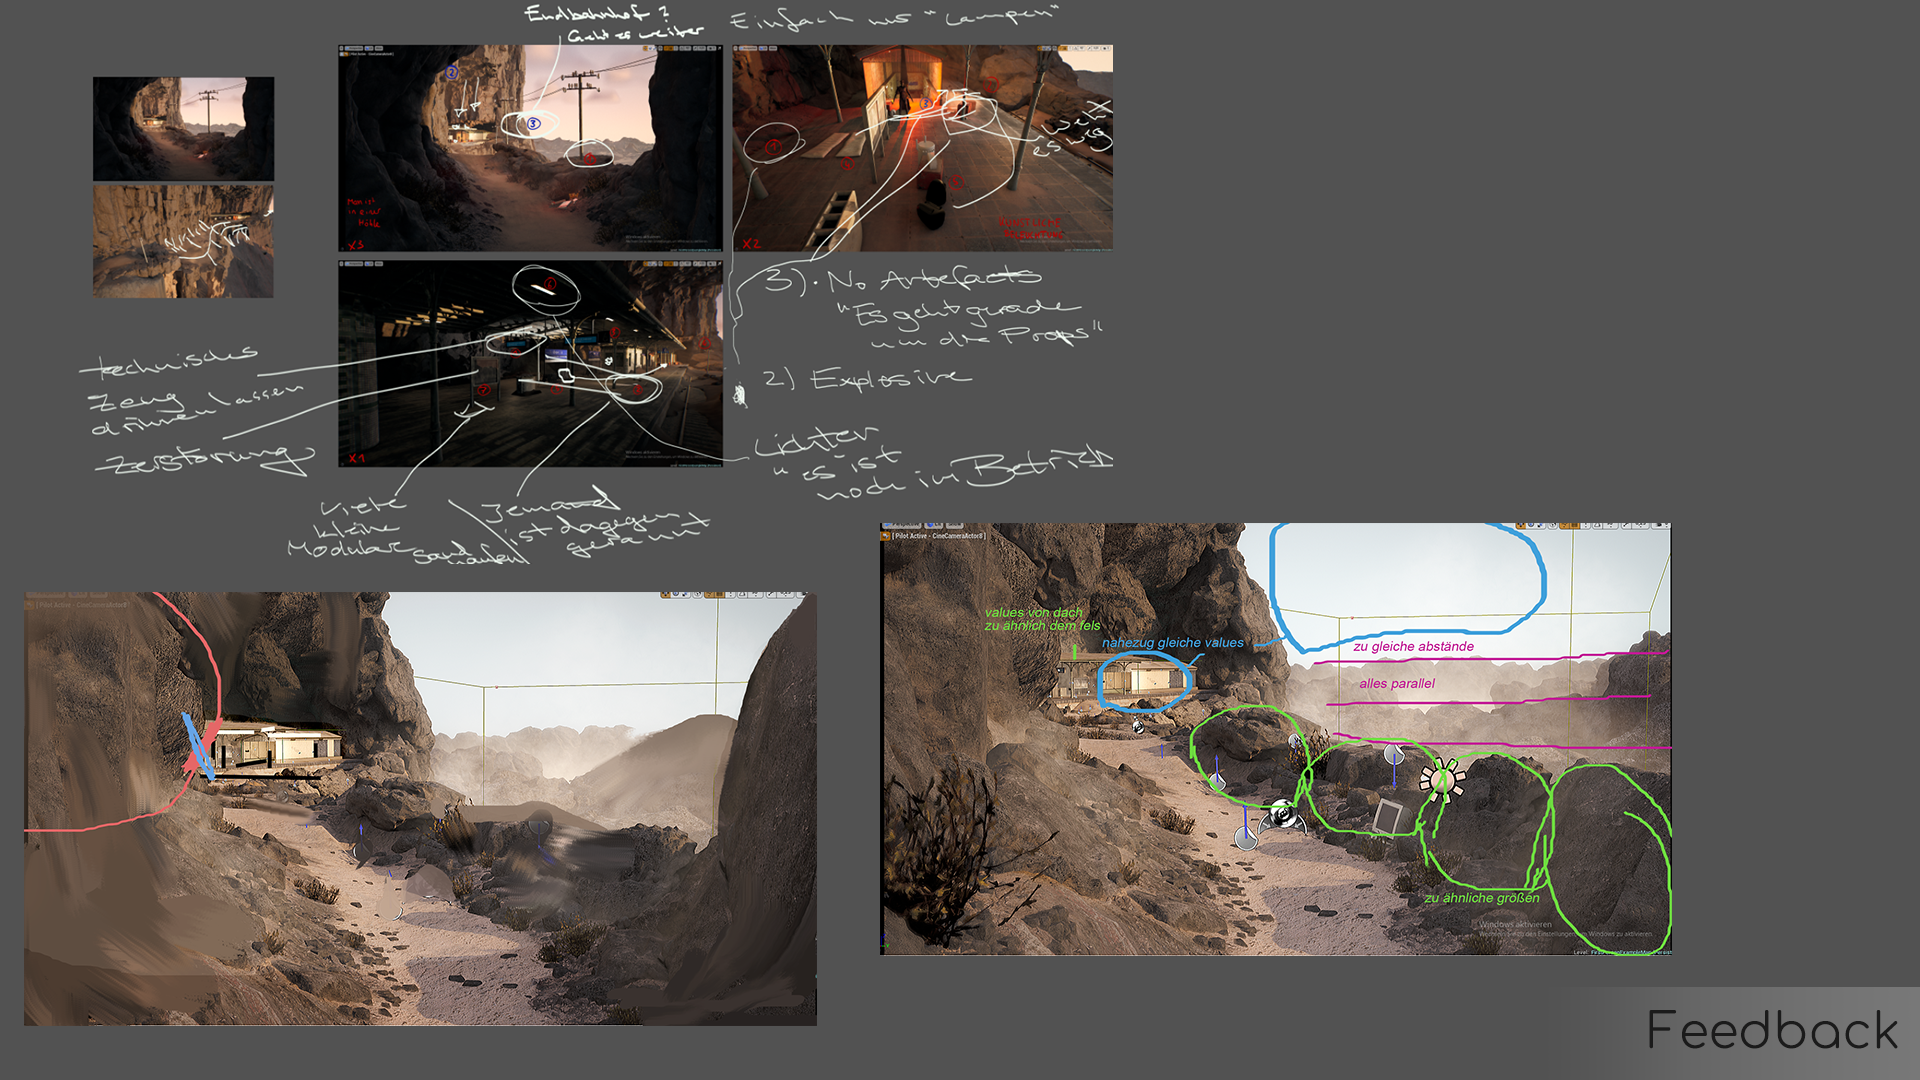
This is a cut together of a few Photoshop documents I created while working on the concept and the enviroment. It helped a lot to visualize ideas and think about them visually.
While in the process of creating I got a lot of support from Marc Meyer and Malte Decker which was incredibly useful. Thank you guys for that!

I also got a lot of support from Jeremy Estrellado the founder of the DiNusty Empire and his amazing artists (Naded, JonJo,Thomas, Felipe, ... only to name a few of them). It was pretty uncomfortable to get feedback on streams while up to 70 people are watching but when they started to also give feedback I was super happy that I decided to do it.
Also a huge shout out to my Mentor Jared Urbanek. Thank you for your time you take to teach me every weekend. It is a pleasure working with you!
I tried to get as much feedback from various people as I could because of them the end result was a lot better and I was able to learn from the mistakes I made.

Building Cliffs in Houdini

When I started this project I knew I will need a lot of rocks and cliffs. Creating those in ZBrush takes a lot of time which might be doable in a team but not so much alone. Luckily I was working on some asteroids in Houdini for the Yuuzhan Vong at War modification and felt quite confident that I can use a similar process to create the cliffs. Houdini does not suffer from some of the problems you will encounter in ZBrush when sculpting Cliffs with a lot of concave parts. The idea behind this specific shape which we will look into is that the train station was forced into the environment and would break the stone and leave behind some sharper edged stones.

We can start of with a cube and use a voronoi fracture on it. The scatter node which is required for the voronoi fracture samples the points on the surface. I used a pointjitter to make them more evenly distributed. Otherwise the following steps may not work out well.

Then we simply scale up the cube along the global Y axis to get this elongated voronoi pattern.

After that we can use the assemble node to pack the geometry. Make sure to check "create packed geometry". And then we can use a delete node to delete the outer parts based on a bounding box. Make sure to unpack your geometry after that step again.

With changing the Global Seed of our scatter node we can already see the power of Houdini.

Then we can start deforming the base shape to remove the perfect sharp edges. To get a higher mesh resolution we can use VDBs in Houdini. They will convert your mesh into voxels. Then we smooth it out a little bit and converted it back to polygons.

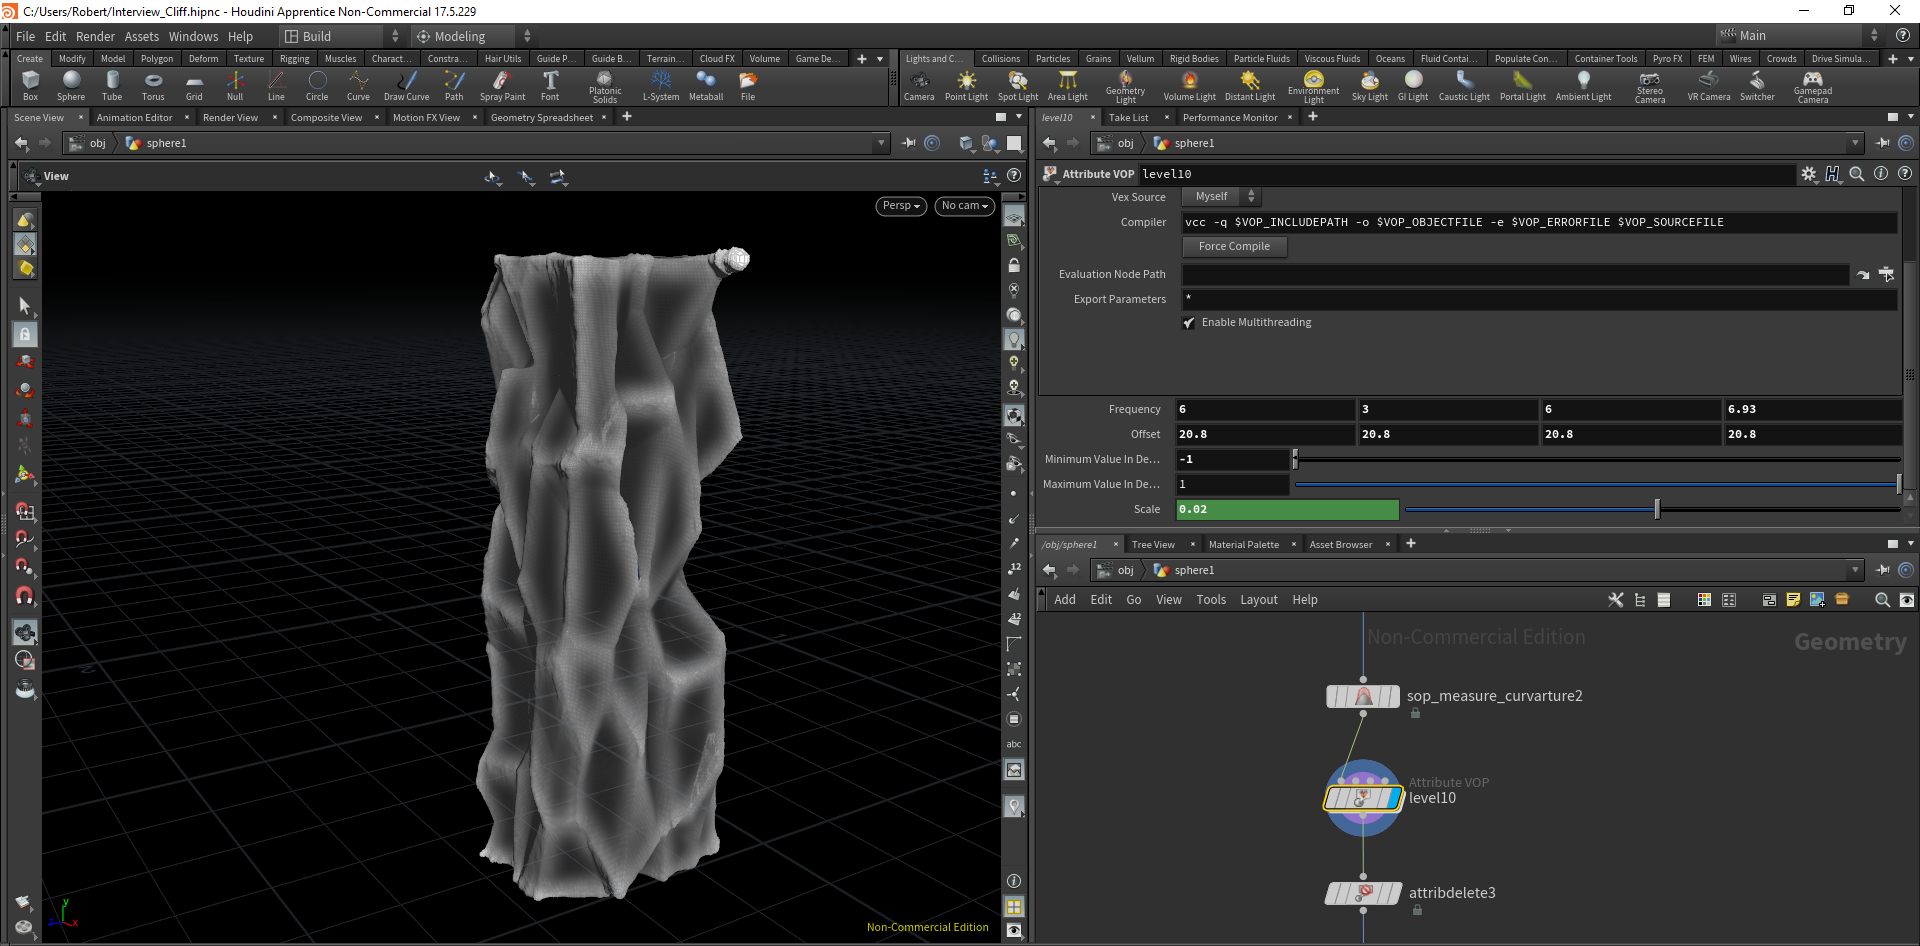
The Game Dev Tools come with a handy curvature node. Which we can use to do an edge select on convex edges to add some noise to them and break of the perfect shape.
Game Dev Curvature

Game Dev Curvature

Then I used the Vertex Color (Cd in Houdini) to add noise to the convex edges with an Attribute VOP. We simply multiply a noise with the vertex color to deform the convex edges.

Then I used the flowmaps which come with the Game Dev Tools to add a layer of detail on it. It helps a lot to remove the perfect-look of the voronoi pattern and tie the shapes together. I reused the Attribute node from above but instead of using the red channel of the vertex color I used the green channel. Here we are starting to get some artifacts due to vertex displacement but do not worry we can fix that.


To fix it we convert the mesh into voxels and use a vdb reshape node. With the reshape node we can carve of the thin parts. After that I used a vdbsegmentbyconnectivity node and as a group we set it to 0. The node always sets the biggest part as 0 and then we simply delete all but 0 by using the blast node.

Because the reshape is removing small details we do an additional detail pass using the nodes from before.

Now we are done with the highpoly Cliff. After that you can either use Houdini´s polyreduce node or a way of your choice to generate the low poly from it. Then I baked down the normal map and used a tilling texture for the detailing.

They were created with the 1.0 version of the workflow. I showed you the updated one which creates more reliable results and is fully procedural. In the 1.0 version I had to hand pick the parts I want to delete. That´s a little tedious. The version with the bounding box is a lot smoother.
Layered Materials in UE4

Layered Materials are a way to have great resolution while having a lower impact on VRam space. The idea is to use grayscale maps to tell the shader where to have each material.


Each channel masks out one material. I used the RGB + A channel to pack the masks in there. So we can layer up to 5 Materials.

In UE4 I created a master material which can layer these materials and also have mesh related Data like a normal map and an AO map.

The mesh data is based on the first UV channel

The Materials have their own UV channel with a higher texture tilling.


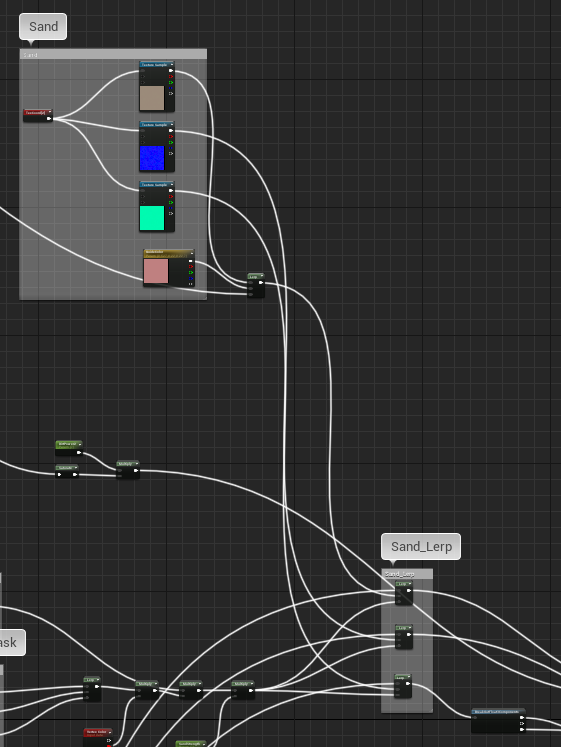
I used a simple lerp to blend between the materials based on the masks.


I used a very subtle effect on the sand where the sand get´s tinted slightly more red the closer it gets towards the focal point of the level. This should subconsciously strengthen the player emotion.

I am also using a world space dirt mask. It is a lot easier to simply use unreals "WorldAllignedTextrue" Material functions to do that.

I am using the blended normal map´s result as a base for the Sand which comes on top of the asset. It is really important to make the assets believable in the environment. Here I am extracting the global z component of the normal map as a mask and blend it with another mask.
Foliage Creation


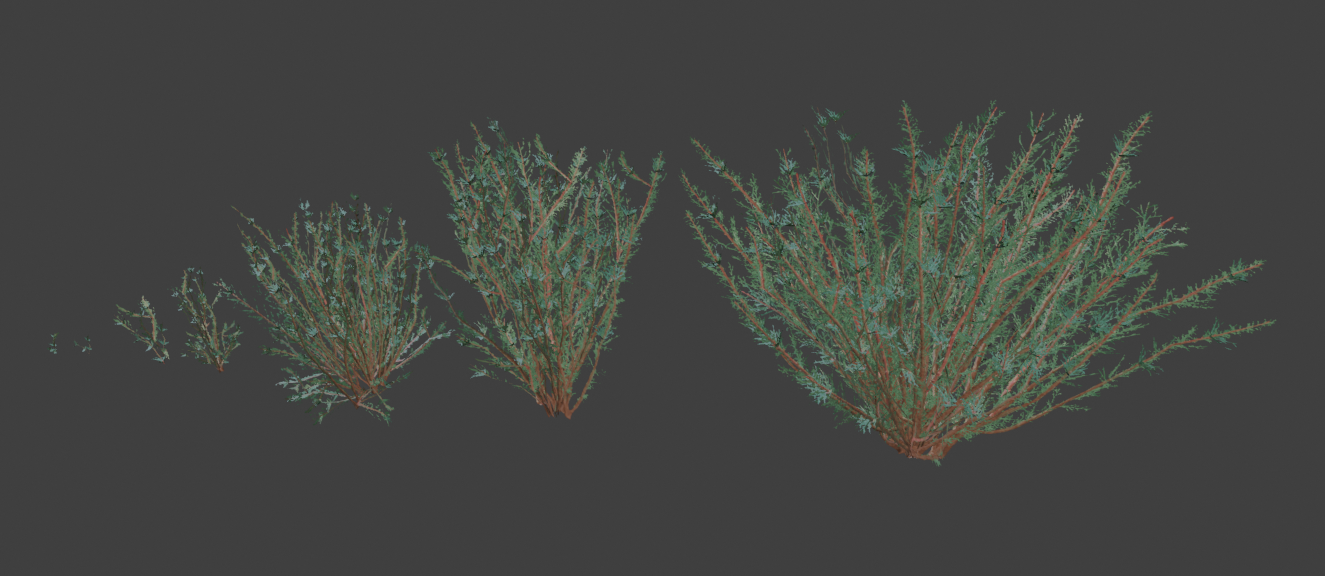
For my enviroment I created a few variations of a tamarix shrub. It was a little hard finding a good reusable plant which is in that area. I was lucky to find the tamarix. I followed Patrick Glady´s amazing Tutorial
He talks about how to approach building foliage in general and as an example he takes a blueberry shrub. The tutorial is absolutely amazing since it teaches a mindset which can be used to create any type of foliage. Even though my Tamarix shrub has different features I could still simply apply the technique he teaches in the tutorial.
Learnings from this shrub


When I created the shrub I did make a mistake which ended up being very annoying. I made the little twigs too high poly because I wanted to make it look good. It ended up being very annoying to work with because my scene ended up having around 40 million triangles to render and everything was very laggy. It was frustrating and that actually impacted the quality of the shrub in a bad way because everything was so laggy I skipped a few steps of variation due to the time I had to spend waiting for the software to respond. So make sure you stay flexible with your foliage in terms of resolution. In the end you can always throw on a Sub-D modifier.

Another thing which I find really important is that the foliage needs to look good from a player perspective. It nice if it looks fine in a final shot but it needs to look convincing when the player looks at it from his perspective. That is something Patrick talked a lot in his Tutorial.
I can highly recommend his tutorial on creating foliage for games. (I am not getting paid to say that :P )


Important Elements and Skills as an Environment Artist
I feel like that the Context of the environment is the most important thing. When you want to create a game environment you need to know what the players abilities are, like the player camera, player mechanics and so on. So you know how everything needs to be set up, which treatment each asset needs and it is important to know these things before you even start your blockout because this information influences all design decisions you will make. Some examples are Texel Density, areas the player can reach, areas the player camera can reach, etc.
I personally feel like that the 3D Composition is incredibly important in a scene. Knowing exactly what is important helps the player to navigate through the scene. As an Environment Artist we are guiding the eye of the player and also influence the decisions he makes in the game. We can make areas visually accessible for the player and let them know that they can reach it or we can make them move in a specific direction even without using invisible box collisions. With 3D Composition we can also create a mood and emotion inside the player. So some places can feel more dangerous or overwhelming to support the current mechanic set the player is using or help to transition between different sets of mechanics to visually introduce satellite mechanics (satellite mechanics = mechanics which replace a core mechanic temporarily to create a mechanic rhythm).

Lighting ties into the 3D Composition a lot and has similar tasks to fullfill. Lighting however has the property to break your scene a lot more than 3D Composition if done unpurposefully. It is one of those steps which can entirely destroy your work but can also make it shine... literally :P Lighting helps a lot to create a mood and guide the player through an environment and to complement materials and cut off areas you don’t want the player to go. Lighting requires a lot of design questions to be already answered before it can be done properly. Such as the set of mechanics since mechanics while playing create a specific emotion, lighting then can be used to complement it or balance it out.


The asset quality consistency is also really important. Inconsistency creates contrast and contrast attracts attention. You don’t want the player to think about quality inconsistencies while playing your game.

One of the most important things not only in Environment Art but also in life is feedback from people. We only have 2 eyes and 1 brain and 1 pool of experiences. Once we expose our work to others they see it with different eyes, process the data with a different brain and compare it with a different pool of experiences and therefore come up with a different image in their head than we as the creators do. We create experiences and we want to share our with other people to experience the same thing. So we have to make sure that other people experience what we want them to experience. There is always the possibility that we are doing a mistake over and over again and we wont fix that if we don’t know about it so we need other people to get aware of those mistakes. Sometimes the next level is just one feedback away!
Challenges
The biggest challenge in this project was definitely not using an already existing concept but doing the concept by myself. But since I am studying Game Design I am amazing in doing design... right ? Well I tried and learned a lot while doing it. Design is definitely something which takes more then a lifetime to get good at it. It was also the first time using Unreal Engine 4 so I also had to learn a lot about the engine.
Special thanks to my family for supporting me. I would be nothing without you!
