
norse axe breakdown: Creating a highly detailed Hero prop
In this article Neil covers his workflow he used to create his incredible 'Jörmungandr' Axe. If you are looking to learn how to utilize ZBrush in your prop workflow then this is a must read! Neil shares all of his top tips for sculpting props, how to properly texture, light and present your props and common mistakes that artists make when sculpting props.
Intro
Hi everyone, my name is Neil Houari and I’m a Material/Prop artist from Paris, France. I started working in the games industry during my 2nd year of university where I had the opportunity to join Cyanide Studio for a little over one and a half years. Most recently I had the pleasure to intern at elite3d which is an outsourcing studio based in Valencia, Spain.
I always had a passion for video games and their visuals, I was the kind of teammate that slowed down the squad because I stopped to look at a nicely textured barrel or beautiful mountain scenery. But my interest in game development really peaked after I watched a GDC talk by some members of the Ghost Recon: Wildlands team about the tools they used to craft the terrain in the game. In their presentation, they showcased World Machine, a 3D terrain generation tool. I decided to have a go at it, downloaded the trial version and after messing around with a couple of nodes, I was hooked by it. That was why I later decided to pursue my studies in 3D art in Paris. The 3 years I spent there allowed me to learn more about the different roles in our industry and have free time work on my portfolio. During my time there, I slowly started orienting myself towards material authoring and prop creation, which I am passionate about today.

Gathering References
Every project I undertake starts with a search for references, I usually start up PureRef and then divide my board into a couple of categories. For this prop I knew that I wanted to make a viking axe with strong storytelling elements.
I first started by searching for viking axes on ArtStation and saved the most relevant ones to my ref board. These images will serve two purposes, the first is a quality bar that I will set for myself and the second one is to see the general designs and ideas that these artists implemented in their prop so that I can differentiate myself from those.

Reference Board
The next step was just to search for Viking axes on Pinterest and Google Images. In this process, I looked for elements and details which were interesting and that I would be able to mix together to achieve a convincing looking weapon. It’s also in this phase where I started thinking about the story I could give to this object. There were two main details that I wanted to incorporate, an engraved head of some sort and carved runes on the handle.

Analysing References
Lastly, I thought about the kind of engraving I could have on the axe head, I am not particularly fond of drawing so I had to rely on already existing concepts. I simply looked for Norse designs online and gathered as many interesting ones as I could. I ultimately decided to go for the one with the dragon / snake that seems to depict the Norse mythology midgard serpent/dragon Jörmungandr.

Norse Designs Reference Board
Sculpting
After organizing my references, I had a clear idea of the basic silhouette the axe would have, so I booted up 3ds Max and quickly modelled the handle and the head (it’s really just a cylinder and a touched up box). I did decide not to model the leather straps in 3ds max as it would be easier to get nice looking ones in ZBrush with a bandage brush I previously downloaded.

Base Mesh
Following the most tedious and challenging modelling session of my life, I took the already subdivided mesh to zbrush where I started to shape and detail the handle.
Handle
A rather easy two step pass, I started with DamStandard strokes along the sides without it being clean and also lightly carved some areas out with ClayBuildup, just to add some detailing. I then flattened out some areas with TrimDynamic to remove parts of the noise and finished off by placing a wood grain alpha on top. I tried to keep the sculpt details light and soft so that the final product would not be overly noisy.

Sculpting the Handle
I finally incorporated the carved runes that I saw in one of my refs with the Standard brush. I just picked a tighter alpha already available in ZBrush and carved away with a couple of strokes only.

Sculpting the Runes
Straps
As I said earlier, I decided to model the leather straps in ZBrush with Manoj Maharana’s Bandages Brush. It is a super easy tool to use, I drag around the areas where I want my strap to be and repeat the process multiple times.

Sculpting the Straps
The straps are low-poly when you first apply them so I gave them a couple of divisions to smooth them out and be able to work on them. I randomly flattened some areas to give that tough leather feel to it. With the Standard brush, I made the edges pop out a little for a more rustic look.
Axe Head
Knowing that the axe head was going to have the intricate engraving covering most of its surface and that the texturing was going to involve somewhat noisy, and to a certain extent wore down metal, I decided not to sculpt any chipping, edge damage or any type of wear and tear for that matter.
I prepared the surface that I wanted to lay the engraving on by drawing an outline with the chisel tool and masked out that zone.

Chisel and Masking Tools
Before placing the engraving, I adjusted the alpha in Photoshop and also tweaked it a little bit by filling areas to create some variety instead of only having the outlines of it.

Tweaking the Engraving in Photoshop
I then simply imported the alpha into ZBrush and masked out the area I had prepared with it.

Adding the Alpha in ZBrush
Now that I have the engraving masked out, I can go into the deformation menu of ZBrush and negatively balloon inflate the area. I used balloon inflate instead of a normal inflate because it gives soft edges which will look better when baking.

Balloon Inflate in ZBrush
And that’s it for the High Poly!
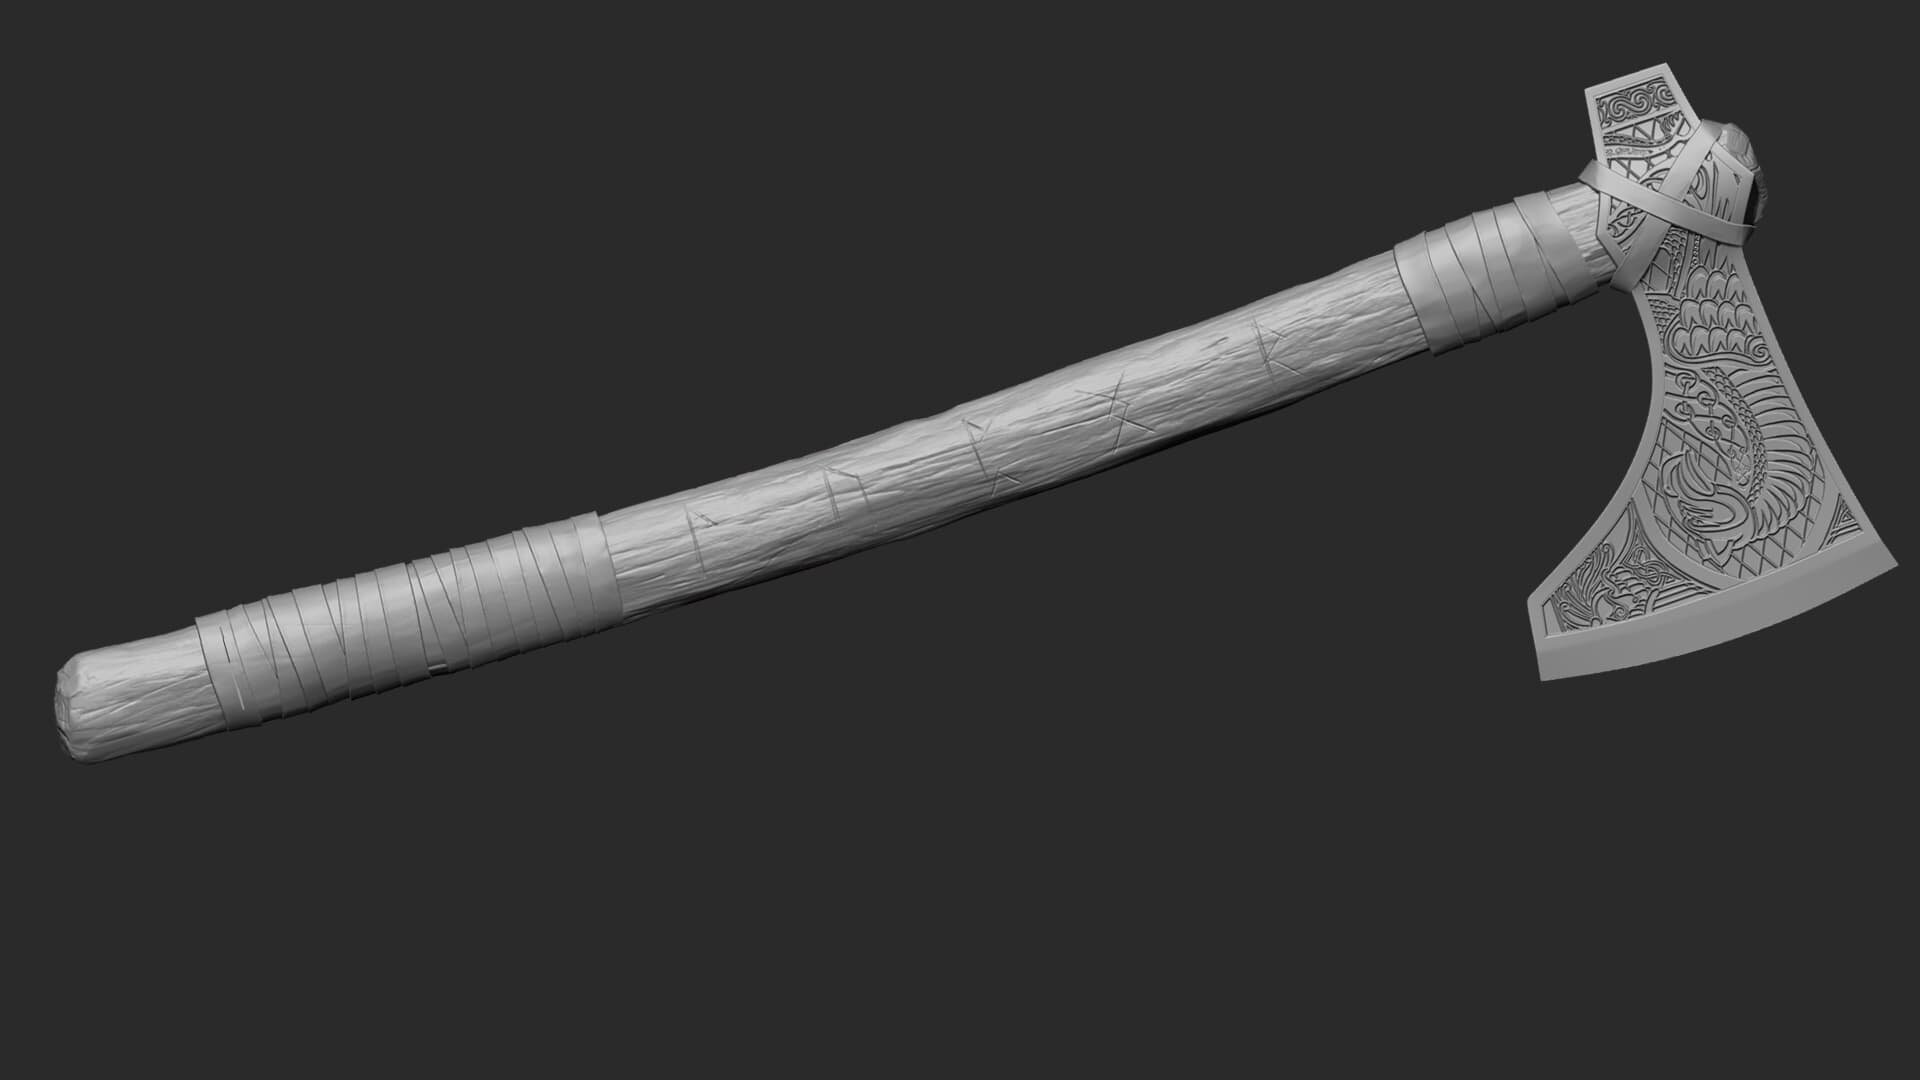
High Poly
Texturing and Storytelling
Selecting Photo Sourced Images
The base materials for each element of the axe were all photo sourced, with the references I had, I looked for images that were as close to them as I could find. What I tend to focus on are the main patterns visible on the images- color and brightness don’t matter that much since I’ll touch up the images either way in Photoshop.
Preparing the Base Materials
With the wood grain as an example, I take the photo in Photoshop to make it the correct size (4k in my case) and also make it tile. I offset the image halfways on both axis and correct the seam line with the healing brush tool. It’s fine if it does not look clean because it’s just for the base material, with all the wear and dirt layering you won’t even notice it. I finished up by messing with the hue, saturation and brightness to get the look I wanted. I repeated this quick process for the metal for the axe head and the leather as well.

Wood Base Material
Storytelling
After launching Substance Painter, I imported the base material images I created and set them up respectively. I used a couple of levels for each map ( Roughness, Albedo etc. ) to finalize and fix them if necessary.
The most important thing to keep in mind for me is storytelling- how much has the axe been used? In what type of environment? What are the areas that are more prone to dirt? What about damage? I also have to think about how Vikings treat their weapons, they were probably more careless with it than the English or French at the time.
Something else I do that I find very important is to have a quick Marmoset scene set up so that I can constantly check my modifications directly in the engine where the final presentation will be done. Substance’s viewport renderer does not do justice to the texturing you put in and so you might overdo roughness or wear/dirt and end up with a super noisy over the top looking prop.
Handle
When texturing, I always start from macro elements down to micro and give intention with each of my layers. I try to analyze and deconstruct the wear / damage / dirt from my references and reproduce them one by one. In this case it was a lot of discoloration and smudging which can probably explained by the rough handling of the weapon.
Texturing the Handle
Leather Straps
I gathered a lot of references for the leather straps, there are so many different types of leathers out there, modern leather is very colorful and has the classic leather pattern to it. After some research though antique and old leather that was used for weapons looks relatively smooth and only shows it’s distinctive pattern after it has been worn down, which is what I went for.

Texturing the Leather Straps
Axe Head
The head is probably the most important part of the prop as it holds the majority of the Storytelling. Aside from the heavy edge chipping and the cutting edge, a lot of the details were small variations in roughness and color. One thing I tend to avoid with black / grey material is to have them completely desaturated, the dark metal has a slight blue tint and the cutting edge has a light blue tint as well, I do this to give more depth because having the majority of the albedo in grayscale makes the element feel flat.

Texturing the Axe Head
Lighting and Presentation
Planning Out
Before getting in Marmoset, I gathered some more images from ArtStation of props that have an interesting presentation. By doing so I can get inspired by the camera angles, the lighting, the post-effects etc… but most importantly deconstruct the different elements that make these props presentation eye-catching. I try to avoid going for too many shots because I think it is better to have 3-5 very solid images rather than have a dozen that show every single angle imaginable while lacking intention. That’s the main reason I went for three shots.
Lighting with Intention
I always avoid using the lighting of the HDRI as it just lights in a very uniform way making your piece look extremely flat and boring. I only turn it on very slightly so that I start off with no unlit areas. Following that is the placement of my key light (Soft a directional light in Marmoset) that is used to give the main and general lighting direction of the element I’m presenting. It’s a very important element to block out early as the rest of my lighting will be based around it. The axe is pretty flat in terms of lighting so now I want to make certain areas pop with fill lights ( medium intensity omni lights in Marmoset ), this is where intention comes in play, I light each interesting elements in order to make the roughness reflect more, the metal to shine, the scratches to pop etc… It’s in this step that you want to give justice to the time you’ve spent tediously texturing your prop. Finally, I ended the lighting by placing rim lights (high intensity omni lights in Marmoset) on the edges of the axe. I don’t follow any rules for rim lights as they are used for general depth and ‘’ pop ‘’ and because it's very abstract in placement, I just messed around with them until I was satisfied with the result.

Lighting Breakdown
Concerning the camera settings, I only touch up the exposure and sharpness. Post-effects settings are a slippery slope and you can end up with a final product that is completely different from what it is actually supposed to look like. If you are not happy with the roughness or the color of certain elements, you definitely should modify those in your texturing software.
I then repeated these steps for the other two shots and I was all done!


Common Mistakes
I want to take the opportunity to point out common mistakes I sometimes see in props that are very easy to avoid that will save you time and bump up your quality.

1 - Overuse of height in Substance Painter: It makes your prop super noisy and gives no areas to rest your eyes on.
2 - Noisy texture on top of a noisy bake: Noise on noise doesn't sound good and it certainly doesn’t look good. It generally happens when pointlessly stacking layers and layers of grunges together with no intention or logic.
3 - Over sharpening in Marmoset: Sharpening in Marmoset is easy and it really makes your art piece nice and crisp but sometimes you can go a little over the top and create weird errors, it also comes down to your image compression. A sure way to go is to upload it on ArtStation or Imgur as a private post and see how it looks. Sometimes it is even better to manually sharpen in Photoshop.
4 - Exaggerated wear and sculpt details: When you go over the top sculpting in ZBrush, you can end up having very soft and almost stylized looking sculpt. I’m not saying skip the detailing in Zbrush but instead have some solid references of wear and tear of the object you are working on. Metal doesn’t chip the same way as stone and glass doesn’t crack the same way as wood etc…
5 - Micro-details in ZBrush: They can really add to your bake but be careful of how small you go, at some point the details are so micro that your normal will just look like white noise.
6 - Too low poly… or too high poly?: You need to plan beforehand what type of prop you are going to make, is it a hero prop? How big or small is the prop? Is the player going to interact with the prop or is it just going to be in the background of a scene?
Inspiration, Feedback and Takeaways
Artstation is a great place for me to be inspired. I spend some time every day looking at the trending posts and discover underrated ones. Today I am generally inspired by my friends though. I am lucky enough to hang out with very talented artists in the industry that are always coming up with killer pieces. They’re also genuinely excited to give feedback to push each other’s art to be great.
The production of this prop was not linear. It went through a lot of different changes not only for the looks but for the quality. I think I remade the axe head from scratch (low to high to texturing) around four times and a little less for the other elements. I personally believe it’s okay not to be satisfied with elements of a piece you are working but you should not spend an absurd amount of time reiterating on it. In my case I didn’t start from scratch on a whim, I knew clearly what was wrong or didn’t work and it happened to be so substantial that it was faster and cleaner to re-do it.
Outro
Original references, unique storytelling and a good amount of feedback is what I think the recipe for a perfect project is. I finally want to say, challenge yourself and make something fun! You learn so much when working outside of your comfort zone and if it’s for a personal project, there’s no risk in doing so. Thank you for reading this article and I hope you learned something from it :)
You can find more of my work and expect new projects coming soon on my portfolio.
Big thanks to all my friends who helped me and gave me feedback for this piece.