
KEEGAN KEENE - Creating Detailed and practical materials
Ever wondered how you can get the most out of your materials? Keegan shows us the various ways he creates his materials and his thought processes while creating them. Join us as we cover the topics such as trim sheets, Marvelous Designer, presentation, as well as Keegan’s tips on becoming a Material Artist.
Introduction
My name is Keegan Keene and I am primarily a Texture Artist though I do focus heavily on environment art too. I have lived in Plano, Texas my whole life right next to the Dallas metroplex and attended Collin Community college for some time after having taken many lessons on CGCookie.com
I grew up playing lots of Valve's games and mostly Nintendo games like Mario 64 which made me very interested in game creation.

Career Path
My career path is actually very short, the first time I even opened a modelling program was in September 2015 so I have been doing this for about 4 years and working professionally for almost 3 years.
Many people seem surprised how quickly I was able to advance my skills but I always like everyone to know that a lot of that speed is thanks to my parents being supportive. I was 19 when I started and was able to live rent free with my parents and did not have a job. All of this help allowed me to spend 40+ hours each week modelling and learning with Google and sites like CGCookie.com
I did go to college for a bit but was not learning anything new from what I was already learning online in the game art department. After my first year of college I was contacted by gametextures.com to work for them so I started going less and eventually decided to drop out because my skills were advancing far faster at work then at school.
If there is one message I would like to give out in terms of career choice is that everyone’s path will be different based on their circumstances. Some will have the benefit of expensive schools or the luck of not having to work right from high school and that will affect the rate at which they advance due to time constraints. I think it is important to note that everyone is where they should be and there is no shame in being older when getting into a career for games.
Material Artist
GameTextures has been absolutely great to work for! We focus on making practical textures geared towards game artists for texturing props to tiling in environments. Many people may think of texturing as just drawing or maybe just Substance Designer but we use as many different techniques that prove useful as we can.

We are a tight pack here at GT but we all work remotely. At times we work closely in an assembly line like process for textures, other times we are independent and work on our own thing. Matt Dirks is our primary Substance wizard and I focus a lot on modelling plus scanning so often I will do scans and modelling then pass that to Matt for final material creation.
Trim Sheets
My process can be very different per material. Substance Designer is the usual go to and can do the majority of materials I need but every program has its limits so I think it is important for artists to use a variety programs in order to stay efficient.
Some may think it would get boring making just textures but in order to make said textures I get to model, sculpt, draw, and even travel at times to scan textures. Texture Artists will want to exercise many disciplines to be able to make as many different kinds of materials as possible.
With all that in mind I will almost always start with a height map whether that be in Blender, Marvelous Designer, ZBrush or Substance Designer. Once height is done I will then start to composite colour + roughness combos and while often checking how just the roughness and height look alone.

Trim sheets are a similar process material wise but a lot of thinking goes into how the trim sheet will be used. Texture space is very important with trims and you want each trim sheet to be modular and very reusable, that way you don't need tons of textures for an environment. This is why I also do a lot of environment art as I would not understand how to make practical trim sheet textures if I don't know how they would be used for an environment.
I have made a few custom nodes a while back but I primarily use just core nodes.

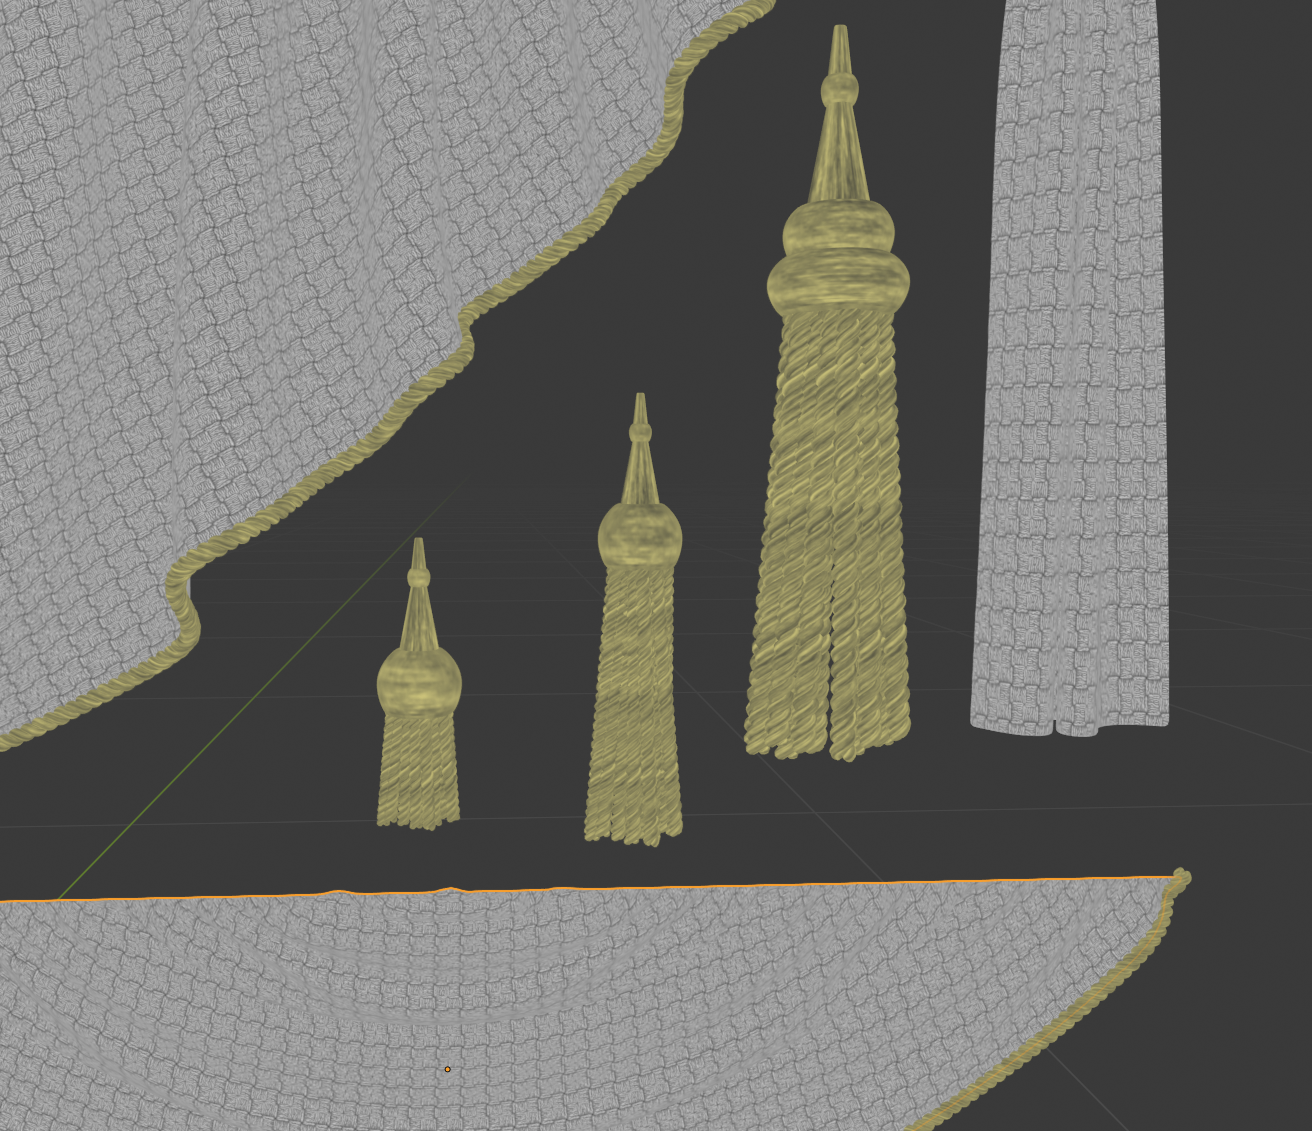
Drapery Trimsheet
The drapery trimsheet was something I did for fun one weekend out of curiosity to see how well thread materials would bake. I was also thinking of using them in an environment at the time but did not get around to it.

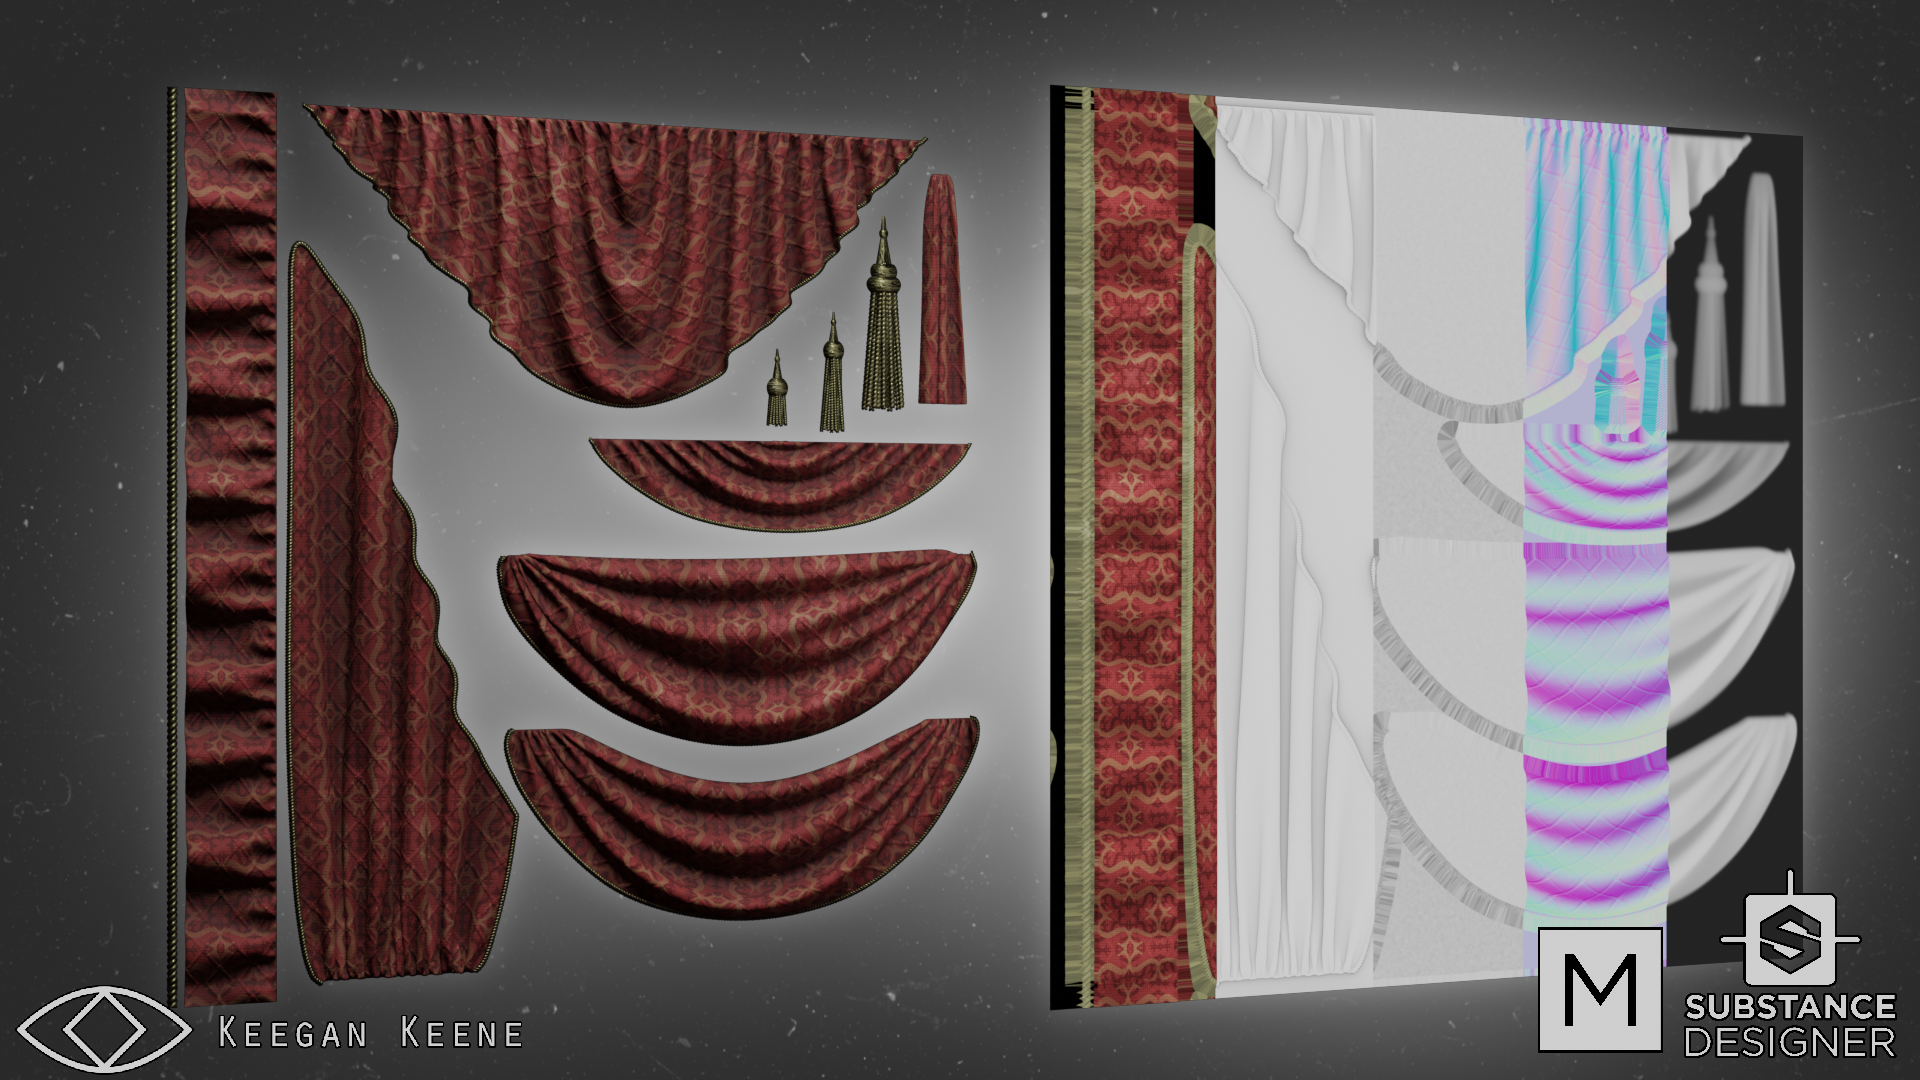
The process for making this texture is to first make the drapery model which is mostly done with Marvelous Designer then I model in the threading parts using an array+curve modifier in Blender. Next I make two very simple materials to tile upon the fabric part and the thread part. Here is what they look like inside Marmoset before the bake.


This is important for realism. Drapes are just flat pieces of fabric that fold, bend and drape. Because of this the pattern on drapery can wrap and go under folds and other parts so if you were to just overlay the normal and other textures on top of the drapery it would not look right.

I also have a RGB mask in the emissions which is what I use as the fancy colour pattern with controls to adjust colours in SD. Here are the final bakes:

The albedo is actually grayscale for the fabric and I ended up making the thread grayscale too in SD so I can simply plug that into a blend node and choose to colours to get primary fabric colour. What I ended up doing is using that emission mask to choose your 3 primary colours then the albedo bake is overlayed to add some fabric colouring.

Some of the drapes here are subdivided once but the rest are very simple flat geometry. You can make the geometry even simpler if the drapery is gonna be far away from the player.
Trim Sheets - Various Techniques
Substance Designer is very new, before I would hand draw and model textures when I was first starting out. Modelling and sculpting out the height for baking is still very popular and gets great results that can be hard to do in a procedural manner.
I also use scans in my work every now and then. I usually scan myself and did for some of the figures below but the rest are free public domain scans which can be pretty hard to find. I found these on MyMiniFactory. Most scans will not be allowed for monetization but some are.

Always use the right tool for the job. Models for ornate textures let me quickly rotate and move complex shapes like roses, pine cones, fleur-de-lis and other things that would be a very long and difficult challenge to make entirely in Substance Designer. It would be great to do it with Substance Designer for portfolio but not the best practice in production.

I use a basic subdivision modelling workflow for making all these plus some modifiers like mirror.

On the left is the model before subdividing and right is after subdividing about 5 times. If you want to get better at subD modelling then try to work as broad and low poly as possible and let the subdivision do the work for you. Adding edge loops where needed or you can sharpen edges to resist subdivision but I find edge loops get better results.

For most ornaments I work pretty flat like I am drawing. There are lots of ornament drawings form old catalogs before the digital age that you can reference.


Once the general shape has been drawn I add an edge loop through them and raise them up.
After a few more adjustments you should have something like this. Keep in mind that since I am just rendering height you can have intersecting meshes and the anti-aliasing will soften those out so it may be better to that if you don't need edge loops.

Each of these were drawn flat out of polygons then I would raise of sections I wanted higher. After previewing subdivision I then add edge loops on key parts to keep them sharper.

Once height is completed in Blender I render height then drop that into Substance Designer to generate the rest of the textures. I only render height because bitmaps are very large so I would rather save space and generate things like AO and normals in Substance Designer.

The graph is pretty simple since all the height was done in Blender. First thing I do is put height into a levels node and set it to be relative to parent so the resolution can change. After that I get the curvature and AO to use in mask generators like the mask builder node and metal edge wear though you may have to make masks from scratch depending on your needs. With these few masks, I use them to mix and match basic combos of colour and roughness to get the end result.
Lighting & Presentation
For most renders I do a perspective shot and the classic sphere render. For trim sheets I may make a diorama or some scene to demonstrate how the trim sheets can be used.
The setup for the render is simple but I actually have a bit of a more complex system to automatically composite all my material renders using Blenders composite system. I have multiples scenes such as sphere, cylinder, plane, curved plane, wall, and others in a single blender file.

Once the image renders, blender then composites it using the render result plus some local graphics I dropped in.

This method makes it easy for me to export a texture set into a folder called "textures_for_render" and I make sure it only has identifier names from Substance Designer like "basecolor.png roughness.png" etc. so that blender will automatically update these files when I export out textures from a different Substance Designer file.
Workflow
I use as many methods as I can as some methods are better for certain textures. Most textures I make by hand in Substance Designer or other programs but for some things like forest grounds and tree barks I will use photogrammetry. Photogrammetry can be a lot of manual labour when you do big scan runs. Ideally you resort to scanning when it would be faster. Ornate statues or tree root wrapped rocks could take a very long time to model and sculpt by hand but can be scanned and processed via Reality capture in just an hour or 2.
My favourite type of scanning is Photometric Stereo Scanning. You are familiar with this method if you have used Substances 8 point light scan system. I use a program called Dabarti for this as it gets the best results I have ever seen and you can take many many pictures for better results.

Chocolate Sauce

Photometric Stereo Scanning is best for scans around 1 foot by 1 foot and smaller. It is great for capturing micro details such has finger prints and small thread fibers so I recommend it for fabric scanning.
Overall I like to switch up what I do and work on all sorts of materials that take different workflows.
Marvelous Designer
Marvelous Designer has been a favourite of mine for making sci-fi fabrics and puffy padding.
The biggest difficulty is that Marvelous Designer was not designed for precise tiling textures so the object manipulation tools are not quite exact. Working in Marvelous Designer is now quite a bit easier than when I started a few years back with it because now you can trace patterns from the UVs of 3D models allowing you to model your fabrics then import and simulate.

Seeking Feedback and Maintaining Consistency
I mainly got feedback from my instructors at Collin College and once I started at Gametextures I got feedback from them too.
We are a pretty small team so when working on materials we post in a WIP channel on Slack to show where we’re at on something then people can give suggestions on what they can be better or let us know if they think it is good. We aim for the quality that one would see in AAA games as several of our biggest customers are AAA studios.
I think quality will get even higher as technology progresses and games demand even more detailed textures or perhaps a new material standard comes into play.
Landing your First Job - How to Improve
When it comes to Material Artists I think a big thing is if your materials are practical and if you understand how they will be used. I do think it is okay to do over the top crazy stuff on your portfolio because those are really fun to do and still show skill.
A lot of the newer artists I see use just Substance Designer and I do think it is a primary tool for materials but if you have skills in sculpting, modelling, and painting then there will be no limit on what textures you can make. For example if all you know is Substance Designer and were asked to make a tiling corpse pile material involving realistic bodies you would have a very hard time doing that all in just Substance Designer, something like that would be best laid out in a modelling program or sculpting.
Last skill I think that would help a lot of Material Artists is showing your process plus what your material looks like in engine. You don't need to do this for every material but making a small diorama or scene using things like trim sheets and tileables displays understanding of texture space real estate.
Future Work
I think you can expect more breakdown scenes and trim sheets from me in the future. I am very passionate about education and free public information so I would like to add more to the internet because that is where I learned most of what I know.
Advice and Tips
Just want to say don't worry about being behind others in skill! Everyone learns at different rates and some people may simply be too busy with life to practice a skill but you are were you are so focus on getting better than your previous self!