
The Waiting Place - An Unreal Cinematic
Ted Mebratu explores the process of creating this epic cinematic submission for the Unreal Film Jam. Read through as he breaks down specifics such as compositional storytelling, lighting outdoor environments and leveraging video editors for artistic flare.
Introduction
Hi everyone! My name is Ted Mebratu and I’m a Lighting Artist from Ethiopia. My first interest in 3D came from discovering and playing around with different modding/map making tools when I was in high school and that evolved into me wanting to learn a bit more about how video games were made. Since then I’ve worked on many different types of projects and am now currently working as an Associate Lighting Artist at Ready at Dawn Studios.


The Waiting Place was a short UE4 film I’d been working on as an entry for the Unreal Film Jam. I’ve always been into making cinematics to showcase my personal projects and thought this competition was a perfect opportunity to make something cool using Megascans and Unreal marketplace assets without having to worry about doing any modelling/texturing of my own.
Contrasting Composition
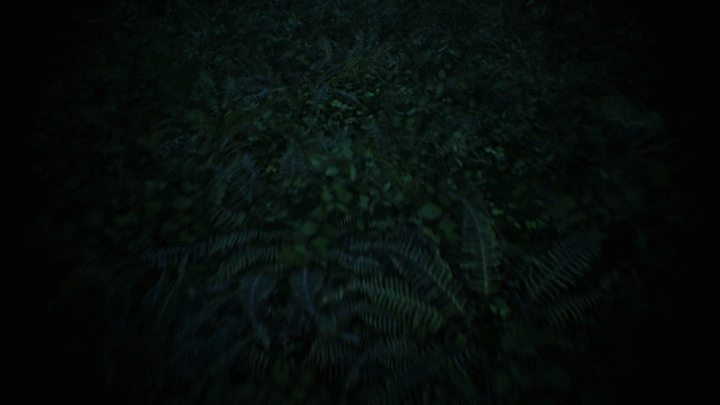
The whole concept I had when lighting the first half of the cinematic was for it to feel very surrealistic and oppressive, almost like you’re in a dream state. So I tried to exaggerate the lighting in certain areas for a more dramatic effect while also placing some sources of light that wouldn’t make sense in the real world.
I started with just one directional light and a sky light in the beginning but noticed how hard it would be to make the vegetation and other assets look interesting with the sun barely hitting anything on the ground level, so I used two solutions to tackle the problem.
Firstly, I started adding fill rectangle area lights to further accentuate bounce from the sun and the sky as I wasn’t using any kind of static or dynamic GI system and since this was a cinematic, I didn’t have to worry too much about performance. I added and modified a ton of these lights everywhere throughout the course of this project. They really helped in creating some separation and removing flatness from the many points of interest in the scene.


Secondly, I used reflection probes with high intensity values and a small radius as a replacement to specular only lights. I placed these around moss, statues and ground vegetation to give them a more wet and reflective look, it helped a lot in having the statues stand out since they were now catching all of those cool enhanced specular highlights from the sky.


Aside from that. In order to create some contrast I used a lot of local light sources throughout the whole forest sequence. Having these warm point lights scattered around the world floating in the air really helped in breaking up the dullness of the blue and bringing in some interest to the whole scene in general.
Cinematic Breakdown
Planning the shots went through a ton of revisions. I had originally planned on doing a more handheld perspective with camera cuts but ultimately felt that having a smooth one take composition worked more in line with what I wanted to achieve with the scene.
I had done a basic blockout of the scene by this time and had a vague idea of how I wanted it to look so I created a cine camera, added it to sequencer and started flying it around the map and recorded the keys. The main plan was to get a rough draft of the camera movement first and just build the whole environment around the sequence, that way I didn’t have to waste too much time on something that wouldn’t be seen by the camera. Using this method also eliminated having to deal with any major changes down the line and simplified the whole production greatly as all the shots would be in one level and I didn’t have to setup any more cameras.
The final camera sequence is pretty similar to the one I had originally, just some smoother rolls/rotations here and there and some other small pacing tweaks were the most of it. The majority of my time was spent on level design and framing the world and points of interest in a meaningful way around the sequence.


The Fog
Fog was very crucial for achieving the desired mood for the scene, I played around with the exponential height fog settings in Unreal a lot until I found a balance that worked for me.
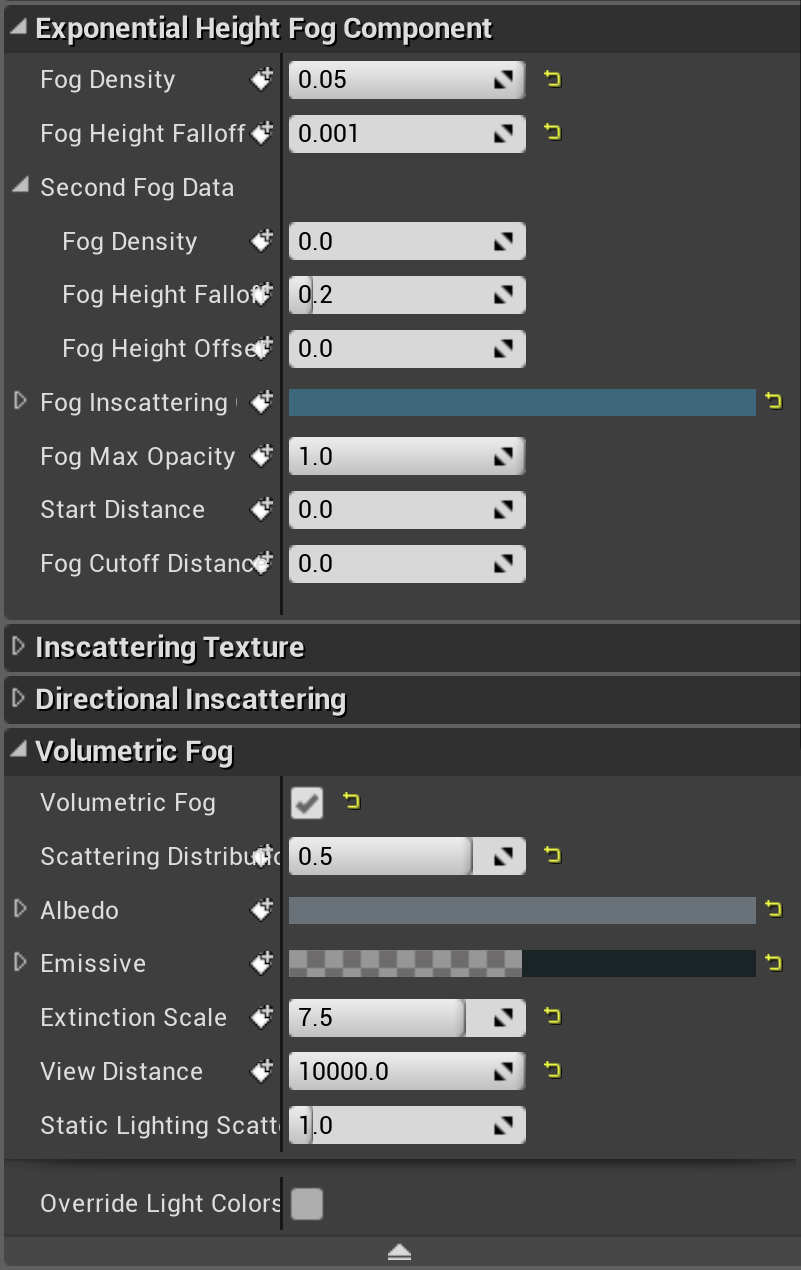
I found that increasing the emissive colour value in the volumetric fog a little bit above black after amping up the extinction scale helped a lot with providing that ambient thick fog around the entire map. I mostly relied on the volumetric fog for the majority of the shots but did use some fog particles in areas where the volumetrics weren’t really helping much. Also setting r.VolumetricFog.GridPixelSize to a lower value like 2 really helped with getting much crisper volumetric shadows.


I did a lot of mood/lighting tests with the default redwood forest asset pack first before attempting any cinematics. It was important to me that I had a good base to start from in terms of lighting and atmosphere before I started building the scene and fog played a key role in that. I did some variations including an overcast mode with some rain but ultimately found that the dark and cold early morning look felt better.


Cinematic Sky Transition
I was looking into ways of having the sky transition/time lapse from day to night in real time but couldn't find any believable ways of doing it. So eventually I settled on just duplicating the level, having a night sky variation on the second level, capturing the same camera sequence on both and finally overlaying them in Premiere Pro and cross-fading between the two over time.

Night/Day Transition
Using Lighting to Push Story
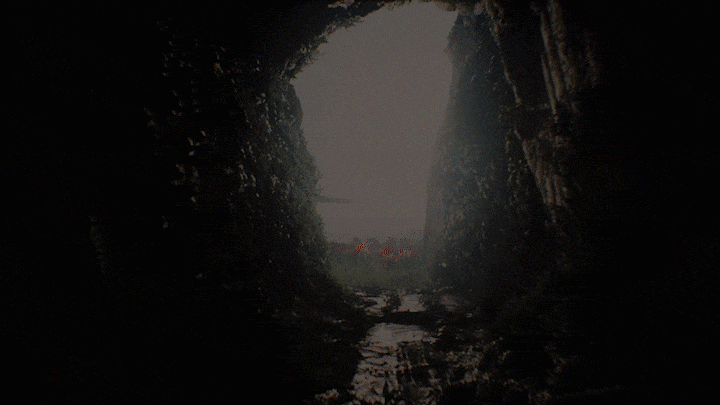
Since I didn’t have any characters or dialogue to push the narrative, I was mainly relying on the lighting and environment for storytelling. I structured the key light sources in the first half to evoke or represent a sense of alienation and mystery. While the second half is meant to feel much calmer and inviting. The whole narrative being an escape from a dark and desolate place into something new/good, I tried to shoot the whole thing in a way that is open ended and non literal so that the viewer could maybe form their own interpretations in the end. I’ve always been into narrative experiences that don’t hold your hand and leave you to figure things out for yourself whether that be in games or film and wanted to attempt something similar here.
For both portions of the environments I just used a static skybox with some skies I found on CG Skies but at the end part when it transitions into a starry night, that’s using the ultra dynamic skies plugin from the Unreal marketplace, which was super easy to use and saved me a lot of time as I couldn’t find any night sky HDRIs that achieved the same effects as that did.
Maintaining Quality
Aside from some important feedback from some friends and coworkers I was primarily responsible for all the work done, having a great asset pack like the Redwood Forest by MAWI United provided me with a solid foundation to build everything around and keep things consistent. I basically scrapped all of the vegetation they had in their example scene except for the trees and started slowly replacing it with assets from my Megascans 3D plant library, which proved to be super helpful both in efficiency and visual quality. I didn’t have to tweak too much on the plants in order to make them look good which was also a huge time saver.

Megascans Library
Another issue I came across with using all these different asset packs together on one scene was having unbalanced albedo values from one asset to another, so I had to go in and tweak each asset individually to match it up with everything else.
Receiving and Implementing Feedback
I found seeking feedback from many different people throughout the whole process to be extremely helpful. Sometimes when working on a project like this non-stop you might feel like you hit a dead end and may fail to notice some very glaring issues as well as all of the small ones. That’s when having unbiased opinions and perspectives around you helps a lot.
I rendered out a test sequence every weekend to kind of have a timeline of the things that changed since last week and whether the progress is good or if I had to revert some things. Doing this helped a lot in seeing a clearer vision of where I was heading and also making sure I wasn’t deviating too much from my previous ideas. I often showed these test renders to some friends and co-workers and got a lot of feedback on how well the lighting and composition worked to sell the narrative and on what areas I could improve upon.


Common Junior Lighting Problems
Too much contrast, mismatch of the light to the light source and a lack of specularity or accurate reflections are the main things I see a lot.
The best practice is to gather lighting references that closely resemble what you want to do and following them throughout the project, that way your lighting is somewhat grounded in reality and you don’t stray too far away compared to just going off from the top of your head. I’ve hit a lot of dead ends in the past when I’d do something without any references and would feel like something isn’t working or looking right but I’d have no idea why. Collecting mood references before you start and actually understanding how the light and fog interact with the environment based on different contexts helps a lot in avoiding these issues.
Looking to the Future
Making cinematics and lighting are my favourite aspects of 3D so I will probably keep working on improving my skills by doing more medium length projects like this in the future. For the time being I've been experimenting a lot with real-time ray-tracing in Unreal. I'll hopefully get around to finishing up some relights and posting them pretty soon!
Additional Tips & Advice
The biggest thing I learnt from this project is to measure up the scale of what you want to undertake with the amount of time you have or want to set from the start. I wasted a lot of time near the end exploring and trying out completely new ideas for the second half of the short while I already had an almost complete version ready. Exploring isn’t necessarily a bad thing but shouldn’t be done so close to a deadline when everything concept wise should be locked in and polishing should be the main priority. Here’s a gif of the scrapped version:

Thanks for reading! I hope you’ve enjoyed this breakdown and maybe learnt something that could be of use. If you have any questions feel free to message me on my Artstation!