
Al Capone’s Cell - Eastern State PENITENTIARY in UE4
Mikel created his stunning recreation of Al Capone’s jail cell while studying at Think Tank Training Centre. In this article he covers his creation process for the scene including; planning, utilising Google Maps and Photogrammetry for reference, modular building, set dressing, decals, lighting and much more!
Introduction
Hello everyone! My name is Mikel Iriberri, I’m a 3D Environment Artist from Spain and I have a background in Graphic Design, 2D & 3D Animation and BFA in Digital Art and Animation. Right now I’m a student at Think Tank Training Centre. My first introduction to the 3D world was in Industrial Design Engineering and Product Development, with software like AutoCAD and Solidworks. After that, I started with Autodesk Maya & V-Ray and did an internship at a studio in Vienna as a 3D Generalist & Motion Graphic Artist.

Considering myself an art and gaming enthusiast for as long as I can remember, I guess the first game I played was Metal Slug in a multi-game arcade machine. I grew up playing insane hours of games, from Pokemon Yellow to RDR2 but the ones that actually made me start developing an interest for the videogame industry would be Counter-Strike or Call of Duty. Also, I'll never forget all of the time spent playing zombies on maps like Kino der Toten and the feeling of playing a multiplayer first-person shooter with your friends on a custom map made by yourself is just awesome.

The freedom it gives you being able to use Modding Tools as Valve Hammer Editor or Radiant to use their assets and create maps is exactly what made me start thinking about games as a future job instead of just an entertainment platform. In the end, playing games is always fun, but if you can create & play them it is much more fun. Who doesn’t want to be capable of designing whatever you have in your head in 3D, you can tell stories without saying a word just creating environments.
Reference
I'm a big fan of urban exploration, abandoned places, little corners where you can see how nature takes over the place. Doing a little bit of research I ended up looking at images of the Eastern State Penitentiary and I found Al Capone's Cell. It fitted perfectly with what I had in mind, making something pretty modular but with a unique and organic touch. One of the biggest inspirations for this project was the awesome work done on Wolfenstein II. I fell in love with some of the warm and cosy corners walking through the corridors at Eva's Hammer.

Finding Inspiration From Wolfenstein II

Something really interesting that happened to this scene was being able to go inside the Eastern State Penitentiary through Google Maps, nowadays it is a museum so you can actually see everything from inside and walk around the prison. Having the chance to look and zoom to every object in Google Maps was key to creating all of the assets.
Never trust your mind! You have probably heard this a hundred times but always use reference, even if it is the smallest detail. In the end if you trust your mind, you only have a certain idea of what an object looks like to you, but if you compare it to a real-life reference you will know you were probably wrong. That's why you need to use real-life references and obviously PureRef, one of the tools that every artist needs in their workflow. A really nice and easy to use software to have every reference you need for a project.

PureRef Board
Planning
This project was my first modular environment in Unreal Engine. I had to plan everything ahead perfectly and try not to over scope too much because if not you will end up arriving at the deadline without finishing the scene. I use Trello to organise my projects and also sort assets by priority, making yourself tasks with deadlines. That is the only way to keep on track with your project.

Trello Board
Have in mind that you will need to learn new things through the process that you may not know so it is better to have everything organised. Trello is basically a place where you can add photos and descriptions of each asset and material with their respective naming conventions. Once you have everything here you start realising the amount of work you need to do and which things to prioritise through the process.

Progress GIF
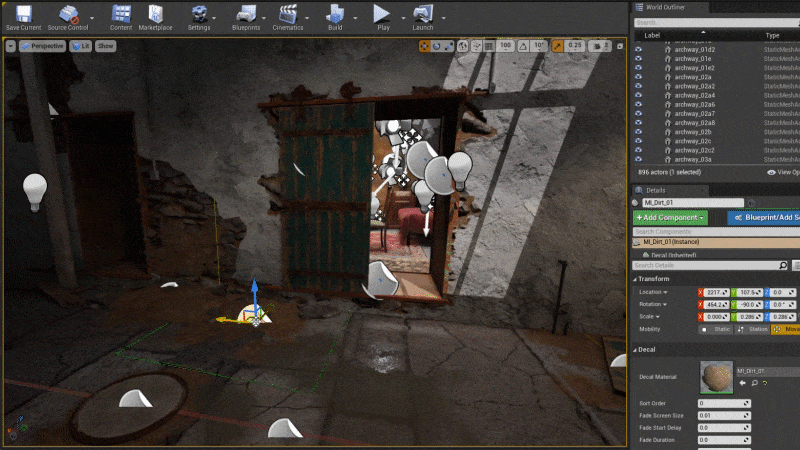
When the planning and the reference research are done, I start a blockout phase in Maya, in this case just simple geometry of the prison corridor that can be duplicated across the environment. I then import this to Unreal Engine to test a basic lighting setup and establish the camera shot. I keep adding basic shapes like doors and tubes to get the look I want, but again just with really basic geometry. This geo is just for figuring out the scale of the scene. In this part of the process what you need to have is every object of the scene inside Unreal which you are going to replace and update in the future. With this method, every change you make to an object in the scene in Maya is going to change inside Unreal.

Assets
Scale and Photogrammetry
As I mentioned before, one of the best things that happened with this project was being capable of walking through the entire prison inside Google Maps, this gives you basically all the real-world references you need. But other than that I wanted to have all the measurements of this prison in real size. I'm sure that most of you have seen the awesome work of Wiktor Ohman and the recreated Counter Strike - De_Dust 2 scene he did using Quixel Megascans, and how he approached the beginning of that project, well I wanted to try the same method with the prison for the scale reference.
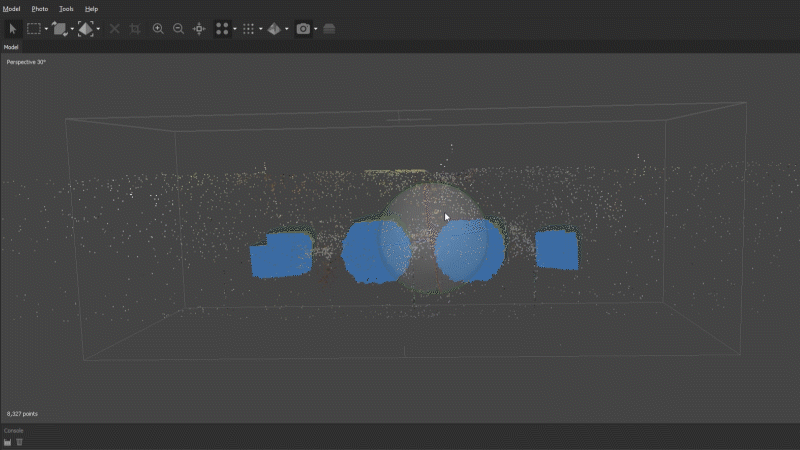
Prison Photogrammetry
To start with I took around 250 screenshots of the inside of the prison through Google Maps, generating two spheres full of photos and also two more side points with support photos to help match the perspective, the next thing you will need is a photogrammetry software like Agisoft Photoscan. The workflow here is pretty simple, you add the photos and the software will align everything for you, build a dense point cloud and export the scanned geometry with textures. Once you have all the scanned data you can use your favourite 3d software to keep going. From here it was easy to match the size of the doors, cells, archways and even the ground tiles. This part of the process was a game-changer because I didn’t spend too much time dealing with the scale of every object.

Using Photogrammetry as Modelling Reference
Modularity

Assets
The entire scene is pretty modular except the warm and cosy cell, every asset inside that room is unique. I divided the prison into three parts, each one of them with their respective lightblock. The end and the start of the corridor is unique geometry and everything in the middle can be duplicated as many times as you want so you could have an infinite modular corridor.

Modular Pieces
In the end for the middle part of the corridor I only have three pieces for the structure; archway_01a, wall_01a and floor_01a, each one has 3-5 variants to give a little bit of life to the scene and try not to look similar. In little scenes like this one repetition gets pretty obvious quickly and you can see duplicated geo everywhere, the scaffold for example, is one of the objects that helps a lot breaking that repetition. All the walls, cells and tubes in one of the sides of the corridor are duplicated and inverted or rotated either way, this way you only need to worry about having everything working in one side.

Decals and Breakup Assets
The variety of this scene at the end is basically good set decoration and placement of decals. If you combine it with vertex painting that can be tileable between walls without any seam you can easily achieve a non-repeatable pattern. Set Decoration is my favourite part of the process because you are giving each object a place to stay, you need to feel where each object needs to be. I think it is this moment when art comes together in a scene. You have the ability to make the viewer look where you want just by placing the elements so you have to place every object carefully. You will need to ask yourself a lot of things like why is this piece of wood on the floor, why is that puddle there or why is this door open. When you establish the camera shot you also start thinking about composition, there are some examples of symmetry, rule of thirds or framing among others. Colour balance is really important also, I divided a lot of the shots with one bright side so the viewer can focus on the warm points. Most of the decals are intentionally placed to create leading lines that guide the viewer through the image to the centre of interest.

Composition Breakdowns
Basic Materials and Decals
This scene does not use really complicated shaders or functions, just basic materials to achieve the look I wanted. It is true that sometimes less is more, my overall shaders are not that fancy. I think that with a simple material and vertex painting functionalities a lot can be done. As a result of this, I could invest more time in Substance Designer and making my materials shine.

Vertex Painting
I had the opportunity to create an asset for Dekogon and I used the same nomenclature and texture sets for my project, this is why I used RMA for the textures. It is true that you can use Roughness in the green channel because it has better quality, but this was an environment for personal work and I didn’t mind using RMA. All of the materials for this scene were done with Substance Designer, each material has a more damaged stage to blend it in the scene.

Substance Designer Materials
All the props from the Al Capone’s Cell share the same master material, every asset is textured in Substance Painter and some of the materials have emissive channels to control the light intensity. There are some unique materials like the lamps, that have two more textures to control the emissive and the opacity. This way you can create the effect of transparent linen as if the light goes through the cloth. The decals are set up in a pretty easy way with an opacity mask where you can control the contrast and value. There are also decals for the dirt, so you can make less noticeable the debris or dirt mount in the scene, with this method the dirt mount fades in the ground with the help of the decal and you can get rid of any faceted edges.
Ground Dirt Decals
Lighting
The lighting of this scene is one of those things that actually enhances the mood I wanted to create. I tried to spend as long as I could to get the lighting the same as the real-life reference. At first I wanted to go with a little bit of a bright scene but didn’t feel confident with the result. That is why I ended up with daytime lighting conditions but pretty dark so not all the sky light enters through the flat roof dome inside the corridor and you can only focus where the three lamp lights are. The first thing I figured out was how many lamp lights were going to be in the corridor, three light points for all the corridor was a really good odd number.

Detail Lighting Breakdown
There are static rectangular light sources in every roof dome of the corridor to help the sun light source. Each block of the corridor contains one sphere reflection and one static point light to fill with some clarity every part where the sun goes inside through the ceiling. The lamps have two lights, one movable spot light heading down and another one pointing towards the lamp itself to create a light volume that helps volumetric fog to be more intense just in that area. The lightblock of this scene is really simple, consisting of three meshes as I mentioned before with a double-sided material that allows light just to go through some of the flat roof domes of the ceiling. Actually it’s the same setup as in real life if you see the Eastern State Penitentiary from Google Maps.

Lights Breakdown
Al Capone’s Cell lighting is a little bit more complicated but is resolved in a pretty easy way. The skylight is just a plane with a high emissive material added to it, this way you create a fake sunlight that helps to fill the cell. To support that there are two rectangle static lights in both roof domes. Each lamp uses a point static light supported also with an emissive material as I said before to give this warm focal point like in the reference.
Sound
I know I’m not a sound designer, but sound is also important in my opinion, every environment requires a little bit of attention in that sense. Nowadays there are free samples of whatever you wanna hear all over the internet and this scene without sound wouldn't say that much. I think it was just a question of time to add that jazzy vibe to the scene. In the end, if there is a radio somewhere in the environment you just need to play a little bit of music, and this one was shouting for some old radio mono music in that abandoned and lonely prison. I always imagine and place myself in all of the spaces I create.
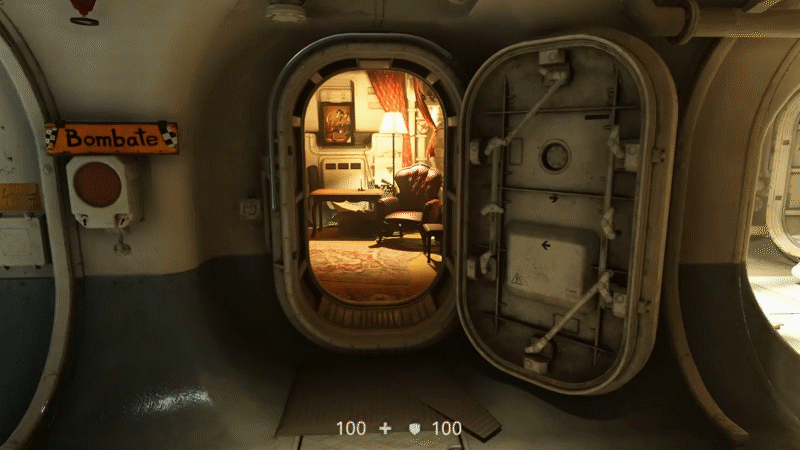
Al Capone’s Cell


I started with a really easy blockout, mainly cubes and quick geometry just to fill up the scene and start figuring out the scale of each asset. When I had every asset inside unreal engine with the proper naming conventions. I start working on each asset individually. As well as testing different light setups from the beginning. My goal here was to create something that felt warm and cosy as the room itself in real life.
Most of the assets have been hand sculpted in ZBrush except the plant that is an atlas from Megascans. Baked all the maps in Marmoset Toolbag and used Substance Painter for layering the textures. The plaster material of that unique cell has been done in Substance Painter instead of Designer, this way I had total control over the strokes I was painting and the process basically was painting, updating texture in unreal and comparing it to the real-life reference. One of the biggest challenges in this room was matching the size of every object with each other.

Progress GIF
Actually you can see in the GIF process how the scale of some of the objects in the scene is completely messed up at first, for example, the light on the right of the nightstand. My intention was to get as close as possible to the reference, even the design of some of the assets like the painting or the carpet. There have been a lot of iterations while creating this little cosy room, all of these changes came from comparing the scene to the real-life cell photograph. If you focus on one of the assets through the time lapse GIF you can see all the scale and texture changes that have been done.
My goal with this part of the environment was nailing the scene to the real-life reference of the Al Capone’s cell at Eastern State Penitentiary, and I was really ridiculously picky with some stuff, so there has been a lot of research to find the same models of radio, wardrobe or even the lamp. You probably laugh but I can say that I even asked for help finding the same design of carpet because I was literally gonna give up searching. Now I am happy to inform you that yes! It has the same carpet design, also the painting in the scene was tricky to find, but I figured out how to look for it.

Method Used for Finding the Painting in the Room (Jessie Arms Botke (1889-1971) - Cockatoos and Avocado)
Final Tips
As soon as you do your blockout create a camera shot from the angle you are going to showcase the most of the scene and every time you think you have gone forward a little bit take a screenshot, this way you can track your progress. I say, it’s really pleasant when you finish the scene and check your time lapse.
Another thing I can advise is to always plan ahead what you are going to do, keep a list of to-do things or use organising tools like the one I mentioned before, this is key to keep going and realise the amount of work you have ahead. Also always try to use naming conventions for every material, asset or texture you create. Nowadays there are a bunch of websites and really nice groups on Discord where you can seek feedback, so you don’t have any excuse to do that! Just share what you are making and you will receive an answer for sure.
And do it with love! In the end, we are Environment Artists and we have to treat everything with a little bit of love. I hope you have found this helpful and also thank you for reading! :) Feel free to ask me anything if you have further questions.