
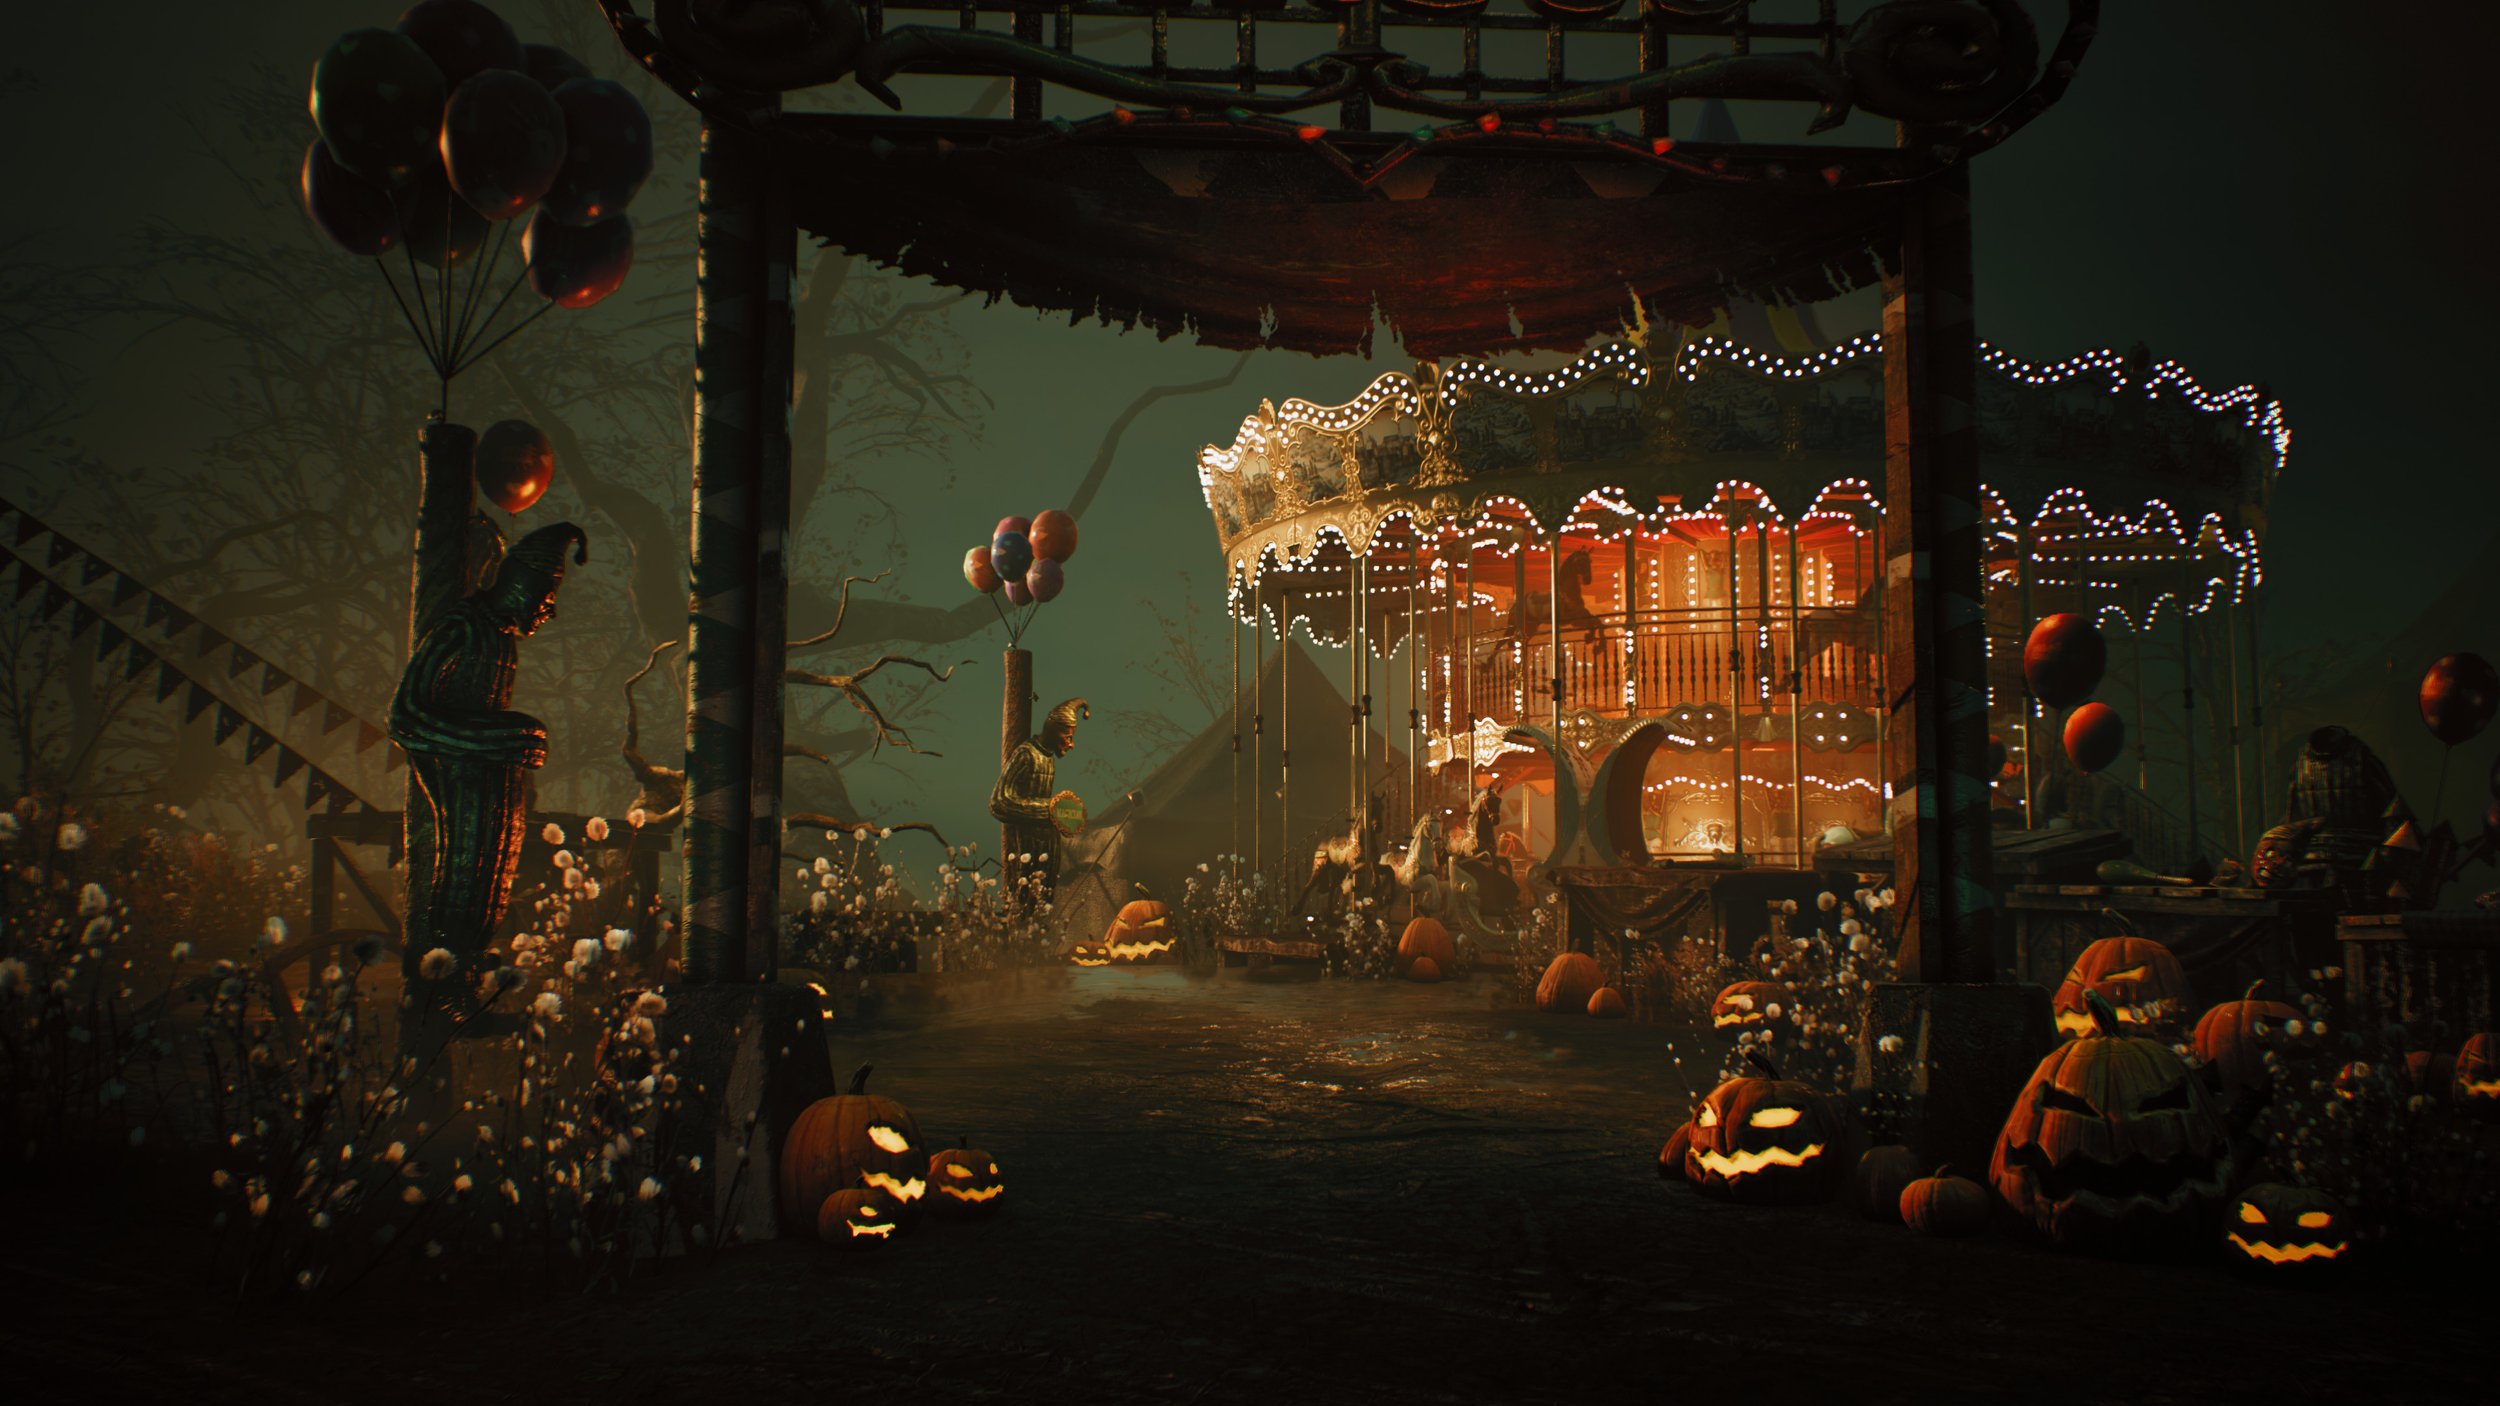
The Buffoon
In this article we’re joined again by Principal Lighting Artist, Maria Yue, as she breaks down her atmospheric Guillermo del Toro inspired circus act, The Buffoon. Learn about Maria’s journey as a Lighting Artist, lighting and colour grading, camera setups, lighting tips and tricks and how she crafted her stunning piece.
Intro
Hello everyone, I am Maria Yue, I am a video game lighting artist currently working at Deviation games, CA, USA. I do a lot of personal work in my spare time and love to share my little knowledge at my lighting blog. Previously I have worked at 4 AAA studios located in 3 different counties. I started at Ubisoft Shanghai in 2013 for Far Cry 4 and Far Cry Primal, joined Crytek Frankfurt, Germany in 2016. In 2017 I moved back to the UK, worked at Cloud Imperium Games for Star Citizen, and Splash Damage for Gears 5.
My hometown is the Chinese Cyberpunk city, Chongqing. Since I could read, I was fascinated with Japanese animation and Manga, stop motion movies, and traditional shadow puppetry, using flat cut-out shadow puppet or wired plastic dolls to perform in a mini paper theatre. There is a video game store near where I live, kids at my age back then were not allowed, but I love watching the others playing through the window without knowing much of what's going on.
Example of Shadow puppetry from the movie I Am Dragon
I love certain art styles such as Impressionism and Pre-Raphaelite Brotherhood a lot. I am extravagant to collect pretty dolls and small ornaments, beautiful prints and postcards. I trust as a kid that’s how I spend all of my new year's lucky money given by my parents.
After graduating from Sichuan Fine Art Institute (Chongqing, China.) with BA Photography & Film making as my major, I moved from China into the U.K. The West End theatres and fashion weeks in London have a long reputation among art students in my university. Without second thoughts while deciding where I should go in terms of oversea study, England becomes my choice.
Chongqing, China
It was the summer 2007 when I started my MA in Kingston University London, as the fine art education system I am familiar with in China is heavily inherited from the Russian classic art foundation. The British contemporary art practice blows my mind. Instead of restrictively training visual skills like painting or sketching into a sophisticated level. I’ve been encouraged to develop ideas and express them really well.
In fact, I think my creative habit is slowly building up during the very year I am studying in the U.K. Instead of delivering highly polished artwork only, I start trying to employ every art practice I have to express the ideas, mood or subject matter that I want to deliver. Since it's a postgraduate degree, research and creative development plays a significant role during my 1 year MA study, so I concentrated on Scenography as that’s the subject I've been interested in for a long time.
I had a rather difficult icebreaking journey during my early career development, by the year I finished my MA in the U.K. it was early 2009 when the financial crisis is around the world. As an international graduate I am allowed to work in the U.K. without visa sponsorship for 2 years. Instead of going back home and finding a stable job, I start to work as a freelance photographer for fashion brands and individual designers, later I’ve found a few apprentice or internship with theatres, art galleries. Though I love theatres and fashion photography a lot, as an foreign graduate who relies on visa sponsorship, it was almost impossible to work as a freelancer abroad back then.
While I am almost reaching the expiration date of my post study working visa in the U.K. Mirror’s Edge 1 was out and the poster is everywhere. Watching my friend finishing the game and I found there is a job title lighting artist in the credits. I love playing video games even though I am never good at it. Back then I thought anyone working in the games industry must know rocket science subjects to me, such as mathematics, physics, or computer science (nod, I am talking about those super smart engineers..)
Knowing a video game lighting artist as an existing role makes me feel more than excited. While the expiration date of my visa is whipping me to get a stable job as soon as possible, I decided to spend all of my savings from my previous freelance job and enrolled in a digital media course.
2009 was an intense software training year for me. Thanks to my mentors back then, and free learning source from 3D Buzz,Polygon, I learned the basics of Maya, UDK (yes it was called such back then, Unreal Engine 3). Experiencing cameras in Mental Ray and UDK was a very joyful experience to me, as I could move lights freely without worrying about breaking my arms, setting up lights without worrying about the voltage. Lighting in 3D to me, the limitation is above the sky.
My learning path of video game lighting is heavily community based, I’ve joined so many small groups online and learned a lot from professionals whom I never meet in person. Including the lighting artist from Mirror’s Edge, Oscar Carlén (Thank you Oscar), who pointed me in the direction of learning resources.
After completing a few internships in small outsource studios with lots of ups and downs, I joined Ubisoft Shanghai in 2013 as a lighting artist for Far Cry 4. Later my job carries me all over the world. I’ve lived in beautiful Frankfurt while working at Crytek in 2016, and experienced the amazing reflections of rainy Manchester while making Star citizen. Till Gears 5 brings me back to London again in 2018, as a senior lighting artist at Splash Damage. In 2021 the pandemic starts, but Deviation games waited me 18 months until they got me onboard in California. USA.
Working as a video game lighting artist, I had a very difficult start up due to multiple reasons, but my profession has carried me all over the world in the past 10 years. It is amazing.
Composition and Use of Fog
The directional light works as the main light source for shaping up the entire scene. There are a few area based spotlights with synchronized angle of the directional light. As the scene is pretty shallow in terms of distance, the local spot lights are placed as a highlight brush to pop up the features of the main assets.
Areas of Local Lighting
As my scene is very compact, I have marked the lighting set above by area for easier readability. The white triangle area is mainly lighted by directional light only. I have adjusted the volumetric fog parameters on both distance and scattering to ensure the fog can be visibly triggered by both of the directional light, and the local point lights.
Local Fill Light
The image below is divided into 3 areas while in the lighting design phase shown below.
A giant non-shadow-casting point light is placed as a volumetric fog trigger at the center of the carousel. From the perspective of lighting design, the carousel should be my main local light source to sell the depth of distance from my camera angle.
As the carousel wears a lot of small point lights, it could look rather ‘noisy and loud’ if I only light it up. As the buffoon features standing right in front of the carousel, using volumetric fog for the carousel could distinguish the foreground from the busy looking carousel in the background.
There are two parts of the volumetric fog concept employed in this project. The one is to look after the overall atmosphere via a scattering effect triggered by the directional light. The other is the warm local volumetric fog triggered by a giant local point light located in the central area of the carousel.
Directional Light and Local Key Light
Lighting Setup
Below is my ambient light setup. Since I have assembled a very colourful scene, the circus assets wear a lot of colour by default, which is why I keep my directional light colour white, but using the colour temperature to bring the anxious, sunset orange tint.
Instead of using an HDR texture based skybox, I decided to use the SkyAtmosphere instead in this project. As my scene is small with a lot of close shots, the physical SkyAtmosphere is the best media for light colour mix.
I’ve always loved the mixing colour and scattering effect bought by multiple light sources. In this project I would like to leverage the advantage offered by UE5 together with the directional light, sky light and volumetric fog.
Lighting Setup
Exposure Setup
For a haunted scene darkness is always good for pushing the mood, meanwhile, I would also prefer to retain as much detail as possible. On the exposure setup, there is a range allowance locked between Min EV100 at 0 -Max EV100 at 2. This setting allows the eye adaptation working as an auto-exposure bar. It will be more forgiving while viewing both dark and bright areas in real time. I have shifted the exposure compensation a tiny bit at the very end of my production, for better contrast.
Later I decided to push my fog colour into a mist blue, very similar to the skylight colour I use, as I would like the fog in the background to have an even heavier blue base to contrast the warm lighted carousel. Since the final result we see in lighting is always a mixture of direct and indirect light source, with the warm 3800k on my directional light, my background of this scene finally has the melancholic teal mixture shown in the screenshot below.
Initial Ambient Lighting Mixture
Above is the initial ambient lighting mixture I have, the teal background is archive via a warm sunlight with cold blue skylight, However, latter I decide to decrease the teal colour a bit, tough the current result looks pretty striking, viewing in my aesthetic the colour difference is a bit too ‘loud’. Personally, I always admire elegant falloff and detail oriented lighting transitions more than super contrasty style. Any of my aesthetic decisions at polish stage is usually based on personal taste. I trust this is the very reason why personal projects always excite me. It is a perfect opportunity to reveal our own creative standard, testing new tech in the tool. Learning something new while enjoying expressing our own ideas. I then refined this ambient light setup later.
Blue Tint Decreased On Fog
Above is the image closer to the final look, I decide to decrease the blue tint on my fog, as the previous result does a good job on distinguishing the foreground from the background. Composition-wise I feel its too obvious, which is why I decide to shorten the gap between my warm and cold tone in the end. I am after a visible but gentle transition between warm and cold tone in this piece.
It can not be easier to get lost while working with very colourful assets, adding colourful lighting into a loud scene will easily trick our eyes. While working in this scene, I keep switching between light only/ diffuse/ viewport versions, it is a very good way to remind myself how far I go by adding colour on top of a textured asset. And what influence is bought by each light I’ve thrown into the scene.
Viewport, Detail Lighting, Diffuse
As this scene is assembled by myself, I placed those assets carefully to cohere with the directional light angle in my mind. If I explain my scene with primary shape, we can simply read the carousel as a cylinder, and the booth where the buffoon figure stands are simply cubes.
While assembling the scene, I have already made up my mind that I want my key light come from the upper left angle. As this is the best incident angle for the cylindrical carousel to catch up a bit of high light on the upper left, using this angle also benefit to reveal the volume of the carousel. The depth of the scene is rather shallow in terms of distance, I would prefer to emphasize the dimensional volume of each asset, rather than adding too much filled light which could easily flatten everything, and decrease the focus of overall compositing.
When it comes to setting up the local key light, consistency comes up as my priority. Instead of creating extra practical lighting sources and hanging them everywhere in my scene, I simply decided to ‘expand’ the coverage of the directional light via local spot lights. The execution is rather simple, just use local spot light to extend the coverage of the sunlight.
Local Key / Fill Lights Comparison
If we take a second look at my sky/ directional light intensity, you will notice I set the brightness very gently. As I do need the correct incident angle to drive the volumetric fog scattering latter. I do not want an overly bright directional light to wash out the entire scene. Instead, I use local spot light to highlight the small areas where I have placed reflective surfaces (figures, tables, tents in the scene).
Take a look at the screenshot below, you will notice that most of my local spot lights are almost aligned incident angle wise. It is simply because I want all of them to deliver a reasonable look as if it comes from a single light source.
Aligning Local Spot Lights
Whenever the brightness of an area is increased, the depth of the scene is decreased at the same time.
However, it does not mean that adding light on top of another should be avoided. To me, the theoretical concept of painting with the light actually means controlling the brightness among multiple light sources. And the result is to create the contrast between the lighted side of a subject and the shadow side.
The light ratio is a photographic fundamental. I will not write a dissertation about how to use the light ratio here. A practical case in this project is that I keep my directional light quite dim on brightness. In addition, the directional light shapes up the entire scene while providing enough margin for adding extra spot light. So I can easily paint the highlight area even if the scene is already lighted up by a global directional light.
The result is similar to painting the highlight area with a white brush on top of a painting.
Tips For Working With So Many Lights
⦁ Focus on the scene, not the lights.
When working with any scene, how to focus on the point of interest in the scene is my primary concern. In other words, I design the light based on where I would like my audience to look, and which mood I would like to deliver to the audience who is looking at my work.
Even though my work is all about lighting, my focus is never the light source itself. There are two primary goals whenever I am designing my lighting setup, presenting the key object and its surrounding space, addressing the mood.

Similar Incident Angle on Multiple Local Light Sources to Keep Things Consistent
⦁ Adding light is necessary, but reduce unnecessary light bounce is also matters
We keep adding lights in the 3D world. However, in real- life, reducing unnecessary light is an everyday challenge to gaffers, photographers. Perhaps this is one of the benefits of learning lighting from the field photo shooting and stage, it builds a habit of using as little light source as possible, even in the 3D world there is no voltage and heat to worry about anymore.
⦁ Figure out the ambient light before shaping up the details
I tend to define the ambient lighting before any other local light rigs, regardless if the scene is interior or exterior, a fine ambient light helps me define the potential exposure range, contrast level among the highlight and shadow area. I usually lock up my exposure setting once I am happy with the ambient light setup, as it provides me a narrow down on exposure range, with a stable tone as a canvas. Personally I tend to call my ambient lighting setup as ‘Canvas lighting’.
⦁ Design the incident angle carefully.
Using spot light or other directional lighting actors to shape up the key objects is the next step. I could sit in front of my screen and try thousands of possible incident angles of my 1st key light for the whole day, however, as the initial ambient and key light is completed. The rest of the light rig is going faster afterwards.
Local Key Lights Comparison
Feeling and Mood
To me, I trust addressing the mood and awakening the audience/ player’s empathy is the primary function of lighting design. Obviously, Video Game lighting wears another unique characteristic which is guidance as well. As a lighting artist I often get the request to meet both requirements and maintain visual consistency in many of my shipping titles.
Speaking of mood and style, a very reason I love doing my personal work is that I have the freedom to pursue styles I like, expressing the ideas or feelings I have. If I saw someone leave me a comment and it matches the exact mood I would like to emphasize in my project, simple things like such could make my day full of joy.
Lighting References
This project is heavily inspired by Guillermo Del Toro’s amazing Nightmare Alley. I have gathered a few screenshots as my ambient light setup reference (The screenshot is for reference only, all rights are respectively reserved to the content creators). In the movie most of the colours are low in saturated with an elegant mixture of gray tint. As a lighter I can tell most of the final result is a mixture of multiple light/ secondary light sources, such as fog and dust.
Comparison to Movie Reference
Colour Theory
Colour Palettes
I usually decide my colour palette based on the final result only. That means the colour palette only refers to the result of the mixture among lighting, diffuse colour and the fog.
Until I reach the very last stage of detailed lighting polish, the albedo of my volumetric fog remains mid gray, and this is simply due to fog being a media reaction to the lighting, rather than a light source illuminating the scene. I feel any colour related change on the fog could easily affect the entire scene, after years of practice, I slowly get the habit of keeping my fog colour neutral unless I absolutely have to add any extra colour to achieve a very specific look.
Moreover, I usually only have the idea how to add the extra colour to the fog after the lighting setup is finished. As I could only see how the fog reacts to the lights, how the scattering effect looks once the full lighting setup is complete and tends not to change much.
Camera Shots
Because most of my recent work is based on real-time lighting with UE5, the best way to present the dynamic lighting requires an unavoidable use of a cinematic camera. Particularly, this piece is all about a certain style, halloween. I am after a magnificent but also haunted look. Naturally I’ve chosen my focal range between some wide and close shots. The lens choice is a 24-70mm DSLR in a cinematic camera. This is also the most familiar focal range to me as I actually have the very lens from Canon, using it for many years back to my freelance photographer years.
When doing multiple shots to a single scene, it is very easy to break the consistency due to there are so many possible choices of lenses, camera types. I found the most efficient way of choosing a cinematic camera is based on what you need for the established shot.
In my case I need to introduce the scene, give it some interesting movement but nothing too crazy. Which is why I end up using the focal range 24-70mm to all of my shots. With a bit of truck (move the camera side by side) and dolly (moving the camera position close or far from the object, without changing the focal length). To avoid the intersection with the front vegetations, a bit of pedestal (moving the camera up and down without changing the focal length) also involved at the final long take. I tend to avoid zooming in/ out on the lens for close shots as I prefer the result bought by physical position movement bought by the camera itself. In addition, movement like this in the 3D world is way easier than the real life camera sets, so why not? :)
Using and Selecting Asset Packs
My personal project is always driven by my very own interests. Circus is one of the very topics that I want to develop a lighting design about for a long time. Initially this idea was more horror theme based. I was fascinated by Slavic folklore like Baba Yaga. At the beginning, this idea was about an abandoned place in a dark forest. I was referring to the mood of Pan's Labyrinth a lot (yes directed by Guilermo del Toro again). I enjoyed checking monthly free stuff from the Epic marketplace, while I also purposely searched asset packs with key words related to whatever I am interested in at the present.
Initially, I had this abandoned carnival circus pack from Epic marketplace for quite a while ago. The iconic horror face sculpting in this asset package somehow reminds me of the Whateley family, from H.P. Lovecraft’s novella, The Dunwich Horror. The asset is amazing for lighting, but back then I could not figure out the best mood of the lighting design.
Until I watched the movie Nightmare Alley, the circus scene from the movie really inspired me. Plus it was around Halloween while I was planning the lighting design, I got a free pumpkin pack from Epic market place via the monthly free share. The only asset I was actively looking to complete this project is the carousel. It was so exciting when I found the one made by Egemen Barutcu.
Speaking of personal work, I see myself as the type of artist who has very specific style preference. Not all of the styles I like are popular in terms of trends, but I am also very stubborn about my choice. The last thing I will be passionate about in my creative journey is making something because it's trendy. On one hand, it's always great to hear positive feedback about our personal creative projects; On the other hand, I hardly find doing something because it's trendy provides me much motivation compared to creating a personal project with a style that I am truly fascinated with.
Compared to what I do at my full time job, even if it's the same craft using exactly the same tool, my personal work is always and only about revealing the feelings, ideas, or a clip of a story related to my own experience. I found this is the best way to keep myself motivated and keep evolving from both the art and tech perspective.
Tips For Junior Lighting Artists
Allow me to share a tiny part of my teaching notes that I made for my lighting boot camp course below. The primary role of portfolio building is quality over quantity.
⦁ Regardless of interior or exterior scenes, the lighting design does not have to be super complicated, but a fine exposure range with good material readability matters.
⦁ Feedback is good, but it's someone else’s opinion, and you are doing your own work.
⦁ Visual feedback: Everybody can share their feedback on your lighting, as we see it everyday. However, only you know what kind of final look you are after. Listen to feedback but keep your own opinion.
⦁ Tech feedback: Take tech feedback and double check it yourself with manuals as there are different reasons to make different tech choices. Always double check it by yourself with reliable references.
⦁ If you start a project, finish it before thinking about what’s next. Try not to make excuses to abandon an on-going project even if it's difficult. Problem solving is the best way to progress this craft to me.
⦁ Portfolio Consistency. As a lighter I see my job as a specialist rather than a capable generalist in production. If you are building up a portfolio for a job, make sure every piece there is related to reveal your lighting skill instead of a bit of every other role in the games industry.
Extra Tips From Creating the Scene
Shadow plane is a good way for boosting contrast over all.
Shadow Plane
The scene has plenty of interesting assets, thanks to the amazing modelers who created these assets. However, environment wise it's actually located in a flat area. I did have some tree branches in the background, but certainly, it's very difficult to create interesting contrast without any extra cover.
To push this lighting design into a better contrast level, I decided to throw a couple of invisible shadow planes alongside the left area, around the glade. Shadow plan, or shadow flag is really essential to reduce the flatness of the overall compositing. Design the position of placement carefully, this extra shadow control method is great whenever I feel like to add a bit more contrast level to my scene apart from post production.
Areas Looking to Grow as an Artist
Keeping the tech related skill up-to-date is certainly a must, especially we are using the latest real-time light technology in video game editors. As I mainly work with Unreal Engine, it has the amazing Lumen as the real-time lighting solution. In addition, I also enjoy checking any real time rendering technology from others like Nvidia. As an artist I see myself as a user in terms of the latest technology, it's always good to catch up with the latest tech.
Aesthetic wise, I love browsing different media other than games whenever I am looking for new ideas. Seeing how the artists use their own way to express ideas through other media is very interesting to me. In addition, I still enjoy watching musicals or street performances. Anything LIVE interests me way more than seeing a clip on Instagram or Twitter. Seeing the artwork is amazing, but seeing how people react to the very piece is more interesting to me.
Practice is the best way to continue evolving in any craftsmanship, that’s another motivation to keep myself up in terms of creativity.
How Has Your Focus and Artistic Preference/Style Changed Through the Years?
It's an interesting question to me, as my preference never changes.
Instead, those very topics I am into keep up the fresh inspirations towards my next project. I will probably forever be fascinated with Interiors from the Victorian Era, Dark fairy tales, Cthulhu universe, Slavic folklore, Japanese horror. As well as alternative fashion such as LolitaFashion or historical dress,In my spare time I enjoyed sewing and making ball- joint-doll clothing.
My sewing for cosplay costumes and doll clothing
Instead of changing my taste, recently I started combining styles I love together with some contemporary elements. Such as Sci-fi or Minimunism. I really enjoy mix and match, my personal project is all about experimenting with something I truly like but different from my references.
This project is inspired by the Nightmare alley a lot, but I tried to imply my own opinion based on the inspiration. In the end I created a much brighter scene while trying to retain the haunted atmosphere. It's not perfect but I am happy with the final look. For any sort of reference, I will try to learn from it but not copy it, as it will be less fun if it's only about observing and making it look the same.
Biggest Interest in Game Development Besides Lighting Art?
Maybe VFX and Sound, as those two areas are close to my everyday tasks, but so different. When you are working as a specialist in a certain field, I guess anything from different areas makes me feel curious. At work VFX and lighting are both at the very end of the production pipeline, usually the last two department fixes issued before the content lock. So have five to every VFX artist I’ve worked with in the past.
Sound guys are magicians from another world to me, I can not comment much as I am not a sound professional, but their work just makes the level alive.
In addition, I think it's the people I meet. So far I have been working in several studios located in 4 different countries. Eventually I met people from different continents, I learned a lot about culture, mysterious tales by words from my friends and colleagues, and those small talks constantly brought fresh thoughts that benefited my crafts.
If You Had To Start Your Career Again?
My initial dream job was becoming a costume designer, I guess I will totally try it again if I had the second chance. Making dream dresses like Cruella or for movies like Crimson Peak would be awesome. Tim Walker’s photography and Vivienne Westwood’s design are still inspirations I check often. When I first saw the Alien shoe and Titanic Shoe design from Alexander MacQueen, designed by Sarah Burton, it made me understand immediately that there are no boundaries between art forms, architecture and fashion could get mixed easily as long as you find a way.
Some of the set design sketches I found online, costume design from the movie Cruella. I gathered those references a long time ago before I started this lighting design project.
What Would You Tell Your Younger Self?
Honest answer… my first day at my first job was basically a dumb user trying to understand Perforce as I never used it before. To my past younger version, treat yourself and fetch a Tech Artist if anything does not look right. Sometimes at work, asking questions can get problems solved faster than Googling it by yourself. And it is okay to say that I do not know how it works because I was new.
Tips For Lighting Artists on How to Work With Environment Artists
Have an initial chat with your environment artists, ask them to give you a tour at the very level. That’s what I like to do whenever I am about to take it to a new level. Once a good friend of mine told me that as an environment artist, he really put heart and soul into every corner of the map.I think if you talk to the very artist, he or she will share a very unique perspective about their understanding of the level. As a lighter we will have a better idea to address the space if aligned with how it has been made from the environment perspective.
Pay attention to any transition area, entrance, and make sure both of you agree on any potential risk which might occur in terms of transition, loading, gameplay related conflicts.
An example set of references I like to use while discussing diffuse textures with Environment Artists
Tips For Environment Artists on How to Work With Lighting Artists
If there is any specific concern or request that could make the environment work easier or better, share it with your lighting artists. The lighting design heavily relies on level structure, any detail or specific requests worth an attention as early as possible.
Another example I use often while discussing how to introduce the fog via environment/interior planning
In addition, the function of the area matters for interior spaces, sometimes exterior space as well. As lighting a level means two parts of problem solving, the first is lighting fixture placement, and the second is the actual lighting design. Different areas use different types of lighting fixtures in real life, such as a decorative lamp that should not show up at an engineer's worship unless there is a specific reason. Knowing the function of the area will help you lighting artist design the reasonable light source and make the environment more believable.
Lighting Art Common Mistakes
As we are artists, every case could be different, I will not call it a mistake. Actually, I usually describe those facts as a decision made with less experience. I see many talented but less experienced lighting artists spending a lot of time on post production while I feel there are still more issues to resolve in the actual lighting set up. A fair range of exposure and good placement of practical lighting fixtures sell the lighting design the most. Those solid bases will also leave more margin in the post production stage.
Additional Advice
This job requires a lot of basic knowledge of art foundation, such as photography and colour theory. Secondly, being familiar with the latest knowledge of the software for your job is also vital. Furthermore, I think we all could only continue what we do constantly because we love it. For anyone willing to become a lighting artist for video games, I think all you need is dedication to the craft we love.
Tutorials nowadays are great, you can easily find free but also high quality learning resources online, from professional networks. However, evolution of the craft always means none-stop practice. I think this principle applies to any craft based profession as well.
Inspiration
I am inspired by anything that fits my interests and taste. Movies, manga, anime, advertisements on the street, displays while I am window shopping. Fashion shows, musicals, and people. Novella from H.P Lovecraft and Edgar Allan Poe, movies from Baz Luhrmann and Guillermo Del Toro are my usual inspirations in terms of style and narrative. Usually I enjoy dark fairy tales and folktales a lot. Speaking of fantasy novels, I love the Chronicles of Narnia, Alice in Wonderland and Harry Potter. I never consider myself as a bookworm, and am still slowly finishing The name of the wind by Patrick Rothfuss. I do enjoy reading any description of a fantasy universe.
Work Inspired by Places I’ve Been or Lived
Some Initial Reference I Gathered for This Project
In fact, I rarely look for inspiration due to work, as I keep mentioning that I like very specific things, art and design wise, the usual scenario for me getting inspired is like, I was watching Netflix, or chatting with friends, and suddenly the idea just came up. And whenever it happens, I just use my notepad app on my phone and take quick notes about it.
Initial Reference for the Carousel Lighting
Feedback
There are two parts of feedback related to lighting, aesthetic and technique feedback. At the tech side, usually I will jump into any official manual, asking tech artists I trust or any fellow lighting artist who might be familiar with the very issue.
However, I will not seek art feedback until I finish my personal work. Here I have to address that feedback for work is very different from my personal work. At work we usually have regular reviews in a certain period of time. But for personal work, I tend to spend a lot of time at my pre-production stage, to find enough references, and also filter and arrange my ideas.
Inspiration could come in various forms, however I am doing a piece of lighting design. We all know how easy it is to fall into a rabbit hole while tons of inspiration excites our creative mind.
My aesthetic feedback usually starts from filtering ideas and defining style by myself. Even with real-time lighting technology like Lumen in UE5, the speed of production is tremendously boosted, the time is still limited for each piece. I genuinely feel that a consistent pre-production will make the execution steps way efficient.
Future Projects
I am currently building my lighting blog mariayue.com. It is a place where I share my design thoughts, personal projects, and learning notes, work in progress. (Special thanks to the talented Asher Zhu for helping me build this little blog).
In addition, I am still continuing teaching at Vertex School as I truly enjoy it. While writing this article, I am planning some basics of my new lighting design tutorial as well. As style and look dev are topics I enjoy a lot, the new tutorial will be heavily on aesthetic rather than tech only.
Outro
Thank you for having me. I truly enjoyed writing this article as it is also a nice look back to my own creative journey. Feel free to reach out on my social media below.