
AMERY & WINSTON - MODULAR BUILDING exercise
Sander Agelink walks us through how he created this modular building based on the Columbus Tower. Dive in to learn how he used cubemaps for the windows like in Marvel’s Spider-Man, procedural window blinders, world aligned dirt with trim sheets and much more!
Introduction
Hi! My name is Sander Agelink and I am currently studying Game Architecture & Design at Breda University of Applied Sciences.
I’ve been into games as long as I can remember. My dad has always been very much into computers, and from a young age he showed me how to use them.
I remember him having 2 games that left an impression on me; one was a very old Star Trek simulation, the another was Sid Meier’s Alpha Centauri. Most of this game went over my head but I loved the art and the ambience. After that I got my own games. Some of my favourites were the Rayman series and Sim City.
It was in 2012 that I set my eyes on a career in the games industry but initially I wanted to become a concept artist. For years I worked hard on my portfolio and I helped on some small projects but over time I discovered my love for 3D and the more technical aspects of game development. Blockouts for my concepts turned into environments and I learned some very basic programming so I could explore proceduralism.
Eventually I realised that my heart lay with 3D environment art over concept art and I decided to go to University to flesh out my skills. I’m currently only half a semester into my second year, so I’ve still got some way to go!


Procedural Buildings
Blueprints in Unreal are actually very easy! The randomization blueprint was actually the very first blueprint I ever made. Some of the assets in my scene are grouped together so I decided to group them all inside a blueprint, similar to prefabs in Unity. And since they’re inside a blueprint I might as well add some variation! I’ll quickly explain how it works.
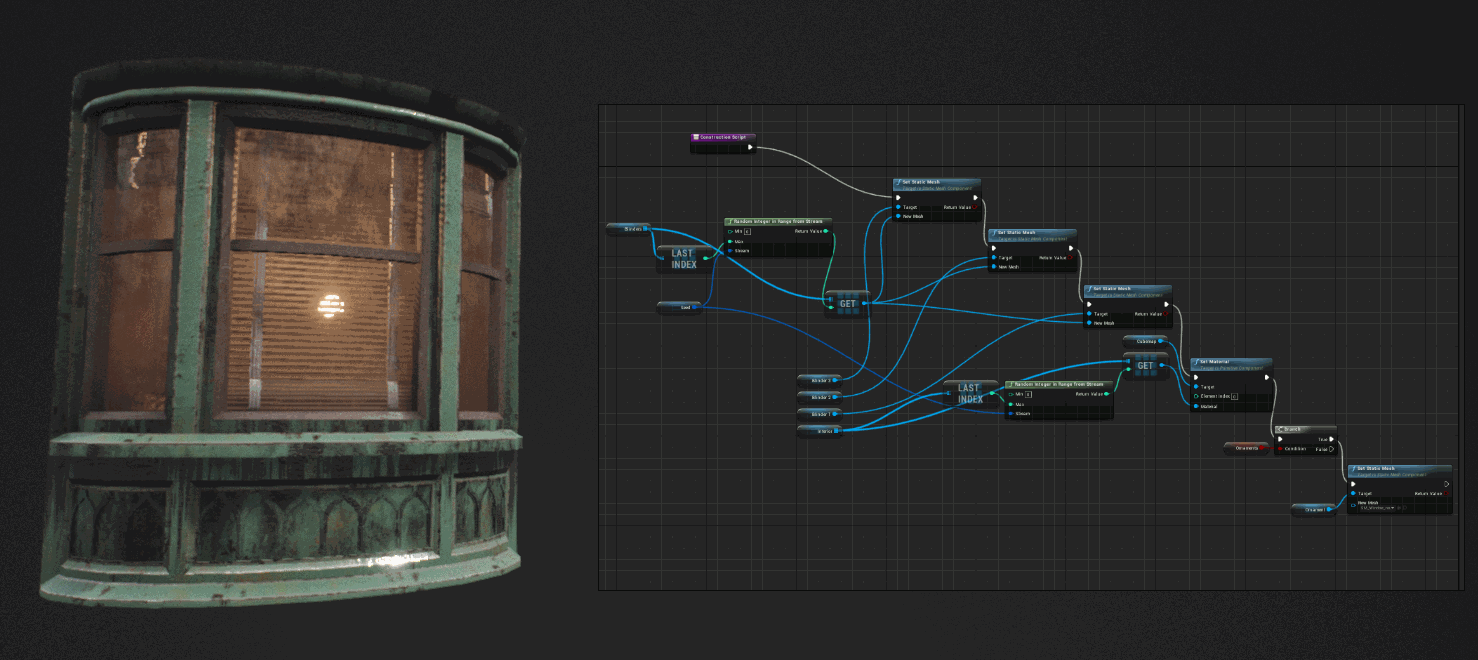
Procedural Windows
First select all the objects you want together in one prefab, then go to Blueprints > Convert selected components to Blueprint Class. Inside your blueprint you want to add a couple of variables. A variable is basically a little box of information. For example it can contain a number or a reference to an object, which is exactly what we need.
First you need a ‘Seed’ variable. A seed can be any number and each number will shuffle your assets differently (Make sure the variable type is set to Random Stream!). Secondly you need an array. An array contains multiple numbers or objects. In our case, multiple types of blinders.

Converting Components to Blueprint Class

Variables
Then inside the construction script you get a random asset from your array, and swap the desired mesh with your new one. In this case I have 4 blinders, so I run it 4 times.

Construction Script
And voila! You have a procedural asset. Inside the actor you can change the seed number and you’ll get a different outcome. Do keep in mind that this works best with dynamic lights.
Trimsheets & Tilables
My scene has two 2K texture atlases for the details. The road, walls, sunscreens and all that is green uses 512px tileable textures. On top of that I also used 2 trim sheets but these were quite experimental. I’ll quickly try to explain how they work.

Asset Sheet
If you want edgewear on a texture, you usually need a unique texture for each object. I wanted to try and make it so that all objects could use a single, tileable texture, but still have dirt and edgewear like with a Substance Painter material. To accomplish this I UV’d my meshes into strips, and overlaid them on top of a trimsheet that I used as an alpha (Green channel is edge wear, red channel is dirt). I then switch between 3 tileable textures depending on these alpha masks, (The third one being the default texture).

Assets Unwrapped

UV Layout of Assets
You could simply bake these effects straight into the texture but there were some cases where UV islands were simply too large for this trick, like here:

To fix this problem I would move these UV islands over to the second UV space, and switch between a black mask or the alpha mask depending on the UV space so that these particular parts of the mesh would not receive that particular effect.

If statement inside UE4 Material Editor
With this effect I was able to reduce texture space from a 2K texture for each copper object to a single 512px texture that could be used universally, as long as the UV’s follow the trimsheets.
Lighting
The lighting in my scene is really basic. Since it’s a turntable I wanted very neutral lighting.
To start I used a very neutral skylight with very few dark shadows. I then added a directional light with a value of 3.14, a dielectric material with a value of 0.18 (equals 50% gray in UE4) and a metallic material with 0% roughness. I got these values from Unreal livestreams and documentation. According to them this is the most neutral setup in UE4.
This setup is a great starting point to texture with because the light won’t distort your colours.

Neutral Lighting - Material References

Neutral Lighting
My final lighting setup remained very similar to my initial one. I increased the directional light a bit, made it a bit colder, added an exponential height fog to get rid of the really dark shadows and I placed some warm point lights in the windows to add some contrast. I also added a HDRI inside the glass material to boost the reflections.

Lighting Modes
Window Tricks
The great thing about the windows of this building is that they are extruded. This means I didn’t have to cut holes in walls and even better; it allowed me to add fake interiors! I got inspired by the cubemaps in Marvel’s Spider-Man on the PS4. This video will teach you everything you need to know about cubemaps.


To add some interest to the cubemaps, I rounded the texture so the highlights were white and everything else was black. I then used that as a mask to make the highlights emissive. This added some more realism to the interiors.

Cubemap Material
The light intensity in the windows is pretty much uniform, however I didn’t place lights in every window. The dirt on the window also has the world position offset and because of this the reflections on the windows are varied. This was another happy accident due to the world position offset.
Modularity
After a few days of research I stumbled upon the Columbus Tower in San Francisco and it was exactly what I was looking for and the modularity was fairly straight forward. I knew I wanted to make the walls and the windows modular. Everything else I figured out along the way.

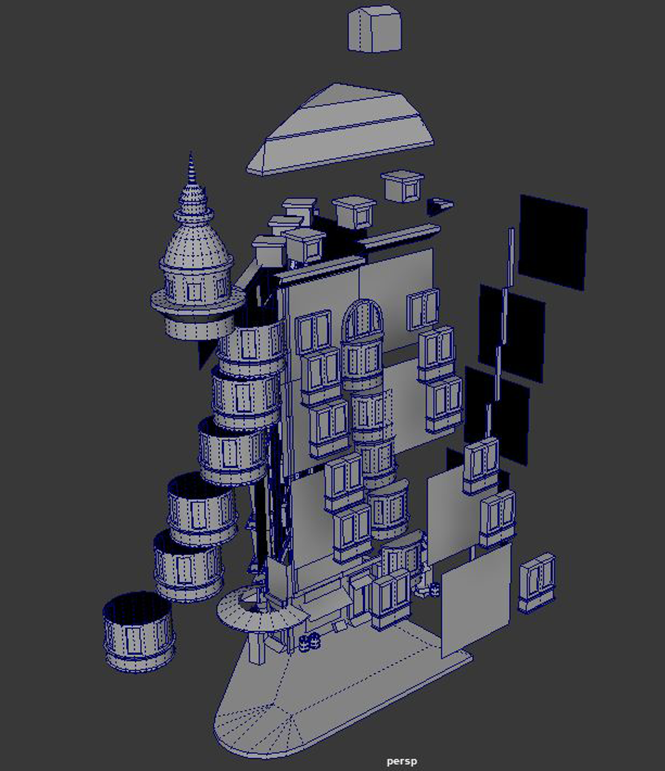
Modular Kit

Ref Board
World Position Dirt
Unreal has a node called WorldAlignedTexture which will offset and scale your textures independently from your mesh. This node didn’t work for me because not all my walls were on 90 degree angles. So instead I wrote my own material function. It is far from perfect but it worked for this scene.

World Aligned Dirt

World Aligned Material Function
A great happy accident with this material function was that I no longer needed my modular wall assets, because now I could scale my walls to whatever custom shape I needed.

Feedback
A great advantage of studying is the regular hands on feedback from teachers and fellow students. I was also very active in various Discord servers like No More Grid, The DiNusty Empire, ExperiencePoints and Unreal Slackers. Discord has definitely been a game changer when it comes to feedback!


A lot of feedback was about the design of the building, particularly about the shops on the ground floor. It was also lacking a focal point according to many. Initially I wanted to come up with something original. I tried many designs for the ground floor but in the end I decided to stay close to the reference.
Colour Theory
I would recommend any artist to draw and paint regularly. If not at least delve a bit into colour theory! Before getting into 3D art I spent several years doing traditional and digital paintings. I’m definitely not the best out there but I was still incredibly surprised how well those skills translated over to 3D. Technical skills help you think ‘how’ something works, artistic skills help you understand ‘why’ something works.
Tools and Workflow
My tools are nothing special! This was actually the first project ever where I used Substance Painter and Designer. Before this I relied completely on Maya, Photoshop and Unreal. I am however having a lot of fun exploring procedural software like World Machine and Houdini and I hope to publish some Houdini projects of mine on Artstation someday.
I definitely enjoy the technical side! Optimising is like a puzzle to me and if you set up your shaders right and spend some extra time on proper UV’s, it only enhances the creative side for you and your colleagues!


Future Work
I’ve got several projects in progress or planned. Expect more scenes and more standalone structures. School will take priority though so I am not sure when the next update will be.
Advice and Tips
Work on what you love the most, not what you think will be popular. It’s that passion that will help you stand out and it will keep you excited on whatever you’re working on.
Outro
Wow, you made it to the end! Thanks for taking your time to read my article and thanks to Exp-Points for granting me this opportunity. I hope that this article was helpful and inspiring, and if you have any further questions feel free to send me an email or message me on Artstation! Cheers!