
DANCE HALL - RAYTRACING IN UE4
In this article we have Mike Gomez, Lighting Artist at Beenox, break down his latest UE4 environment. We explore blockout, texturing, lighting scenarios, and dive deep into raytracing and it’s capabilities in UE4.
Introduction
Hello everyone, my name is Mike Gomez, a 25 years old Belgian and I live in Quebec, Canada! I work at Beenox (a company of Activision) as a Lighting Artist.
I don’t have any brothers or sisters so I’ve played a lot of video games since I was a child, it’s where my love for video game showed up. Even if I didn’t know anything about it, I said “When I grow up, I will make games”. 20 years later here I am and my passion is still there!
I studied at the “Haute Ecole Albert Jacquard” a university in Namur, Belgium, where I got 2 diploma’s as I did an extra year to learn more. After school, I was a 3D Generalist artist in Belgium (Games and VR experiences, video mapping and so on).
After that, my partner and I decided to move to Canada and I got a job as a Lighting Artist at Beenox, where I’ve had the opportunity to work on the development of Call Of Duty: Black Ops 4 and Call Of Duty: Modern Warfare (and more to come!).
Inspirations | Background
I wanted to make a realistic project in Unreal Engine 4 with raytracing and with all the new knowledge I’d learnt so far as a Lighting Artist and Environment Artist.
This idea popped up in my head when I was on the plane to come back to Canada after my journey to Belgium. Somebody was watching the movie “Step Up” in front of me and even though I’ve never watched the entire movie, the dance room gave me the idea for this project. After 1 or 2 weeks thinking about it, I started to make a reference folder about dance rooms and some props.
The story for this dance room was quite simple, I wanted to make it occupied with people in it, new, modern and well maintained. I quickly realised finding good 3D character models isn’t simple and thus without characters the room felt empty, dead and without interest. So I thought about a new context and background to make a complete opposite mood, like a room in renovation, it was on old and dirty room for sale and someone bought it.

Reference Board
Modelling
I started by making a blockout in Unreal Engine 4 with cubes and the character mesh from Unreal to keep good proportions. Then I made a list of props I would use in the level and sorted them into differents categories:
• The foundation meshes like wall, roofs, ceiling, ground and so on which will use tileable textures and vertex painting.
• The props which would use tileable textures.
• The props which would be baked into atlas textures.
When I finished the blocking I exported from Unreal to Maya and I started to model all of the props. Even if I made a list, it’s not possible to think of everything so I had to model some props after. Then I modelled all of the foundation meshes in modular way, I export them into Unreal to see the results with some textures, I also made some tests to find a good sun angle, pitch and a first mood for the scene.

Foundation Meshes

Props with Tileables

Props with Atlas 1

Props with Atlas 2

Props with Atlas 3

Blocking Process Shot 1

Blocking Process Shot 2
Like I said for the background, I wasn’t convinced with the global aspect, so I modelled new props and thought about the existing packs in my library like the Construction Packs from Dekogon on the Unreal Marketplace. These packs allowed me to focus on the rest and to save a lot of time modelling and texturing!
Texturing
For the texturing part I used a lot of Megascans textures because Epic Games bought Quixel 2 or 3 days after I started the project and made them free. I was so excited to try it! I usually created my textures in 3D Coat, I would say there are both equal with their strong and weak points. I could test Megascans textures in high resolution! That was so cool! However I couldn’t find all of the textures I needed in the Quixel library so I looked to textures.com to find the missing textures.
For all of the baked props, I separated them into 3 atlas’s of 2048 textures, I used xNormal to generate the AO, curvature and normal map and Substance Painter to texture them.
After changing the direction for the mood, I wanted to have a lot of wood and brick, which is more dinstinctive for an “old” aspect. Old houses are more often warmer and welcoming so I wanted to keep this aspect by adding a lot of wood everywhere, this wood contributed a lot in terms of the lighting because the bounce from the sun was more orange!

Dekogon Prop Packs: Construction Site VOL. 1 and Construction Site VOL. 2

Tileable Textures
Unreal Engine 4
In Unreal Engine I used my master material that I use in every project now, it allows me to make a lot of things like:
Parallax occlusion mapping
Having 4 textures sets, 1 for the base material and 3 others I can paint in vertex on channel R, G and B
The channel A allows me to paint water puddles on vertex’s too - I can add ripples in water when it rains - I can add a random colour on every instance in the base albedo
I have a details texture for albedo and normal map
I add switch parameters to activate/deactivate some functionalities to optimise the material!

Master Material
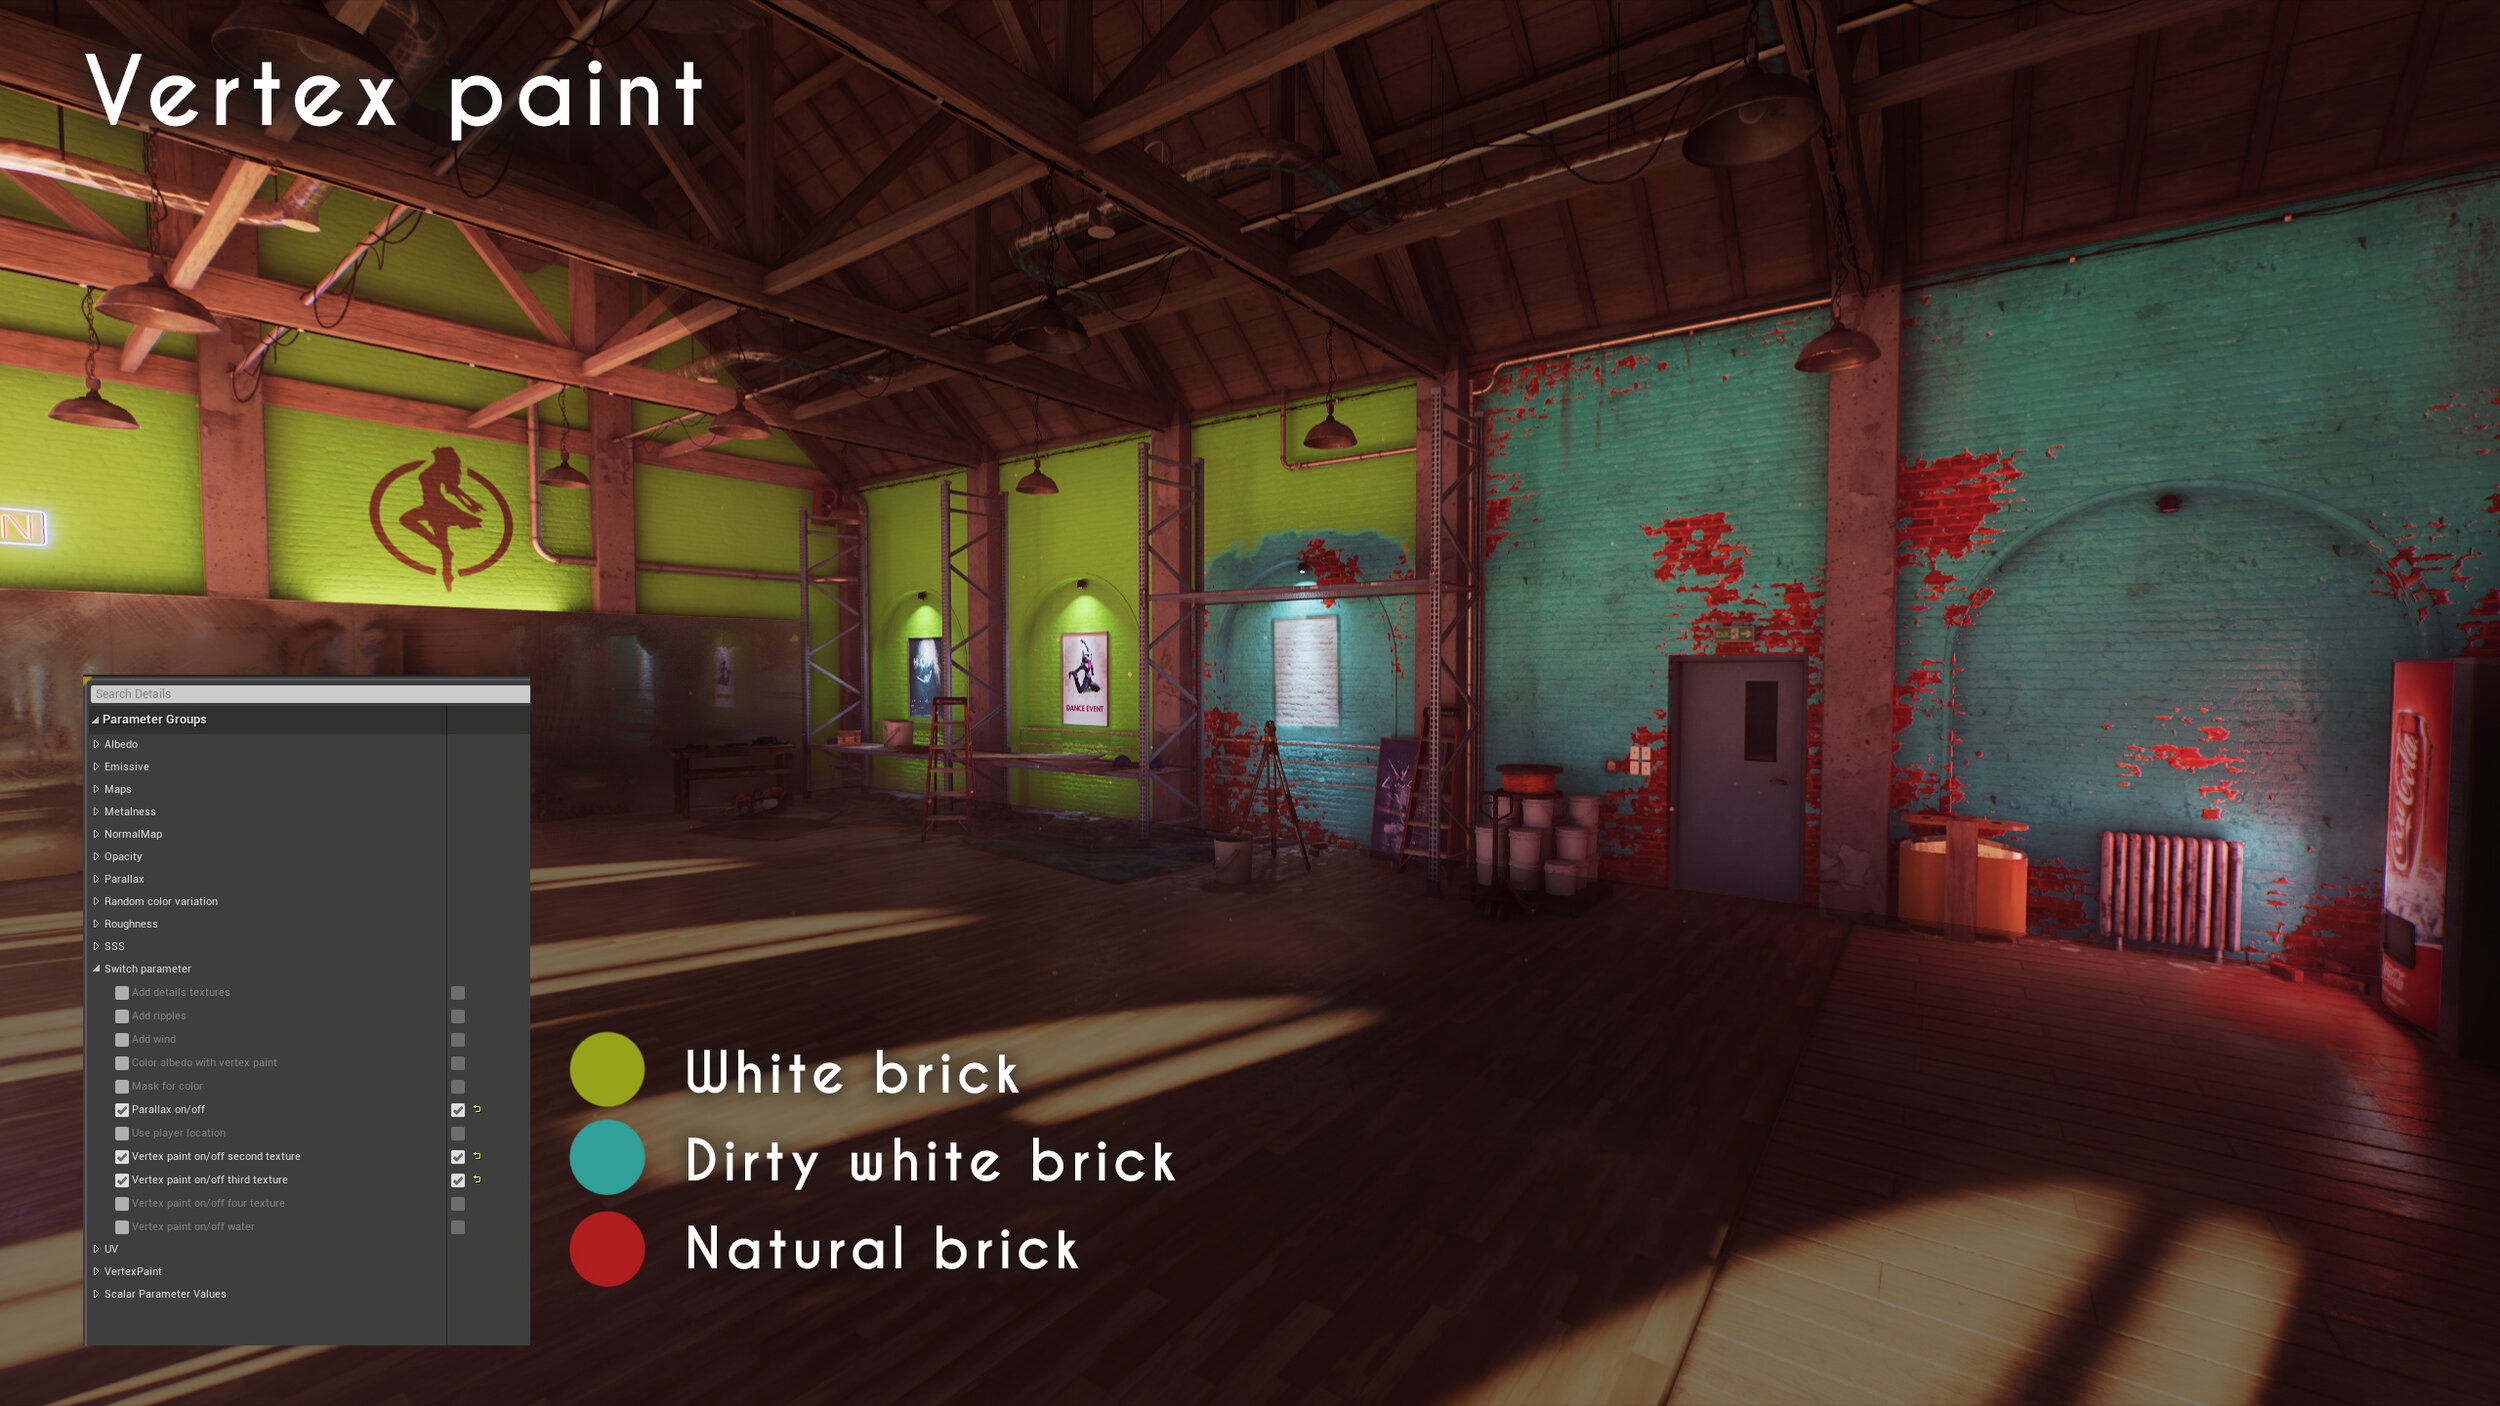
Vertex Painting Example

Vertex Painting / Parameter Demo
Lighting
At the beginning of this project I wanted to have very different moods, so I think about what time of day I wanted to have (day, dawn, overcast and night). I can alternate between all the moods with the levels systems and the lighting scenario function.
The level system in Unreal is very cool and well made, it allows us to have a principal level and a lot of sub levels streamed inside, this allows us to work in a sub level and have the principal level still visible.
The lighting scenario function allows me to have all the lightmaps baked in only one level, for example you can have several moods of the same level!
I’ve used this lighting scenario function for a long time now, even if it’s for abandoned projects or projects still in production! ;)
I don’t like to have only one lighting scenario. In the job as a Lighting Artist we need to iterate a lot and most of the time we just keep only one version of our lighting. For my personal projects I love to make different moods, this changes the vision of the project and creates variety.
I started to work on the lighting after I put my first assets into Unreal and built the entire scene. In lighting we often start with PBR values so I search for HDR skies in my library to find 4 different skies which match what I want. After that I put them into Unreal for the calibration.

Lighting Only Shots
When I finish calibrating the skies and I’ve found different sun angles I like, I have a good idea for the different moods of the dance room. Even if we start from PBR values, as a Lighting Artist we need to guide the player, their eyes and creating dreaming ambience, for example a day time is often a bit boring, so we can boost the colour of the sky and the sun to have a better result! Here I modify some colour values and intensity to have more distinct mood.
After a first bake, even if the sun and the sky were calibrated, there wasn’t enough light coming from the outside and it looked a bit weird. In games it’s not easy to make an uniform lighting for outside and inside at the same time, we often make the choice to render the lighting correctly outside and we fake more the interiors with some artificial lights or fake the bounce of the sun or the sky.
But if we stop an instant and we look at how lighting reacts in reality, we would be very surprised on how much light bounce can enter from a small window and light up a big room!
So for my project I boost some values for the bounce to look more accurate and when I baked the sun and the ambient, they made most of the job so I just added small light sources to add more detail, colour, shine and to avoid pitch black areas.
Most of the time, the small lamps on the walls were enough to light the posters and the trophies but for the night and overcast mood I needed more lights, so I turned on the spots in the ceiling to have a light pool which bounces in the whole room!
At the end of the project I found that I didn’t have enough to show with the dance room alone so I started to make a bathroom with 2 different lighting scenarios.


Different Skies for Lighting


Bathroom Environment
Raytracing
Raytracing… it’s like a new toy for Real-Time Lighting Artists because this technology has existed for a long time and was calculated with CPU and that was extremely long. But in video games, in real-time also, with the hardware acceleration we can have raytracing in real-time! This technology is new in video games and we have a hybrid result at the moment with the raytracing and the classic rasterisation method. In the future we would be able, with a more powerful graphics card, to have a full render in raytrace (This is call path tracing).
I already used raytracing with one of my previous projects but it was just an automotive scene. For this one I just thought it would be cool to use raytracing in a full environment. This technology came in Unreal Engine 4.22 and to activate it you need to go in the project settings, activate the raytracing and change the DirectX mode to DX12 and after that a simple restart of the project and… the raytracing is active!
Within 4.24 there are new default setups for projects and we have the possibility to activate the raytracing directly in the creation of the project.

Raytracing Settings
There are many different things with raytracing in UE4, for the reflections we don’t need place the sphere/box reflections one by one and for the GI, no more need to bake lightmaps and so on...
There are a lot of options available in the the output log of Unreal, in the post process or nodes in materials, you need to setup correctly all the options for raytracing because it’s easy to lose a lot of performance with 2 or 3 options!
There are many functions for raytracing, for example:
Global Illumination
Reflections
Ambient Occlusion
Transparency
Shadows
Even audio can have raytracing!
Obviously it’s important to choose which utility we want for raytracing, we cannot activate all the functions at the same time because our graphics cards aren’t powerful enough! However you can make a compromise, for example if you have a sci-fi game with a lot of metallic reflections, it will be very useful and wise to activate the reflections in raytracing. Another example, if you have a game in a forest, the reflections are less important than the GI so you can activate the GI in raytracing!

Examples of Different Games That Benefit The Most From Raytracing in Different Areas
There are still bugs with raytracing in Unreal Engine but in 4.24 a lot of functionalities work with raytracing. The documentation for raytracing on the Unreal website is very complete. You can check it out here!
For my project it was just for my portfolio so I didn’t check for the performance, I activated a lot of functionalities in raytracing like the AO, shadows and 2 bounces for reflections.
Post Processing
Post Processing is the final part of my project. I added a look up table (LUT) for the colour grading, a chromatic aberration effect, some depth of field on rendering camera, a subtle lens flare and dirt on the lens.

Post Process and Camera Settings

Environment LUT Comparison
Finally the last thing I did, is to setup the auto exposure for my camera, then it reacts the way it’s supposed to, no matter what happens. We can visualise the EV in our level, go to Show -> visualize -> HDR (Eye adapatation).
I used DaVinci Resolve to create the colour grading LUT for every mood. Using this software at my job, I just thought it would be great to use it for my personal projects. This software is very useful and efficient because it allows us to edit images and videos, create colour grading, etc. Of course Adobe Premiere the same but DaVinci Resolve does it better, faster and more precisely especially for the colour grading part.
In the colour grading part of the software, we can create nodes and every node has its own parameters. A mask system is also available to isolate the parts we want to grade, it depends on the luminance, colour and saturation.
As a beginner, I created a simple setup made from 6 nodes, 2 lines with 3 nodes each. The first line is the luminance, the second for the colours. The first column is for the shadows, the second one the midtones and the last one the highlights. At the end I added 2 nodes for the final adjustments, this way I have an overall control on the saturation and contrast if I want.

DaVinci Resolve Overview
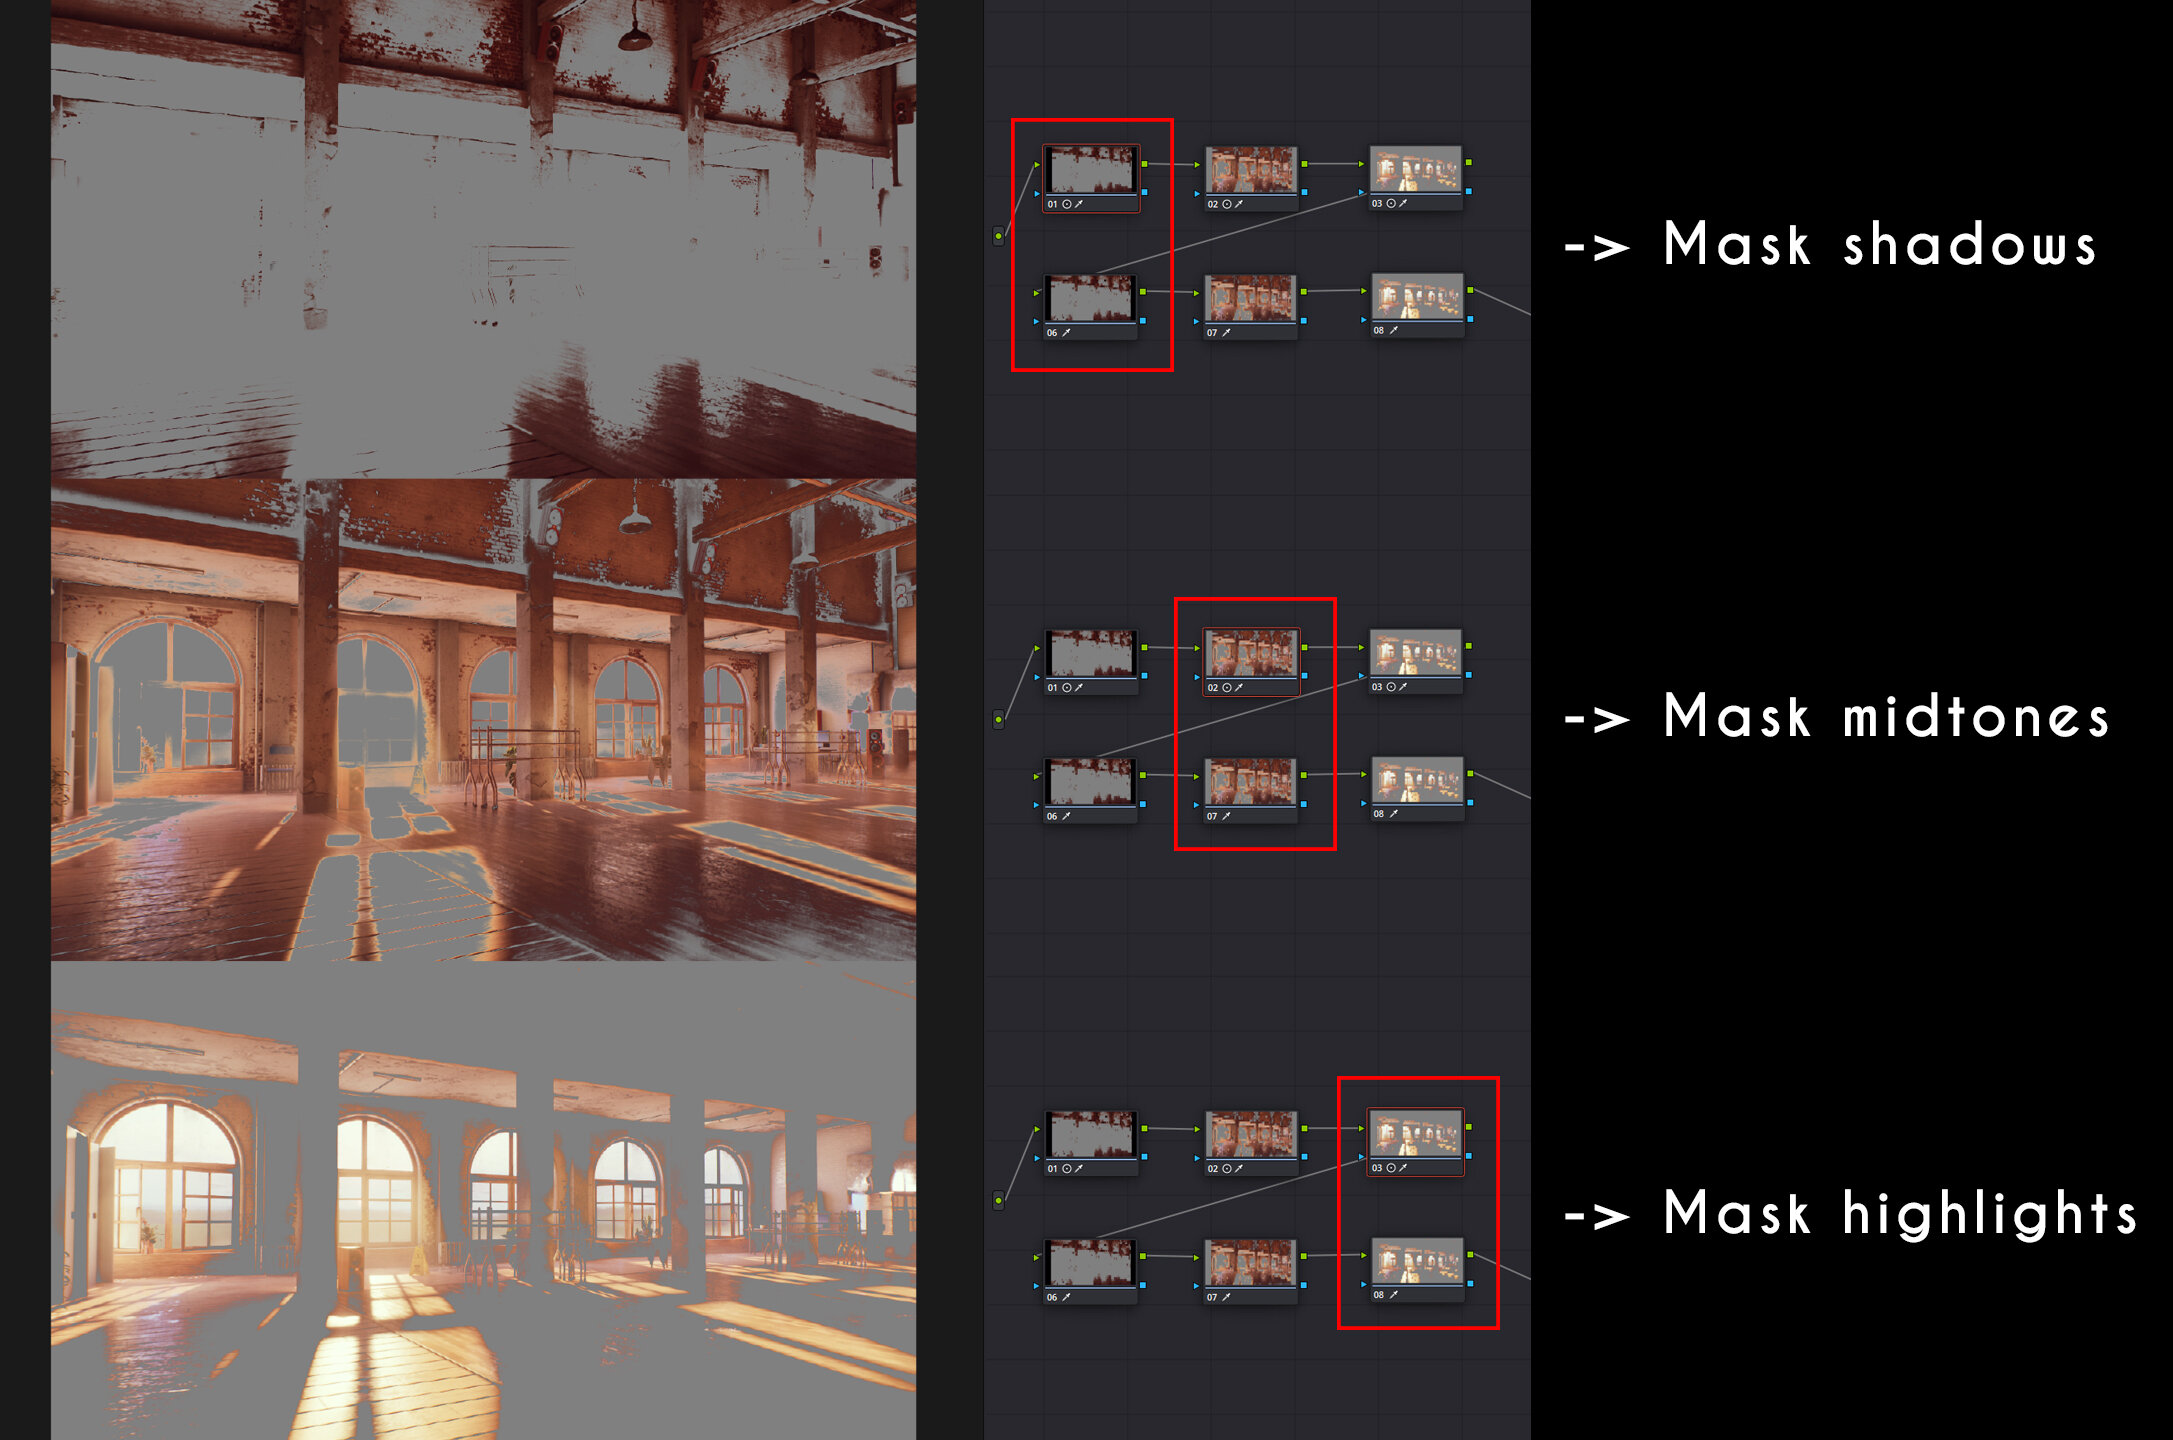
DaVinci Resolve Masking Tones
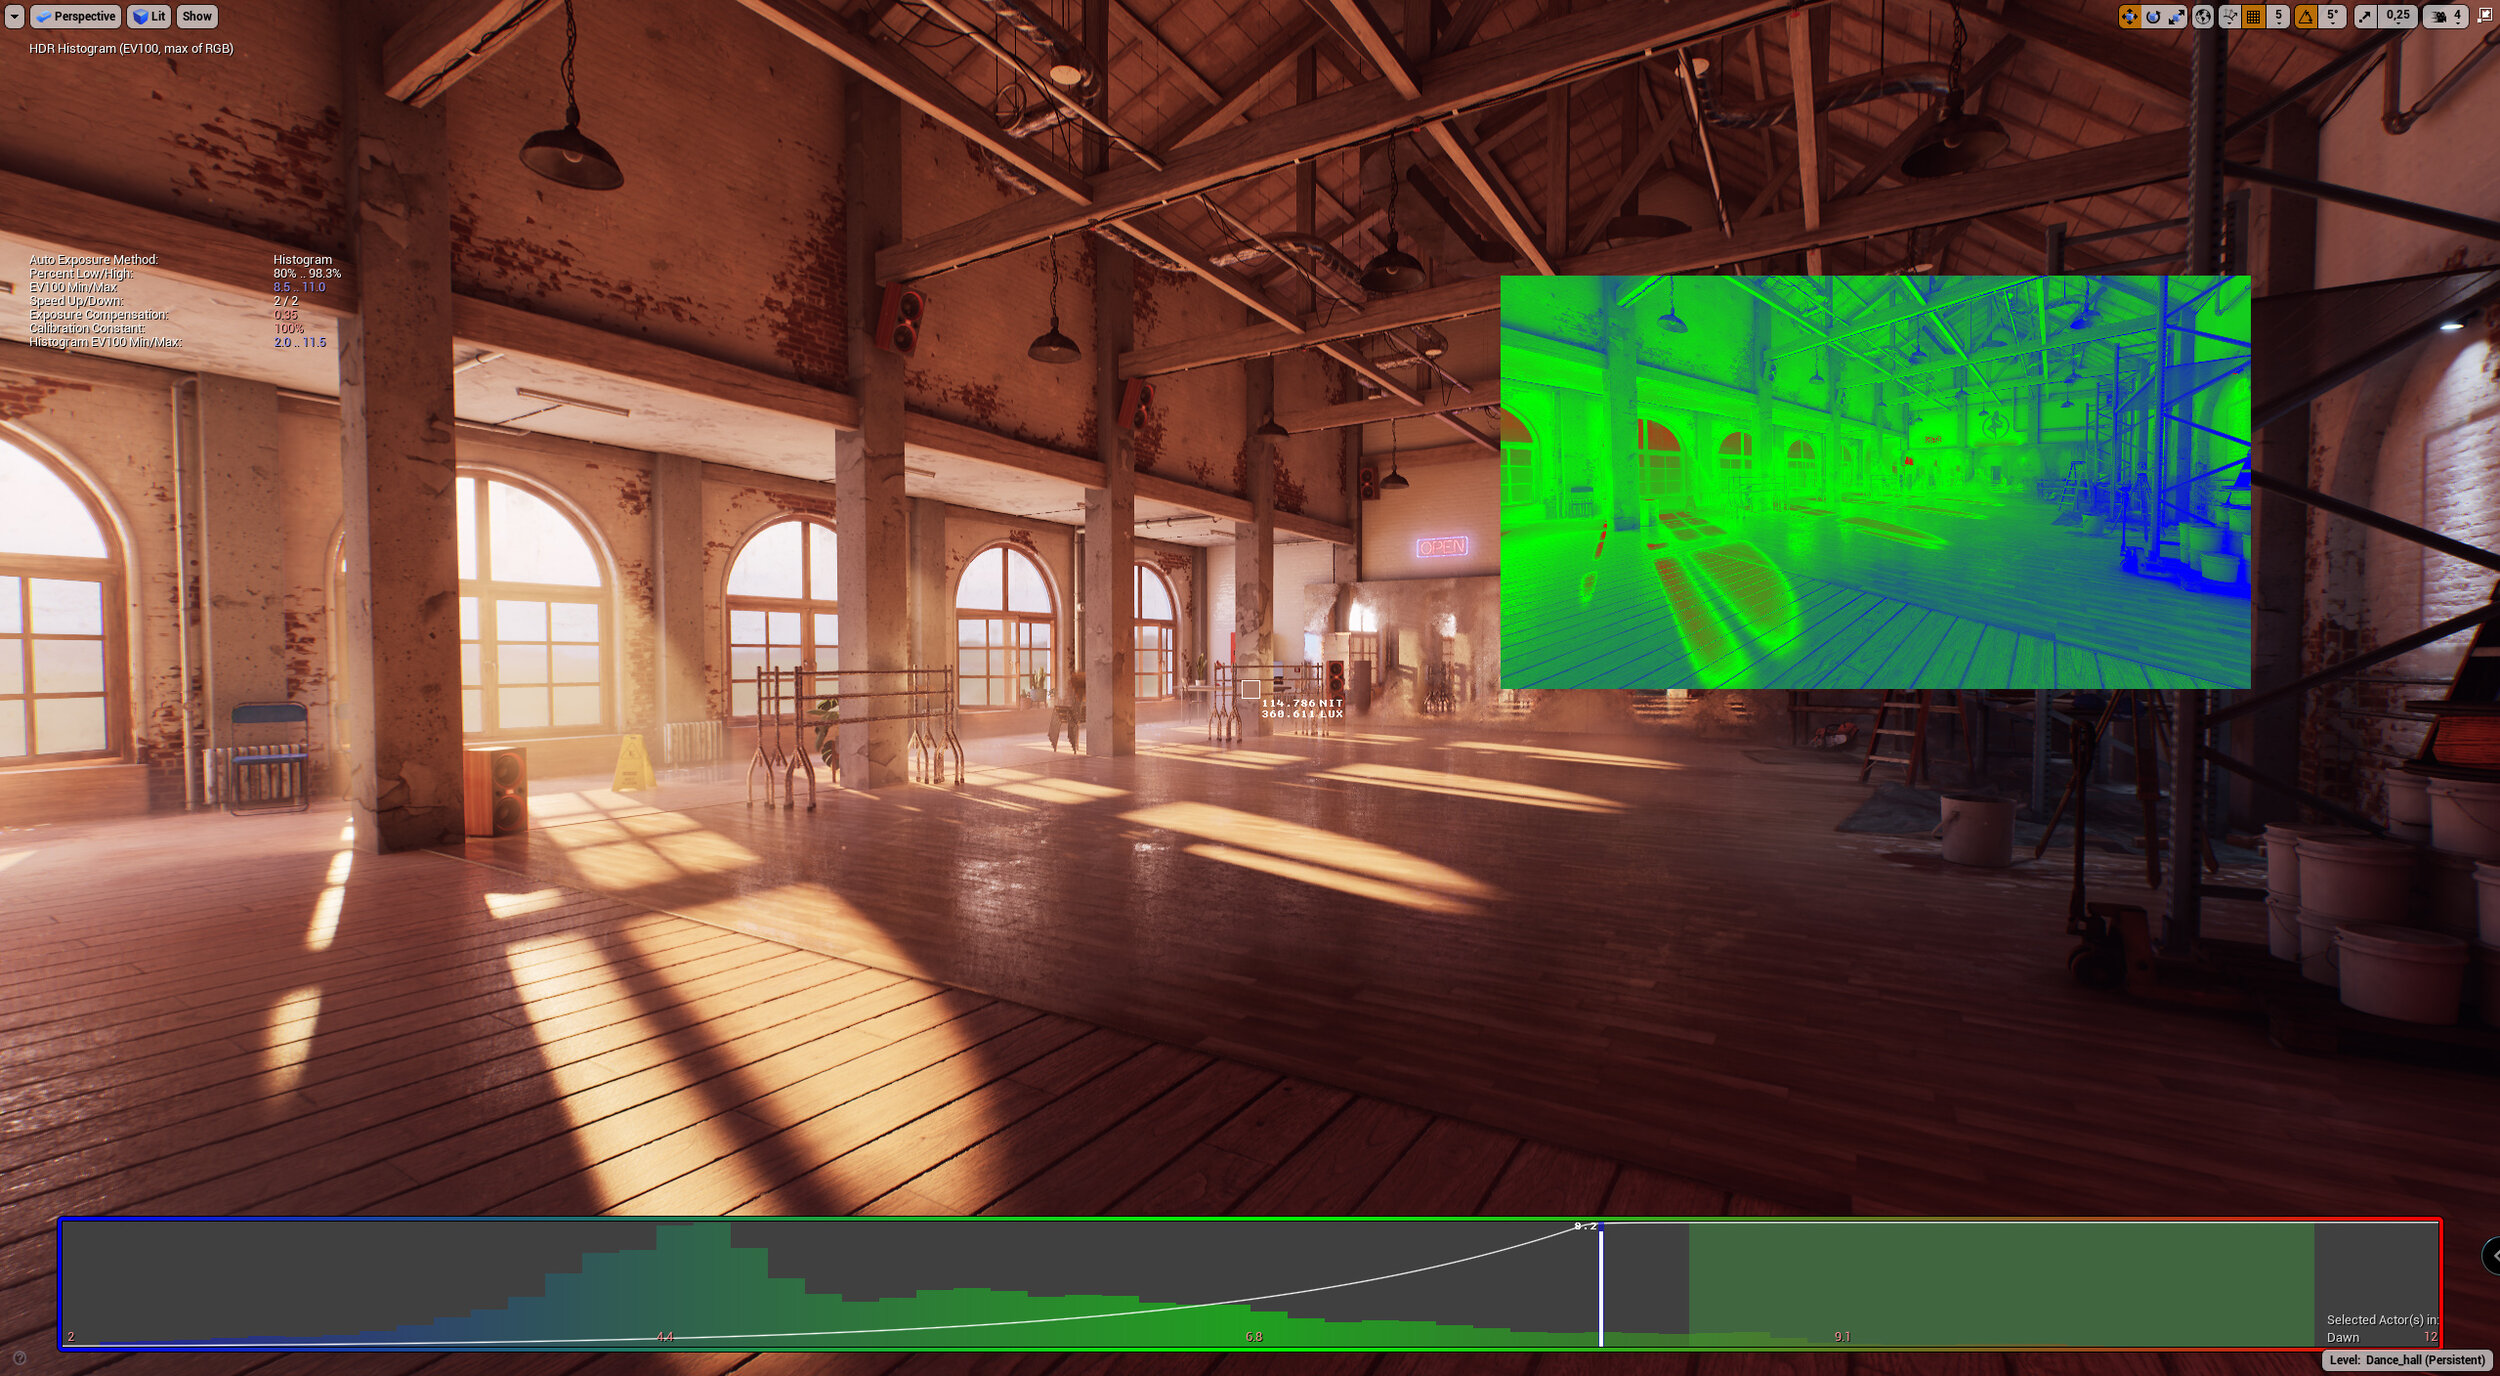
EV Visualisation
Conclusion
At the end I can’t tell you how many hours I spent on this project, I began a few days before Epic bought Quixel and I worked on it a few hours per week.
My advice to create a project from A to Z without losing motivation and having a persuasive result would be:
Take your time! Take your time to make your stuff and remember the knowledge you learnt so far so you don’t make the same mistakes again.
Ask for feedback! Accept criticisms and advice from people around you. You don’t have to do everything they tell you but sometimes it’s good to get some distance to know what’s best for our project.
Don’t be too ambitious! When we begin a project, we tend to see something way bigger than we are able to do. So we give up pretty fast due to a lack of motivation, especially when you’re are a junior.
In practise, I would tell you:
Be careful to the details, having storytelling is always useful and a plus to your project.
The lighting is very important (I don’t say that because I’m a Lighting Artist) but having the best environment in the world if your lighting sucks, the entire scene will suck. Good lighting makes a big difference and gives your scene a “next-gen” look. If you don’t believe me, go and look at all of those empty environments made of simple concrete walls with stunning lighting.
Use a lot of PBR values for the skylight, sun and lights to help your scene to render more realistically (even for stylized projects). You can modify some values after but at least you will begin with good values.
Take care of the colours you use, the good colours are the ones that match well together. This Adobe website is great for that. Go and have a look, it’s very useful!
If you can’t do it, if you’re stuck, go and look at some tutorials to help you, ask the community for some advice to improve yourself. Unfortunately I haven’t got any tutorials to show you for lighting, the key is the practise.
The Future
Projects! As the hard worker I am, I love creating stuff on my PC, I love discovering new things and l’m constantly learning and trying to improve myself by “working” on new projects. So of course I have plenty of projects in my mind and there’s one which is in progress. It’s been almost 2 years now I’ve been working on it. It’s not a simple scene I usually make, it’s a playable demo!
As a big fan of Ratchet and Clank, I realise they didn’t make the Eudora planet in the remaster game in 2016, so I decided it would become my new challenge, it’s not the only planet that wasn’t remastered but Eudora is the one I really liked back in the day. After all I was a little boy when I played on this planet for the first time, the game was released in 2002 on the PS2. So making this lovely planet is for me a great chance, I can recreate it with the technology of these days. So far it looks a lot better than the old one (luckily).
That’s a side project so I don’t work on it full time, just in my spare time. That’s why it’s slowly progressing but one day I will finish it! I’ve done almost everything in the game, the BP, the environments, the models, the lighting, etc. but my girlfriend Christine is making the VFX and another friend, Guillaume is in charge of the rigging and animation of the characters.
Here’s the YouTube where I post some videos from time to time and here is my Twitter where I put gifs and videos.


Ratchet and Clank Eudora Remake Shots

Outro
I would like to thank the people who helped me by giving feedback and critiquing on Discord, my friends and so on, they were very helpful! And a special thanks to my soulmate Christine Fioroni, who made the VFX for my scene and gave more life to it!
And of course big thanks to the Experience Points team, who asked for this interview and thanks to you, who read this, I hope you liked it!