
JESUS MERINO - wonder park foliage AND sAMURAI armour
Join us in this double article as we talk with Jesus Merino about his work on the Wonder Park vegetation, followed by a breakdown on his Samurai Armour. Read about his processes, what software he uses for each stage of his development, and more.
Introduction
Hello, my name is Jesús Merino and I am a Senior Modeller and Texture Artist. I was born in Valencia, city of Spain on the shores of the Mediterranean. My path to 3D began when I worked as a delineator in an architecture studio. There I could see how some colleagues worked in architectural visualisation. That's when I decided to focus on creating CGI images. After studying at the Universal Arts School of Valencia, I worked for several years in various studies and advertising agencies. Later I decided to take some time to improve my demo reel and make the leap to animated movies. This gave me the opportunity to enter the surfacing department at Ilion Animation Studios. At the end of the production, it was when I decided to change and try in the video games sector, something I had always wanted to do since I was a child. The first console game I played was Astro Warrior for the Master System in 1988 if I remember correctly if not then it was Eliminator or Nebulus on the Atari st220.
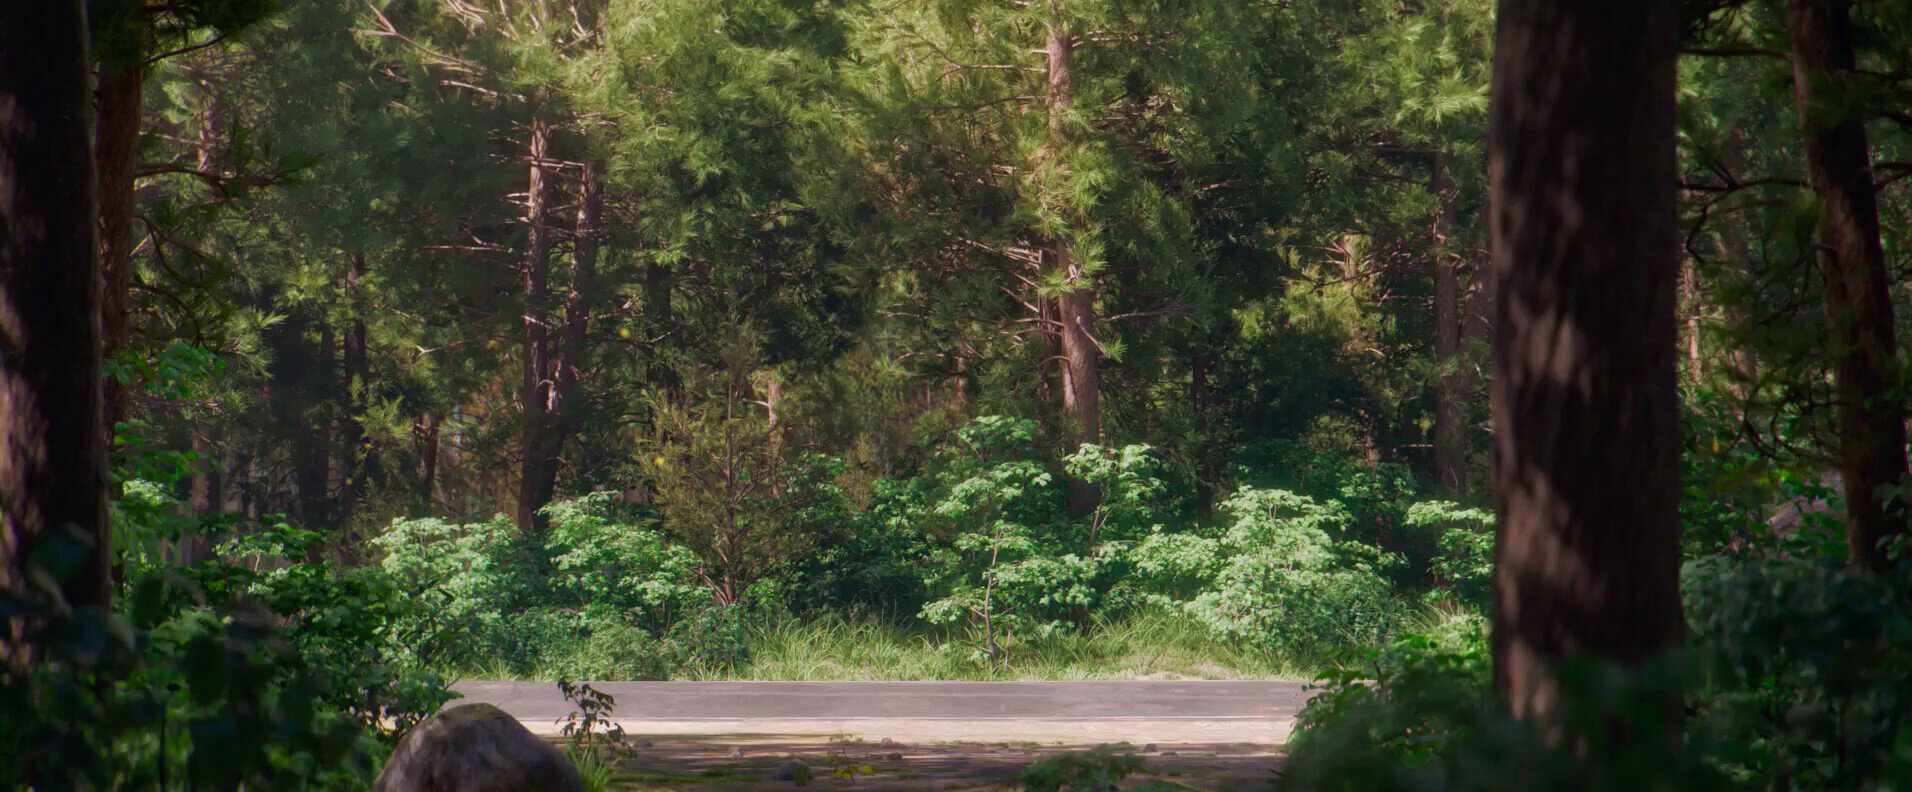
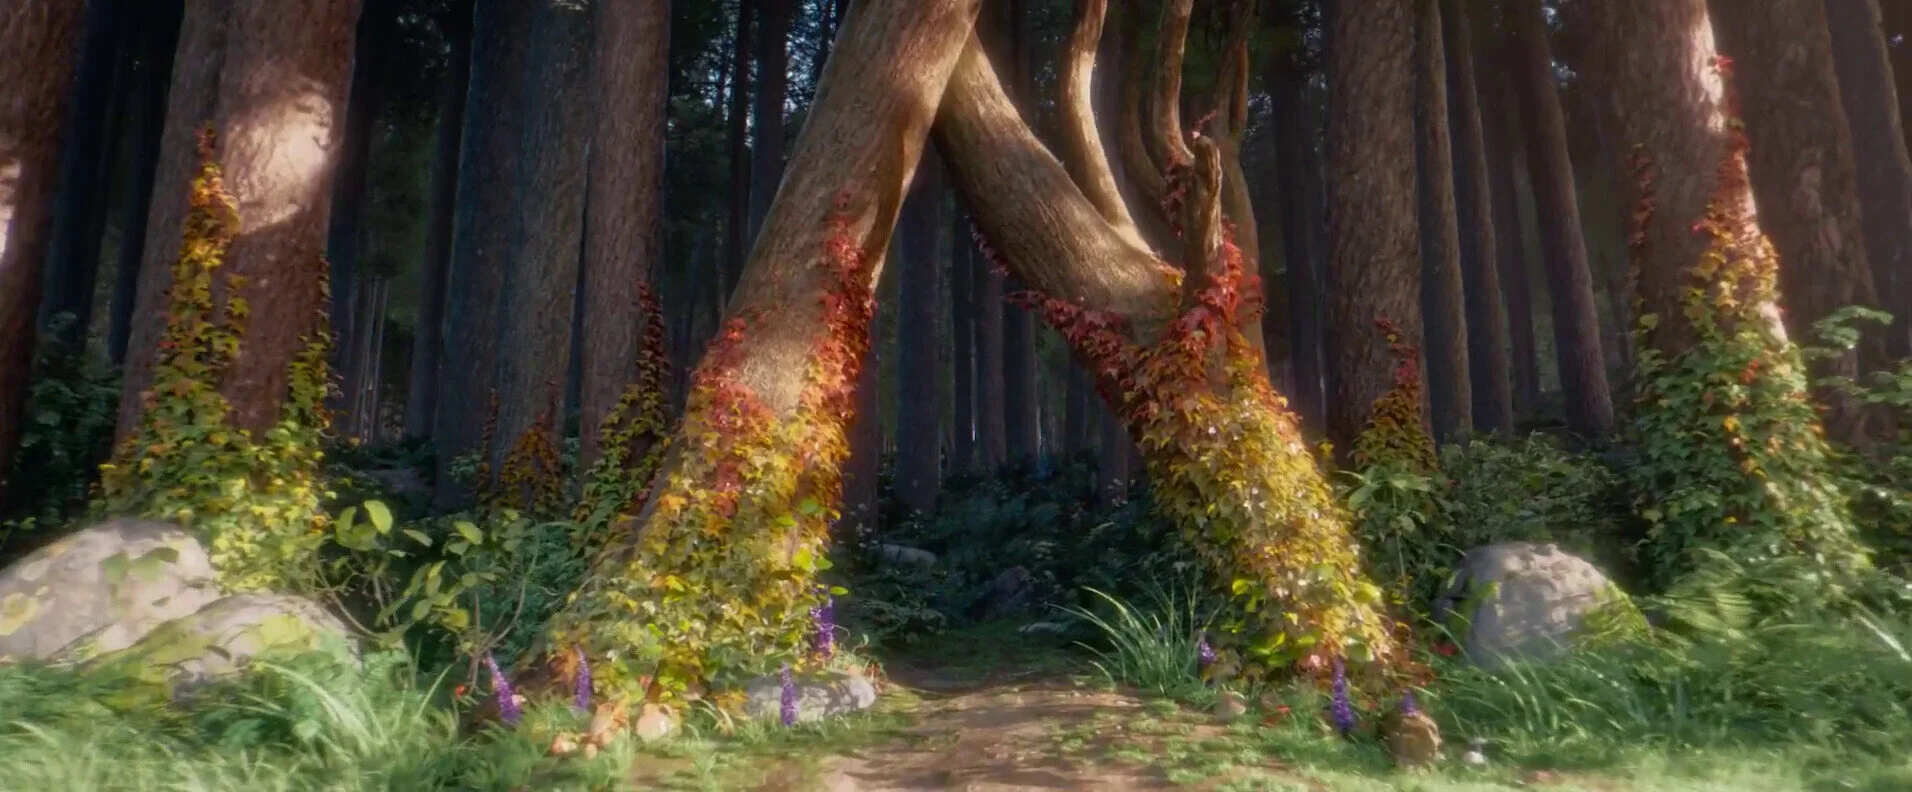
In the Wonder Park vegetation scene, what was your process for texturing the foliage? Was there anything more challenging or different about working with foliage as opposed to another asset?
For the vegetation of Wonder Park we worked with SpeedTree, an incredible software for the creation of all types of trees and plants. First the trees were modelled with a node system that allowed us to modify the structure of the tree quickly according to the requirements of the director. Then the sheets that were later replaced by a particle system were added in Maya. These particles were in turn replaced by the final model of the sheets that were to be used. The biggest challenge came when creating the ivy. The shader was quite complex because he should be able to apply different coloration to the leaves depending on their location, scale and other factors.
When working in such a distinct style how do you manage PBR materials? What are some of the techniques for handling metal in this style as opposed to a photo-realistic metal?
For the creation of materials, the most important thing is to understand the physics of the real world and predict what the surface behaviour will be in different lighting conditions. Today there are many websites where you can find all this information, such as indexes of refraction, albedos and other physical properties of the materials. This is always a good starting point but sometimes you have to be flexible to adapt to the demands of the production. For the creation of metals, in the first place, it is very important to have a suitable lighting set to be able to work with them since many will be quite reflective and their appearance will depend largely on the environment where they are located. I always recommend working with different HDR textures, of course well calibrated. It is also important to work with photographic references and analyse them to understand the physical behaviour of the metal.
Would you be able to talk about composition and how you make decisions for how each shot would be composed?
A good composition of the elements is a fundamental part for the creation of good images. We must organise the different visual ingredients such as space, colour, texture and lighting seeking balance and relationship between them to achieve visual harmony. We will use different types of composition depending on what we want to express in our image. We can learn a lot about composition by looking at Baroque or Renaissance painting classics. These influences are constantly used by cinematographers in current cinema.
What are texture budgets like when working on an animation project? What was the normal texture size you used?
Texture budgets in animation are much more flexible than in video games. The textures are converted to TX format, this allows loading depending on the distance to the camera the optimal resolution of the maps. It is something similar to what happens with LOD’s in video games. Normally we work with 4K textures and if necessary 8K but only in very specific cases. The most common is that if you need more resolution, raise the number of UDIM’s in your UV’s. Working with Mari to texture greatly facilitates this process.
How often were you able to reuse materials you had already created? Did you use modular techniques such as trimsheets or tileable materials?
I always try to reuse the base of my materials, that saves you a lot of time to be able to dedicate it to improve other phases of the model. It is important to have well organised your material library with well calibrated PBR values.

Working in such a distinct style, what are some of the techniques you use to achieve a consistent visual quality? How does it differ from realism?
In my case, I try to work my shaders in the most physically correct way, that gives you greater consistency in different lighting conditions. Then, I work the detail of the textures to give it a more cartoon or photo-realistic look depending on the production.
What are the major differences of working on an animation project such as Wonder Park, compared to a video game? How do you approach the workflow of creating models and textures?
In video games the process is less collaborative, at least under my experience. You usually start working with a concept provided by the art department. And you are responsible for the creation of modelling in high poly, low poly, collision boxes, make the UV’s, bake all the maps of normal, cavity, AO, etc., textured model, and integration into the game engine to make sure everything is correct. In animation all this process involves several departments such as layout, modelling, surfacing, lighting, rigging, groom, FX, animation... This makes your work very specific and dependent on a pipeline complex.
Do you seek out feedback, and if so where did you ask for it? How did you respond and implement feedback?
It is good to show your work to people from different departments, this can give you a different vision than what you usually have in surfacing for example. There are also many platforms such as Artstation, it is a good place to look at other jobs and receive feedback from yours.
What can we be on the lookout from you in the future?
The future is uncertain, but I always like to do new things that pose a challenge to my knowledge. I am currently working on a personal project which in general is about how the geometry of some surfaces interferes with the wavelength of light at very small scales. For example, some bird feathers or scales of certain repeats diffract the light creating very interesting optical effects, but I am still collecting information on the subject. Maybe next year we can see something.

Do you have any additional tips or advice to share with our readers?
My advice, especially for those who are starting in this industry is that at first try a little of everything (modelling, lighting, animation, FX...) and then focus on the speciality you like most, because bigger companies are looking for more specialised workers every day. On the other hand, this is a sector that is constantly evolving and each artist has to be up to date in order not to fall behind.
Outro
As one day the person I consider my mentor, my sensei, the person who aroused my passion for this industry, the great Dario Lanza Vidal said, "3D is the perfect fusion between art, science and technology. We have the best job in the world" and I as a humble 3D artist, I can't agree with him any more.
Samurai Armour Breakdown

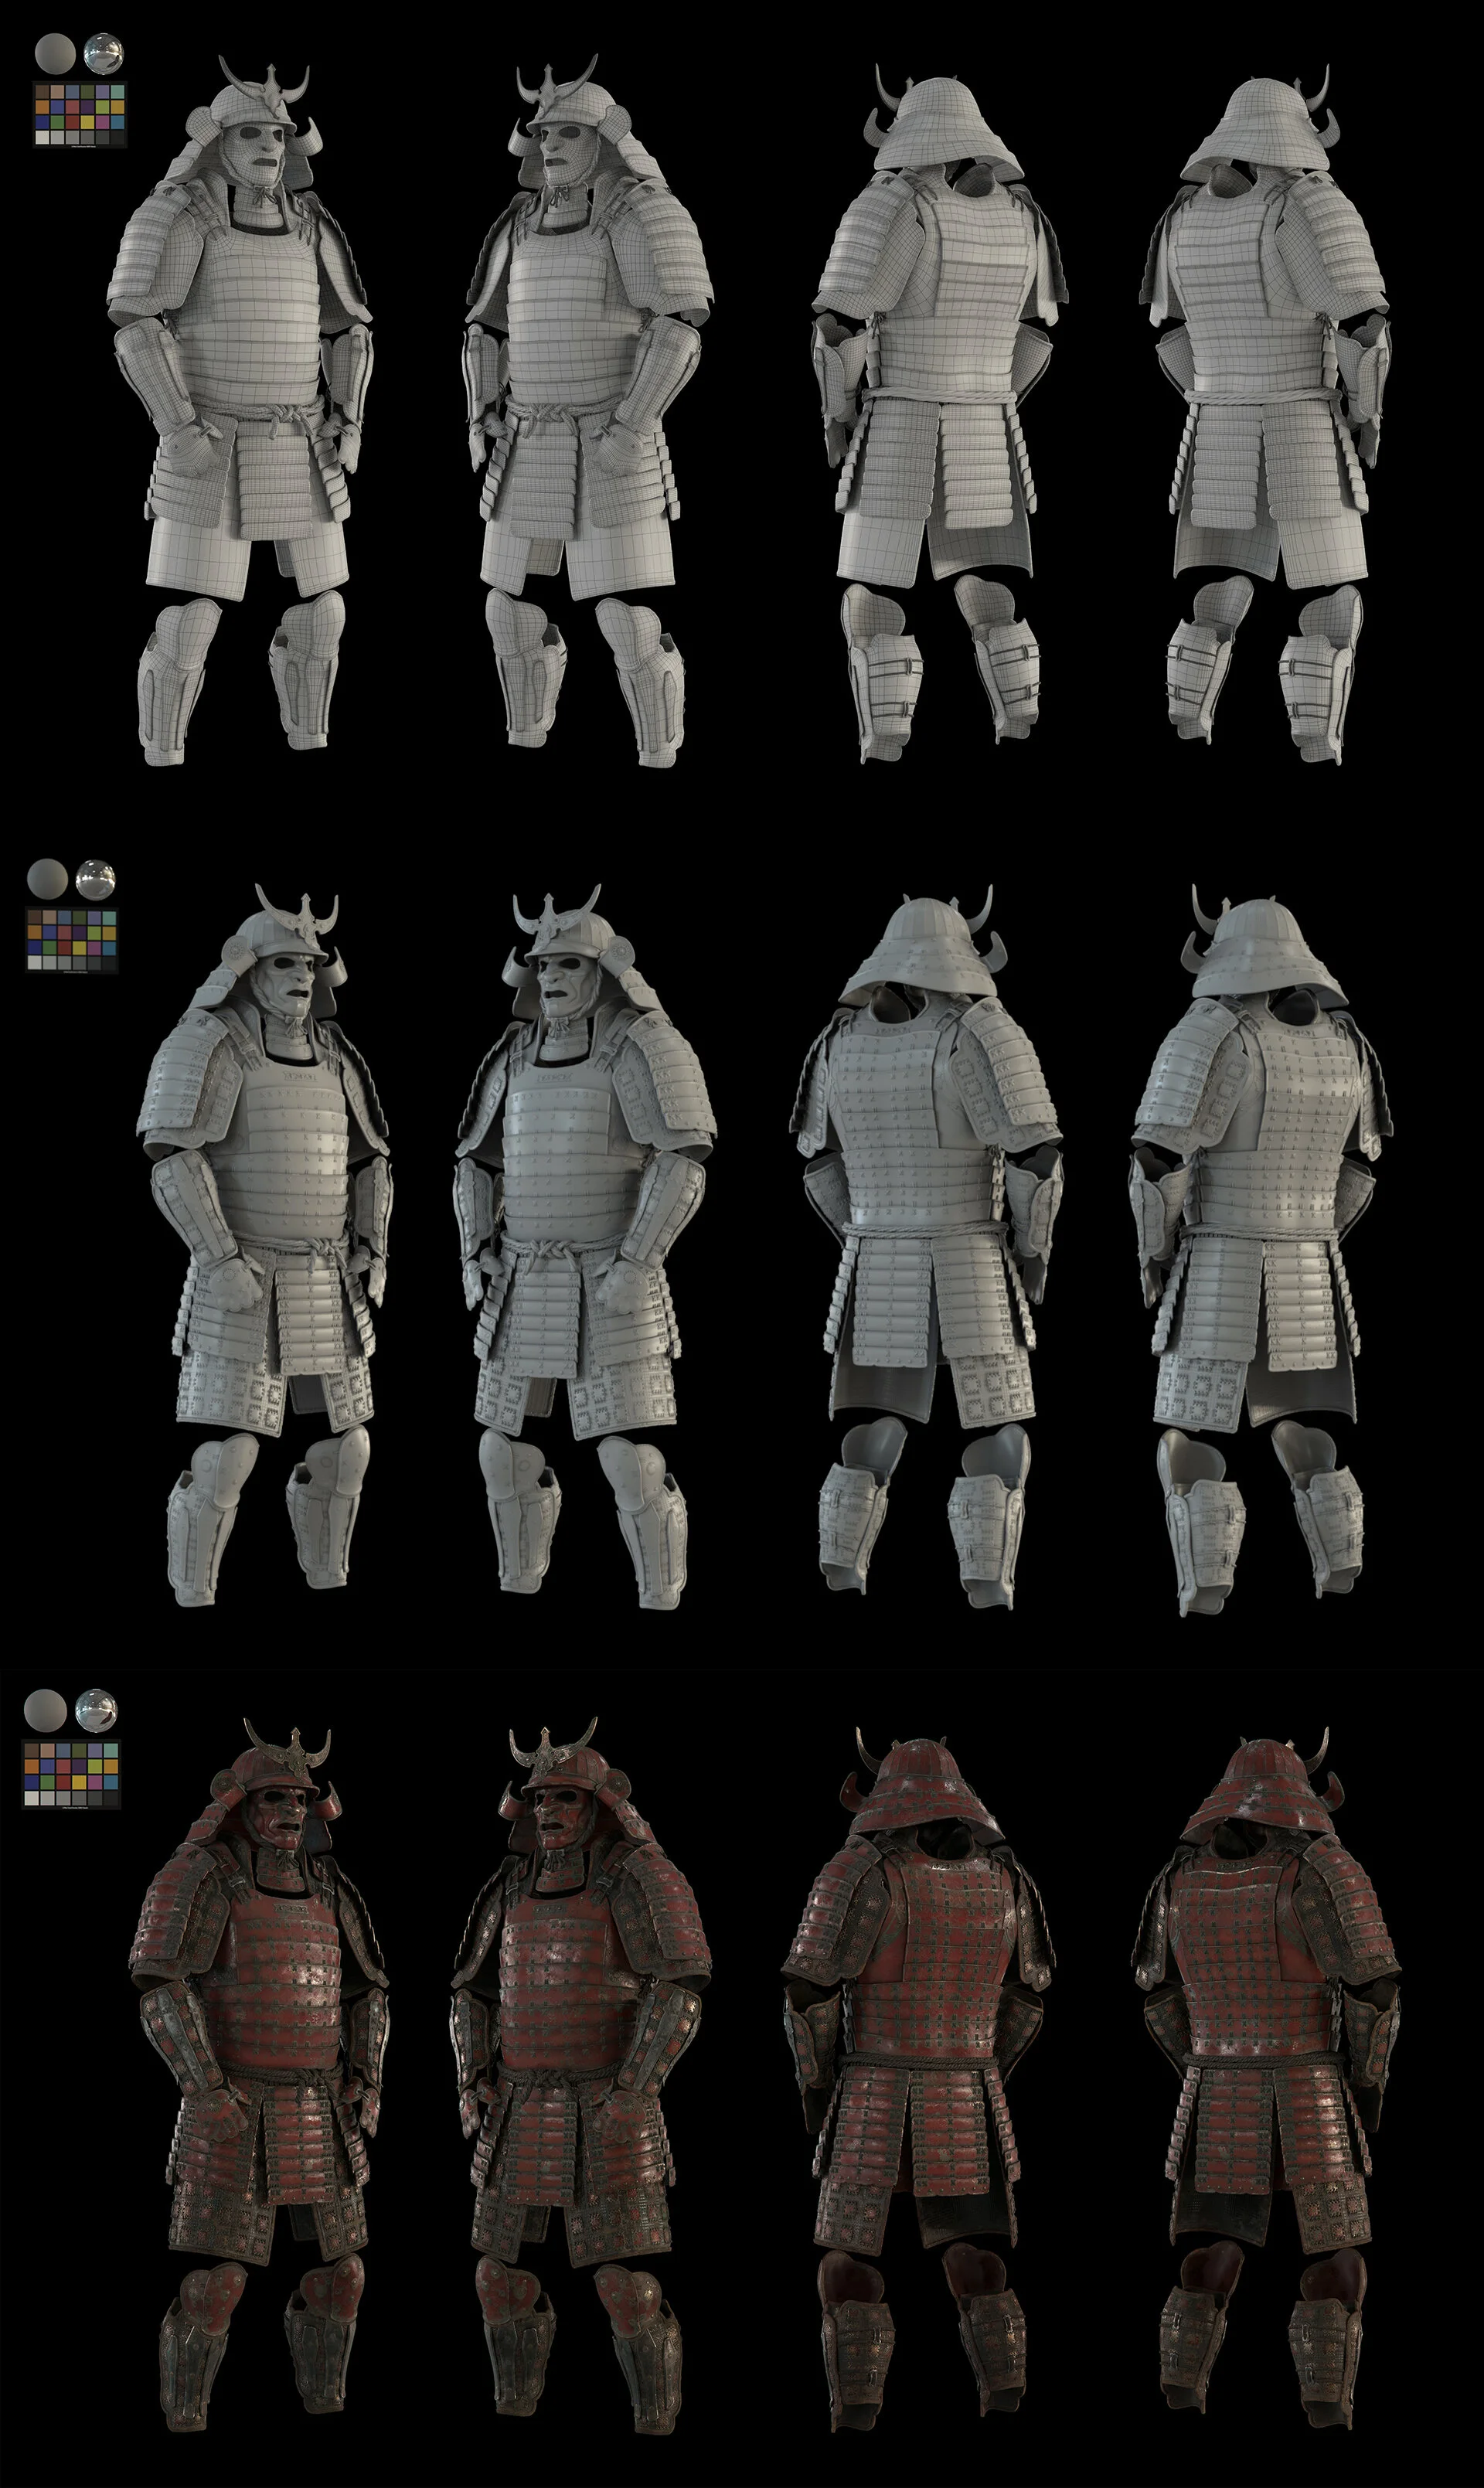
The Model
For this project I wanted to focus mainly on the shading and lighting part. For this reason, I decided to save some time in the modelling phase by using a model from here. On this website we can find files for ZBrush with an impressive price-quality ratio.

Samurai Model
The first step is to decide which elements of the model would be part of the displacement and which parts would not. The fact of eliminating the equation of all small parts drastically reduces the time spent creating UV’s and the number of textures to be used.

Before removing small details

After removing small details
Retopology
For retopology we can use the ZBrush tool ZRemesher. I had to adjust the amount of polygons depending on the topology of the piece, but we always try not to lose the original shape too much.

ZRemesher visualisation
Normally with the default values in the tool it works quite well, but sometimes we will have to adjust some of parameters to maintain the definition in certain areas. After, I manually deleted some loops that don't interest me and I repaired small errors in geometry. Anyway, I leave here a link to an excellent tutorial by Francis-Xavier Martins of how to use ZRemesher for much more complex models, wonderful!

ZRemesher Example

ZRemesher Settings
UV’s
When all the pieces are finished, we can start to unwrap the UV which were performed in completely in Maya.

Mesh in Maya
In this case I used 9 units with a 4k resolution, dividing the model into its basic parts: helmet, shoulder, arm, leg, ropes, chest, back, middle and leg protections.

UV Unwrap
Baking
I used Marmoset to make the geometry bakes and be able to extract the different maps of cavity, AO, thickness, position, displacement and object of normal map and tangent space. All of them will be necessary to correctly texture in Painter. Sometimes it can be interesting to have 2 AO maps with different radio to be able to mix them and get better results.

Baking in Marmoset Toolbag

ID Bake in Marmoset Toolbag

Bakes Overview
References
The search for references is an essential part when starting any project. I chose the armour of the movie "The Last Samurai" as the main reference. Also making a small tour of other ancient armour for analysis as their materials age after centuries of antiquity.

Reference Board
Texturing
For the creation of textures, I used Substance Painter. I always like to start with a small test of some of the main materials of the model. At this point, the materials are completely procedural without adding any type of hand-painted mask. This method allows us to save some time, as we begin to work with a less complex but equally effective model to see if the textures work correctly.

Material Testing in Substance Painter
After we can start texturing, just have to import our geometry in to Painter, apply the different maps extracted in Marmoset and assign the previously created materials with the help of the ID map.

Texturing in Substance Painter
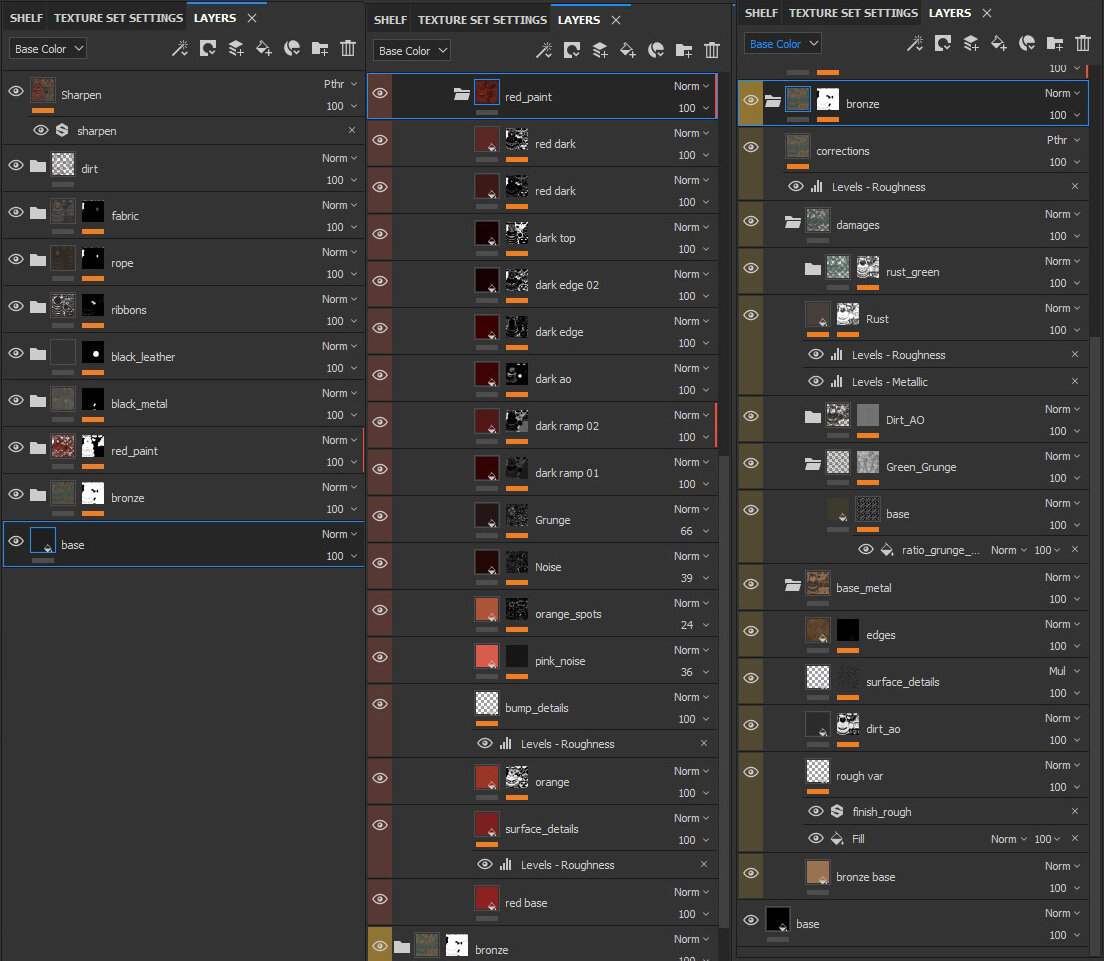
Layer Stack Examples

Armor Pieces Texture Overview

Final Textures Overview
Lighting and Rendering
I chose Arnold for Maya, especially for its quality vs. time against other render engines. Before starting to place lights, it is important to build your shaders in a scene calibrated for lookdev. In this phase we can test the materials under different lighting conditions and test their consistency.
Rendering with Arnold
The devil is in the details. Add some small fibres to the armour belt always gives some extra points. These were generated with XGen.

XGen Fiber Generation
For lighting use a simple setup. A dome light with an HDR to soften the intensity of the shadows and generate some specular reflections. And the keys and fill lights, with softbox HDR textures.

HDRI Examples
The volumetric effect played an important role within the scene. Simulating suspended dust or fog, always bringing a touch of realism and mystery to the scene.

Another interesting part of this project has been the displacement maps. To do this, I used textures in 32 EXR format to preserve the greatest amount of information and have a good definition in the nearby details.

Displacement Example


Render Split
For each camera it uses a set of different lights, but at the same time it maintains a coherence with the scene in general.
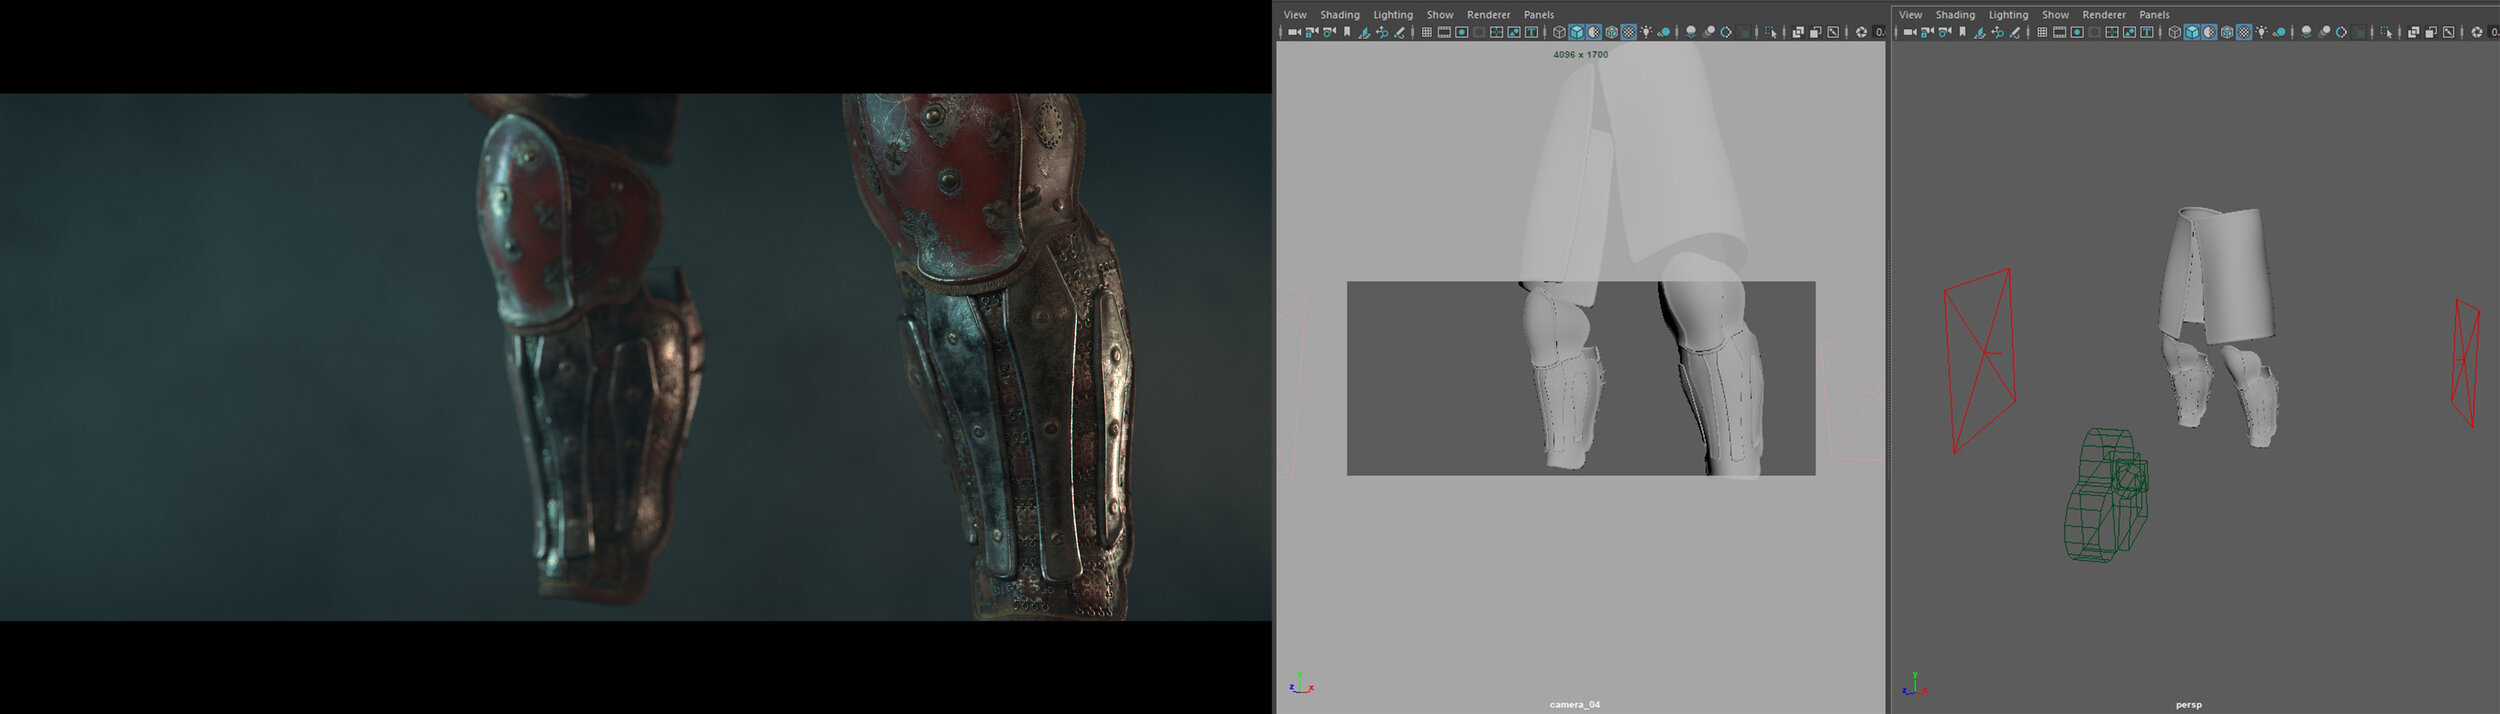
Legs Setup
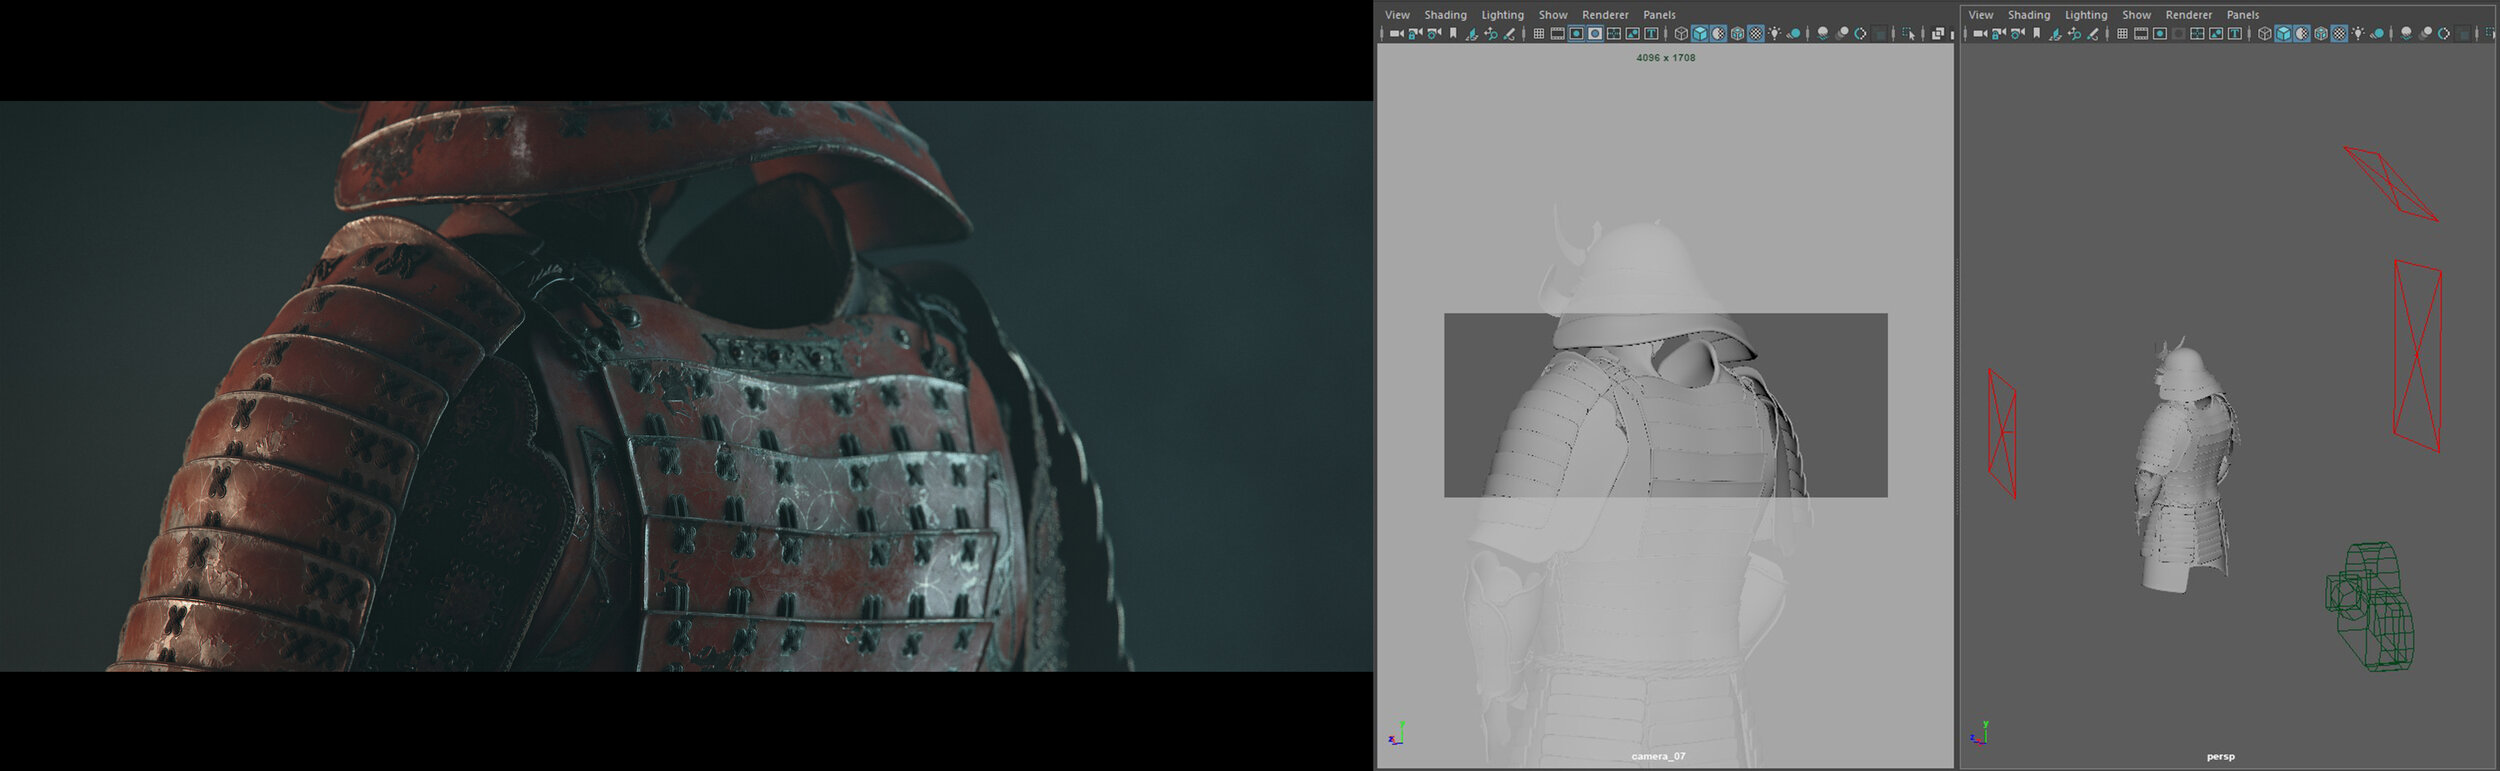
Torso Setup

Full Body Setup
For these shots, decide to start with a single high-resolution image in vertical format and then be able to crop and extract details in a more cinematic format. This method can save us hours of rendering and postPro.

Full Front Setup

Final Shots
Environment
The temple. At first, I didn't have plans to do it but as the project progressed I thought definitely deserved it. The design was inspired by the Japanese architecture of the feudal era, this had to be simple not to steal prominence from the armour.

Temple Reference

Scene Layout

Substance Painter Texturing Example
Post Production
The choice of using After Effects was mainly because the tweaks were going to be very basic. A few colour corrections and adjustments with the help of AOVs.

After Effects Overview

And finally, a light grading colour with the magic bullet looks plugin.

Colour Grading
And the armor is ready to go out into the world.
Thank you very much for reading and I hope you liked it. Also thank Experience Points for contacting me and giving me the opportunity to show you this project. Do not forget to drop by my portfolio if you want to know something more about my work.
