
The Darkroom
We’re joined by Sahaar as we dive deep into his darkroom environment inspired by the likes of Alan Wake and the Resident Evil 2 remake. We explore topics such as composition, lighting, adding story to the scene, prop creation, working efficiently as well as Sahaar’s advice for other artists.
Intro
Greetings! My name’s Sahaar Chhabra, I’m based in Canada and I’m currently working as a 3D Environment Outsource Artist at PlayStation Studios. I’ve had a lifelong passion for games and it eventually drove me into pursuing an education and career in game development. I started young on my Playstation 2 and games like Grand Theft Auto: San Andreas, Mortal Kombat, WWE Smackdown: Here Comes the Pain, Marvel Ultimate Alliance and Spider-man were some of my go-to games.
When I got around to playing God of War 1, I stumbled across the extras section and saw some behind-the-scenes development shorts of the game. The idea of an entire team passionately pooling their blood, sweat and tears into fulfilling their artistic vision just gave me an insurmountable level of inspiration and I felt the call to be involved in game development whenever I grew older.
I went a different route with my education and enrolled in a 3-year Animation program at a college in Toronto. Due to the nature of the course, I was given an introduction to almost all the disciplines in the industry such as Concept Art, Matte Painting, Animation, 3D Modelling, Rigging, and everything in between. The program felt like a scenario where you were taught to be a jack of all trades but a master of none.
At first, I wanted to be a concept artist. I enjoyed drawing and digital painting; and I thought it was the perfect medium for me. I detested modelling as I couldn’t understand it and I didn’t have the patience or skill to be an animator. Life has a funny way of sometimes working because one of my modelling courses in my second year of college comprised making a Stylized Environment in Unreal Engine. Suddenly, things started to click and I felt invested in the project and the idea of pursuing modelling. By my third year, I was pretty set on my pathway and wanted to become an Environment Artist. The idea of bringing together and putting life into an empty screen just fascinated me with the craft. With an environment artist role, you were the master of your narrative and you could produce and tell so much in your work by building a scene with your personal creative elements.
Composition
Multiple theories of interior environment modelling were applied to the creation of this scene. I did a lot of introspection about what I wanted to do and create in this environment. I started creating a mood board with all my references and inspirations for the mood, tone and atmosphere which I wanted to make for my scene.
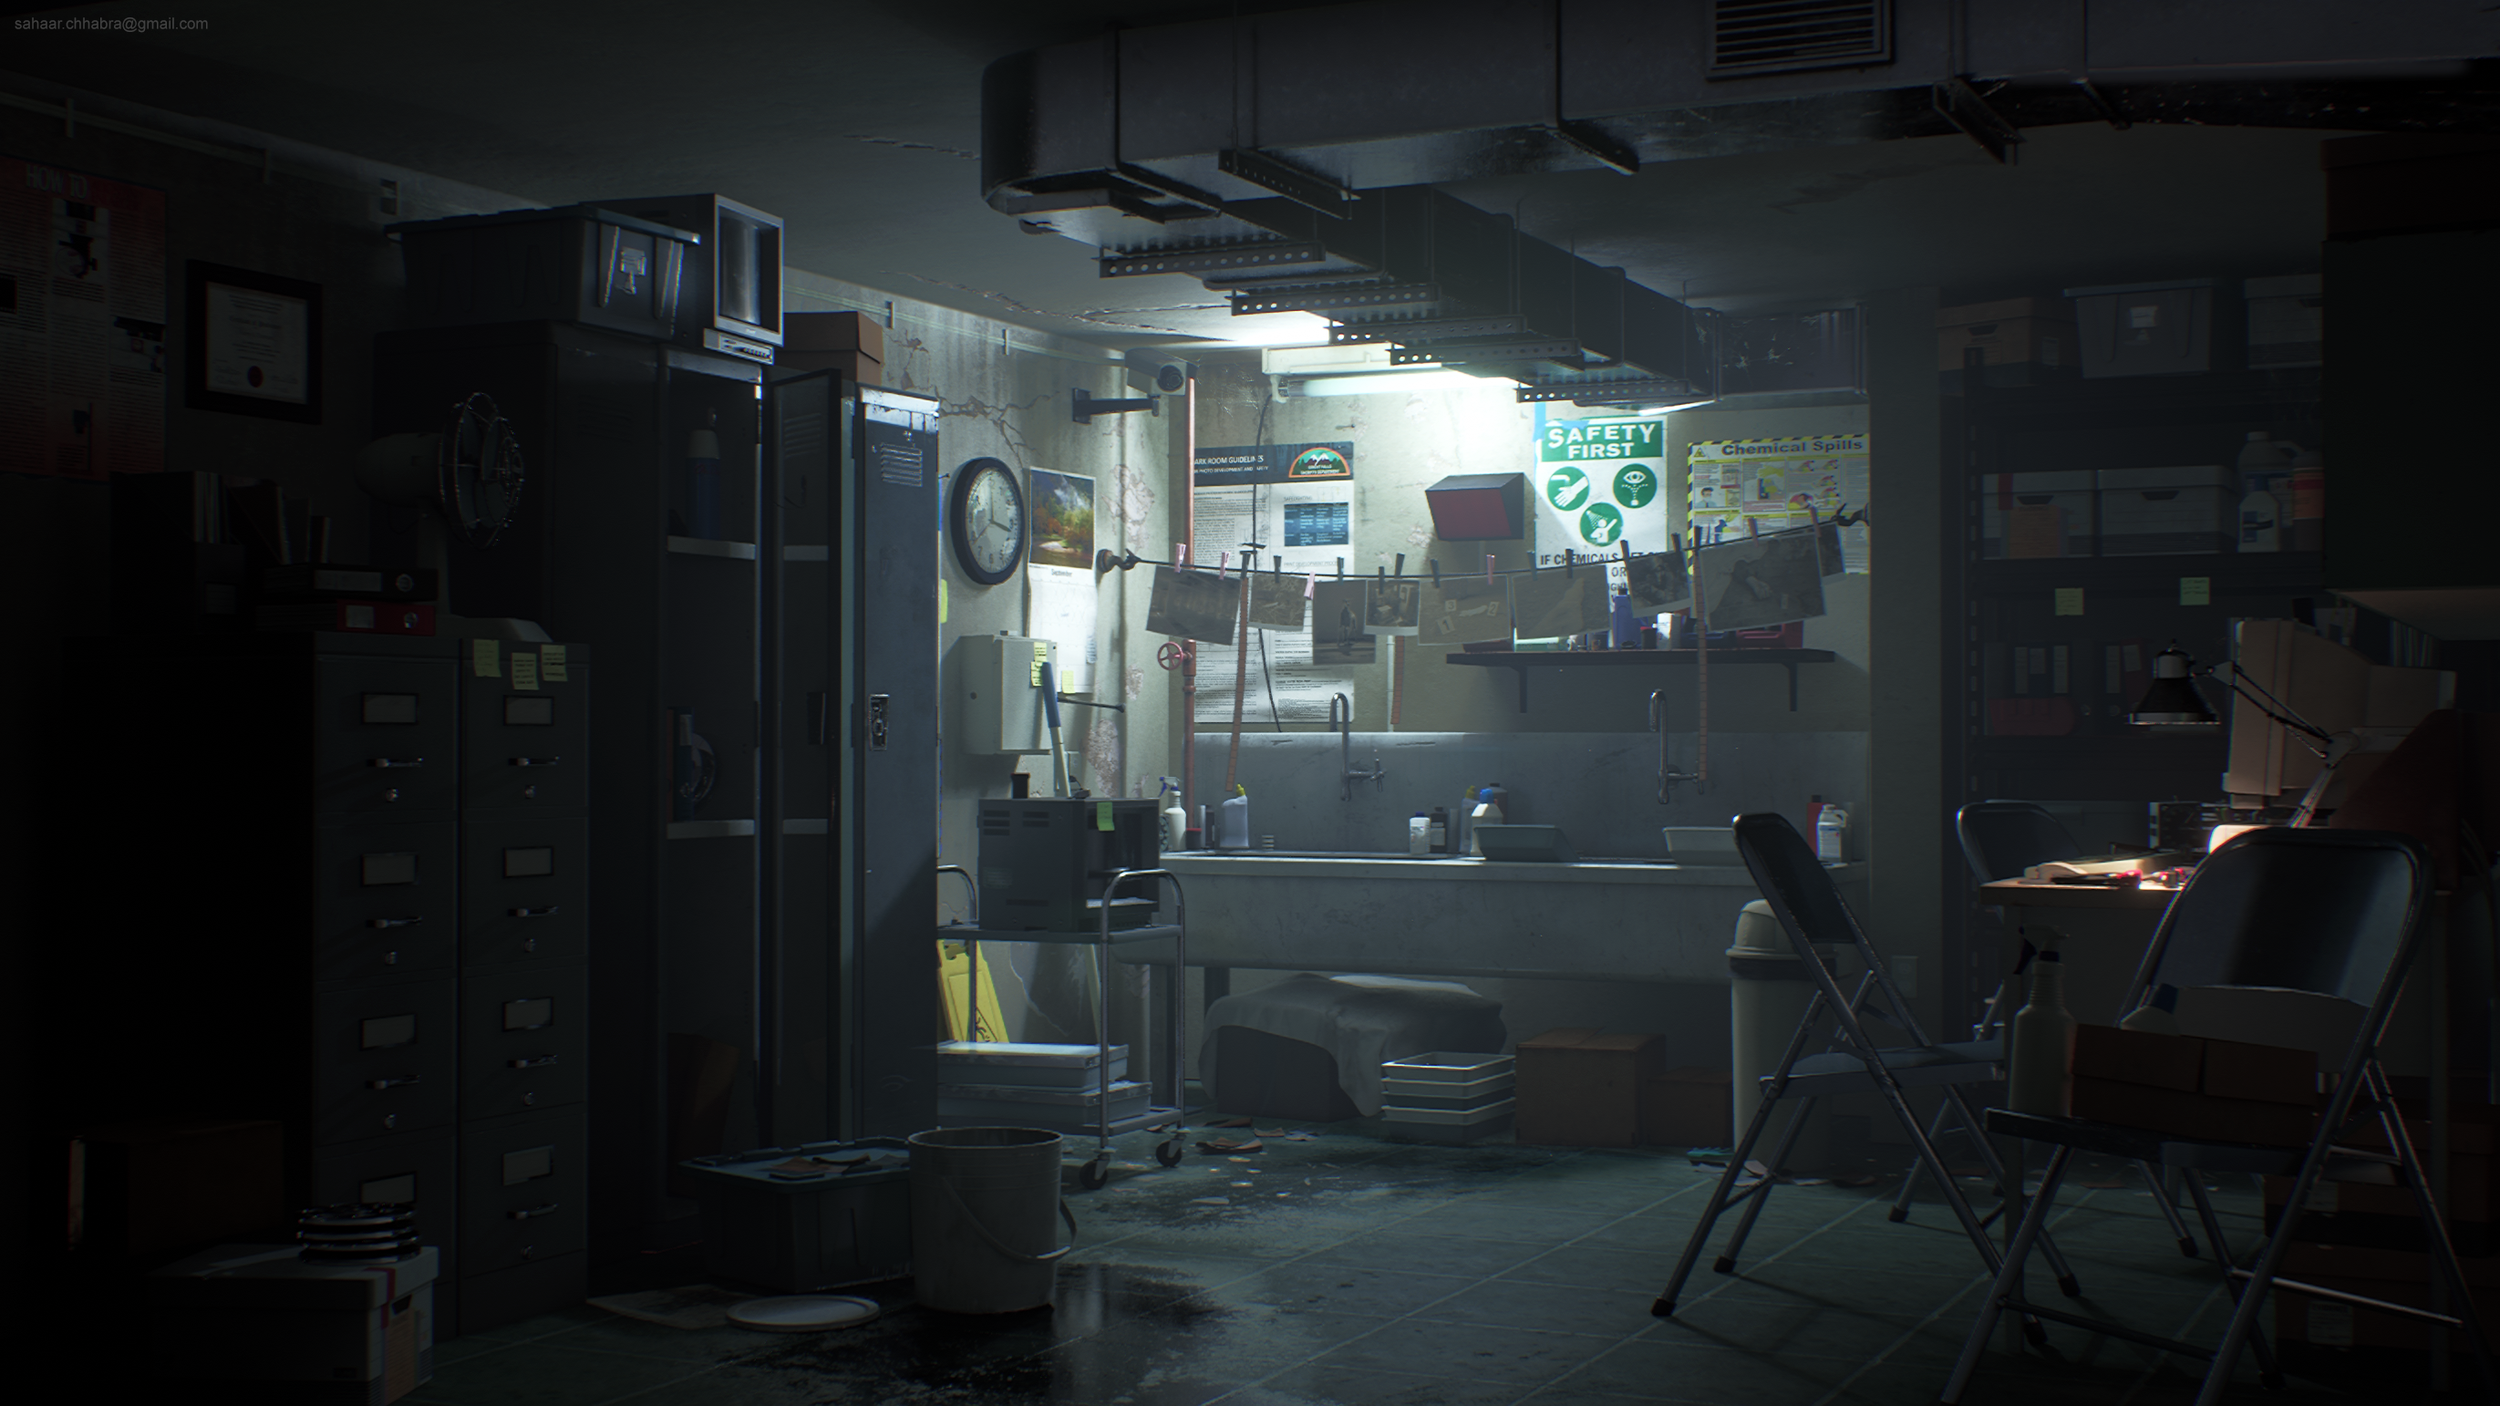
Though the scene seems rather simple, a lot of thought and core principles of interior environment modelling were applied to it. Theories of Directional Spacing were applied to guide the viewer’s eyes to the focal point of the composition.
The Golden Spiral rule as well. The focal composition is placed in the centre of the scene and the pockets of detail grow rather large and spread out the farther we get from the centre. A level of balance and harmony is presented by applying a theory like this.
Golden Spiral Paintover
Layout Explanation
Story
I wasn’t trying to tell a direct story with this scene, there are elements of storytelling present such as the police case files, water leakage, etc. but I’d prefer the viewer to subjectively conjure up their own narrative with the scene at hand. I wanted to emphasize more on the mood, tone and atmosphere of my scene. I wanted to make a scene with an intensely cool colour palette which emphatically expressed unsettling feelings of isolation and eeriness.
Iterating On The Story
Making something fresh and unique has always been an important factor in my artwork. Personally, I’m really tired of seeing bedrooms, sci-fi hallways and medieval alchemy labs (unless they’re done well or have a well-thought-out world behind them) because they’re so saturated and overdone.
I wanted to make a Darkroom as I thought that it would be a unique environment with lots of storytelling and modelling opportunities. I was heavily inspired by the Darkroom Save Room in Resident Evil 2 Remake and the colour palette of Alan Wake.
I always set a target quality with my work which references visual mediums like games that inspire my artwork. Capcom’s integration of their newly developed RE Engine has set the bar pretty high with the graphical fidelity and quality you see in games like Resident Evil 2 Remake, Devil May Cry 5 and such. With that in mind, I wanted to match the quality of those games with my environment and that is what I believe pushed the narrative of my environment.
Set Dressing
This process entails a lot of research. I went through pages of websites to figure out and source references for time period-appropriate photo development devices. There’s a level of authenticity which you are required to bring to the world you create. If you’re making a diner from the eighty’s then you already know that chequered floor tiles, neon colours and jukeboxes will be staples in making that diner look like it belongs in that era. I applied the same theory to my Darkroom which is set in the mid-nineties.
Texturing your props appropriately is another critical factor in pushing your scene to the next level. It is important to think about the attributes of your environment before delving into texturing your props. What type of environment are you creating? What’s the temperature in that area? How does the environment affect the assets? Is there moisture buildup? Is your environment set in a musty old basement? Or is it set in a sanitary office? Keeping these notes in mind is critical to creating props and assets which look like they belong in your environment and homogenize well with the foreground to create a balanced composition.
Darkroom Props
With my Darkroom environment, I wanted to establish a very specific type of atmosphere. There are puddles of water on the floor and sink, a couple of wet floor signs and a mop next to the sink. These elements indicate that this place is a little dilapidated and hasn’t been taken care of properly for some time. There’s water damage, leaky pipes and cracks in the ceiling. With peeling paint and moisture, you get heavy grime on the walls. Some of these elements can be exaggerated to fit the narrative, atmosphere and tone of your environment and take your work up a notch.
So keeping all these things in mind, I went on to create and texture all my assets. I start with applying all my base fills and materials before adding any actual details. Two things that I believe increase the level of detail and add realism to your props are accurate grunge passes and surface variation. Take your time with it, look at your references and see where the dirt spots start. Where the dust is most visible, where would you most likely see fingerprints? Build up each level of detail with multiple grunge/detail passes and several layers. Enhancing your texturing work will push your environments to the next level.
Darkroom Misc Props
Lighting
My lighting setup was pretty simple. Interiors with one primarily light are relatively easy to set up and Lumen does a lot of the heavy lifting with the new global illumination settings. Since a fluorescent tube light in the corner of my scene was my primary light source, I decided to use a Rect. Light which could replicate the accurate shape, length and spread of a tube light without blowing up the scene in overwhelming brightness.
My settings were set to minimal values so that the lighting was subtle and helped illuminate the contrast and details around the scene. The aim was to illuminate and highlight the sink as the focal point of my environment.
When I integrated the Fluorescent Tube Light into the scene, I also made sure that I’d go into my details panel and enable the emissive boost setting to a value of 2.0 so that the emissive texture could be highlighted and stand out prominently in the scene.
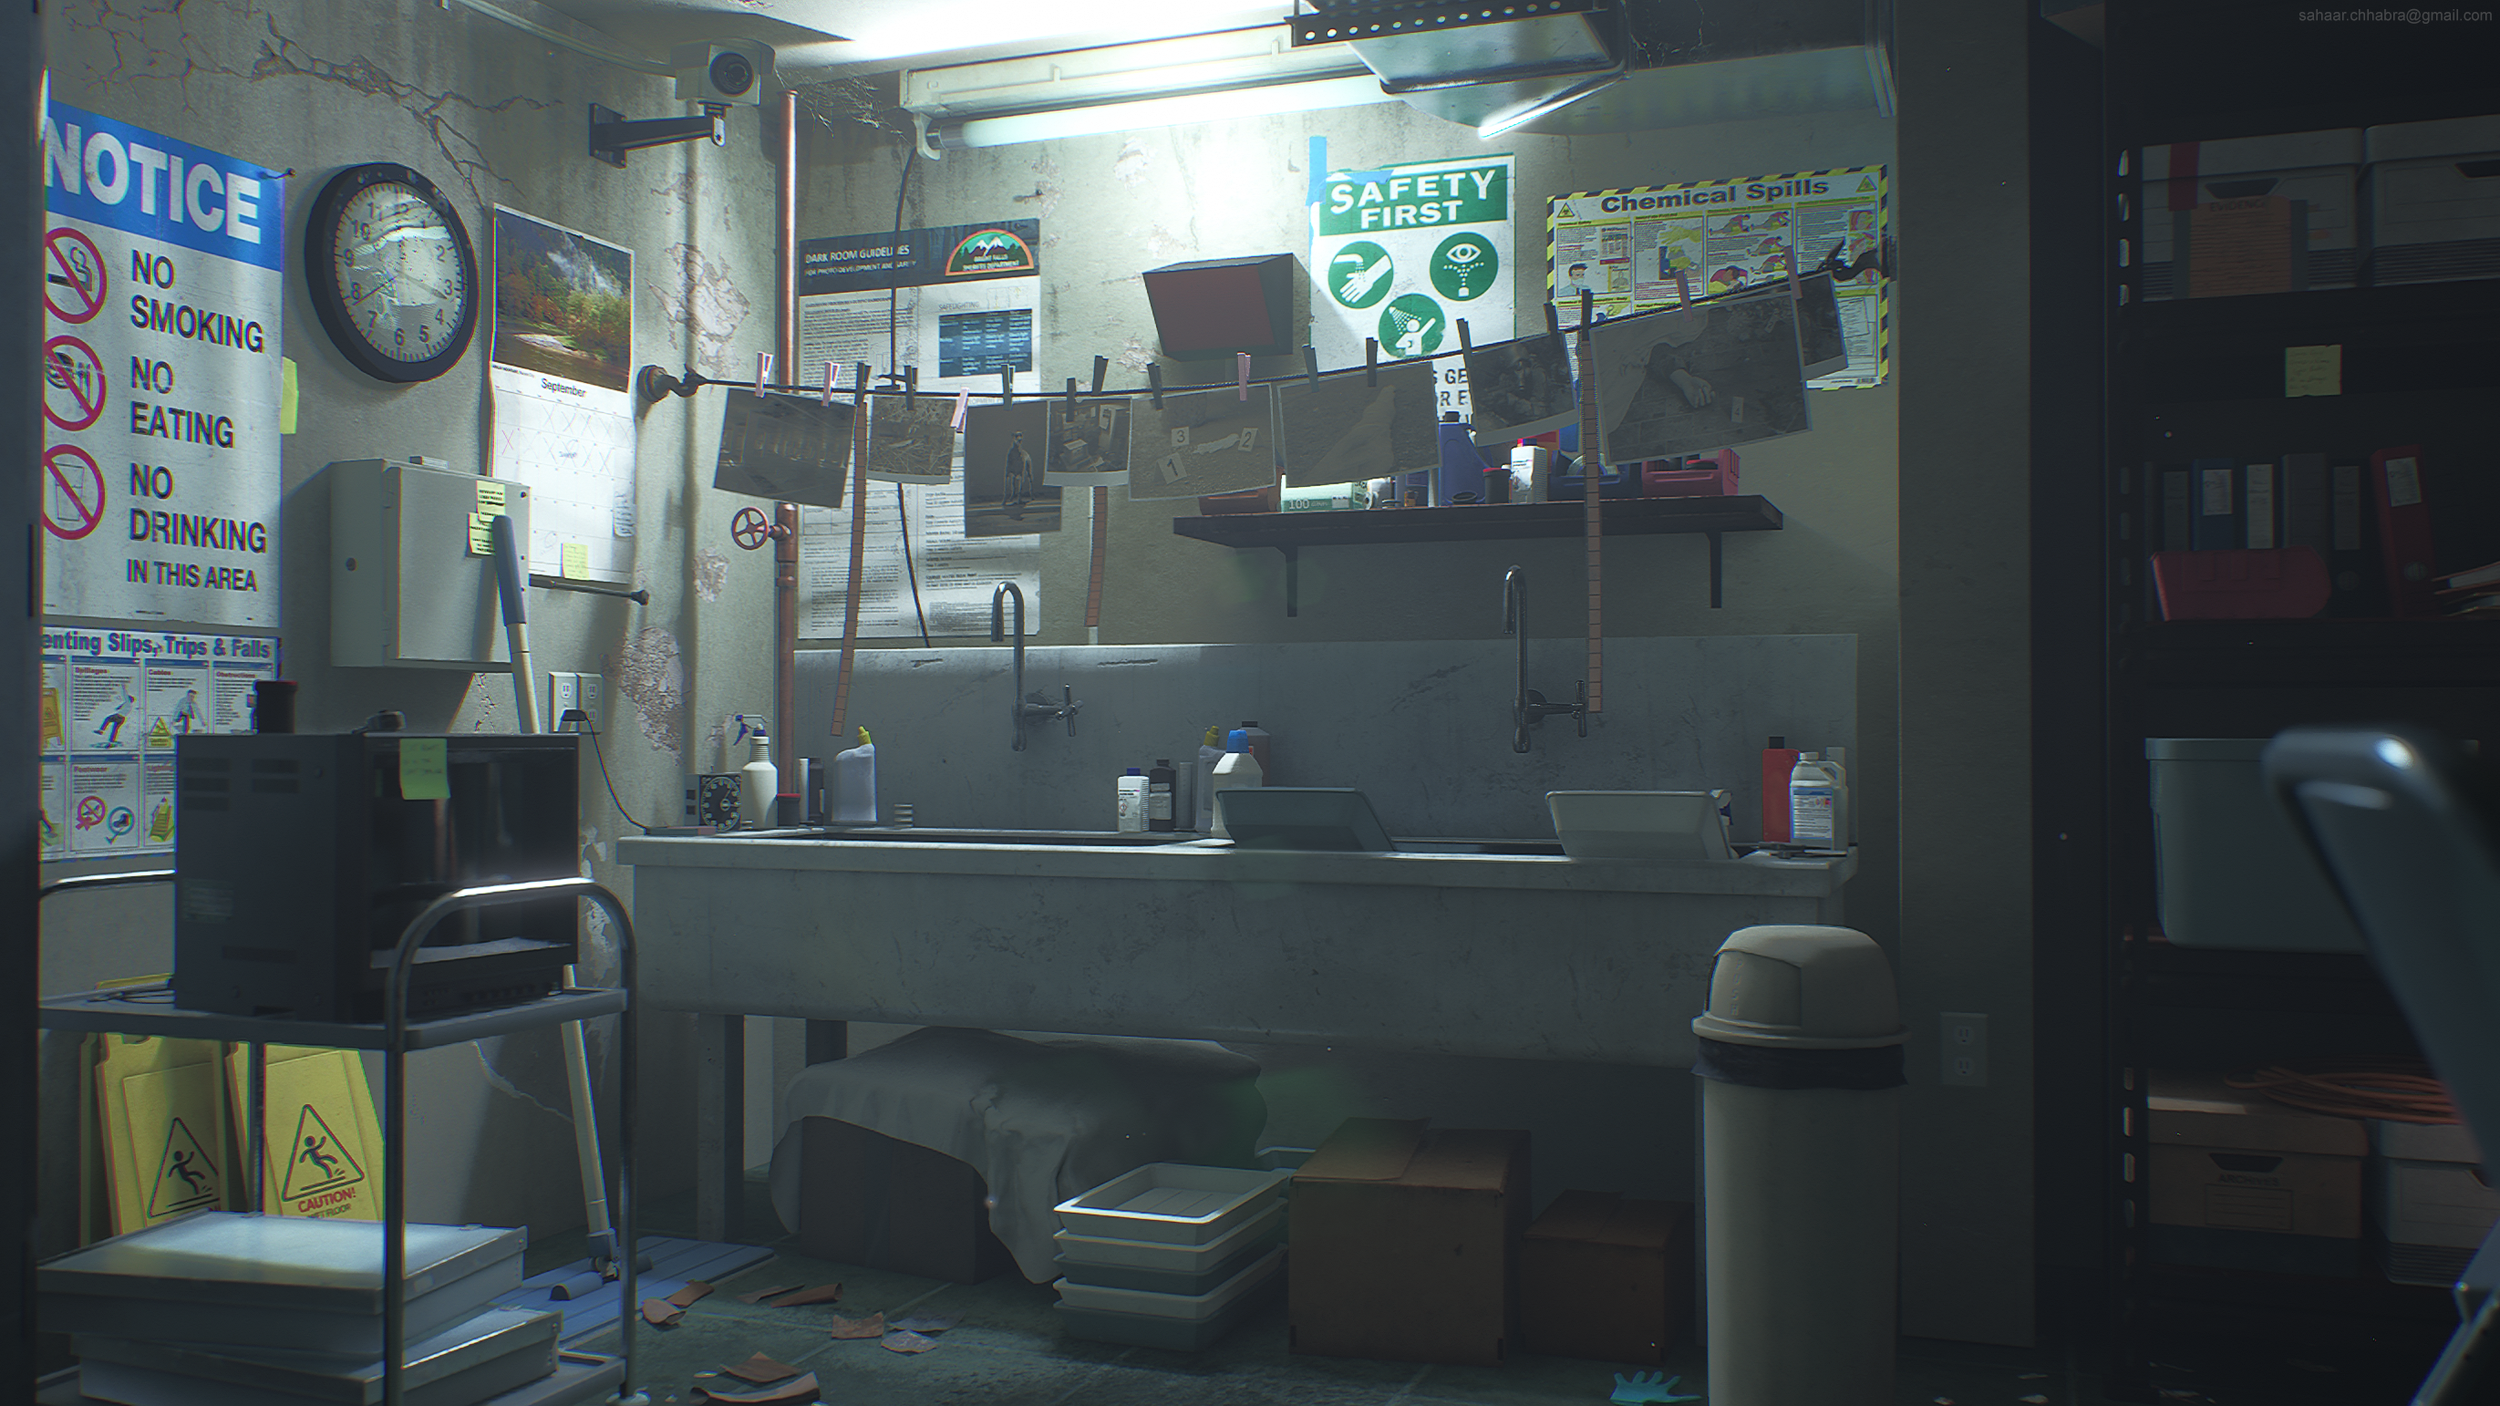
I then added a Point Light right below the tube light to enhance the falloff and create some effectively cast shadows for the surrounding components of the scene. This gave a nice highlight to the back wall and gave the illusion of higher intensity to the Rect. Light without blowing out all the subtle details, reflections and light bounces.
This is where Unreal Engine 5’s Lumen system shines as the real-time global illumination system takes your scene’s information into account and spreads the light naturally across the scene. Falloffs, light bounces and reflections all look so natural and realistic.
Rect. Light and Point Light Settings
Detail Lighting
Material Creation
The tileable materials are all from Quixel Bridge. Though it is an important skill to learn and master Substance Designer, it is far more important to finish what you’ve started with a long-term project like an environment. I can’t recommend Quixel enough for automating this step in my workflow and making me a more efficient artist. I sourced materials for the floors and the wall from Quixel and then changed some of the values like the tiling, albedo, roughness, and specular and normal parameters for the instanced materials to fit my needs. The one additional modification that I did make myself was adding surface imperfections to the master material of these materials.
Some contrast values on your materials go a long way in adding much-needed depth, personality and realism. Especially when tileable materials for walls and floors are so basic and clean in appearance. Decals and Roughness Variation help in breaking up that procedural look.
Roughness Variation
Metal Materials
Achieving realistic metal can be quite a challenge at first. The key to making it feel and look authentic is Surface Variance. No normal, everyday metallic objects that you see around your surroundings will have a clean chrome sheen and look pristine, even when they’re right out of a box. Your fingerprints leave small smudges and subtle surface imperfections. With time, you’ll notice that the shine/glossiness also wears out. With effective weathering, you will be able to notice scratches, scuff marks, discoloration, and patchy spots that are rougher than the rest of the metallic body.
We also exaggerate things to bring them out more noticeably in 3D. The contrast goes a long way in highlighting these surface imperfections. Scratches and scuffs with a roughness value of 0.85 will stand out more prominently on a surface with a metallic value of 0.9-1. When you start to make a note of these details, looking up references to them is much easier and that itself is the winning ticket to creating accurate metal. Lastly, don’t forget to PBR Validate your materials. This step should be a part of your checklist whenever you texture anything in Substance Painter.
CRT Monitor
Computer Prop Creation Process
I looked up a ton of references for artistic inspiration before starting this prop. I really wanted to create a bulky typical 90s retro computer.
After finding my references, I started modelling the high poly. Whenever I model a prop which has lots of details like panelling, buttons, plugs, etc.; I try to block as much of it as I can with primitive shapes. This helps me gauge the dimensions and scale of all the components as well as gives me some direction on how to start constructing it piece by piece.
With a computer like this, there’s a monitor which is composed of a stand, a base, a back panel with an outlet, and buttons the main PC has a couple of panels in the back with different plug points, outlets and tertiary features.
Almost all these details can be blocked out with some modified boxes, cylinders and planes. I started with a primitive block out on my first pass. Once I get all my shapes in, I start to further adjust and refine the model. This step is where I added my support loops, and bevels/chamfers and modified the topology for things like the holes and fixture plates. I then moved on to adding the fine detail like the buttons, disk drive, etc and subdivide the mesh to generate a high poly asset.
When I was satisfied with the result, all I had to do was duplicate the mesh, and remove the turbo smooth modifier and any other topology dense modifier to start optimizing the mesh for a low poly iteration.
After I was satisfied with the optimized asset, I started my UVs. My procedure for unwrapping 3d models is pretty straightforward. I try to straighten and flatten all the UV islands/shells as much as possible for a clear and precise layout. I scale the UVs uniformly/proportionally to the size of the model. From there on out, It’s a game of Tetris to fit everything nicely into the 0-1 UV Space.
Unwrapping
Once the UVs are completed. I took both versions of the computer asset into Marmoset Toolbag. I prefer baking in Marmoset Toolbag because the baking tools give you so much more control over several parameters of the mesh. I adjust all my cages so that my low poly mesh has enough coverage. The real-time previews save you so much time, which leads to a more efficient production process.
Baking
Texturing
When it comes to texturing, my layer stack’s always a padded mess. I like to start with all my base fills. What primary materials would compose a computer? A matte off-white plastic for the body, glossy, reflective material for the liquid crystal display of the screen, aluminum and silicone for the back panels and plates, and other variations on plastic for the keys, buttons, etc.
After I’ve applied all my primary materials, I start on the subtle imperfections which push the idea of realism on the asset. White colour computers go on to develop patches of yellow and grey discoloration due to weathering and bad maintenance. Layers for dust, grunge and any visible dirt.
The next task is to push the narrative with prominent imperfections with grunge overlays and surface roughness variance. Smudges, fingerprints, scuff marks, scratches, edge wear.
Computer Prop
Large Iterations
Even though it runs straight down the ceiling of the room, the ventilation unit is completely modular. I could move and change the layout of the entire system.
Some of the other larger model iterations which helped in padding out the set dressing come from the lockers, steel chairs, file boxes and wall cabinets. I only had to make one version of each model and duplicate it across the room to increase the asset density within the scene.
Vents Modular Kit
Creating several instances of materials help in indicating variation and differences in props even if it was the same model using the same material. The only settings which I had to tweak came from some dirt masks and the roughness contrast and I could create an asset in the engine which looked completely different from the original.
Creating instances of my custom master material was an effective way to save time and speed up the development of my scene.
Assets
Staying Organised
Setting manageable goals is a skill I’ve forced myself to work on when it comes to projects of this scope. For environment projects, I like to make sure that all my tasks are laid out and organized in a precise and efficient manner. I achieve this by creating lists for myself. It helps me consolidate my priorities and gives me better direction with the timeline of the project.
I made a list of every prop that I had to model for my scene. Things like the sink, chair, lockers and tables were big props so they were given priority. Medium assets with more detail like the computer, monitor and enlarger were next on the list and then I eventually made my way down to the tertiary details in the scene which contribute to the major set dressing of the scene. This included the stationary items on the table, posters, photos, etc.
I think implementing a step like this in your projects is crucial to avoiding burnout and fatigue. Since you’re creating a scene bit by bit, there’s so much work to do. Creating a specific task for the day with set deadlines ensures that you can work at manageable pacing and accomplish something at the end of the day no matter how insignificant it might seem in the grander scope of things. It genuinely feels good to scratch something off your to-do list at the end of the day because it means that you’re making fruitful progress.
Easter Eggs
There are definitely a few in here! I’ve included multiple Easter Rggs and nods to games and shows that inspired the artistic direction for this scene. Areas like the sink and the table have multiple examples of these references. Let me know if you ever spot and identify any of them!
Easter Eggs
Working Efficiently
I already mentioned creating a very resourceful master material for my props. Creating a complex shader like this gave me control over several parameters which affected the appearance of the assets. With an applied system like this, I could create several iterations of my assets without needing to texture them differently or individually. Another time-saver was grouping several props for texturing. A pencil on its own doesn’t require a 1024 texture map, so I would assign the same material to a bunch of stationery items like a pen, highlighter, roll of tape, scissors, etc. I grouped, baked, textured and integrated all of them into Unreal at the same time. Effectively, I was going through the entire pipeline of modelling, unwrapping and texturing multiple props within a day.
Stationary Props
Stationary Props UVs Packed Together
Areas Looking To Grow
Everywhere! The moment you stop learning is the moment you plateau out in an industry like this. There are so many new emerging tools that are putting a spotlight on this industry. Mastering tools like Houdini and Substance Designer are goals which have always been in the pipeline. Just like anybody else, I’m human…life catches up, work keeps you busy and you have less and less time on your hands to prioritize your personal development as a 3d artist. I’m still a work in progress. We all grow and develop at our own paces
There is so much more left to learn! I’d like to make the process of creating environments more efficient and automated. That process would entail a blend of artistic and technical skills which would help me create complex master materials with multiple blending options. A more in-depth extensive knowledge of blueprints, etc.
Foliage and organic modelling/sculpting are some other skills that I’d like to take up in the coming months so stay tuned for the future! I hope I can pull off an exterior environment next time around. If anybody wants to take me on as a mentee, feel free to hit me up.
Enlarger
Inspiration
I’m a big old nerd, comics, videogames, movies…you name it. I always find that when I’m in a slump concerning my work, I get my motivation and inspiration, from visual mediums that I either play or watch. I’ll play a video game or watch a movie and start observing a level/ or an environment that I like. From there on out, it becomes an obsession. I have a list on my phone of environments from some of my favourite games, shows and movies which I’d like to recreate myself at some point in my career and life. One of the recent ones was the meat packing plant from the Return of the Mandalorian episode in the Book of Boba Fett. Games like Resident Evil 2 Remake and Alan Wake were some of the direct inspirations behind my darkroom if you couldn’t tell already. The cool colour palette, foggy lighting, tones, atmosphere and storytelling elements were some of the key attributes which I wanted to emulate from those titles. Viewing other people’s artwork is also something that gets the creative juices flowing. Some of the environments in my pure ref board played a tremendous role in motivating me to create this scene.
Feedback
I seek feedback in any place that can offer it. Whenever I’m working on a personal project, I like to share my WIPs with fellow 3d artist friends over discord. I have a few friends that I can always rely on to serve me a slice of humble pie whenever I think that I’m getting ahead of myself regarding my artwork. I also actively participate as much as I can when I have the time in Discord communities like 3DFT, DiNusty Empire and your very own Experience Points!
CRT Monitor
Additional Advice
I always tell developing artists who genuinely want to build their skills that the learning curve in an industry like ours is exponential or rather limitless. You can never reach a ceiling cap or plateau unless you choose to do so for yourself. I feel like I barely even touched the water, still on the tip of the iceberg with what I know and what I can do in my craft.
New software, tools and workflows will arise regularly, look at the boom with Quixel and Unreal Engine over the last few months as an example. The Ninety Days showcase had me in absolute awe. Now and then, new developments in the industry will render almost everything you learn obsolete and old. Take this as a challenge to better yourself and elevate your artistic being and evolve with the times.
Learn that software, or discipline that you’ve been feeling ambivalent about taking on. Do it at your own pace and terms but do it. Experiment and push yourself to get out of your comfort zone so that you can try new things with your art. Most importantly, have fun with it! We create video games for a living!
This one’s more of a personal take but I think that it’s worth addressing to beginners out there. I can’t emphasize this enough, Quality over Quantity. I see this problem with many students/ developing artist portfolios who are looking for jobs on Artstation. Trim the fat and focus on the polish. Pick one discipline that you enjoy and devote all your time to developing in that pathway.
Having an extensive body of work which lack a level of refinement in fundamentals, presentation and general awareness will just make recruiters pass up on you. The odds are in your favour if you have 3-5 excellent pieces which express your understanding and versatility with art versus 20 mediocre pieces. They could be cut if they don’t stand on their own. The last thing you want a person to see is your most recent piece of artwork and then compare it to your oldest. Even if there’s a drastic difference in improvement, why would you display something that you’ve made obsolete with your personal growth?
Future Work
Oh man, if time permits and I find some magical way to understand the optimum version of time management; then expect a couple more environments and props! I mentioned that list previously, I’d like to scratch some more names off of it. With all the things that I want to set out and learn, I’d like to apply them to my portfolio and reach a new echelon with my capabilities in 3D Art. As for work-related things, there’s a lot of stuff that’s under NDA. You will all know soon enough!
Outro
That’s all folks, if you read this far, I hope it was worth something and I didn’t just waste your brain synapses. Thank you so much for riding alongside me on this journey. Truly, it's been an honour to be part of and contribute to a platform like this. I hope that my anecdotes and reflections help you in some way or another whether it’s related to art or life in general. The industry is booming and we need talented, passionate and driven artists everywhere to support the legs of the game-developing industry. It’s given me so much, the memories, nostalgia, tears, anger, frustration, appreciation and everything in between. It’s all worth it!
Lastly, don’t compare yourself to artists out there who have years of experience under their belts. They’ve been on the same journeys as many of us and with time, established themselves as the professionals that they are today. Instead, compare yourself to the person you were yesterday. The skills, knowledge, awareness and abilities that you had yesterday. If you see growth, regardless of how minimal it is; It means you’re heading in the right direction! Thank you once again for making it this far and taking an interest in my work. If you have any further questions or inquiries, please feel free to contact me via my email or on Artstation!